
02. 상품 업로드 페이지 생성하기
상품 업로드 UI 생성하기
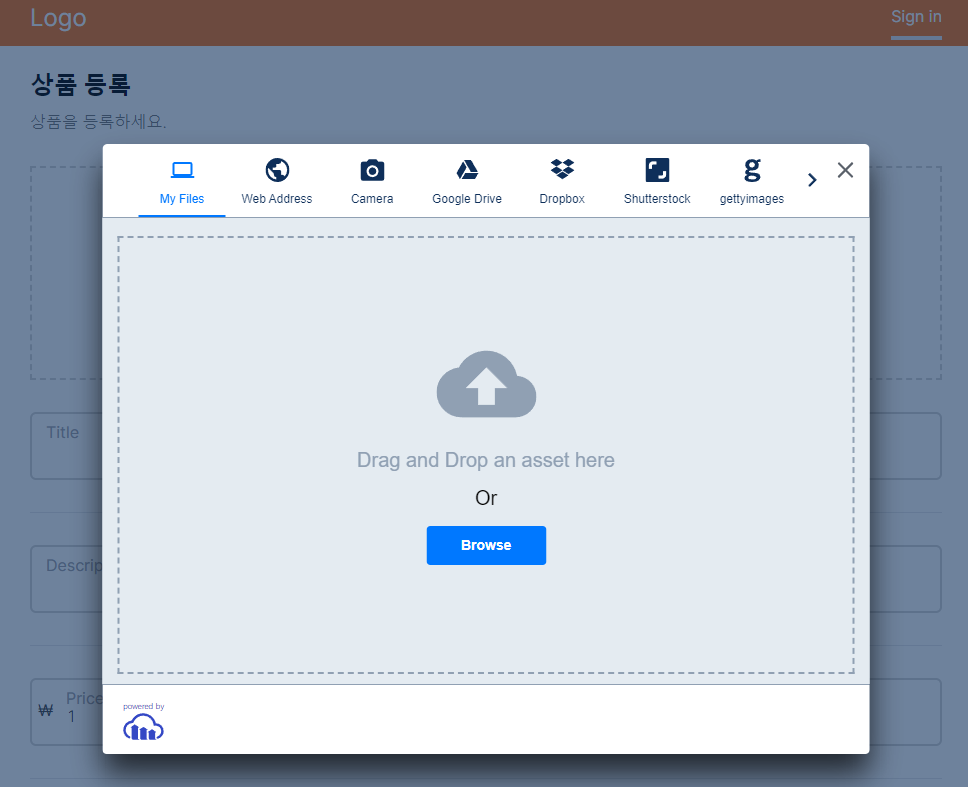
상품 업로드 페이지 UI
src/app/products/upload/page.tsx
"use client";
import Button from "@/components/Button";
import Container from "@/components/Container";
import Heading from "@/components/Heading";
import Input from "@/components/Input";
import React, { useState } from "react";
import { FieldValues, SubmitHandler, useForm } from "react-hook-form";
const ProductUploadPage = () => {
const [isLoading, setIsLoading] = useState(false);
const {
register,
handleSubmit,
setValue,
watch,
formState: { errors },
reset,
} = useForm<FieldValues>({
defaultValues: {
title: "",
description: "",
category: "",
latitude: 33.5563,
longitute: 126.79581,
imageSrc: "",
price: 1,
},
});
const onSubmit: SubmitHandler<FieldValues> = (data) => {
}
return (
<Container>
<div className="max-w-screen-lg mx-auto">
<form className="flex flex-col gap-8" onSubmit={handleSubmit(onSubmit)}>
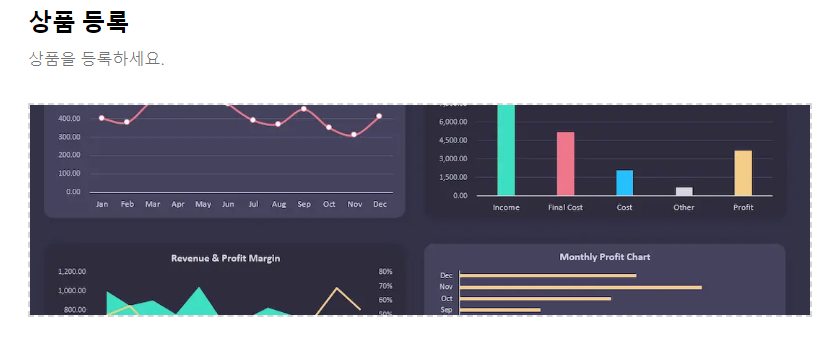
<Heading
title="상품 등록"
subtitle="상품을 등록하세요. "
/>
<Input
id="title"
label="Title"
disabled={isLoading}
register={register}
errors={errors}
required
/>
<hr />
<Input
id="description"
label="Description"
disabled={isLoading}
register={register}
errors={errors}
required
/>
<hr />
<Input
id="price"
label="Price"
formatPrice={true}
disabled={isLoading}
register={register}
errors={errors}
required
/>
<hr />
{/* category */}
<div
className="grid grid-cols-1 md:grid-cols-2 gap-3 max-h-[50vh] overflow-w-auto"
>
</div>
<hr />
{/* kakaoMap */}
<Button label="상품 생성하기" />
</form>
</div>
</Container>
);
};
export default ProductUploadPage;Container 컴포넌트
src/components/Container.tsx
import React from 'react'

interface ContainerProps {
    children: React.ReactNode
}
const Container = ({ children }: ContainerProps) => {
  return <div className="max-w-[2520px] mx-auto xl:px-20 md:px-10 sm:px-2 px-4 py-6">{children}</div>;
};

export default Container
Heading 컴포넌트
src/compoenents/Heading.tsx
import React from 'react'

interface HeadingProps {
    title: string;
    subtitle?: string;
    center?: boolean;
}
const Heading = ({ title, subtitle, center }: HeadingProps) => {
  return (
    <div className={center ? 'text-center' : 'text-start'}>
      <h1 className="text-2xl font-bold">{title}</h1>
      <h4 className="mt-2 font-light text-neutral-500">{subtitle}</h4>
    </div>
  );
};

export default Heading
상품을 위한 스키마 작성하기
model User {
  id             String    @id @default(cuid())
  name           String?
  hashedPassword String?
  email          String?   @unique
  emailVerified  DateTime?
  image          String?
  accounts       Account[]
  sessions       Session[]
  createdAt      DateTime  @default(now())
  updatedAt      DateTime  @updatedAt
  userType UserType @default(User)

  favoriteIds String[]
  products    Product[]
}

model Product {
  id            String @id @default(cuid())
  title         String
  description   String
  imageSrc      String
  category      String
  userId        String
  price         Int
  latitude      Float
  longitude     Float
  createdAt     DateTime @default(now())
  updatedAt     DateTime @updatedAt

  user  User @relation(fields: [userId], references: [id], onDelete: Cascade)
}
DB 싱크 맞추기
npx prisma db push
ImageUpload 컴포넌트 생성하기
이미지 업로드는 클라우디너리 모듈 사용
설치 npm i next-cloudinary
이미지 업로드 컴포넌트 props 준비하기
src/components/ImageUpload.tsx를 간단생성 후
업로드페이지로 돌아와서 props를 설정한다.
react-hook-form이 아니라서 register를 안하기때문에 업데이트가 안되는데
setValue를 써서 state를 업데이트한다.
imageSrc를 upload/page.tsx에서 ImageUpload컴포넌트로 내려주는 방법
default value가 업데이트될때마다 watch를 이용해서 내려준다.
src/app/products/upload/page.tsx
  const imageSrc = watch('imageSrc');
  const setCustomValue = (id: string, value: any) => {
    setValue(id, value); // react-hook-form 제공. value는 이미지경로
  }
  ...
  <ImageUpload onChange={(value) => setCustomValue('imageSrc', value)} value={imageSrc} />
이미지 업로드 컴포넌트 생성
이미지 업로드와 미리보기 과정
이미지업로드 -> onChange함수 호출 -> setCustomValue 호출 -> setValue로 imageSrc의 value가 이미지경로 됨 -> watch로 imageSrc 변경 -> 다시 ImageUpload에 value가 변경됨 -> 컴포넌트에 실제 값 들어와서 이미지보여주게됨
UI 작성
src/components/ImageUpload.tsx
import { CldUploadWidget } from 'next-cloudinary';
import Image from 'next/image';
import React from 'react'
import { TbPhotoPlus } from 'react-icons/tb';
interface ImageUploadProps {
onChange: (value: string) => void;
value: string;
}
const ImageUpload = ({
onChange,
value
}: ImageUploadProps) => {
const handleUpload = (result: any) => {
console.log('result', result);
onChange(result.info.secure_url); // image 정보 https url 제공
}
return (
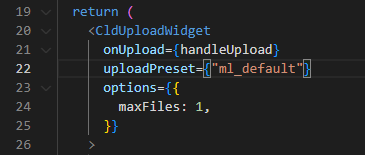
<CldUploadWidget
onUpload={handleUpload}
uploadPreset={'ididi'}
options={{
maxFiles: 1
}}
>
{({open}) => {
return (
<div
className='relative flex flex-col items-center justify-center gap-4 p-20 transition border-2 border-dashed cursor-pointer hover:opacity-70 border-neutral-300 text-neutral-300'
onClick={() => open?.()}
>
<TbPhotoPlus
size={50}
/>
{value && (
<div className='absolute inset-0 w-full h-full'>
<Image
fill
style={{ objectFit: 'cover'}}
src={value}
alt=''
/>
</div>
)}
</div>
)
}}
</CldUploadWidget>
)
}
export default ImageUpload Cloudinary 연동하기
https://next.cloudinary.dev/installation
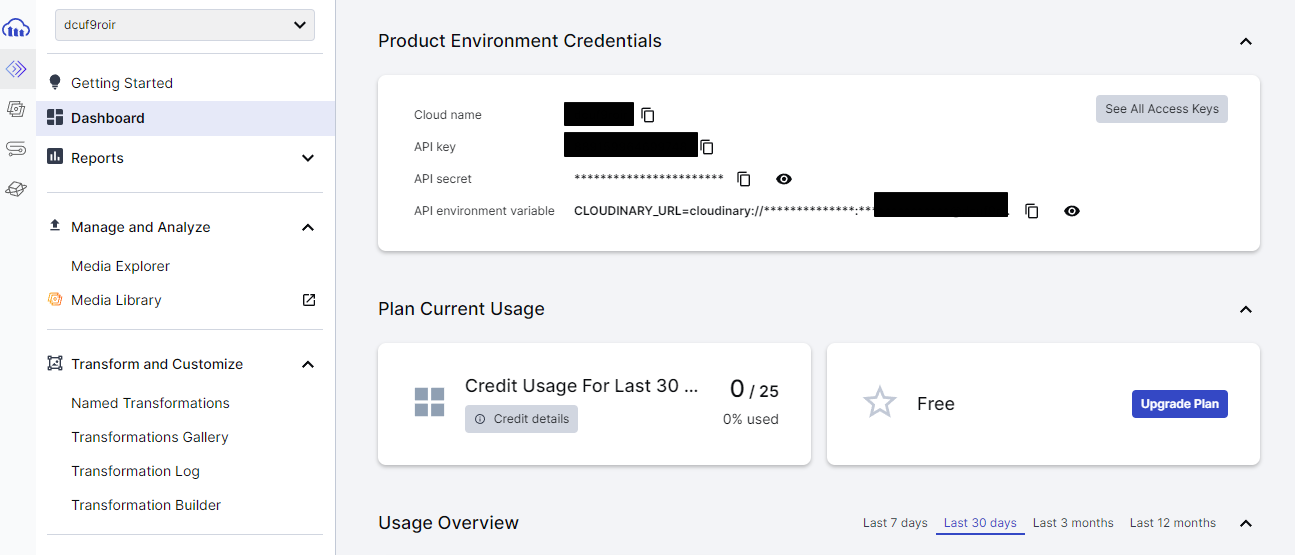
Cloud name을 지정해야한다.
.env에
NEXT_PUBLIC_CLOUDINARY_CLOUD_NAME="<Your Cloud Name>"을 임의로 넣는다.
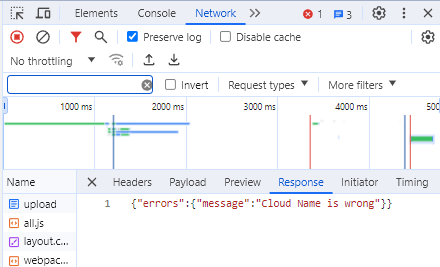
cloude name is wrong은 name이 잘못되었다는 얘기인데, cloudinary에 가서 회원가입을 한 후, Dashboard에서 cloud name을 확인할 수 있다.

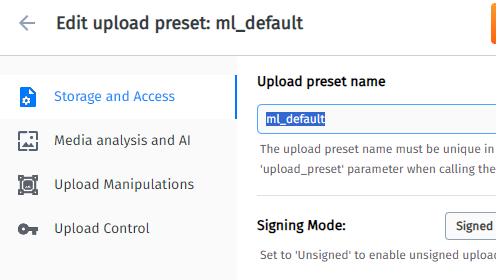
setting > upload > Upload presets > upload preset name 복사
src/compoenents/ImageUpload.tsx
<CldUploadWidget>에 uploadPreset={"프리셋이름"}에 넣는다.
.env에 변수 등록하여 사용한다.
NEXT_PUBLIC_CLOUDINARY_UPLOAD_PRESET="프리셋이름"
환경변수가 브라우저에 노출되는것은 NEXT_PUBLIC으로 시작해야한다.
{"error":{"message":"Upload preset must be whitelisted for unsigned uploads"}}
다시 업로드 테스트를 해보면 이런 에러가 나는데,
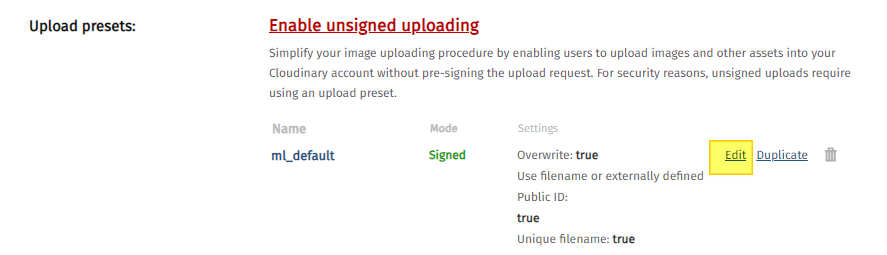

setting > upload > Upload presets > Edit > Storage and Access > Signing Mode에서 Unsigned로 수정하고 Save
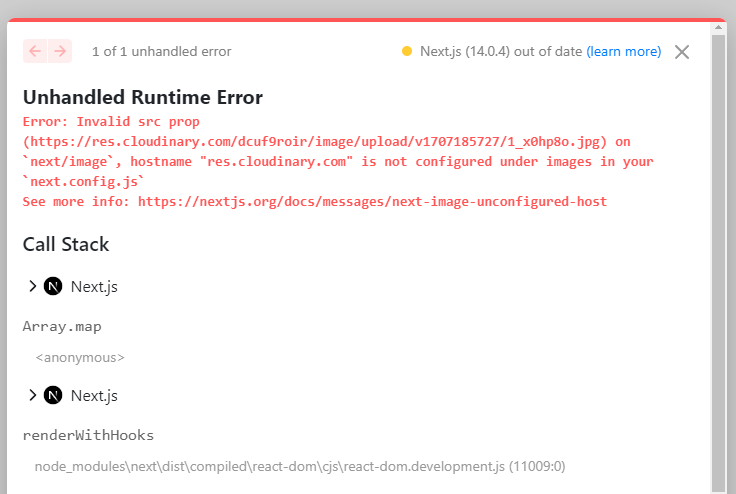
그다음 에러
Unhandled Runtime Error
Error: Invalid src prop (https://res.cloudinary.com/dcuf9roir/image/upload/v1707185727/1_x0hp8o.jpg) on `next/image`, hostname "res.cloudinary.com" is not configured under images in your `next.config.js`
See more info: https://nextjs.org/docs/messages/next-image-unconfigured-hosthttps://res.cloudinary.com/dcuf9roir/image/upload/v1707185727/1_x0hp8o.jpg에 이미지가 들어가 있는데, 앱에서 보일수있게 허용 설정을 해야한다는 의미다.
next.config.js
/** @type {import('next').NextConfig} */
const nextConfig = {
    images: {
        domains: [
            'res.cloudinary.com'
        ]
    }
}

module.exports = nextConfig
파일이 잘 올라가는것을 확인 할 수있다.
Category 컴포넌트 생성하기
카테고리 목록
src/compoenents/categories/Categories.tsx 카테고리 목록 배열
import React from 'react'
import { FaSkiing } from 'react-icons/fa';
import { GiBoatFishing, GiIsland, GiWindmill } from 'react-icons/gi'
import { MdOutlineVilla } from 'react-icons/md'
import { TbBeach, TbPool } from 'react-icons/tb'

export const categories = [
  {
    label: "디지털기기",
    path: "digital",
    icon: TbBeach,
    description: "디지털기기 카테고리 입니다.",
  },
  {
    label: "생활가전",
    path: "appliances",
    icon: GiWindmill,
    description: "생활가전 카테고리 입니다.",
  },
  {
    label: "가구/인테리어",
    path: "interior",
    icon: MdOutlineVilla,
    description: "가구/인테리어 카테고리 입니다.",
  },
  {
    label: "여성의류",
    path: "women-clothing",
    icon: TbBeach,
    description: "여성의류 카테고리 입니다.",
  },
  {
    label: "남성패션/잡화",
    path: "men-fashion",
    icon: TbPool,
    description: "남성패션/잡화 카테고리 입니다.",
  },
  {
    label: "뷰티/미용",
    path: "beauty",
    icon: GiIsland,
    description: "뷰티/미용 카테고리 입니다.",
  },
  {
    label: "스포츠/레저",
    path: "sports",
    icon: GiBoatFishing,
    description: "스포츠/레저 카테고리 입니다.",
  },
  {
    label: "중고차",
    path: "used-car",
    icon: FaSkiing,
    description: "중고차 카테고리 입니다.",
  },
];

const Categoreis = () => {
  return (
    <div>Categoreis</div>
  )
}

export default Categoreis
카테고리 리스트 map 뿌리기
src/app/products/upload/page.tsx
카테고리 선택시
- category값이 path로 설정
- onClick
{/* category */}
 const category = watch('category');

...
          <div className="grid grid-cols-1 md:grid-cols-2 gap-3 max-h-[50vh] overflow-w-auto">
            {categories.map((item) => (
              <div key={item.label} className="col-span-1">
                <CategoryInput
                  onClick={(category) => setCustomValue('category', category)}
                  selected={category === item.path}
                  label={item.label}
                  icon={item.icon}
                  path={item.path}
                />
              </div>
            ))}
          </div>
카테고리 버튼
src/compoenents/categories/CategoryInput.tsx
import React from 'react'
import { IconType } from 'react-icons'

interface CategoryInputProps {
  icon: IconType;
  label: string;
  selected?: boolean;
  path: string;
  onClick: (value: string) => void;

}
const CategoryInput = ({
  icon: Icon,
  label,
  selected,
  onClick,
  path,
}: CategoryInputProps) => {
  return (
    <div
      onClick={() => onClick(path)}
      className={`rounded-xl border-2 p-4 flex flex-col gap-3 hover:border-orange-500 transition cursor-pointer ${
        selected ? "border-orange-500" : "border-neutral-200"
      }`}
    >
      <Icon size={30} className={`${selected && "text-orange-500"}`} />
      <div className={`font-semibold ${selected && "text-orange-500"}`}>
        {label}
      </div>
    </div>
  );
};

export default CategoryInput
Kakao API KEY 생성하기
카카오맵 API사용하기위해 키 생성하는 방법을 알아보자.
애플리케이션 추가
https://developers.kakao.com/console/app/
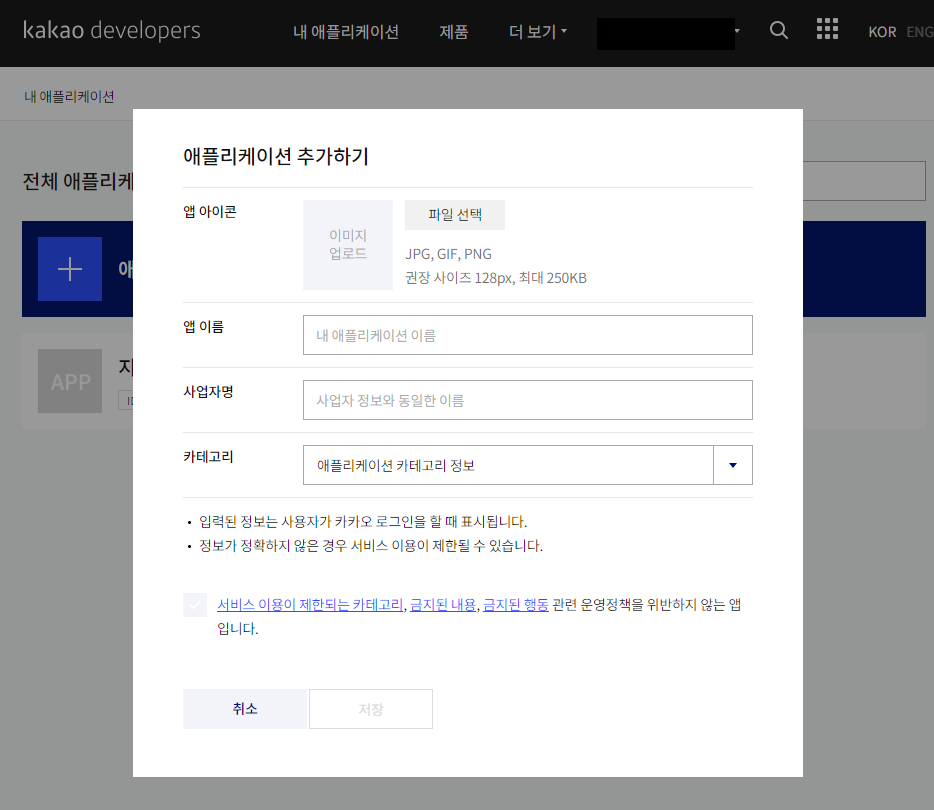
앱이름은 nextjs-market-app으로 해두고
사업자명도 동일하게지정하고,
카테고리는 쇼핑으로 했다.
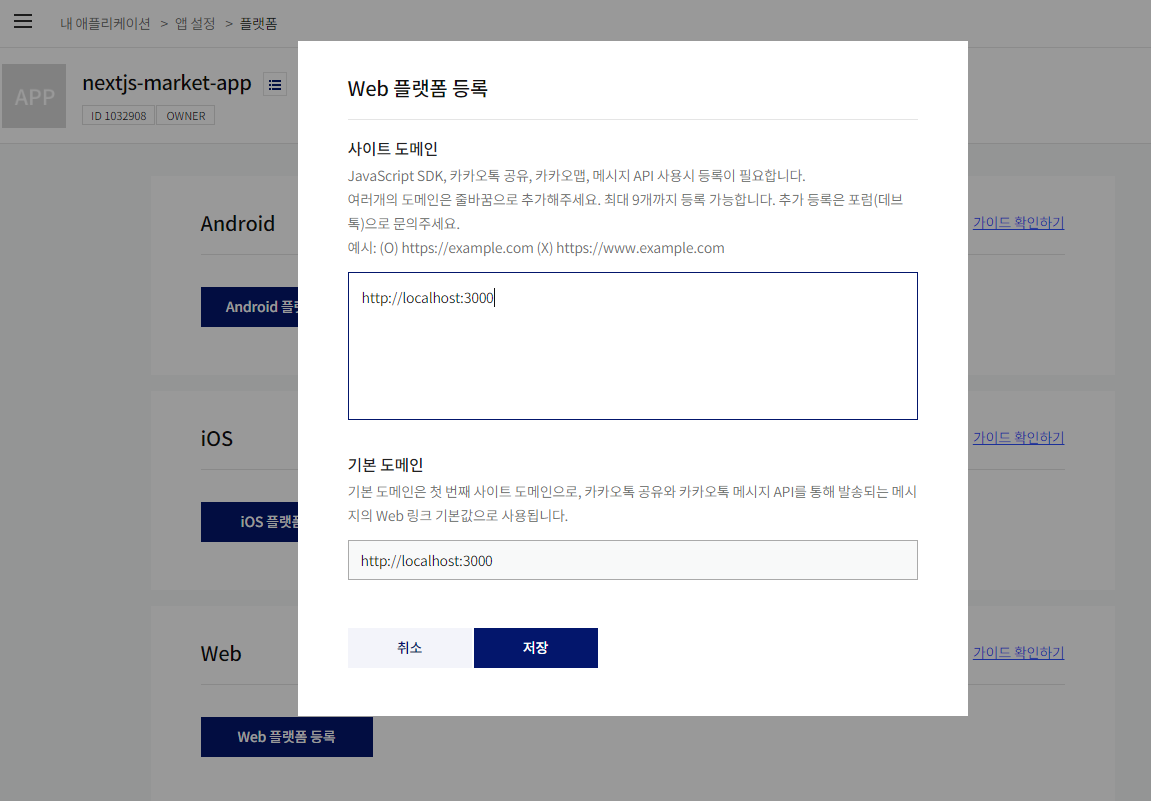
플랫폼 > Web > Web 플랫폼 등록
로컬주소인 http://localhost:3000으로 지정
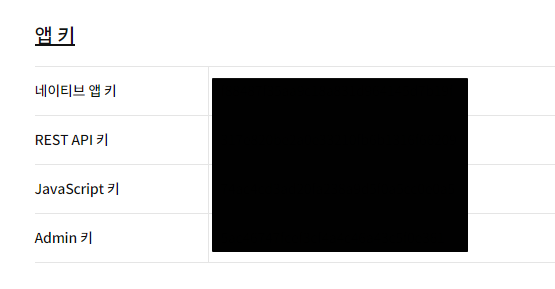
요약정보에 앱키를 잘 저장해둔다.
Kakao Map 컴포넌트 생성하기
dynamic import
카카오맵 컴포넌트는 dynamic import를 사용해야한다.
dynamic import를 사용하면 모듈은 빌드타임이 아닌 런타임에 불러오도록 한다. 번들파일을 분리하고 퍼포먼스가 향상될 수 있다.
초기 로딩 시 사이즈가 크거나 초기 로딩부터 사용하지 않는 부분, 또한 런타임에만 알 수 있는 정보에 기반해서 모듈을 가져와야할 때 사용한다.
With no SSR
서버사이드렌더링은 보통 true지만..
클라이언트사이드 렌더링을 하기위해서 ssr을 false로 설정한다.
src/products/upload/page.tsx
  const latitude = watch("latitude");
  const longitude = watch("longitude");

  const KakaoMap = dynamic(() => import('../../../components/KakaoMap/KakaoMap'), {
    ssr: false
  })
  ...
{/* kakaoMap */}
<KakaoMap
  setCustomValue={setCustomValue}
  latitude={latitude}
  longitude={longitude}
  />
src/components/KakaoMap/KakaoMap.tsx
import React from 'react'

interface KakaoMapProps {
    latitude: number;
    longitude: number;
    setCustomValue?: (id: string, value: number) => void;
    detailPage?: boolean;
}
const KakaoMap = ({
  latitude,
  longitude,
  setCustomValue,
  detailPage = false, // 상품 상세페이지 분기처리
}: KakaoMapProps) => {
  return <div></div>;
};

export default KakaoMap
react-kakao-maps-sdk로 카카오맵 컴포넌트 만들기
https://react-kakao-maps-sdk.jaeseokim.dev/
설치
npm i react-kakao-maps-sdk
카카오맵 API 스크립트 추가
app/layout.tsx
import Script from 'next/script';
...
  return (
    <html lang="en">
      <body className={inter.className}>
        <Navbar currentUser={currentUser} />
        <main>{children}</main>
        <Script
          type="text/javascript"
          src="//dapi.kakao.com/v2/maps/sdk.js?appkey=발급받은 APP KEY를 넣으시면 됩니다.&libraries=services,clusterer"
        />
      </body>
    </html>
  );
KakaoMap 컴포넌트에 지도 넣기
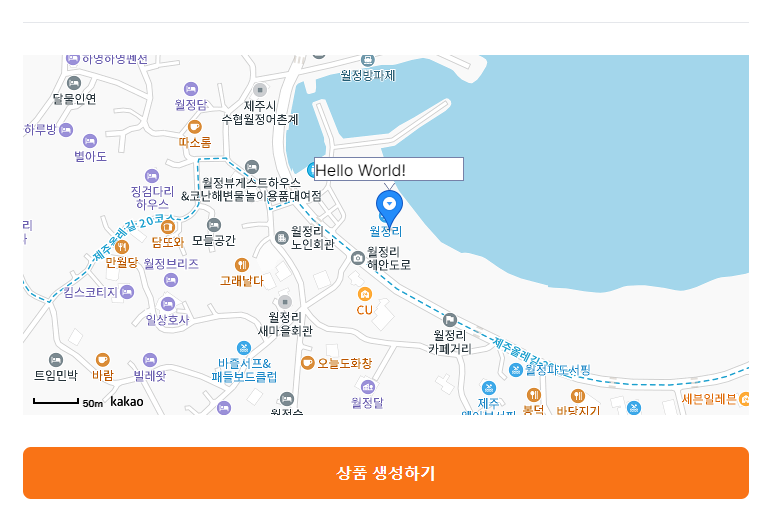
import { Map, MapMarker } from 'react-kakao-maps-sdk';
...
  return (
    <Map
      center={{ lat: 33.5563, lng: 126.79581 }}
      style={{ width: "100%", height: "360px" }}
    >
      <MapMarker position={{ lat: 33.55635, lng: 126.795841 }}>
        <div style={{color:"#000"}}>Hello World!</div>
      </MapMarker>
    </Map>
  )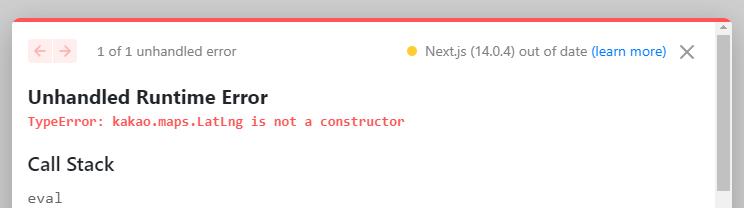
Unhandled Runtime Error
TypeError: kakao.maps.LatLng is not a constructor
이런 에러가 난다면,
layout.tsx에서 src을 &autoload=false을 추가하여 변경한다.
src="//dapi.kakao.com/v2/maps/sdk.js?appkey=발급받은 APP KEY를 넣으시면 됩니다.&libraries=services,clusterer&autoload=false"
카카오맵 컴포넌트가 잘뜨는데,
페이지 렌더가 끝나고나서 렌더된다.
맵에서 클릭시 좌표 변경
Map에 onClick 이벤트 설정 mouseEvent를 handleClick에 넘겨주고
handleClick에서 latitude와 longitude를 각 해당 값으로 변경(setCustomValue)
const KakaoMap = ({
  latitude,
  longitude,
  setCustomValue,
  detailPage = false, // 상품 상세페이지 분기처리
}: KakaoMapProps) => {

  const handleClick = (mouseEvent) => {
    // console.log(mouseEvent);
    setCustomValue('latitude', mouseEvent.latLng.getLat())
    setCustomValue("longitude", mouseEvent.latLng.getLng());
  };

  return (
    <Map
      center={{ lat: 33.5563, lng: 126.79581 }}
      style={{ width: "100%", height: "360px" }}
      onClick={(_, mouseEvent) => handleClick(mouseEvent)}
    >
      <MapMarker position={{ lat: 33.55635, lng: 126.795841 }}>
        {/* <div style={{ color: "#000" }}>Hello World!</div> */}
      </MapMarker>
    </Map>
  );
};
(mouseEvent console.log시)
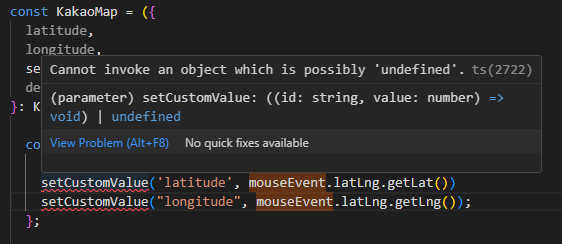
setCustomValue가 optional하기때문에 에러가 나는 부분이다.
어떤때는 setCustomValue를 내려주고(글작성시)
어떤때는 안내려주니까(글 조회시)
디테일페이지라면 return하고
setCustomValue를 단언한다.
그리고 Map의 center와 MapMarker의 position은 해당 좌표값으로 넣는다.
...
  const handleClick = (mouseEvent: kakao.maps.event.MouseEvent) => {
    if (detailPage) return; // 간결, 효율적
    setCustomValue!('latitude', mouseEvent.latLng.getLat());
    setCustomValue!("longitude", mouseEvent.latLng.getLng());
  };

  return (
    <Map
      center={{ lat: latitude, lng: longitude }}
      style={{ width: "100%", height: "360px" }}
      onClick={(_, mouseEvent) => handleClick(mouseEvent)}
    >
      <MapMarker position={{ lat: latitude, lng: longitude }}>
        {/* <div style={{ color: "#000" }}>Hello World!</div> */}
      </MapMarker>
    </Map>
  );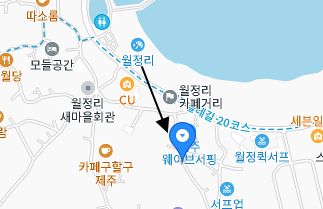
잘 이동이 된다.
상품 데이터베이스에 저장하기
Client로직
axios.post('/api/products/'.data)로 요청 -> /api/products/rout.ts의 POST()에서 처리
src/app/products/upload/page.tsx
  import { useRouter } from "next/router";
  ...
  const router = useRouter();
  const onSubmit: SubmitHandler<FieldValues> = (data) => {
    setIsLoading(true);

    axios.post('/api/products', data)
      .then(response => {
        router.push(`/products/${response.data.id}`);
      })
      .catch((err) => {
        console.error(err);
      })
      .finally(() => {
        setIsLoading(false);
      })
  }
이라고 작성했는데 에러가 뜬다.
NextRouter was not mounted. https://nextjs.org/docs/messages/next-router-not-mounted

"use client"를 사용하면 useRouter는 사용할 수 없다.
useNavigation을 사용해야한다.
import만 next/navigation로 해보았다.
import { useRouter } from "next/navigation";Server로직
src/app/products/upload/page.tsx에서 axios.post('/api/products/'.data)로 요청한것을
/api/products/rout.ts의 POST()에서 데이터 저장 처리
getCurrentUser()로 로그인된 유저인지 확인(비로그인 error return)
내용이 없다면 error return
내용이 있다면 prisma.product.create({data}) product테이블에 데이터 create(각 컬럼별 값)
NextResponse.json(product) 리턴
import getCurrentUser from "@/app/actions/getCurrentUser";
import { NextResponse } from "next/server";
import prisma from '@/helpers/prismadb';

export async function POST(request: Request) {
    const currentUser = await getCurrentUser()
    if(!currentUser) {
        return NextResponse.error();
    }

    const body = await request.json()

    const {
        title,
        description,
        imageSrc,
        category,
        latitude,
        longitude,
        price
    } = body;

    Object.keys(body).forEach((value) => {
        if(!body[value]) {
            return NextResponse.error();
        }
    });

    const product = await prisma.product.create({
        data: {
            title,
            description,
            imageSrc,
            category,
            latitude,
            longitude,
            price,
            userId: currentUser.id
        }
    });

    return NextResponse.json(product);
}
잘 들어간다.
+ price 값 바꿔서 등록은 왜 안될까
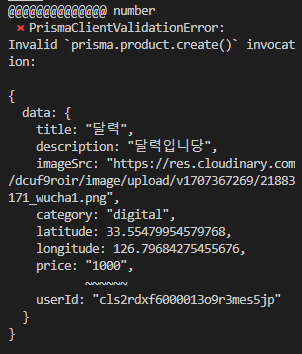
input type도 number로 바꾸고
body[price]도 number로 바꿔서 넣었는데도
"1000"이된다.