
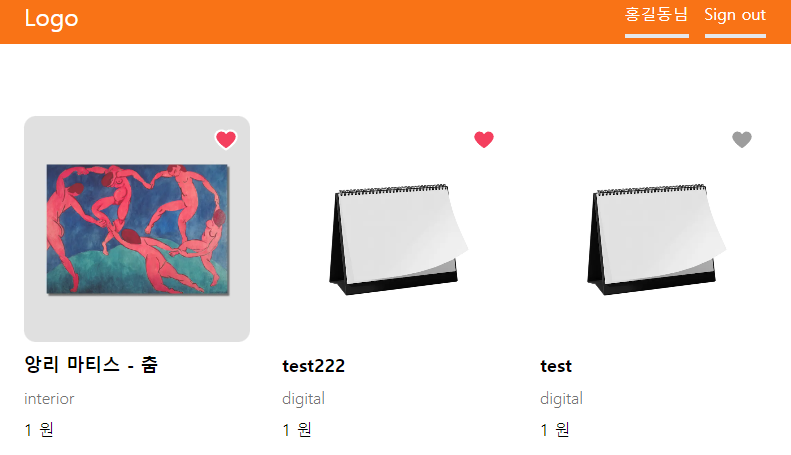
Favorite Post Route 생성하기
현재유저의 favoriteIds라는 필드 배열에 새롭게 좋아요한 상품ID를 넣어줌
src/app/api/favorites/[productId]/route.ts
import getCurrentUser from "@/app/actions/getCurrentUser";
import { NextResponse } from "next/server";

interface Params {
    productId?: string;
}

export async function POST(request: Request, {params}: {params: Params}) {
    const currentUser = await getCurrentUser();

    if(!currentUser) {
        return NextResponse.error();
    }

    const { productId } = params;

    if(!productId || typeof productId !== 'string') {
        throw new Error('Invalide Id');
    }

    let favoriteIds = [...(currentUser.favoriteIds || [])];

    favoriteIds.push(productId);

    const user = await prisma?.user.update({
        where: {
            id: currentUser.id
        },
        data: {
            favoriteIds: favoriteIds
        }
    });

    return NextResponse.json(user);
}
오우 잘된다.
Favorite Delete Route 생성하기
같은 상품코드는 필터링시킴
POST에서 push부분만 filter로 바꾸면된다.
favoriteIds = favoriteIds.filter(id => id !== productId);
src/app/api/favorites/[productId]/route.ts
export async function DELETE(request: Request, {params}: {params: Params}) {
const currentUser = await getCurrentUser();
if (!currentUser) {
return NextResponse.error();
}
const { productId } = params;
if (!productId || typeof productId !== "string") {
throw new Error("Invalide Id");
}
let favoriteIds = [...(currentUser.favoriteIds || [])];
favoriteIds = favoriteIds.filter(id => id !== productId);
const user = await prisma?.user.update({
where: {
id: currentUser.id,
},
data: {
favoriteIds: favoriteIds,
},
});
return NextResponse.json(user);
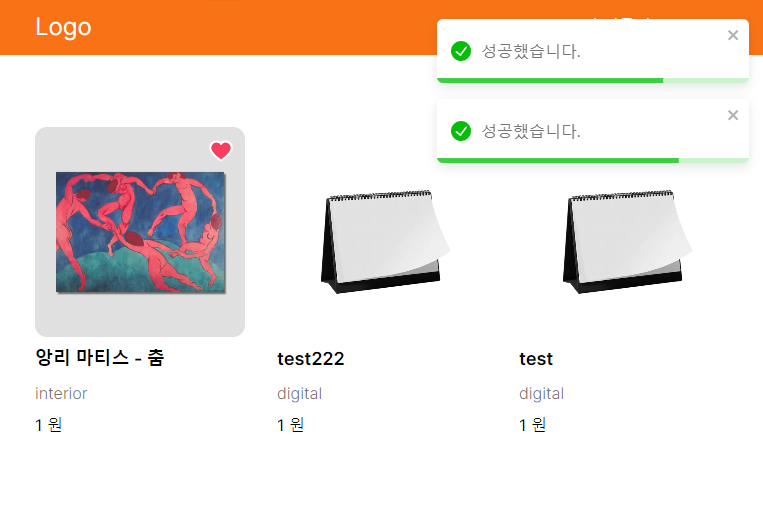
}react toastify
좋아요가 눌렀다면 처리된 내용을 toastify 스낵바에 보여줄것이다.
https://npmjs.com/package/react-toastify
- 설치를 한다.
npm i react-toastify - 토스트 컨테이너 사용한다. (client component에서 사용해야한다. )
layout.tsx에 등록해야하는데 서버컴포넌트이므로
따로 client component를 생성후에 넣을것이다.
components/ToastProvider.tsx
'use client'
import React from 'react'
import { ToastContainer } from 'react-toastify';
import 'react-toastify/dist/ReactToastify.min.css';

const ToastProvider = () => {
  return <ToastContainer
    autoClose={2000}
  />;
};

export default ToastProvider;src/app/layout.tsx에서 Navbar하단에 <ToastProvider />추가
  return (
    <html lang="en">
      <body className={inter.className}>
        <Navbar currentUser={currentUser} />
        <ToastProvider />
        <main>{children}</main>
        <Script
          type="text/javascript"
          src="//dapi.kakao.com/v2/maps/sdk.js?...."
        />
      </body>
    </html>
  );
src/hooks/useFavorite.tsx 훅에서 때에 따라 사용하기
...
      if (!currentUser) {
        toast.warning('로그인 후 이용해주세요. ')
        return;
      }

      try {
        let request;

        if (hasFavorite) {
          request = () => axios.delete(`/api/favorites/${productId}`);
        } else {
          request = () => axios.post(`/api/favorites/${productId}`);
        }

        await request();
        router.refresh(); // 데이터 업뎃후 상태 변경 화면에서 반영해줘야함(next13 추천방법)
        toast.success('성공했습니다. ')
      } catch (err) {
        // console.error(err);
        toast.error('실패했습니다. ')
      }
    };
...
잘된다.
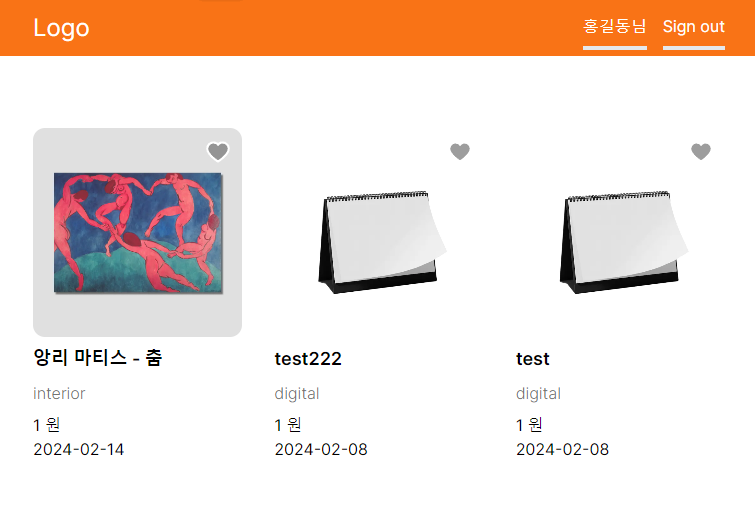
dayjs
dayjs라이브러리를 이용해서 시간 포맷팅
https://day.js.org/
프로덕트가 만들어지고난 후 현재시간과 시간차를 보여줄것이다.(예: N시간 전)
설치 npm i dayjs
기본사용법
import dayjs from 'dayjs';
dayjs(data.createdAt).format('YYYY-MM-DD')
import dayjs from 'dayjs';
import relativeTime from 'dayjs/plugin/relativeTime';
import 'dayjs/locale/ko';

dayjs.extend(relativeTime);
dayjs.locale('ko');
Time from Now
https://day.js.org/docs/en/display/from
https://day.js.org/docs/en/display/from-now
ProductCard 컴포넌트에 바로 사용해도되지만 다른 컴포넌트에서도 재사용할거기때문에
모듈화해준다.
src/helpers/dayjs.ts
import dayjs from 'dayjs';
import relativeTime from 'dayjs/plugin/relativeTime';
import 'dayjs/locale/ko';


dayjs.extend(relativeTime);
dayjs.locale('ko');

export function fromNow(time: string | Date) {
    return dayjs(time).fromNow()
}

export function formatTime(time: string | Date, format= 'YYYY.MM.DD h:mm A') {
    return dayjs(time).format(format);
}
ProductCard에서 사용하기
<div className="">{fromNow(data.createdAt)}</div>
        <div className="flex flex-row items-center justify-between gap-1">
          <div className="font-semibold">
            {data.price} <span className="font-light">원</span>
          </div>
          <div className="">{fromNow(data.createdAt)}</div>
        </div>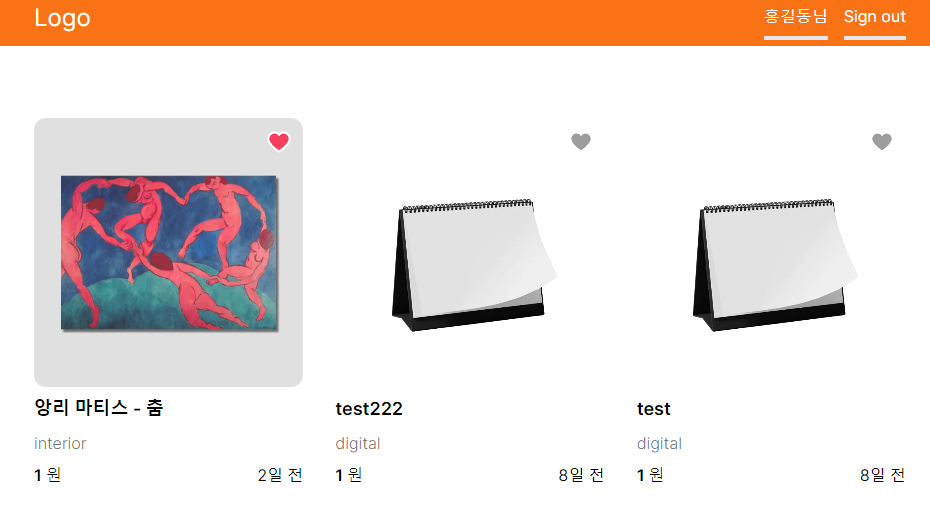
지금으로부터 언제 생성이되었는지 이렇게 나타난다.
Categories 컴포넌트 생성하기
카테고리 컴포넌트
카테고리 필터링
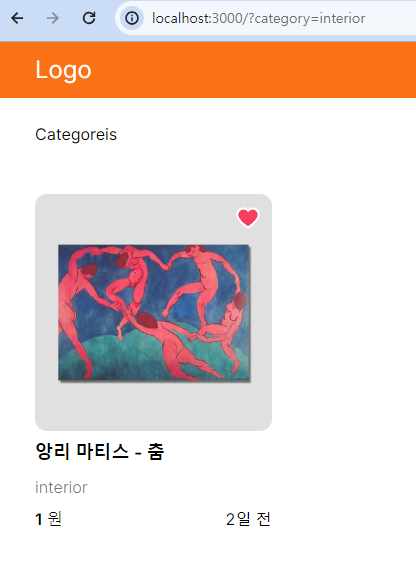
http://localhost:3000/?category=interior로 접속했을때
필터링이 작동하는 이유는..ㅎ
src/app/actions/getProducts.ts에서
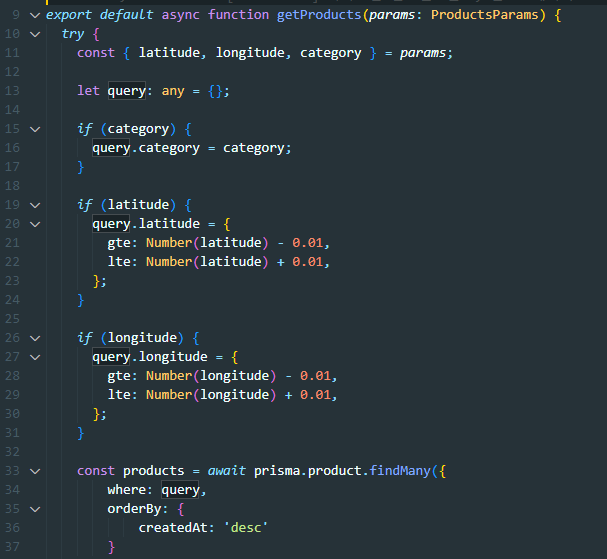
getProducts()함수에서
category값이 있으면 query안에 category를 넣어서
where문에 넣어 데이터를 받아오기때문이다.

갑자기,
홈 페이지 url params를 어떻게 받아오는지 궁금함..
그냥 페이지컴포넌트에 searchParams를 가져오면 useSearchParams를 사용한것같이 거기에 정보가 자동으로 들어가는것일까?
/?category=interior이렇게 쿼리스트링들어가면 ?
useSearchParams
src/componenets/categories/Categories.tsx
...
const Categories = () => {
  const params = useSearchParams();
  // console.log(params?.get('category'), "useSearchParams")
  const category = params?.get('category');
  return (
    <div
      className='flex flex-row items-center justify-between pt-4 overflow-x-auto'
    >
      {categories.map((item) => (
        <CategoryBox
          key={item.label}
          label={item.label}
          path={item.path}
          icon={item.icon}
          selected={category === item.path}
        />
      ))}
    </div>
  )
}
카테고리 박스 컴포넌트 생성
src/componenets/categories/CategoryBox.tsx
import Link from 'next/link';
import React from 'react'
import { IconType } from 'react-icons'

interface CategoryBoxProps {
  icon: IconType;
  label: string;
  path: string;
  selected?: boolean;
}
const CategoryBox = ({
  label,
  path,
  icon: Icon,
  selected
}: CategoryBoxProps) => {
  return (
    <Link
      href={`/?category=${path}`}
      className={`
          flex
          flex-col
          items-center
          justify-center
          gap-2
          p-3
          border-b-2
          hover:text-neutral-800
          transition
          cursor-pointer
          ${selected ? "border-b-neutral-800" : "border-transparent"}
          ${selected ? "text-neutral-800" : "text-neutral-500"}
        `}
    >
      <Icon size={26} />
      <div>{label}</div>
    </Link>
  );
}

export default CategoryBox
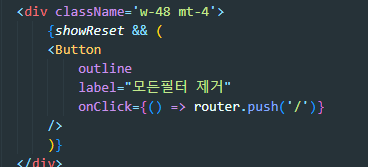
EmptyState에 필터 reset 버튼 주기
src/app/(home)/page.tsx
<EmptyState showReset/> showReset prop을 준다.
  return (
    <Container>
      {/* Category */}
      <Categories />
      {/* Products */}
      {products?.data.length === 0 ? <EmptyState showReset/> : (
        <div className='grid grid-cols-1 gap-8 pt-12 sm:grid-cols-2 md:grid-cols-3 lg:grid-cols-4 xl:grid-cols-5 2xl:grid-cols-6'>
          {products.data.map((product) => (
            <ProductCard
              currentUser={currentUser}
              key={product.id}
              data={product}
            />
          ))}
        </div>
      )}
<EmptyState />컴포넌트 하단 부분 버튼이 onClick={() => router.push('/')}가 걸려있다.

Pagination
https://www.prisma.io/docs/orm/prisma-client/queries/pagination
Offset pagination
const results = await prisma.post.findMany({
  skip: 3,
  take: 4,
})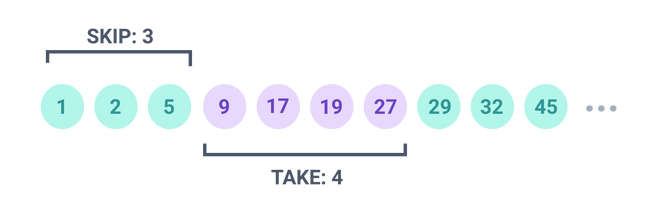
skip: 해당갯수 건너띔
take: 해당갯수 가져옴
interface ProductsParams 수정
src/app/actions/getProducts.ts
export interface ProductsParams {
  latitude?: number;
  longitude?: number;
  category?: string;
  page?: number;
  skip?: number;
}
params 가져오기
localhost:3000/?page=3
src/app/(home)/page.tsx
export default async function Home({ searchParams }: HomeParams) {
  const page = searchParams?.page;
  const pageNum = typeof page === 'string' ? Number(page) : 1;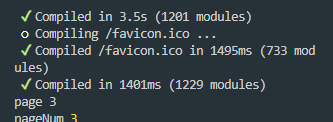
pagination
- product count가 필요
- 한페이지당 상품 수 상수로 만들기
페이지당 상품수 상수 만들기
src/constants.ts
export const PRODUCTS_PER_PAGE = 6;getProducts()에서 totalItems return하기
src/app/actions/getProducts.ts
export default async function getProducts(params: ProductsParams) {
...
const totalItems = await prisma.product.count({ where: query });
...
    return {
        data: products,
        totalItems
    }
홈페이지에서 Pagination 컴포넌트 사용
src/app/(home)/page.tsx
<Pagination page={pageNum} totalItems={products.totalItems} perPage={PRODUCTS_PER_PAGE} />Pagination 컴포넌트작성
리액트 pagination 관련 라이브러리 설치
npm install @lucasmogari/react-pagination
@lucasmogari/react-pagination Demo 살펴보기
https://react-pagination-docs.vercel.app/
'use client'
import React from 'react'
import usePagination from '@lucasmogari/react-pagination';
interface PaginationProps {
page: number;
totalItems: number;
perPage: number;
}
const Pagination = ({ page, totalItems, perPage }: PaginationProps) => {
const {fromItem, toItem, getPageItem, totalPages} = usePagination({
totalItems: totalItems,
page: page,
itemsPerPage: perPage,
maxPageItems: 5
});
const firstPage = 2;
const nextPage = Math.min(page + 1, totalPages);
const prevPage = Math.max(page - 1, firstPage); // 둘중 큰게 prevPage
const arr = new Array(totalPages + 2); //
// console.log('getPageItem',getPageItem)
// console.log('totalPages', totalPages)
return (
<div>
{/* Item {fromItem} - {toItem} */}
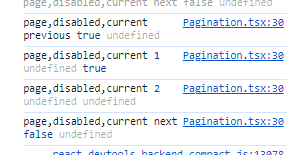
{[...arr].map((_, i) => {
const {page, disabled, current} = getPageItem(i);
console.log("page,disabled,current", page, disabled, current);
if(page === 'previous') {
return (<span key={i}>{"<"}</span>)
}
if(page === 'next') {
return <span key={i}>{">"}</span>;
}
if(page === 'gap') {
return <span key={i}>{"..."}</span>;
}
return (<span key={i}>{page}</span>);
})}
</div>
);
};
export default PaginationPagination컴포넌트에서 props로 page, totalItems, perPage를 받아
usePagination()에 넣는다. 여기서 반환하는 pagination 관련 함수나 변수들을 Destructuring한다.
  const {fromItem, toItem, getPageItem, totalPages} = usePagination({
    totalItems: totalItems,
    page: page,
    itemsPerPage: perPage,
    maxPageItems: 5
  });
firstPage, nextPage와 prevPage 정의
갯수만 가진 빈 배열 arr생성
  const firstPage = 1;
  const nextPage = Math.min(page + 1, totalPages); // 현재페이지 + 1과 전체페이지수 비교해 작은것이 nextPage
  const prevPage = Math.max(page - 1, firstPage); // 둘중 큰게 prevPage

const arr = new Array(totalPages + 2); // prev와 next 버튼 2개 추가getPageItem()으로 페이지 버튼들 map 테스트
        {[...arr].map((_, i) => {
          const {page, disabled, current} = getPageItem(i);
          console.log("page,disabled,current", page, disabled, current);
          return (<></>);
        })}
총페이지 2개, 4번순회(버튼2개 2회추가)
이전버튼, 1페이지(current active), 2페이지, 다음버튼
PaginationLink 생성하기
npm i query-string
'use client'
import React, { PropsWithChildren } from 'react';
import { PRODUCTS_PER_PAGE } from '@/constants';
import Link from 'next/link'
import { useSearchParams } from 'next/navigation'
import queryString from 'query-string';

type PaginationLinkProps = {
    page: number;
    disabled?: boolean;
    active?: boolean;
    // children: React.ReactNode;
} & PropsWithChildren

const PaginationLink = ({ page, disabled, active, children }: PaginationLinkProps) => {
    const params = useSearchParams();
    const limit = PRODUCTS_PER_PAGE;
    const skip = page ? (Number(page) - 1) * limit : 0;

    // console.log("params", params?.toString());

    let currentQuery = {};
    if(params) {
        currentQuery = queryString.parse(params?.toString())
    }
    // console.log(currentQuery);

    // 라우터 쿼리에 존재하는 데이터 사용, 페이지 modify만
    const updatedQuery = {
        ...currentQuery,
        page,
        skip
    }

  return (
    <Link
      href={{ query: updatedQuery }}
      className={`p-2 text-2xl
      ${active ? "font-bold text-orange-500" :""}
      ${disabled ? "pointer-events-none text-gray-200" : ""}
      `}
    >{children}</Link>
  )
}

export default PaginationLink
getProduct에 현재 페이지의 상품 보이기
getProduct query에 skip과 take값 넣으면된다.
export default async function getProducts(params: ProductsParams) {
  try {
    const { latitude, longitude, category, skip } = params;
    ...

    const products = await prisma.product.findMany({
        where: query,
        orderBy: {
            createdAt: 'desc'
        },
        skip: skip ? Number(skip) : 0,
        take: PRODUCTS_PER_PAGE
    });
Loader 컴포넌트 생성하기
Loading.js
https://nextjs.org/docs/app/building-your-application/routing/loading-ui-and-streaming
Loader 컴포넌트 생성
npm install react-loader-spinner
src/components/Loader.tsx
'use client'
import React from 'react'
import { RotatingLines } from 'react-loader-spinner'

const Loader = () => {
  return (
    <div className='h-[60vh] max-w-6xl mx-auto w-full flex flex-row items-center justify-center py-40'>
      <RotatingLines
        strokeColor='grey'
        strokeWidth='5'
        animationDuration='.75'
        width='30'
        visible={true}
      />
    </div>
  )
}

export default Loader
loading페이지
해당 파일 경로에 loading.tsx 라는 파일을 넣으면 자동으로 로더컴포넌트가 로딩할때 보인다. (파일시스템인듯)
단, 해당 파일 경로에 일일이 loading.tsx페이지를 생성해야한다. 마치 page.tsx처럼?
import Loader from '@/components/Loader'
import React from 'react'

const Loading = () => {
  return (
    <Loader />
  )
}

export default Loading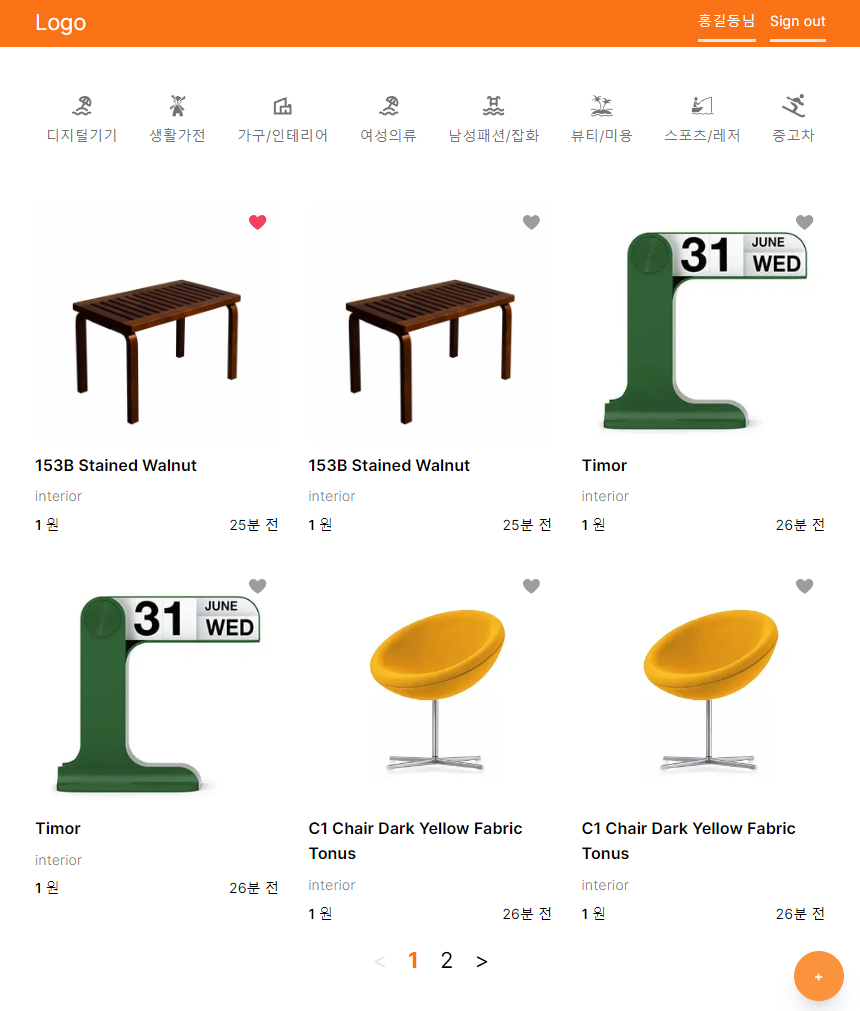
메인페이지 완료