Object Detection의 혁신은 yolo이다.
yolo로 인해 많은 것들이 Real-time내에서 동작이 가능하다.
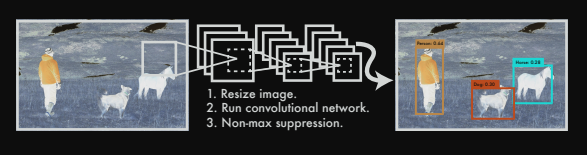
어찌보면 2-stage보다 단순한 매커니즘이라 볼 수 있는데, 어떻게 해서 위와 같은 architecture를 통해 object를 판단하고 위치까지 판단할 수 있는지 깊은 고찰을 해보자.
--나는 항상 전체 Object Detection architecture를 설계할때, model부터 설계하는 편이다.(물론, 데이터 전처리에 대한 부분을 제외하곤 말이다.)
pytorch로 이미지 학습을 하기 위해서는 보통 4D input이 필요하다.
(BATCH_SIZE, CHANNEL, row, column)과 같은 4D input이 필요하다. 이 input은 고정되어 있으며 모델을 설계한 뒤 from torchinfo import summary를 통해서 모델의 과정을 살펴볼 수 있기 때문에, 이와 같이 model architecture을 먼저 설계하는 것을 선호한다.
1. Model Architecture
yolov1의 architecture는 Darknet 구조이다.
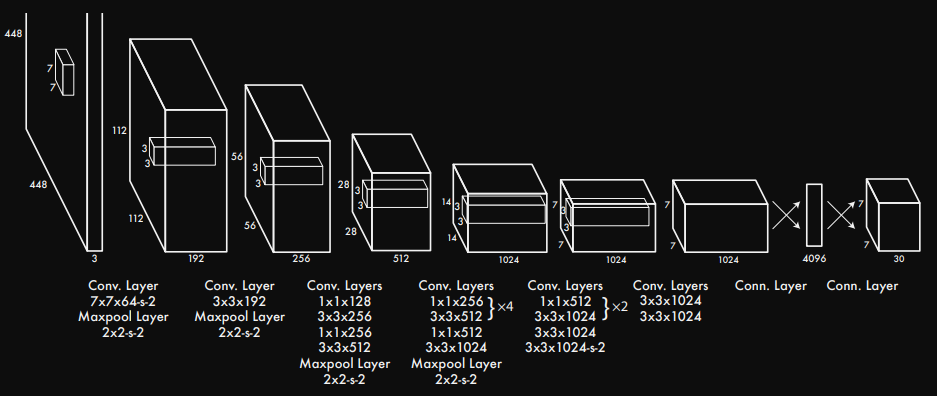
Darknet 구조는 의외로 간단하다. deep Neural Network구조이며 매우 직관적이다. 필자는 yaml파일에 model architecture을 넣고 해당 구조를 가져와서 사용하는 형식을 좋아한다. 유지보수에 용이하기 때문이다.
## model_architecture.yaml

 yolov1_architecture : [
 	# [kernel_size, input_channels, stride, paddig]
    [7, 64, 2, 3],
    'M',
    [3, 192, 1, 1],
    'M',
    [1, 128, 1, 0],
    [3, 256, 1, 1],
    [1, 256, 1, 0],
    [3, 512, 1, 1],
    'M',
    [[1, 256, 1, 0], [3, 512, 1, 1], 4],
    [1, 512, 1, 0],
    [3, 1024, 1, 1],
    'M',
    [[1, 512, 1, 0], [3, 1024, 1, 1], 2],
    [3, 1024, 1, 1],
    [3, 1024, 2, 1],
    [3, 1024, 1, 1],
    [3, 1024, 1, 1]
 ]
yaml 파일의 경우 문자열과 리스트이여야 한다.
yaml 파일에서 해당 모델의 architecture를 가져오는 방법은 간단하다.
## model.py

import yaml

def load_model_architecture(path):
	with open(path, 'r') as f:
  		config = yaml.safe_load(f)

	model_architecture = config['yolov1_architecture']

    return model_architecture
다음과 같이 yaml.safe_load()를 사용해서 yaml 전체 내용을 가져온 뒤에 필자가 작성했던 yolov1_architecture 항목을 가져온다.
위와 같은 방식으로 architecture를 가져왔다면 활용하는 방식은 Yolov1 class를 통해 해당 함수를 사용하면 된다.
# model.py

import yaml
import torch

from torch import nn

config_path = 'your_model_architecture_path.yaml'


def load_model_architecture(path):
	with open(path, 'r') as f:
    	config = yaml.safe_load(f)

    model_architecture = config['yolov1_architecture']

	return model_architecture


class CNNBlock(nn.Module):
	'''
		This class is original CNN Block.
        (input_channels, out_channels, kernel_size, stride, padding, etc..)

    '''
	def __init__(self, in_channels, out_channels, bias=False, **kwargs)
    	super().__init__()

        self.conv = nn.Conv2d(in_channels, out_channels, **kwargs)
        self.batchnorm = nn.BatchNorm2d(out_channels)
        self.activation = nn.LeakyReLU(0.1)


	def forward(self, x):
    	return self.activation(self.batchnorm(self.conv(x)))


class Yolov1(nn.Module):
	def __init__(self, in_channels=3, **kwargs):
    	super().__init__()

        self.architecture = load_model_architecture(config_path)
        self.in_channels = in_channels
        self.darknet = self._create_block(self.architecture)
        self.fcs = self._create_fcs(**kwargs)

    def forward(self, x):
    	x = self.darknet(x)

        return self.fcs(torch.flatten(x, start_dim=1))

    def _create_block(self, architecture):
    	layers = []
    	in_channels = self.in_channels

		for x in architecture:
        	if isinstance(x, list) and len(x) == 4:
            	layers.append([CNNBlock(in_channels, x[1], kernel_size=x[0], stride=x[2], padding=x[3])])
                in_channels = x[1]
            elif isinstance(x, str):
            	layers.append([nn.Maxpool2d(kernel_size=2, stride=2)]
            elif isinstance(x, list) and len(x) == 3:
            	conv1 = x[0]
                conv2 = x[1]
                repeat = x[2]

                for i in range(repeat):
                	layers.append([CNNBlock(in_channels, conv1[1], kernel_size=conv1[0], stride=conv1[2], padding=conv1[3])])
                    layers.append([CNNBlock([conv1[1], conv2[1], kernel_size=conv2[0], stride=conv2[2], padding=conv2[3])])
                    in_channels = conv2[1]

         return nn.Sequential(*layers)


	def _create_fcs(self, spilt_size, num_boxes, num_classes):
    	S, B, C = split_size, num_boxes, num_classes

        return nn.Sequential(
            nn.Linear(S * S * 1024, 4096),
            nn.Dropout(0.2),
            nn.LeakyReLU(0.1),
            nn.Linear(4096, S * S * (C + B * 5))
        )
자 하나씩 짚어보자.
CNNBlock class를 만든 이유는 무엇일까?
우리가 사용하는 언어인 파이썬은 객체지향 언어이다. 물론, 파이썬은 순차지향으로 작성해도 된다. 다만, 파이썬은 수많은 라이브러리로 사용자에게 편이성을 제공해주는데 여기에 class가 9할 이상의 역할을 한다. 즉 object를 만들게 되면 재사용성의 편리함과 유지보수에 긍정적인 영향을 주기 때문에, 반복되는 작업일 경우 객체를 만들고 사용하는 것이 좋다.
CNNBlock의 경우 실제 모델 내에서 여러번 반복이 되는 코드이므로 따로 class를 만들어 작업하고 추후 유지보수에도 편리함을 주기 때문에 대부분의 model_core 개발자들은 Basic_block을 따로 만들어 작업한다.
CNNBlock(in_channels, out_channels, kwargs)를 인자로 받는데, kwargs는 keyword argument로 임의 개수를 키워드 인수로 받는 것을 말한다. **kwargs를 사용함으로써 CNNBlock(in_channels, out_channels, kernel_size, stride, padding)으로 길게 작성하지 않고 확실히 필요한 내용만 간결하고 직관적이게 작성하는게 좋다. (이건 개발자의 마음대로이기 때문에 크게 신경쓰지 않아도 좋다.)
if isinstance(x, list) and len(x) == 4: 의 역할은 무엇일까?
yaml 파일로 해당 model의 architecture를 가져오게 되면, yolov1_architecture는 다음과 같은 구조를 갖는다.
## Terminal Run

# print(load_model_architecture(config_path))

[[7, 64, 2, 3], 'M', [3, 192, 1, 1], 'M', [1, 128, 1, 0], [3, 256, 1, 1], [1, 256, 1, 0], [3, 512, 1, 1], 'M', [[1, 256, 1, 0], [3, 512, 1, 1], 4], [1, 512, 1, 0], [3, 1024, 1, 1], 'M', [[1, 512, 1, 0], [3, 1024, 1, 1], 2], [3, 1024, 1, 1], [3, 1024, 2, 1], [3, 1024, 1, 1], [3, 1024, 1, 1]]
해당 리스트를 반복문으로 한줄씩 꺼내본다면 x라는 값에는 어떤 형태가 나올 것 같은가?
for x in architecture:
	print(x)

## Terminal Run
[7, 64, 2, 3]
M
[3, 192, 1, 1]
.
.
.
[[1, 256, 1, 0], [3, 512, 1, 1], 4]
.
.
.
[3, 1024, 1, 1]
[3, 1024, 1, 1]
과 같이 나오게 된다.
len([7, 64, 2, 3])을 출력하면 출력값은 4가 나온다.
len([[1, 256, 1, 0], [3, 512, 1, 1], 4])을 출력하면 출력값은 3이 나온다.
len()는 바깥 리스트를 기준으로 요소들이 몇개있는지 검사하기 때문이다.즉, len()은 7, 64, 2, 3을 각각 하나의 요소로 보고 총 4개라고 반환한다. len()은 [1, 256, 1, 0],[3, 512, 1, 1], 4를 각각 하나의 요소로 보고 총 3개라고 반환한다.
이를 조건문으로 사용했다. pytorch yolov1 scratch를 보면 tuple과 list로 구분을 하지만, yaml를 이용했을 때에는 tuple로 구분할 수 없기 때문에, 다음과 같이 조건문을 추가하여 코드를 정상적으로 작동할 수 있도록 했다.
이제 fcs layer의 동작 방식을 살펴보자.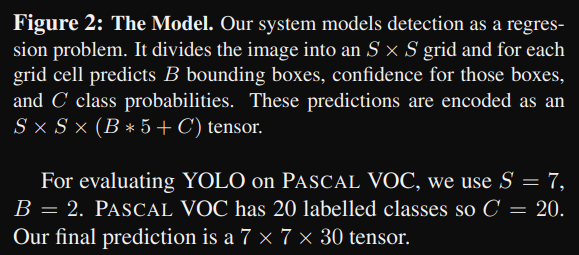
해당 이미지를 보게 되면, These predictions are encoded as an S × S × (B ∗ 5 + C) tensor. 문구를 볼 수 있다. 즉 출력은 다음과 같은 구조여야 한다.
여기서 S = split_size이지만 grid와 같은 역할을 하며 num_boxes는 하나의 cell에서 예측할 수 있는 bounding box의 갯수를 뜻한다. num_boxes는 어찌보면 anchor box와 같은 역할을 하지 않나 싶다. num_classes는 사용자가 Object_Detection할 class 갯수를 의미한다.
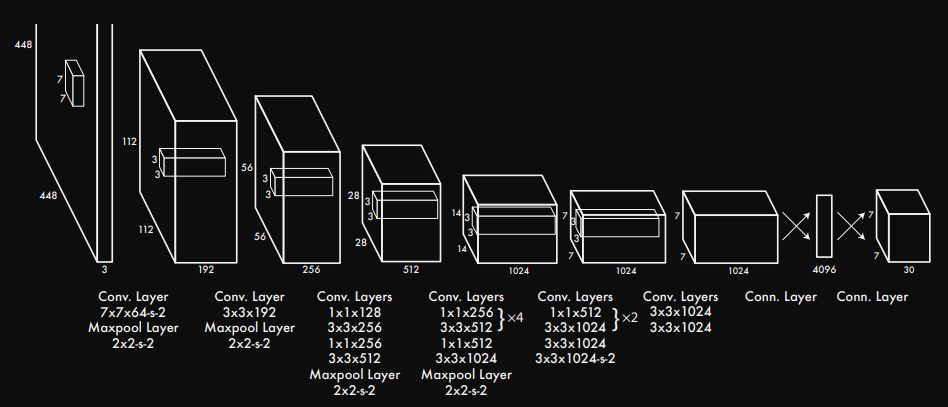
darknet의 모델에서 conv. Layers가 끝나고 connected Layer로 변하는 구간을 보자.
convolution Layer에서 Linear regression을 진행하기 위해서 input.shape는 (BATCH_SIZE, 1024, S=7, S=7)형태를 갖게된다. torch.flatten(x, start_dim=1)을 적용하면서 (BATCH_SIZE, -1)로 shape가 바뀌기 때문에, nn.Linear()의 input_shape는 nn.Linear(S S 1024)가 된다. flatten을 진행했을때, output의 출력이 4096이 되길 원하기 떄문에 최종적으로 nn.Linear(S S 1024, 4096)으로 작성할 수 있다.
마지막 nn.Linear(4069, S S (C + B * 5))가 될 수 있는 이유는 yolo 개발자가 그렇게 출력을 빼놓은 이유가 있다.
추후에 Dataset.py에서 다룰 내용인데 짧게 맛보기로 보면 다음과 같은 이유 때문이다.
각 bounding_box에는 다음과 같은 정보를 담는다.
{B1: 객체의 유무, cell에서의 bounding_box의 중심 x좌표, cell에서의 bounding_box 중심 y좌표, cell의 상대 width위치, cell의 상대 height위치}
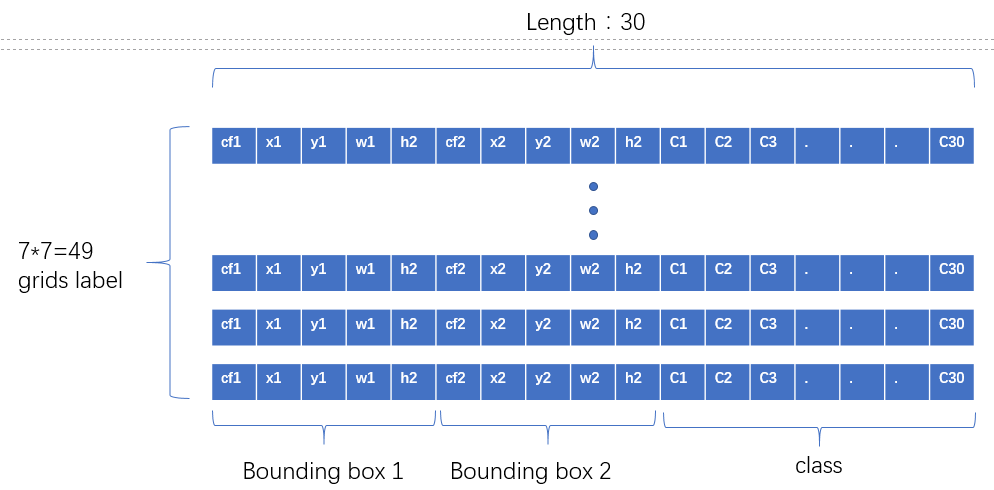
이런 구조로 말이다. 클래스 정보를 앞으로 빼도 되고 위의 그림처럼 뒤로 빼도 상관없다. 코드내에서 고치면 그만이니까.
중요한건 bouning_box의 정보는 박스 한개당 위의 정보를 담으므로 박스 한개당 총 5개의 공간이 필요하다. 따라서 하나의 박스당 5개의 정보가 필요하니 B * 5를 하는 것이다.
2. Dataset 처리하기
많은 초심자들을 무너뜨리는 것 중 하나가 Dataset.py 이다. python의 매직 메소드 혹은 인스턴스 메소드라고 불리는 __init__, __len__, __getitem__의 사용법에 대해서 어려움을 겪기 때문이다. 파이썬의 매직 메소드의 개념에 대해서 먼저 숙지하는 것이 좋다.
기본은 매우 중요하다. 기본을 제대로 알아야 응용을 할 수 있기 때문이다.
a = 3
b = 5
print(a + b)
를 하게 되면 정답은 8이 나온다. 이 같은 코드를 아래와 같이 바꾼다면 어떻게 될까?
a = 3
b = 5
print(a.__add__(b))
정답은 위와 같이 8이 나온다. 파이썬의 매직 메소드는 초심자들을 어렵게 하기 위해 만들어놓은 객체가 아니다. 초심자들이 보다 쉽게 사용할 수 있도록 미리 작성해둔 것을 의미한다. 즉, 오버라이딩을 통해 사용자가 편하게 수정하여 보다 쉽게 원하는 결과를 도출할 수 있도록 미리 만들어 뒀다는 것을 잊지말도록 하자.
일반적으로 pytroch 프레임워크를 통해 custom Dataset을 만들때 torch.utils.data.Dataset을 상속받는다. 해당 Dataset에서 __len__과 __getitem__의 기본형이 작성되어 있고 우리는 그걸 오버라이딩하여 우리 입맛대로 수정해서 사용할 수 있다.
시작해보자.
## dataset.py

import os
import yaml
import torch
import pandas as pd
import xml.etree.ElementTree as ET

from PIL import Image

def load_config(path):
	with open(path, 'r') as f:
    	config = yaml.safe_load(f)

    return config['classes']

def image_annot_df(path, image_name, annot_name):
	image = [images for images in sorted(os.listdir(path)) if images.endwith('.jpg')]
    annot = [annots for annots in sorted(os.listdir(path)) if annots.endwith('.xml']

    images_series = pd.Series(images, name=image_name)
    annots_series = pd.Series(annots, name=annot_name)
    df = pd.concat([images_series, annots_series], axis=1)

    return pd.DataFrame(df)

train_df = image_annot_df(path, 'train_image', 'train_annot')
test_df = image_annot_df(path, 'test_image', 'test_annot')

class FruitsDataset(torch.utils.data.Dataset):
	'''
    	This Class is FruitsDataset.
        df : Data path
        annotation : filename + .jpg, .xml
        S : split_size
        B : num_boxes
        C : num_classes
    '''
	def __init__(self, df, files_dir, S=7, B=2, C=3, transform=None):
    	self.annotation = df
        self.files_dir = files_dir
        self.transform = transform
        self.S = S
        self.B = 2
        self.C = C

	def __len__(self):
    	return len(self.df)

    def __getitem__(self, idx):
    	data = os.path.join(self.files_dir, self.annotaion.iloc[idx, 1])
        root = ET.parse(data)
        tree = tree.getroot()
        boxes = []

        label_map = {cls: idx for idx, cls is enumerate(load_config(config_path))}

  		if int(root.find('size').find('height').text) == 0:
        	file_name = root.find('filename').text
            file_path = self.files_dir + '/' + file_name
            image = Image.open(file_path)
            width, height = image.size

            for member in root.find('bndbox'):
            	classes = member.find('name').text
                class_label_map = label_map[classes]

            	xmin = int(member.find('xmin').text)
                ymin = int(member.find('ymin').text)
                xmax = int(member.find('xmax').text)
                ymax = int(member.find('ymax').text)

                center_x = ((x_min + x_max) / 2) / width
                center_y = ((y_min + y_max) / 2) / height
                width_box = (x_max - x_min) / width
                height_box = (y_max - y_min) / height

                boxes.append([class_label_map, center_x, center_y, width_box, height_box])

       elif int(root.find('size').find('height').text) != 0:
       		width, height = root.find('size').find('widht'), root.find('size').find('height')

            for member in root.find('bndbox'):
            	classes = member.find('name').text
                class_label_map = label_map[classes]

            	xmin = int(member.find('xmin').text)
                ymin = int(member.find('ymin').text)
                xmax = int(member.find('xmax').text)
                ymax = int(member.find('ymax').text)

                center_x = ((x_min + x_max) / 2) / width
                center_y = ((y_min + y_max) / 2) / height
                width_box = (x_max - x_min) / width
                height_box = (y_max - y_min) / height

                boxes.append([class_label_map, center_x, center_y, width_box, height_box])

   		boxes = torch.tensor(boxes)
        image = Image.open(self.files_dir + '/' + self.annotation.iloc[idx, 0])
        image = Image.convert('RGB')

        if transform is not None:
        	image = self.transform(image)

        grid = torch.zeros(self.S, self.S, self.C + self.B * 5)

		for box in boxes:
        	label_map, x_center, y_center, box_width, box_height = box.tolist()

            if isinstacne(label_map, str):
            	label_map = int(label_map)

          	i, j = self.S * y_center, self.S * x_center
            x_cell, y_cell = self.S * x_center - j, self.S * y_center - i

            width_cell, height_cell = width * self.S, height * self.S

            for b in range(self.B):
            	if grid[i, j, self.C + b * 5] == 0:
                	grid[i, j, self.C + b * 5] = 1

                start_idx = self.C + b * 5 + 1
                box_coord_info = torch.tensor([x_cell, y_cell, width_cell, height_cell])
                grid[i, j, start_idx: start_idx+4] = box_coord_info
                grid[i, j, label_map] = 1

        return image, grid
torch.utils.data.Dataset을 상속받고 __len__, __getitem__을 오버라이딩하려고 한다. 매직 메소드인 len()의 경우 매우 간단하다. 해당 custom dataset의 data길이를 반환한다.
classification을 했을때, 손글씨 mnist나 fashion mnist를 생각해보면 다운받고 해당 dataset에 len()를 사용하여 데이터셋이 총 몇개 있었는지 확인했던 적이 있을 것이다.
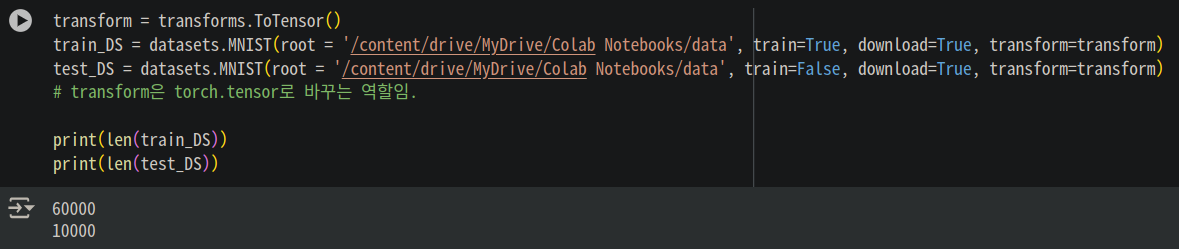
단지 이뿐이다. 매우 사소하지만 매우 중요하다. train_data의 길이와 test_data의 길이를 확인하는 것은 매우 기본이니 말이다.
이제 이해하기 어렵고 매우 난해해 보이는 __getitem__에 대해 알아보자.
__getitem__은 일반적으로 idx를 인자로 받아서 처리한다. 나중에 train할 때 사용한 DataLoader를 사용하여 학습하기 위해서는 반드시 필요한 작업이다. BATCH_SIZE를 정하여 학습을 할 경우 반드시 필요한 작업이기도 하다.
특히 이 __getitem__은 데이터를 어떤 형식으로 가져올지에 따라 코드가 바뀌므로 정답이 없다. __len__처럼 정답으로 정해져 있지 않으므로 많은 연습을 통해 데이터에 따라 사용자가 원하는 출력을 얻을 수 있도록 코드를 수정해야 한다.
다시 __getitem__으로 돌아가보자.
label_path는 다음과 같은 구조를 갖는다.
'path + / + filename.xml'의 구조를 갖으며 idx가 달라질때마다 즉, 해당 데이터셋의 갯수만큼 xml 정보를 계속해서 가져올 수 있다.
xml.etree.ElementTree 라이브러리를 통해 우리는 원하는 정보를 파싱할 수 있다. 파싱이란 크롤링에서도 많이 사용하는데, 원하는 데이터를 추출하고 쉽게 분석할 수 있도록 구조화된 형태로 변환하는 과정이라 생각하면 된다. 우리는 xml에 있는 size와 bndbox에 있는 각각의 정보들을 가져와야 하므로 해당 과정은 필수적이다.
yolo의 데이터 구조는 셀 내의 바운딩 박스의 중심좌표와 그리드 내 해당 셀의 바운딩 박스의 width와 height를 알아야 한다.
하지만 그 전에 (xmin, ymin),(xmax, ymax)의 구조를 [x_center, y_center, box_width, box_height]로 변환을 해줘야 한다. 그래야 grid 변환이 편리해진다.
## Dataset.py에서 __getitem__의 일부 코드

for member in root.find('bndbox'):
   	classes = member.find('name').text
    class_label_map = label_map[classes]

    xmin = int(member.find('xmin').text)
    ymin = int(member.find('ymin').text)
    xmax = int(member.find('xmax').text)
    ymax = int(member.find('ymax').text)

    center_x = ((x_min + x_max) / 2) / width
    center_y = ((y_min + y_max) / 2) / height
    width_box = (x_max - x_min) / width
    height_box = (y_max - y_min) / height

    boxes.append([class_label_map, center_x, center_y, width_box, height_box])
해당 코드는 그 과정을 담은 코드이다.
grid = torch.zeros(self.S, self.S, self.C + self.B * 5)

for box in boxes:
    label_map, x_center, y_center, box_width, box_height = box.tolist()

    if isinstacne(label_map, str):
       label_map = int(label_map)

       i, j = self.S * y_center, self.S * x_center
       x_cell, y_cell = self.S * x_center - j, self.S * y_center - i

       width_cell, height_cell = width * self.S, height * self.S

       for b in range(self.B):
           if grid[i, j, self.C + b * 5] == 0:
              grid[i, j, self.C + b * 5] = 1

           start_idx = self.C + b * 5 + 1
           box_coord_info = torch.tensor([x_cell, y_cell, width_cell, height_cell])
           grid[i, j, start_idx: start_idx+4] = box_coord_info
           grid[i, j, label_map] = 1

return image, grid
해당 코드를 확실히 이해하는 것이 중요하다. 어찌보면 Yolo grid 개념에 대해 정확히 파악할 수 있는 구조이기 때문이다.
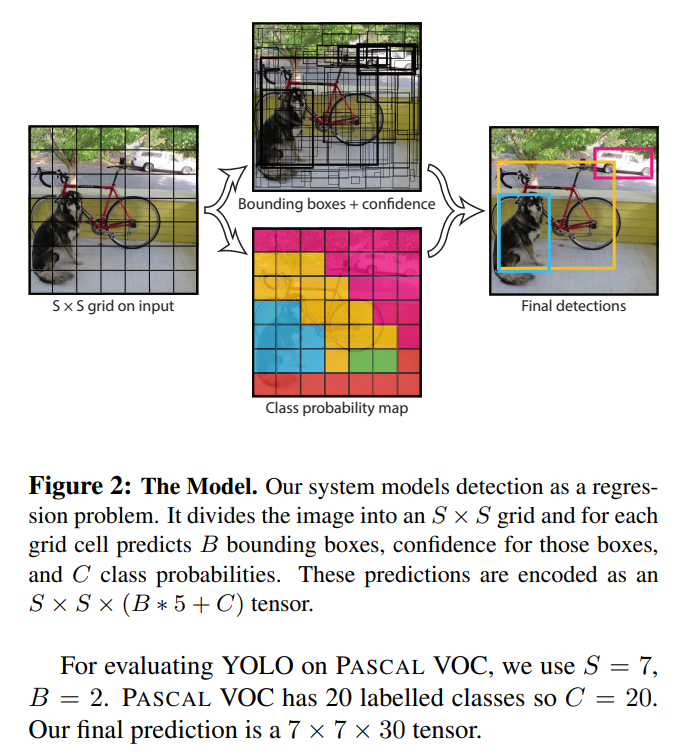
yolov1의 논문 저자는 grid system을 이용해서 문제를 해결하려고 했다. 따라서 이 grid system에 대해서 정확히 이해하고 넘어가는 것이 중요하다.
이미지를 특정 값인 grid로 나누어 해당 셀에 객체가 있는지 없는지를 판단하는 것이다. 전체 이미지로 판단을 하기에는 어려운 요소들이 있으나 셀에 한정하여 객체의 유무를 판단하면 그나마 쉬워지기 때문이기도 하다. 여러 이유가 있긴한데,
- 객체 위치 예측을 구조화하기 위함이다.
-> 셀 단위로 할당함으로써 정확한 좌표 예측 문제를 단순화한다.- 단일 패스에서 모든 예측을 처리하기 위함(Real-time)
-> RCNN의 경우 Region Proposal 기반 방식은 여러 번의 계산 단계가 필요.
-> yolo의 grid system은 단 한번의 forward pass로 모든 바운딩 박스와 클래스 정보를 출력한다.- 겹치는 예측 문제를 줄임.
-> 각 셀에서 하나의 객체만 탐지하도록 함.- 전체 이미지 맥락을 고려한 예측을 위함.
-> 이미지를 전체적으로 한번에 처리하고 각 그리드 셀에서 객체를 탐지함.- 계산 효율성과 메모리 사용을 최적화하기 위함.
-> 바운딩 박스를 제한함으로써 메모리 사용과 계산 비용을 줄여준다. RCNN은 그러지 못함.
이러한 이유 때문에 grid system은 엄청난 극찬을 받기 시작한다. Real-time의 시초랄까?
이미지 전체를 그리드 방식으로 처리하기 위해서는 다음과 같은 작업이 필요하다. 우선 grid의 공간을 만들어야 한다.
grid = torch.zeros((self.S, self.S, self.C * self.B + 5))공간이 만들어졌으므로 해당 공간을 채우면 된다.
for box in boxes:
	# xml에서 받아온 정보들를 언패킹을 통해 풀어주고 각각의 변수에 넣는다.
    label_map, x_center, y_center, box_width, box_height = box.tolist()

    if isinstance(label_map, str):
    	label_map = int(label_map)

    # 구조를 생각하자.
    # self.S = 7, y_center과 x_center는 0과 1사이의 값으로 이루어져 있다.
    # i에 self.S * y_center로 y값을 먼저 넣어주는 이유는 이미지의 특성 때문이다.
    # image[y,x]로 읽어들이기 때문.
    # i는 바운딩 박스의 y 중심좌표가 어느 셀에 있는지 알려준다.
    # j는 바운딩 박스의 x 중심좌표가 어느 셀에 있는지 알려준다.
    i, j = int(self.S * y_center), int(self.S * x_center)

    # x_cell과 y_cell은 위에서 구한 해당 셀에서 어느정도 떨어져 있는지 상대정보를 알려준다.
    # 해당 바운딩 박스의 중심좌표가 해당 셀 내에서 얼마나 떨어져 있는지 알 수 있다.
    x_cell, y_cell = self.S * x_center - j, self.S * y_center - i

    # grid 내에서 해당 바운딩 박스의 width, height를 구하는 코드
    width_cell, height_cell = self.S * box_width, self.S * box_height

    # 바운딩 박스가 2개 이므로 num_boxes를 2로 설정했으므로
	for b in range(self.B):
    	# class가 총 3개라고 가정하면 데이터 구조는 다음과 같다.
        #[cls1, cls2, cls3, obj1, x, y, w, h, obj2, x, y, w, h]
        # 해당 위치에 객체가 있다면 [i, j, 3] 혹은 [i, j, 8]에 객체가 존재한다고 알려줘야 하기 때문이다. loss를 구할때 필요하므로
        if grid[i, j, self.C + b * 5] == 0:
        	grid[i, j, self.C + b * 5] = 1


        # start_idx가 필요한 이유는 yolo의 데이터 형식을 원하는 위치에 넣기 위함이다.
        start_idx = self.C + b * 5 + 1
        box_coordinate = torch.tensor([x_cell, y_cell, width_cell, height_cell])
        grid[i, j, start_idx:start_idx+4] = box_coordinate
        # 해당 객체의 클래스 정보 넣어 어떤 클래스가 들어있는지 알 수 있다.
        grid[i, j, class_label] = 1

    return image, grid
자... 이제 Dataset.py까지 모든게 끝났다.
물론, utils와 가장 어려운 요소인 loss 파트가 남았지만 여기까지 왔다면 많은 걸 얻어갔을 거라고 생각한다.
내용이 길어지니 나머지는 2편에서 정리해보려고 한다.