> redux 도입
이제 검사 후 문제가 있는 코드에 색깔 처리를 해주고 클릭 이벤트를 주어야 한다. 코드를 검사한 뒤 그 결과를 파싱된 코드 객체에 담아주면 결과에 따라 하이라이트된 코드 노드를 만들 때 색깔 처리와 클릭 이벤트까지 같이 적용하는 방식.
그런데 가만 생각해보니 그렇게 되면 Left에서 Right까지 너무 많은 props 트리를 타고 이동해야 한다. 현재 Result 아래에 Left와 Right가 있고 각각 코드 블럭이 있는데, Result에서 setRightCodeBlock과 같은 setState 함수를 하나 만들고 Left에 전달해준 뒤 Left의 코드블럭에서 문제가 있는 코드륵 클릭하면 Left코드블럭 -> Left -> Result -> Right -> Right코드블럭 순으로 전달해주어야 했다.
이 방식은 너무 무겁다고 생각했다. 그래서 redux를 도입하기로 했다. 원래는 소규모의 프로젝트엔 상태관리 툴이 너무 무거울 수 있다고 생각했다. 하지만 이런 상황에선 오히려 프로젝트를 가볍게 만들어 준다고 생각한다.
// redux/codeSlice.tsx
import { createSlice } from '@reduxjs/toolkit';

const codeSlice = createSlice({
  name: 'code',
  initialState: {
    language: 'html',
    code: '',
    parsedCode: null,
    selectedCode: null,
    description: '',
  },
  reducers: {
    setLanguage: (state, action) => {
      state.language = action.payload;
    },
    setCode: (state, action) => {
      state.code = action.payload;
    },
    setParsedCode: (state, action) => {
      state.parsedCode = action.payload;
    },
    setSelectedCode: (state, action) => {
      state.selectedCode = action.payload;
    },
    setDescription: (state, action) => {
      state.description = action.payload;
    },
  }
});

export default codeSlice;
export const {
	setLanguage,
  	setCode,
  	setParsedCode,
  	setSelectedCode,
  	setDescription
} = codeSlice.actions;
redux toolkit 은 이번에 처음 사용해 보았다. 기존의 redux와 다르게 반복되는 코드가 많이 줄고 간결해졌으며 여러 라이브러리를 설치할 필요가 없어서 좋았다.
// components/result/Left.tsx
import { useEffect } from 'react';

import { useSelector, useDispatch } from 'react-redux'
import { RootState } from 'redux/store';
import { setParsedCode } from 'redux/codeSlice';

import { Parser } from 'htmlparser2';
import { DomHandler } from 'domhandler';
import { cssToJson } from 'utils/cssjson';

import Box from 'components/result/Box';
import BoxTitle from 'components/result/BoxTitle';
import CodeBlock from './CodeBlock';
import Highlighter from 'highlighter/Highlighter';

export default function Left() {
  const dispatch = useDispatch();
  const language = useSelector((state: RootState) => state.codeReducer.language);
  const code = useSelector((state: RootState) => state.codeReducer.code);

  useEffect(() => {
    if (language === 'html') {
      const handler = new DomHandler((error, result) => {
        if (error) {
          alert(error);
        } else {
          dispatch(setParsedCode(result));
        }
      });
      const parser = new Parser(handler);
      parser.write(code);
      parser.end();

    } else if (language === 'css') {
      setParsedCode(cssToJson(code));
    }
  }, [code]);

  return (
    <Box>
      <>
        <BoxTitle>Your Code</BoxTitle>
        <CodeBlock><Highlighter /></CodeBlock>
      </>
    </Box>
  );
}
> Suggestion 영역 구현
문제가 되는 코드에 클릭 이벤트나 배경 색을 입히는 방법은 총 두 가지다. 첫째는 파싱된 코드 전체를 검사하여 미리 Highligter가 바로 하이라이팅을 적용할 수 있는 객체로 만들어 두는 것. 둘째는 Highligter가 코드를 토큰으로 분리하여 하나 하나 하이라이팅 작업을 할 때 검사도 함께 진행하는 방법.
두 방법 모두 장단이 있는데, 첫 번째 방법은 우선 가독성이 좋고 관리가 용이하다. 두 번째 방법은 어차피 전체 코드 객체를 서칭하며 하이라이팅 작업을 진행하기 때문에 검사도 함께 진행한다면 효율이 더욱 좋아진다.
나는 두 번째 방법을 택했다. 사이드 프로젝트기에 유지보수가 많이 필요로 하지도 않으며 혼자 작업하는 일이기에 가독성보다 효율이 더욱 중요하다고 판단했다.
export default function HTMLHighlighter({ parsedHtmlDom, validateAt = false }:
                                         { parsedHtmlDom: ChildNode[], validateAt: boolean }) {
  const dispatch = useDispatch();

  const handleClickNode = (item: ChildNode) => {
    const suggestion = HTMLValidator(item);
    dispatch(setSuggestion(suggestion))
  }

  return (
    <>
      {parsedHtmlDom.map((item, i) => {
        if (validateAt) {
          return <div key={i} onClick={() => handleClickNode(item)}>{getHighlightedNode(item)}</div>
        }
        return <div key={i}>{getHighlightedNode(item)}</div>
      })}
    </>
  );
(↑HTML highlighter)
import { ChildNode, Text, Element, ProcessingInstruction } from 'domhandler';
import { Suggestion } from 'utils/types';
import { hasAlt, hasSrc } from 'validator/html/img';

export default function HTMLValidator(node: ChildNode): Suggestion {
  let suggestion: Suggestion = {
    node: [node],
    description: [],
  }

  if (node instanceof ProcessingInstruction) {
	...
  }

  if (node instanceof Text) {
	...
  }

  if (node instanceof Element) {
    hasSrc(suggestion);
    hasAlt(suggestion);
  }

  return suggestion;
}
(↑HTML validator)
import { ChildNode, Element } from 'domhandler';
import { ParsedCode, Suggestion } from 'utils/types';

const getImgElement = (node: ParsedCode): Element | null => {
  if (!Array.isArray(node)) return null;
  const childNode = node[0];
  if (!(childNode instanceof Element)) return null;
  if (childNode.name !== 'img') return null;
  return childNode;
}

export const hasSrc = (suggestion: Suggestion): Suggestion => {
  const imgElement = getImgElement(suggestion.node);
  if (!imgElement) return suggestion;

  if (!imgElement.attribs.hasOwnProperty('src')) {
    imgElement.attribs = { ...imgElement.attribs, 'src': './img.png' }
    suggestion.description.push(
      `please add attribute 'src' to tag 'img'`
    );
  }

  return suggestion;
}

export const hasAlt = (suggestion: Suggestion): Suggestion => {
  const imgElement = getImgElement(suggestion.node);
  if (!imgElement) return suggestion;

  if (!imgElement.attribs.hasOwnProperty('alt')) {
    imgElement.attribs = { ...imgElement.attribs, 'alt': 'my image' }
    suggestion.description.push(
        `please add attribute 'alt' to tag 'img'`
    );
  }

  return suggestion;
}
(↑간단하게 만들어 본 IMG 태그 검사 부분)
> 엎고 다시
실행을 해보니 에러가 났다. 콘솔을 찾아보니...
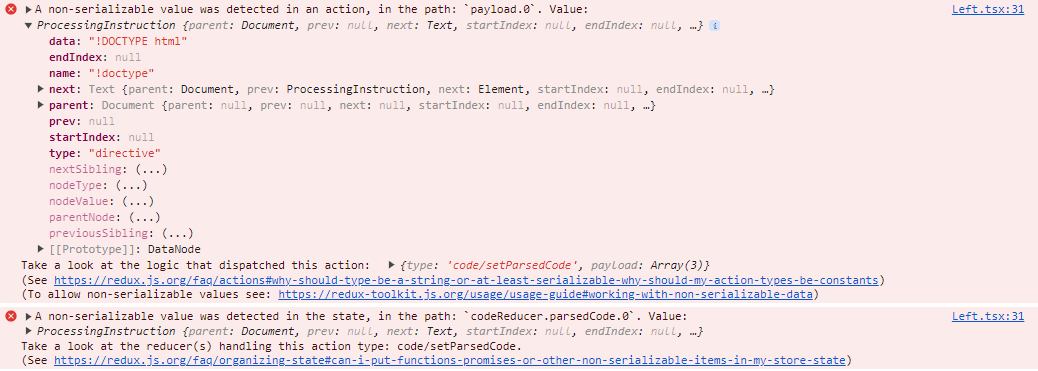
'A non-serializable value was detected in an action' = 직렬화 할 수 없는 값이 있다. 즉, 직렬화 가능한 값만 dispatch가 가능하단 말이다.
직렬화란 Object와 같은 데이터 구조를 다른 곳에서도 사용할 수 있는 String과 같은 바이트 형태로 변경하는 것인데, 배열은 0: value1, 1: value2... 과 같은 형태이기 때문에 직렬화 시 payload.0 이 되면서 위와 같은 에러가 나오는 것이다.
해결방법은 크게 두 가지가 있는데, 첫째는 미들웨어를 사용하여 직렬화 가능 여부를 체크하지 않는 것이다. 둘째는 당연하게도 직렬화가 가능한 값을 사용하는 것이다.
첫 번째 방법이 가장 간단하지만 두 번째 방법을 택했다. 이유는 사실 Suggestion 영역 구현에서 선택한 방법(토큰마다 하이라이트 적용 전 코드 검사)은 결합도가 꽤 높은 편이었다. 그래서 기왕 이렇게 된 거 먼저 전체 검사 후 하이라이트를 적용하는 방법을 택하며 이 에러 또한 함께 잡아주기로 했다.
const covertChildNodeToHtmlNode = (childNode: ChildNode | ChildNode[]): HTMLNode => {
    const _covertChildNodeToHtmlNode = (childNode: ChildNode): CustomElement | CustomText | CustomProcessingInstruction => {
      // Tag
      if (isTag(childNode)) {
        const element: CustomElement = {
          type: 'Element',
          name: childNode.name,
          attribs: childNode.attribs,
        }
        if (childNode.children !== undefined && childNode.children.length > 0) {
          element.children = covertChildNodeToHtmlNode(childNode.children);
        }
        return element;
      }
      // ProcessingInstruction
      if (isDirective(childNode)) {
        const processingInstruction: CustomProcessingInstruction = {
          type: 'ProcessingInstruction',
          name: '!doctype',
          data: '!DOCTYPE html',
        }
        return processingInstruction;
      }
      // Text
      const text: CustomText = {
        type: 'Text',
        data: (childNode as Text).data,
      }
      return text;
    }

    const HTMLNode: HTMLNode = {}

    if (Array.isArray(childNode)) {
      childNode.forEach((node: ChildNode, i) => {
        HTMLNode['node_' + i] = _covertChildNodeToHtmlNode(node);
      });
    } else {
      HTMLNode['node_1'] = _covertChildNodeToHtmlNode(childNode);
    }
    return HTMLNode;
  }
배열 대신 node_1 = ... , node_2 = ... 와 같은 형태로 변경했으며 필요한 속성만 남겨두었다.
CSS도 수정
그러고 보니 기존의 CSSNode도 [key: number]: any 구조이기에 직렬화가 되지 않을 것이 분명했다. 그래서 cssToJson 또한 수정해 주기로 했다.
import { CSSNode, CSSNodeValue } from 'utils/types';

interface Args {
  ordered: boolean;
  comments: boolean;
  stripComments: boolean;
  split: boolean;
}

/* interface Obj {
  name?: string;
  value?: CSSNode | string;
  type?: string;
} */

// const selX = /([^\s\;\{\}][^\;\{\}]*)\{/g;
// const endX = /\}/g;
// const lineX = /([^\;\{\}]*)\;/g;
const commentX = /\/\*[\s\S]*?\*\//g;
const lineAttrX = /([^\:]+):([^\;]*);/;

// This is used, a concatenation of all above. We use alternation to
// capture.
const altX = /(\/\*[\s\S]*?\*\/)|([^\s\;\{\}][^\;\{\}]*(?=\{))|(\})|([^\;\{\}]+\;(?!\s*\*\/))/gmi;

// Capture groups
let capComment = 1;
let capSelector = 2;
let capEnd = 3;
let capAttr = 4;

function isEmpty (x: any) {
  return typeof x === 'undefined' || x.length === 0 || x === null;
};

function trim(str: string) {
  return str.replace(/^\s+|\s+$/g, '');
}

export function cssToJson(cssString: string, args: Args = { ordered: true, comments: true, stripComments: true, split: true }): CSSNode {
  const node: CSSNode = {}

  let match = null;
  let count = 0;

  if (typeof args === 'undefined') {
    args = {
      ordered: false,
      comments: false,
      stripComments: false,
      split: false
    };
  }

  if (args.stripComments) {
    args.comments = false;
    cssString = cssString.replace(commentX, '');
  }

  while ((match = altX.exec(cssString)) != null) {
    if (!isEmpty(match[capComment]) && args.comments) {
      // Comment
      let add = trim(match[capComment]);
      node['rule_' + count++] = add;
    } else if (!isEmpty(match[capSelector])) {
      // New node, we recurse
      let name = match[capSelector].trim();
      // This will return when we encounter a closing brace
      let newNode = cssToJson(cssString, args);
      if (args.ordered) {
        let obj: CSSNodeValue = {
          name: name,
          value: newNode,
          type: 'rule'
        };
        // Since we must use key as index to keep order and not
        // name, this will differentiate between a Rule Node and an
        // Attribute, since both contain a name and value pair.
        node['rule_' + count++] = obj;
      } else {
        /* let bits;
        if (args.split) {
          bits = name.split(',');
        } else {
          bits = [name];
        }
        for (let i in bits) {
          let sel = trim(bits[i]);
          if (sel in node.children) {
            for (let att in newNode?.attributes) {
              node.children[sel].attributes[att] = newNode.attributes[att];
            }
          } else {
            node.children[sel] = newNode;
          }
        } */
      }
    } else if (!isEmpty(match[capEnd])) {
      // Node has finished
      return node;
    } else if (!isEmpty(match[capAttr])) {
      let line = trim(match[capAttr]);
      let attr = lineAttrX.exec(line);
      if (attr) {
        // Attribute
        let name = trim(attr[1]);
        let value = trim(attr[2]);
        if (args.ordered) {
          let obj: CSSNodeValue = {
            name: name,
            value: value,
            type: 'attr'
          };
          node['rule_' + count++] = obj;
        } else {
          /* if (name in node.attributes) {
            let currVal = node.attributes[name];
            if (!(currVal instanceof Array)) {
              node.attributes[name] = [currVal];
            } else {
              currVal.push(value);
            }
          } else {
            node.attributes[name] = value;
          } */
        }
      } else {
        // Semicolon terminated line
        node['rule_' + count++] = line;
      }
    }
  }
  return node;
}
기존에 옵션을 자유롭게 허용하던 방식은 알고 보니 리턴 형태가 완전히 달랐다. 그래서 디폴트로 모든 옵션을 true로 설정하였고, 그 리턴 형태에 코드를 맞추었다. 모든 옵션을 true로 할 경우 기존의 형태는 객체이지만 0: ... , 1: ... 와 같은 구조였다. 이는 순서를 유지하기 위함이었다. 하지만 이 형태로는 직렬화가 힘들기에 rule_0, rule_1과 같은 형태로 변경해 주었다.
> 끝
이런저런 문제가 많은 과정이었다. 코드를 다시 엎고 git을 reset 하고 타입 설계도 다시 했다. 역시 개발자는 손가락부터 움직이면 하수다. 설계가 중요하다. 심지어 타입스크립트나 redux에 대한 학습이 부족한 상태로 작업을 진행하다 보니 문제가 생길 수 밖에. 하지만 역시 개발 공부는 직접 코드를 작성해 보는 것이 최고이기에 이 과정이 많은 공부가 되었다.
📦web-accessibility-validator
 ┣ 📂public
 ┃ ┗ 📜index.html
 ┣ 📂src
 ┃ ┣ 📂components
 ┃ ┃ ┣ 📂main
 ┃ ┃ ┃ ┣ 📜Guideline.tsx
 ┃ ┃ ┃ ┣ 📜Title.tsx
 ┃ ┃ ┃ ┗ 📜Uploader.tsx
 ┃ ┃ ┣ 📂result
 ┃ ┃ ┃ ┣ 📜Box.tsx
 ┃ ┃ ┃ ┣ 📜BoxTitle.tsx
 ┃ ┃ ┃ ┣ 📜CodeBlock.tsx
 ┃ ┃ ┃ ┣ 📜Left.tsx
 ┃ ┃ ┃ ┣ 📜Result.tsx
 ┃ ┃ ┃ ┗ 📜Right.tsx
 ┃ ┃ ┗ 📜Header.tsx
 ┃ ┣ 📂highlighter
 ┃ ┃ ┣ 📜css.tsx
 ┃ ┃ ┣ 📜Highlighter.tsx
 ┃ ┃ ┗ 📜html.tsx
 ┃ ┣ 📂pages
 ┃ ┃ ┣ 📜main.tsx
 ┃ ┃ ┗ 📜result.tsx
 ┃ ┣ 📂reducers
 ┃ ┃ ┣ 📜codeSlice.tsx
 ┃ ┃ ┗ 📜store.tsx
 ┃ ┣ 📂utils
 ┃ ┃ ┣ 📜cssjson.ts
 ┃ ┃ ┗ 📜types.ts
 ┃ ┣ 📜App.tsx
 ┃ ┣ 📜globals.css
 ┃ ┣ 📜index.tsx
 ┃ ┗ 📜react-app-env.d.ts
 ┣ 📜.gitignore
 ┣ 📜package-lock.json
 ┣ 📜package.json
 ┣ 📜postcss.config.js
 ┣ 📜README.md
 ┣ 📜tailwind.config.js
 ┣ 📜tsconfig.json
 ┣ 📜web-accessibility-validator.pptx
 ┗ 📜yarn.lock
(↑현재 폴더 구조)