Chapter 01. 버전관리
1) 버전관리 시스템 (형상관리)
- Configuration Management Systems
- Version Control Systems
(1) 버전관리
- Source Data + History
- 협업, 작업추적, 복구 등이 가능
(2) Git 등장 배경
- Source Folder + 실행파일을 버전별로 카피하여 관리
- 과거 : Local Version Control Systems
- 과도기 : Centralized Version Control Systems (중앙 관리 시스템)
- 현재 : Distributed Version Control Systems (개별 관리 시스템)
(3) 개별 처리 시스템 (Distributed Version Control Systems)
- commit 하더라도 개인저장소 내에 적용됨 (다른 개발자에게 영향 없음)
- 원하는 순간에 배포(Push) 가능
- 오프라인에서도 작업 가능
- 자신만의 version history를 가짐
(4) 버전관리 시스템의 종류
- CVCS : CVS, SVN ..
- DVCS : Mercurial, Git ..
2) Git 기반의 서비스
(1) Git?
- https://git-scm.com/
- SVN 보다 빠른 속도와 많은 기능을 지원
(2) Github
- https://github.com
- Git 을 호스팅 해주는 웹 서비스, 협업을 위한 기능을 제공
- 참고 : 소스코드 보안이 중요한 경우 사용을 기피함
(3) Gitlab
- https://gitlab.com
- 설치형 버전관리 시스템 - 소스코드 보안이 중요한 기업에서 주로 사용
- 클라우드 버전 관리 시스템 - 10명 이하 무료 (Github 와 유사)
- Issue tracker, Git Remote Repository, API, Team, Group 기능 제공
Chapter 02. Installing Git
1) Installing on Windows
- Git Download
- git-scm.com/download/wi
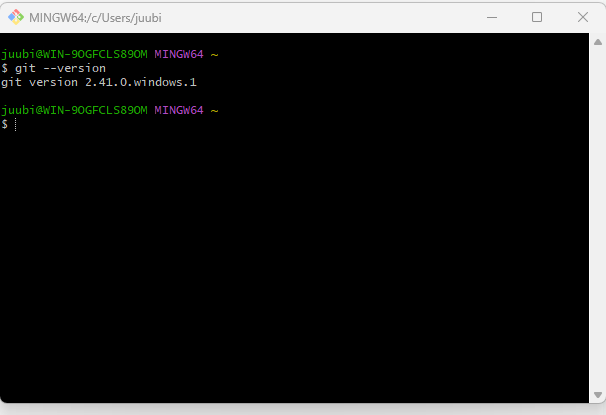
2) Git 설치 확인
- 관리자 권한으로 실행
- 시작 메뉴 > Git > Git Bash 실행
% git --version
- 터미널 환경은 anaconda prompt 보다 git bash 사용 추천
Chapter 03. Git 사용 준비
1) GitHub 가입
(1) GitHub 사이트
(2) Git 가입 확인
2) Git Global Configuration
- 내 컴퓨터 글로벌 설정값 : 기본 설정
(1) Global Username & Email
git config --global user.name <username>
git config --global user.email <email>
- 예제 :터미널에 입력
% git config --global user.name zerobasegit
% git config --global user.email zerobase.git@gmail.com
(2) CRLF - Windows
- 줄바꿈 문자로 diff 인식 차이
- Windows 사용자 주의 설정 꼭 !
: 가져올 때는 LF 를 CRLF 로 변경하고 보낼때는 CRLF 를 LF 로 변경% git config --global core.autocrlf true
- [참고] Line ending
• Windows : CR (\r) + LF (\n)
• Unix or Mac : LF (\n)
• Windows 사용자와 Mac 사용자가 같은 Git Repository 를 작업할 때
코드에서 변경된 내용이 없어도 CRLF 차이로 인해 commit 이 발생할 수 있음(3) Editor
- 디폴트 에디터 설정
git config --global core.editor <editor>
- 예제
% git config --global core.editor vim(4) 전체 설정 확인
git config --list
- 예제
% git config --list
credential.helper=osxkeychain
user.name=zerobasegit
user.email=zerobase.git@gmail.com
core.editor=vim
core.auticrlf=true
(5) 항목별 설정 확인
git config <key>
- 예제
% git config user.name
zerobasegit
3) Git 기본 용어
(1) Repository
- 프로젝트 단위
- 소스코드가 저장되어 있는 여러 개의 Branch 가 모여있는 디스크상의 물리적 공간
- Local Repository 와 Remote Repository로 구분
(2) Checkout
- 특정 시점이나 Branch 의 소스코드로 이동하는 것을 의미
- Checkout 대상 - Branch, Commit, Tag
- Checkout을 통해 과거 여러 시점의 코드로 이동이 가능
(3) Stage
- 작업할 내용이 올라가는 임시 저장 영역
- 이 영역을 이용하여 작업한 내용중 commit에 반영할 파일만 선별하여 commit을 수행할 수 있음
(4) Commit
- 작업할 내용을 Local Repository 에 저장하는 과정
- 각각의 commit 은 의미있는 변경 단위이고, 변경에 대한 설명을 commit log 로 남김 (작성 주의)
- 권장 : commit 을 아끼지 말것 ! (게임의 save point)
- 참고 : commit 단위나 commit log format 을 정해놓은 회사나 팀도 있음 (빌드 서버를 사용하는 경우)
(5) Tag
- 임의의 commit 위치에 쉽게 찾아갈 수 있도록 붙여놓은 이정표
- Tag 가 붙은 commit 은 commit id (version) 대신 tag name 으로 쉽게 checkout 가능
(6) Push
- Local Repository 의 내용 중, Remote Repository 에 반영되지 않은 commit 을 Remote Repository 로 보내는 과정
- 권장 : Push 하는 순간 다른 개발자들도 영향을 받음. 검증되지 않은 코드는 Push 하지 않도록 함
(7) Pull
- Remote Repository 에 있는 내용 중, Local Repository 에 반영되지 않은 내용을 가져와서
Local Repository 에 저장하는 과정- 다른 팀원이 변경하고 Push 한 내용을 Local Repository 에 가져올 수 있음
- 참고 : Push 과정에서 Conflict (충돌)이 일어나서 Push 가 거절된 경우,
Pull 을 통해 Remote Repository 의 변경 내용을 Local Repository 에 반영하여 Conflict 를 해결 한뒤
다시 Push 를 시도해야 함(8) Branch
- 특정 시점 (commit 단위) 에서 분기하여 새로운 commit 을 쌓을수 있는 가지를 만드는 것
- 개발의 주축이 되는 branch 를 master branch (=main branch) 라고 함
- 모든 branch는 최종적으로 다시 master branch 에 merge (병합) 되는 형식으로 진행 됨
(9) Merge
- Branch 의 반대 개념으로 하나의 Branch 를 다른 Branch 와 합치는 과정 (병합 과정)
- Merge 되는 두 Branch 는 주종관계가 성립
: Ex. dev branch 를 main branch 에 merge- Merge 되는 과정에서 Confict (충돌) 이 발생하는 경우
Diff 를 수정하여 Conflict 를 해결한 뒤 Merge 를 진행 할 수 있음
Chapter 04. Repository
1) Local Repository 구성
- Local Repository 는 Git 이 관리하는 3가지 단계로 구성되어 있음
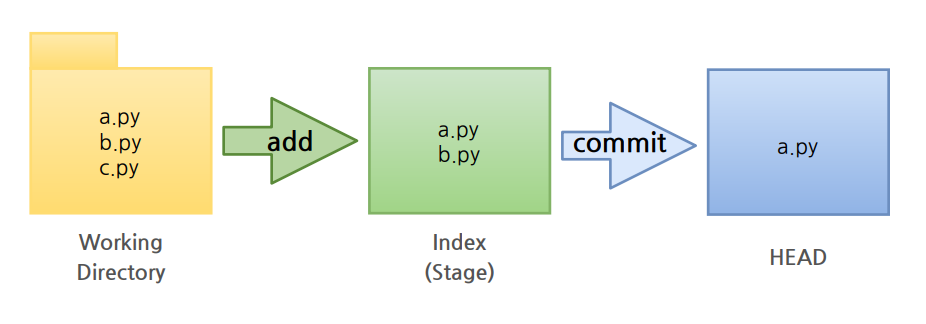
(1) Working Directory
- Working Directory (작업공간) : 실제 소스 파일, 생성한 파일들이 존재
(2) Index (Stage)
- Index (Stage) : Staging area (준비영역)의 역할, git add 한 파일들이 존재
(3) HEAD
- HEAD : 최종 확정본, git commit 한 파일들이 존재
2) Local Repository 생성
- 터미널에서 작업
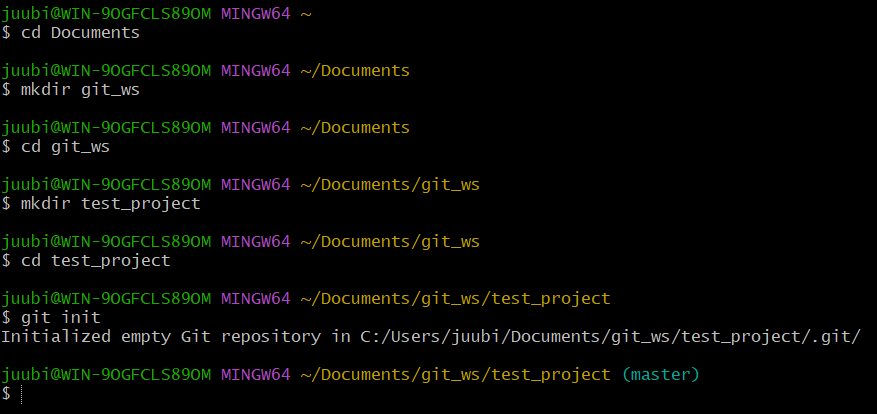
(1) Workspace 생성
% mkdir git_ws(2) Working Directory 생성
- Workspace 로 이동한 뒤 Working Directory 생성
% cd git_ws
git_ws % mkdir test_project
(3) Git init
- 폴더에서 Git 을 초기화하는 명령어를 사용하면 해당 폴더를 Git 이 관리하기 시작
git init
- 실습 : 생성한 폴더로 이동하여 Git init 을 실행하면 Repository 가 생성됨
git_ws % cd test_project
test_project % git init
Initialized empty Git repository in /Users/nomaefg/.../git_ws/.git/
(4) .git 확인
- .git 폴더가 생성된 것을 확인
→ .git 으로 이동해서 파일을 살펴보면 Git 관련 파일들이 생성된 것을 확인ls -all(5) 파일 생성
- Working Directory 에 파일을 생성
- 참고 : touch 명령어 - 빈 파일을 생성
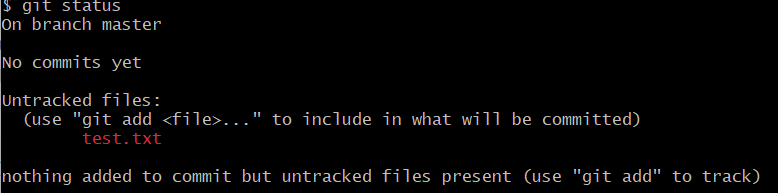
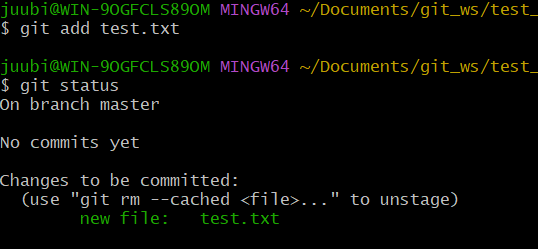
touch test.txt(6) Git Status
- Git 에 존재하는 파일 확인
- 상태 체크
(7) Git Add
- Working Directory 에서 변경된 파일을 Index (stage)에 추가
git add <filename>
- 실습
(8) Git Commit
- Index (stage) 에 추가된 변경 사항을 다시 HEAD 에 반영 (확정)
git commit -m "commit 에 대한 설명" <filename>
- 실습

3) Remote Repository 생성
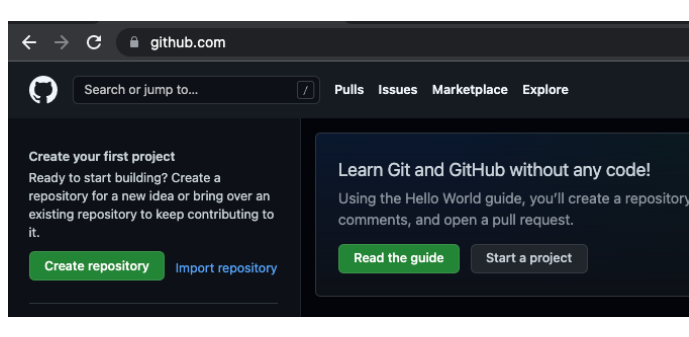
(1) git hub 페이지 접속
- 인터넷에서 사용
- Create respository 버튼 클릭
- 프로젝트 이름을 설정한 뒤 빈 프로젝트 상태로 > Create repository 클릭
(2) Github Token 생성
- 보안상의 이유로 Remote Repository 접속 시 비밀번호 대신 Token 을 사용
- 사용자 메뉴에서 Settings → Developer settings → Personal access tokens → Generate new token
- Token 이름 입력 + No expiration 을 선택 + repo 선택 → Generate token 선택
- Token 생성 완료
: 이후에는 Token 값이 보이지 않으므로 반드시 잘 복사하기
4) Remote Repository 등록
- Local Repository 에 연동할 Remote Repository 를 등록 (Token 사용)
(1) Remote Repository 주소 확인
- 왼쪽 상단 고양이를 눌러서 GitHub Home 으로 이동 → 생성해둔 Remote Repository 선택
- HTTPS 선택 확인 → 주소 복사
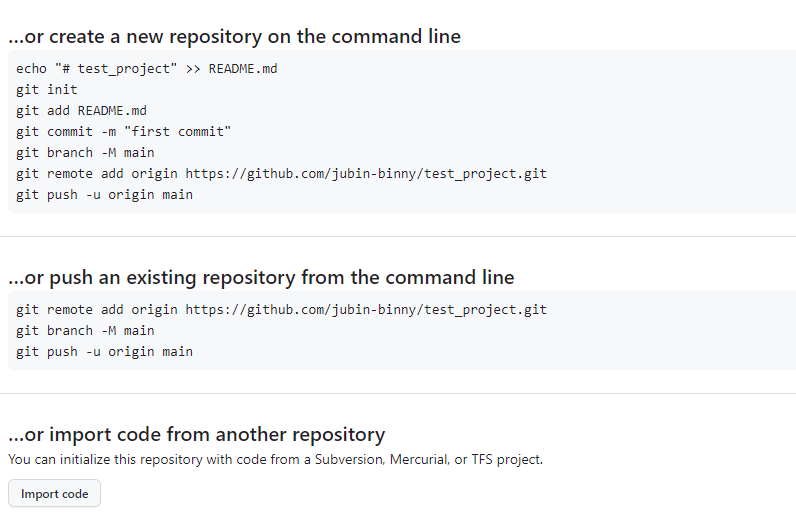
(2) Local Repository 에 Remote Repository 등록
- Remote Repository 등록
git remote add origin https://github.com/<repository>.git
- Remote Repository 등록 with Username and Token
git remote add origin https://<username>:<token>@github.com/<repository>.git
- Remote Repository 정보 확인
git remote -v
- 연결 제거
git remote remove <name>git remote remove origin
5) Remote Repository에 변경내용 Push 하기
- Local Repository (HEAD) 에 반영된 변경내용을
Remote Repository 에도 반영하기 위해서는 Git Push 를 사용
(1) Git Push
git push origin <branchname>
- Git Push 실습
git push origin master
- master 혹은 main 사용
(2) Remote Repository 확인
- Remote Repository 페이지에서 새로고침 하면 Push 된 파일이 보임
6) Remote Repository에 Pull 하기
- Remote Repository 의 내용에 맞춰 Local Repository 를 갱신하려면 Git Pull 사용
(1) ReadMe 파일 생성
- Add a README 버튼 클릭
→ 내용 확인 (모두 Default 설정으로)
→ 하단의 Commit new file 버튼 선택
→ README 파일 생성 확인(2) Git Pull
git pull origin <branchname>
- 실습 : ReadMe 파일을 Local Repository 로 Pull
git pull origin master(3) 확인
- ls 사용
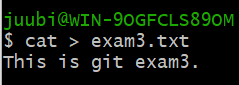
7) 예제 : 혼자 해봅시다 !
- git add commit push pull
- $ cat exam.txt
(1) Local Repository 생성하기
(2) 파일 생성 후 Git으로 관리 시작하기
(3) Remote Repository 생성하기
(4) Remote Repository 등록 하기
(5) Local Repository 변경 내용을 Remote Repository에 반영하기
(6) Remote Repository 변경 내용을 Local Repository에 반영하기
(7) Commit 만들고 각각을 Local과 Remote에 반영하기
Chapter 05. Remote Repository
1) Remote Repository
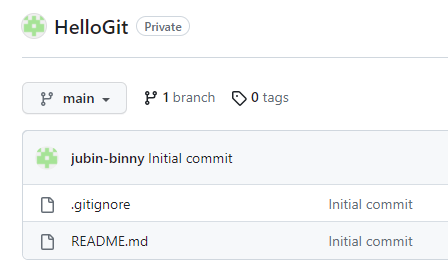
(1) 환경 만들기 : HelloGit 생성
- Git Home 에서 Repositoreis 'New' 버튼 선택
(2) 참고 : README File
- 프로젝트에 대한 설명, 사용방법, 라이센스, 설치방법 등에 대한 내용을 기술하는 파일
- 나, 직장동료, 프로그램 사용자를 위해 존재
- 협업을 위해 기본적인 내용들을 작성
(3) 참고 : .gitignore
- Git 버전 관리에서 제외할 파일목록을 지정하는 파일
- 사용자가 원하지 않는 파일들을 자동으로 commit 대상에서 제외시켜 줌
- 언어별로 작성 가능
2) Default Branch
- 하나의 Repository가 생성될 때 기본으로 생성되는 Branch
(1) Main or Master
- Git에서는 Master
- GitHub에서는 Main
(2) View all branches
- Main or Master로 수정 가능
- 다른 팀원들까지 영향을 받기 때문에 → 수정은 신중해야 함
- 회사별로 하나로 통일하는 경우도 있음
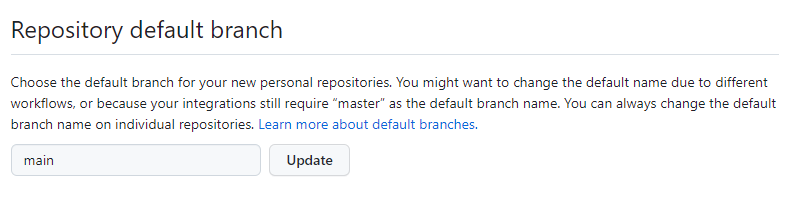
(3) Default Branch 설정
- Remote Repository를 생성할 때 Default Branch 이름을 설정할 수 있음
- 사용자 메뉴 > Settings > Repository > Repository default branch
3) Remote Repository 복제
- Local Repository를 생성하지 않은 상태에서
- Git Clone 명령을 사용 : Remote Repository를 Local에 복제할 수 있음
(1) Git Clone
- 앞서 폴더를 만들고
→ Git Init으로 해당 폴더를 초기화
→ Remote Repository를 등록
→ Remote Repository의 내용을 Pull- 위 모든 과정을 Git Clone으로 할 수 있음
git clone https://github.com/<repository>.git(2) Git Clone with username and token
git clone https://<username>:<token>@github.com/<repository>.git(3) 실습
- Remote Repository 주소 복사 (HTTPS)
- Workspace 로 이동하여 Clone
: change directory .. : 상위 폴더로 이동 → git clonecd ..
- Local Repository 생성 확인
ls
ls -all
4) Branch
- 병행 작업, 개발 테스트 용도 등
(1) Branch 조회 (Local Branch)
- Local Repository의 Branch만 조회
git branch(2) Branch 조회 (Remote Branch)
- -r 옵션 (remote)
git branch -r(3) Branch 조회 (Local + Remote)
- -a 옵션 (all)
git branch -a(4) Branch 생성 (Local)
git branch <branchname>(5) Branch 이동
git checkout <branchname>(6) Branch 생성 + 이동
- -b 옵션 (branch)
git checkout -b <branchname>
- 생성+이동 결과 확인 : branch 조회
git branch(7) GitHub에서 Branch 확인
- Local Repository에 생성된 Branch는 Remote Repository (GitHub)에서 보이지 않음
(8) Branch 생성 (Remote)
- (위 참고) remote에도 branch 생성
- GitHub에서 Branch 생성 확인
git push origin <branchname>(9) Branch 삭제 (Local Repository)
- -d 옵션 (delete)
git branch -d <branchname>(10) Branch 삭제 (Remote Repository)
git push origin --delete <branchname>
5) 예제 - 혼자서 해봅시다 !
(1) Remote Repository 생성
(2) Local 에 Clone
(3) Branch 생성 후 이동
(4) Branch Push
(5) Local Branch 삭제
(6) 남은 Local Branch 모두 삭제
(7) Remote Branch 모두 삭제
Chapter 06. Installing VSCode
Chapter 07. Log and Diff
Chapter 08. Merge and Conflict
Chapter 09. Tag
Chapter 10. README

물음표 말고 느낌표 !