시작
앞서 구현한 키 서비스를 토대로 키 바인더 UI를 제작할 차례다.
만약 UI로 사용하기에 적절한 이미지가 없다면 아래의 이미지를 사용하도록 하자.

여기에서 말했듯이 키 바인더 UI는 MVP 패턴을 이용한다. 하지만 키 바인더 UI는 각각의 키 바인더 슬롯을 묶어주는 컨테이너의 역할이 강하며, 실제로는 키 바인더 슬롯의 비중이 더 크다.
키 바인더 슬롯의 비중이 크긴 하지만 이를 또 MVP 패턴을 사용할만큼 복잡하진 않기 때문에 키 바인더 UI만 MVP 패턴을 이용하고 키 바인더 슬롯은 유니티스럽게 구현해본다.
View
키 바인더의 View도 여러 상황에서 다양한 형태로 쓰일 수 있기 때문에 인터페이스를 우선적으로 구현한다.
public interface IPopupView
{
    void SetDepth();
    void PopupCloseUI();
}
public interface IKeyBinderView : IPopupView
{
void Inject(KeyBinderPresenter presenter);
void OpenUI();
void CloseUI();
}IPopupView는 앞서 말했듯이 팝업 UI의 View 자체에서의 비활성화를 PopupUIManager에서의 비활성화와 동기화시키기 위해 필요한 메서드를 포함한다.
키 바인더 UI는 닫기 버튼이 있을 예정이므로 IPopupView를 구현한다.
using UnityEngine;
using UnityEngine.UI;
[RequireComponent(typeof(Animator))]
public class KeyBinderView : MonoBehaviour, IKeyBinderView
{
[Header("팝업 UI 매니저")]
[SerializeField] private PopupUIManager m_ui_manager;
[Header("UI 닫기 버튼")]
[SerializeField] private Button m_close_button;
private Animator m_animator;
private KeyBinderPresenter m_presenter;
private void Awake()
{
m_animator = GetComponent<Animator>();
}
// Inject()를 통해서 프레젠터를 주입받는다.
public void Inject(KeyBinderPresenter presenter)
{
m_presenter = presenter;
// 닫기 버튼에 PopupUIManager의 상태를 동기화시킬 이벤트들을 등록한다.
m_close_button.onClick.AddListener(m_presenter.CloseUI);
m_close_button.onClick.AddListener(PopupCloseUI);
}
public void OpenUI()
{
m_animator.SetBool("Open", true);
}
public void CloseUI()
{
m_animator.SetBool("Open", false);
}
// UI의 깊이를 설정한다. 얼마만큼 가려지고 얼마만큼 노출될지를 결정한다.
public void SetDepth()
{
(transform as RectTransform).SetAsFirstSibling();
}
// 프레젠터를 링크드 리스트에서 강제로 제거하는 역할을 한다.
public void PopupCloseUI()
{
m_ui_manager.RemovePresenter(m_presenter);
}
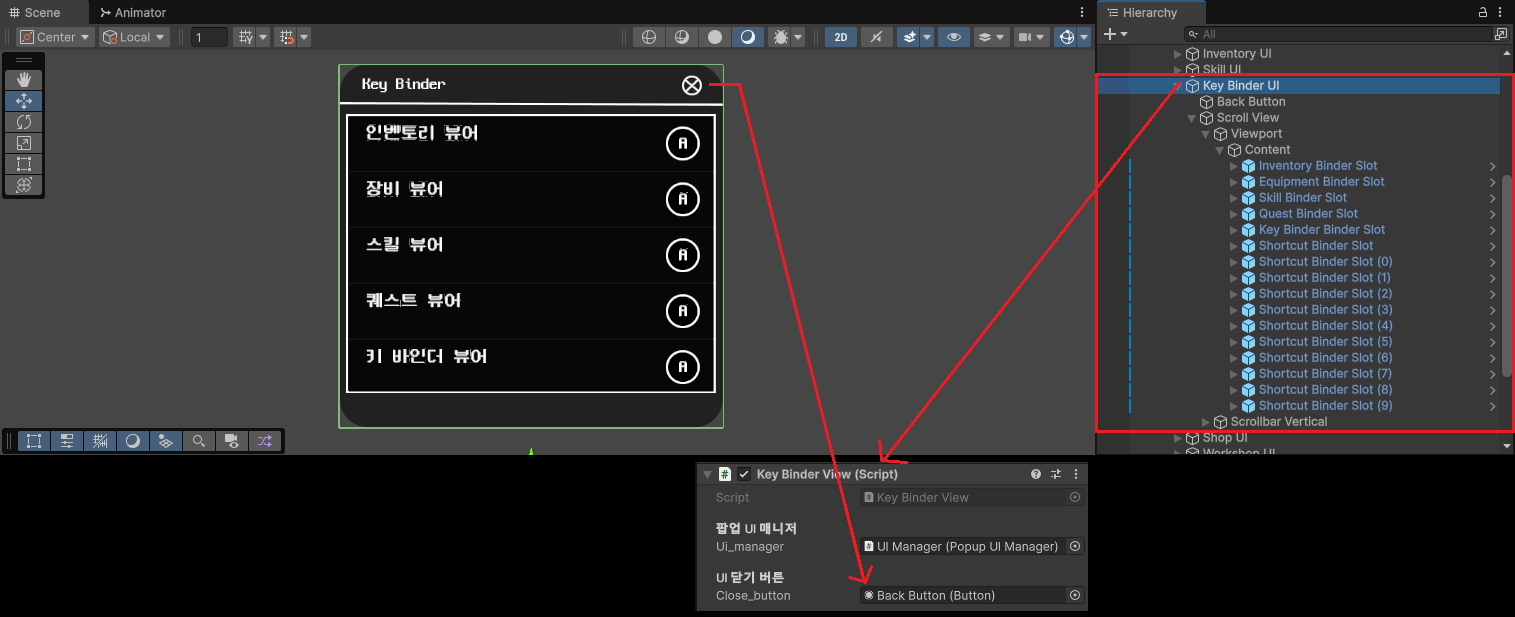
}그리고 이를 토대로 아래와 같이 키 바인더 UI를 구성한다.
Presenter
Presenter는 단순히 View를 활성화 및 비활성화하는 책임만을 가지기 때문에 비교적 단순하다.
public class KeyBinderPresenter : IPopupPresenter
{
    private readonly IKeyBinderView m_view;

	// 생성자를 통해 View를 주입받는다.
    public KeyBinderPresenter(IKeyBinderView view)
    {
        m_view = view;
        m_view.Inject(this);
    }

    public void OpenUI()
    {
        m_view.OpenUI();
    }

    public void CloseUI()
    {
        m_view.CloseUI();
    }

	// View의 깊이를 설정한다.
    public void SortDepth()
    {
        m_view.SetDepth();
    }
}
키 바인더 슬롯
키 바인더 슬롯이 사실 상 키 바인딩 시스템의 전부라고 봐도 무방하다. 키 바인더 슬롯의 역할이 그만큼 크며 로직의 대부분을 담고 있다.
using System;
using System.Collections;
using KeyService;
using TMPro;
using UnityEngine;
using UnityEngine.UI;
public class KeyBinderSlotView : MonoBehaviour
{
private KeyCode m_origin_key_code;
private IKeyService m_key_service;
[Header("매핑 문자열")]
[SerializeField] private string m_key_name;
[Header("바인딩 버튼")]
[SerializeField] private Button m_binding_button;
[Header("버튼 텍스트")]
[SerializeField] private TMP_Text m_button_text;
[Header("예외 텍스트")]
[SerializeField] private TMP_Text m_wrong_text;
private Coroutine m_wrong_key_coroutine;
private void Awake()
{
// 바인딩 버튼에 키 변경 이벤트를 등록한다.
m_binding_button.onClick.AddListener(ModifyKey);
}
// Inject()를 통해서 키 서비스를 주입받는다.
public void Inject(IKeyService key_service)
{
m_key_service = key_service;
// 처음의 키 코드는 인스펙터에서 입력받은 문자열을 통해서 얻어낸다.
m_origin_key_code = m_key_service.GetKeyCode(m_key_name);
// 그리고 이 키 코드를 이용하여 현재 키를 사용자에게 보여준다.
m_button_text.text = ((char)m_origin_key_code).ToString().ToUpper();
}
// 키를 변경할 때 사용한다.
public void ModifyKey()
{
// 키가 변경 중임을 기존의 키에서 '-'으로 변경하여 나타낸다.
m_button_text.text = "-";
// 실제 키가 변경되는 코루틴이다.
StartCoroutine(Co_AssignKey());
}
private IEnumerator Co_AssignKey()
{
// 버튼이 선택되어 있는 동안 발생하며
while (true)
{
// 아무 키를 입력받고
if (Input.anyKeyDown)
{
// 그 키에 해당하는 키 코드가 있는지 확인한다.
foreach (KeyCode code in Enum.GetValues(typeof(KeyCode)))
{
// 만약 해당하는 키 코드가 있다면
if (Input.GetKey(code))
{
// 변경이 가능한 유효한 키인지의 여부를 확인한다.
if (m_key_service.Check(code, m_origin_key_code))
{
// 유효하다면 그 키를 등록하는 과정을 거친다.
m_key_service.Register(code, m_key_name);
m_origin_key_code = code;
m_button_text.text = ((char)m_origin_key_code).ToString().ToUpper();
}
else
{
// 유효하지 않다면 이전의 바인딩된 키로 돌아가는 과정을 거친다.
// 추가적으로, 사용자에게 잘못된 입력임을 나타낸다.
// 여기서는 코루틴을 활용하여 에러 메시지를 발생시킨다.
m_button_text.text = ((char)m_origin_key_code).ToString().ToUpper();
if (m_wrong_key_coroutine != null)
{
StopCoroutine(m_wrong_key_coroutine);
m_wrong_key_coroutine = null;
}
m_wrong_key_coroutine = StartCoroutine(Co_WrongKey());
}
break;
}
}
yield break;
}
yield return null;
}
}
// 잘못된 키 입력임을 에러 메시지로 발생시키는 코루틴이다.
private IEnumerator Co_WrongKey()
{
float elapsed_time = 0f;
float target_time = 1f;
while (elapsed_time < target_time)
{
float delta = elapsed_time / target_time;
SetAlpha(delta);
elapsed_time += Time.deltaTime;
yield return null;
}
SetAlpha(1f);
elapsed_time = 0f;
while (elapsed_time < target_time)
{
float delta = elapsed_time / target_time;
SetAlpha(1 - delta);
elapsed_time += Time.deltaTime;
yield return null;
}
SetAlpha(0f);
m_wrong_key_coroutine = null;
}
private void SetAlpha(float alpha)
{
var color = m_wrong_text.color;
color.a = alpha;
m_wrong_text.color = color;
}
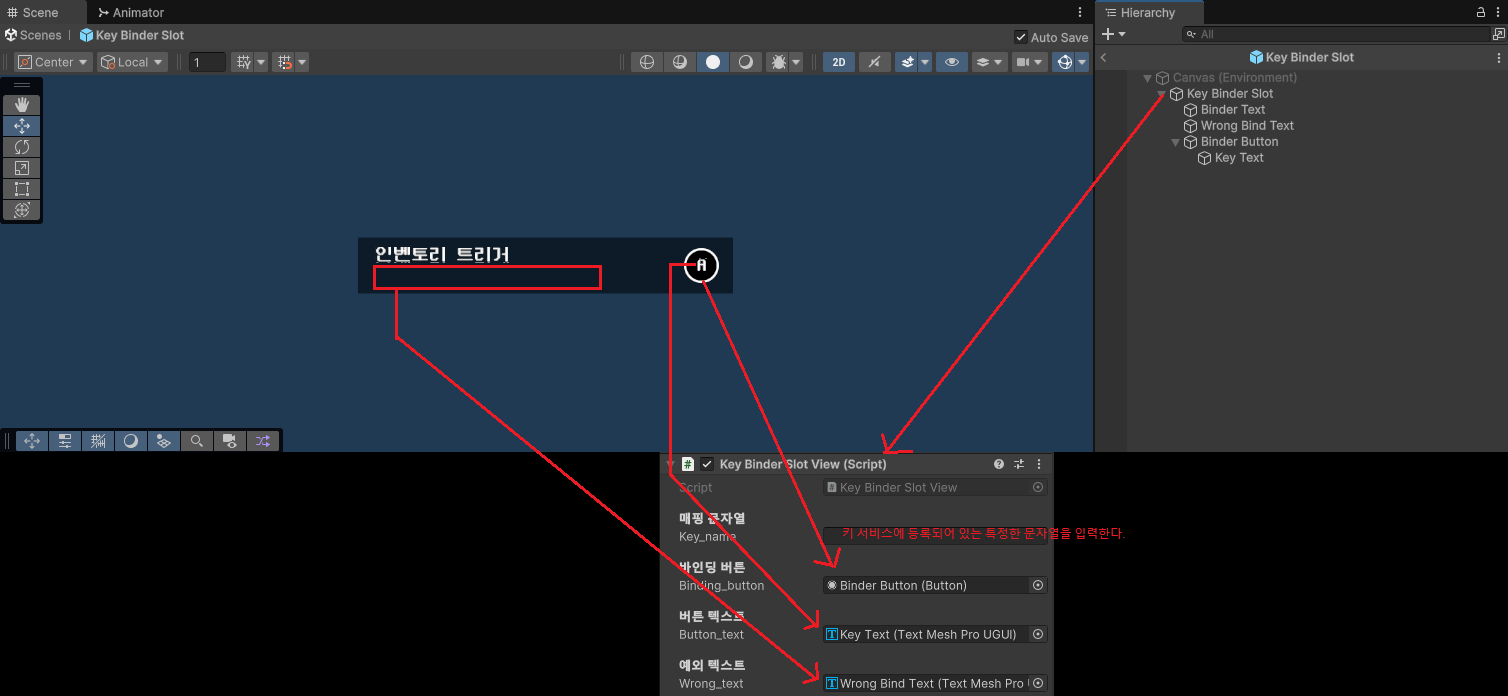
}이를 토대로 다음과 같이 키 바인더 슬롯 UI를 구성한다.
이 키 바인더 슬롯 UI를 키 바인더 UI의 Content 하위의 자식으로 복사하여 원하는 개수만큼의 키 바인더 슬롯 UI를 생성하고 설정한다.
인스톨러 등록
KeyBinderUIInstaller를 생성한 후 다음과 같이 작성을 한다. 그리고 KeyBinderUIInstaller를 Bootstrapper 하위의 자식으로 배치하고 인스펙터에서 알맞게 컴포넌트를 할당한다.
using KeyService;
using UnityEngine;

public class KeyBinderUIInstaller : MonoBehaviour, IInstaller
{
    [Header("키 바인더 뷰")]
    [SerializeField] private KeyBinderView m_key_binder_view;

    [Header("키 바인더 슬롯의 부모 트랜스폼")]
    [SerializeField] private Transform m_key_binder_slot_root;

    public void Install()
    {
        DIContainer.Register<IKeyBinderView>(m_key_binder_view);

        var key_binder_presenter = new KeyBinderPresenter(m_key_binder_view);
        DIContainer.Register<KeyBinderPresenter>(key_binder_presenter);

        var key_binder_slots = m_key_binder_slot_root.GetComponentsInChildren<KeyBinderSlotView>();
        foreach (var slot in key_binder_slots)
        {
            slot.Inject(ServiceLocator.Get<IKeyService>());
        }
    }
}
마무리
이 과정을 모두 마무리했다면 다음과 같이 제대로 실행은 될 것이지만, 아쉽게도 지금은 저렇게 불가능하다.
키 바인더 UI를 활성화 및 비활성화해야 하지만 이것은 PopupUIManager가 있어야 가능하기 때문이다. 다음 글에서 PopupUIManager를 구현하고 키 바인딩 시스템을 완성해보자.