
이전에도 언급했지만, 내가 필사하고 있는 커널은 다음과 같다.
Face Mask Detection-Using PyTorch
Images Identification with Target Class
3개의 클래스별로 색을 설정!
- Red = without mask
- Greem = with mask
- Yellow = mask weared incorrect
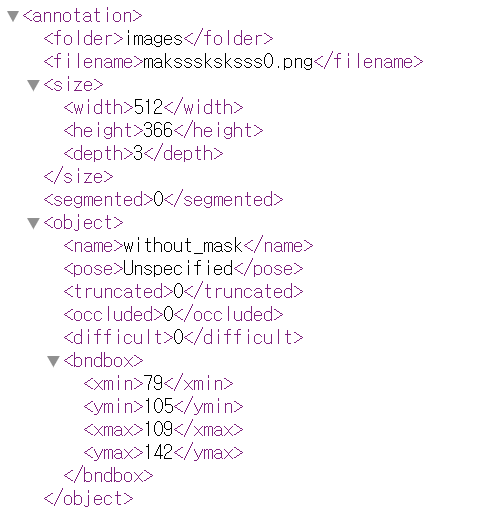
코드의 수월한 이해를 위해 annotation(xml)파일 구조를 한번 더 첨부한다. - annotation/object에 class명 저장
- annotation/bndbox에 ground truth 박스 크기에 대한 정보가 저장
이번 셀은 길어서 사진과 설명을 첨부하지 않고, 코드에 주석을 세세히 달았다.
path_image = "/content/drive/MyDrive/input/images/"

def face_cas(img):
	#여기는 이전과 동일
  with open(path_annotations + img[:-4] + ".xml") as fd:
    doc = xmltodict.parse(fd.read()) #parse = xml→dictionary

  image=plt.imread(os.path.join(path_image+img)) #각각 이미지 불러오기

  fig, ax = plt.subplots(1) #1개 그래프 -
  ax.axis("off") #axis 없애기
  fig.set_size_inches(10,5) #생성된 figure의 사이즈 변경
  temp = doc["annotation"]["object"]

  #temp가 리스트형식이면 = 하나의 이미지에 여러명의 사람이 있다면
  if type(temp) == list:
  	#이미지에 존재하는 사람 수만큼 반복
    for i in range(len(temp)):

      ### with mask
      if temp[i]["name"] == "with_mask":
      	#ground truth 박스 크키 정보 저장
		#x=xmin, y=ymin, w=xmax, h=ymax
        x,y,w,h = list(map(int, temp[i]["bndbox"].values()))
        #bounding box 그리기!
		# (x,y)=시작점, 가로길이, 세로길이, 선 두께, 선의 색(green), 면의 색(없음), 선 두께
        mpatch=mpatches.Rectangle((x,y), w-x, h-y,linewidth=1, edgecolor = 'g',
                                  facecolor = "none", lw=2,)
        #add_patch()로 mpatch 시각화
        ax.add_patch(mpatch)
        rx, ry = mpatch.get_xy()
        #annotation 붙이기 withmask = 초록색
        ax.annotate("with_mask", (rx, ry), color = 'green', weight = 'bold',
                    fontsize=10, ha = 'left', va = 'baseline')


      ### without mask
      if temp[i]["name"] == "without_mask":
        x, y, w, h = list(map(int, temp[i]["bndbox"].values()))
        mpatch = mpatches.Rectangle((x,y), w-x, h-y, linewidth=1, edgecolor = 'r',
                                    facecolor="none", lw=2,)
        ax.add_patch(mpatch)
        rx,ry = mpatch.get_xy()
        ax.annotate("without_mask", (rx, ry), color='red', weight='bold',
                    fontsize =10, ha = 'left', va = 'baseline')


      ### mask_weared_incorrect
      if temp[i]["name"] == "mask_weared_incorrect":
        x, y, w, h = list(map(int, temp[i]["bndbox"].values()))
        mpatch=mpatches.Rectangle((x,y),w-x,h-y, linewidth=1, edgecolor = 'y',
                                  facecolor="none", lw=2,)
        ax.add_patch(mpatch)
        rx, ry = mpatch.get_xy()
        ax.annotate("mask_weared_incorrect", (rx,ry), color='yellow', weight='bold',
                    fontsize=10, ha = 'left', va = 'baseline')


  #temp가 list가 아니면, = 사람이 1명!
  else:
  	#ground truth 박스 정보 가져오고 시각화하기
    x,y,w,h = list(map(int, temp["bndbox"].values()))
    edgecolor = {"with_mask":"g",
                 "without_mask":"r",
                 "mask_weared_incorrect":"y"}
    mpatch=mpatches.Rectangle((x,y),w-x,h-y,linewidth=1,
                              edgecolor = edgecolor[temp["name"]], facecolor="none",)
  ax.imshow(image)
  ax.add_patch(mpatch)


fun_images = img_names.copy()
#이미지 8개에 대해 face_cas()실행해보기
for i in range(1,8):
    face_cas(fun_images[i])
결과 이미지 中
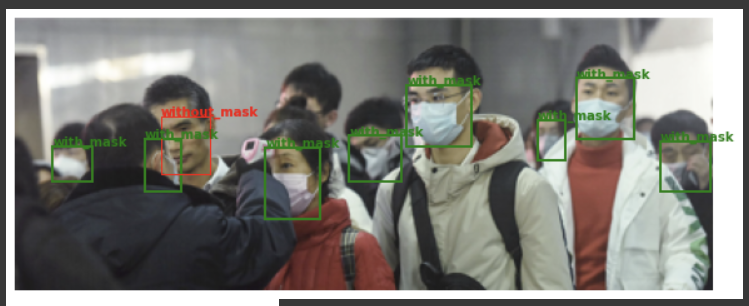
Image Preprocessing
이미지 전처리에는 PyTorch를 사용한다!
- 클래스별로 라벨 생성
options={"with_mask":0,"without_mask":1,"mask_weared_incorrect":2} def dataset_creation(image_list):
image_tensor=[]
label_tensor=[]
for i,j in enumerate(image_list): #인덱스와 원소 동시 접근
with open(path_annotations+j[:-4]+".xml") as fd:
#XML → dictionary
doc=xmltodict.parse(fd.read())
#한명이면
if type(doc["annotation"]["object"])!=list:
temp=doc["annotation"]["object"]
#bouning box의 x,y,w,h 값 저장
x,y,w,h=list(map(int,temp["bndbox"].values()))
#해당 이미지 클래스의 라벨 저장
label=options[temp["name"]]
#input image 특정한 위치로 cropping하고 tensor타입으로 리턴
image=transforms.functional.crop(Image.open(path_image+j).convert("RGB"), y,x,h-y,w-x)
image_tensor.append(my_transform(image))
label_tensor.append(torch.tensor(label))
#여러명이면
else:
temp=doc["annotation"]["object"]
#사람 수만큼 반복
for k in range(len(temp)):
x,y,w,h=list(map(int,temp[k]["bndbox"].values()))
label=options[temp[k]["name"]]
image=transforms.functional.crop(Image.open(path_image+j).convert("RGB"),y,x,h-y,w-x)
image_tensor.append(my_transform(image))
label_tensor.append(torch.tensor(label))
final_dataset=[[k,l] for k,l in zip(image_tensor,label_tensor)]
return tuple(final_dataset)
my_transform=transforms.Compose([transforms.Resize((226,226)),
transforms.ToTensor()])
mydataset=dataset_creation(img_names)Splitting Dataset into Training and Test Set
train data size는 70%,
test data size는 30%로 split할 것이다.
각각 그에 따른 데이터셋 크기 확인
train_size=int(len(mydataset)*0.7)
test_size=len(mydataset)-train_size
print('Length of dataset is', len(mydataset),
      '\nLength of training set is :',train_size,
      '\nLength of test set is :', test_size)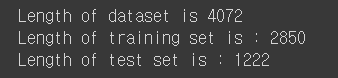
데이터를 겹치지 않고 랜덤하게 split하기 위해 torch.utils.data.random_split()함수 이용
trainset,testset=torch.utils.data.random_split(mydataset,[train_size,test_size])Samples in Training Set
Reference
https://matplotlib.org/stable/api/patches_api.html
https://pytorch.org/vision/stable/transforms.html
https://codetorial.net/articles/matplotlib_patches.html

멋쟁이가 될테야