학습한 내용
편집기 관련
- EidtPlus, atom, VS(Visual Studio), DW(Dreamweaver), Eclipse
- atom 패키지 단축기 변경 시, 해당 패키지 view code -> keymaps 로 변경
태그 관련
<h1>~<h6> 태그는 웬만하면 하나씩 차근차근 내려오면서 사용하기
<form> : 서버 전송 관련, method 속성을 통해 서버 전달 방식 결정
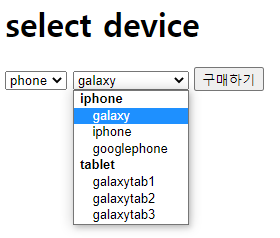
<select> 와 <option> 은 보통 같이 사용, 각각 name 과 value 속성은 리스트의 이름을 명시함, selcted 속성 설정 시, 그 값을 기본 선택값으로 설정
<optgroup label=""> : 선택 불가능한 대분류를 나타냄

<input>
<select>처럼<form>태그 안에서 사용되는 입력 양식- 다양한 속성(
type,min,max,step,value등)이 있음 placeholder속성으로 입력 양식 설명pattern입력할 값의 범위 설정 가능type속성으로 현재 입력되는 값의 종류 설정
(text, tel, email, datetime-local, time, color, file등)

<table>
-
자식 태그로
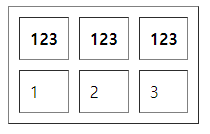
<tr>,<th>,<td>태그 사용, 표가 깨지지 않게 태그 갯수를 맞춰줘야함
 -> 임의로
 cellpadding="10" cellspacing="10" border="1"속성을 적용 -
열 병합은
colspan속성, 행 병합은rowsapn속성
<label>
for속성을 통해 포커스 이동 ,<input>태그의id속성을 통해 연동 가능,
<dl>,<dt>,<dd>
- 설명 목록을 만들때 사용
<dl>부모 태그,<dt>와<dd>는 각각 이름과 값(설명)인 자식 태그
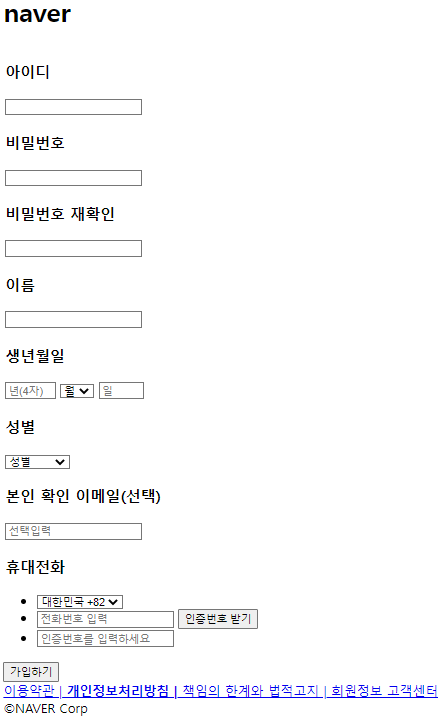
네이버 회원가입 페이지 카피캣
<body>
<h1>naver</h1>
<form>
<table>
<tr>
<td>
<h3>
<label for="id">아이디</label>
</h3>
<input type="text" id="id" name="id" required>
</td>
</tr>
<tr>
<td>
<h3>
<label for="pw">비밀번호</label>
</h3>
<input type="password" id="pw" name="pw" required>
</td>
</tr>
<tr>
<td>
<h3>
<label for="repw">비밀번호 재확인</label>
</h3>
<input type="password" id="repw" name="repw" required>
</td>
</tr>
<tr>
<td>
<h3>
<label for="user_name">이름</label>
</h3>
<input type="text" id="user_name" name="user_name" required>
</td>
</tr>
<tr>
<td>
<h3>
<label for="year">생년월일</label>
</h3>
<div class="input-group">
<input type="text" id="year" name="year" size="4" maxlength="4" placeholder="년(4자)">
<select id="month" name="month">
<option value="월">월</option>
<option value="1">1</option>
<option value="2">2</option>
<option value="3">3</option>
<option value="4">4</option>
<option value="5">5</option>
<option value="6">6</option>
<option value="7">7</option>
<option value="8">8</option>
<option value="9">9</option>
<option value="10">10</option>
<option value="11">11</option>
<option value="12">12</option>
</select>
<input type="text" id="day" name="day" size="3" maxlength="2" placeholder="일">
</div>
</td>
</tr>
<tr>
<td>
<h3>
<label for="gender">성별</label>
</h3>
<select id="gender" name="gender">
<option value="gender">성별</option>
<option value="male">남자</option>
<option value="female">여자</option>
<option value="notgender">선택안함</option>
</select>
</td>
</tr>
<tr>
<td>
<h3>
<label for="email">본인 확인 이메일<span class="select">(선택)</span></label>
</h3>
<input type="email" id="email" name="emlail" placeholder="선택입력">
</td>
</tr>
<tr>
<td>
<h3>
<label for="phone">휴대전화</label>
</h3>
<ul>
<li>
<select id="local_number" name="local_number">
<option value="일본 +81">일본 +81</option>
<option value="홍콩 +852">홍콩 +852</option>
<option value="대한민국 +82" selected>대한민국 +82</option>
</select>
</li>
<li>
<input type="tel" id="phone" name="phone" pattern="[0-9]{3}-[0-9]{4}-[0-9]{4}" placeholder="전화번호 입력">
<button type="button">인증번호 받기</button>
</li>
<li>
<input type="text" id="auth-num" name="auth-num" maxlength="4" placeholder="인증번호를 입력하세요">
</li>
</ul>
</td>
</tr>
</table>
<button type="submit">가입하기</button>
</form>
<footer>
<table>
<tr><a href="#">이용약관 |</a></tr>
<tr><a href="#"><strong> 개인정보처리방침 |</strong></a></tr>
<tr><a href="#"> 책임의 한계와 법적고지 |</a></tr>
<tr><a href="#"> 회원정보 고객센터</a></tr>
</table>
©NAVER Corp
</footer>
</body>
CSS 관련
- CSS를 적용시키는 방법은 3가지
- 태그들에 직접 CSS를 적용시키는 방법
<body style="background-color: blue; color: white">
  test
</body>- style.css 파일을 새로 만들어 적용시키는 방법
(HTML 문서)
<head>
  <link rel="stylesheet" href="css/style.css">
</head>

<body>
  test
</body>
(CSS 문서)
body {
  background-color: blue;
  color:white;
}<style>태그를 통해, 한 문서에서 적용하는 방법
<head>
  <style>
    body {
      background-color: blue;
      color: white;
    }
  </style>
</head>

<body>
  test
</body>
Do it 웹 표준의 정석 : 82p ~ 98p, 122p ~ 162p
