
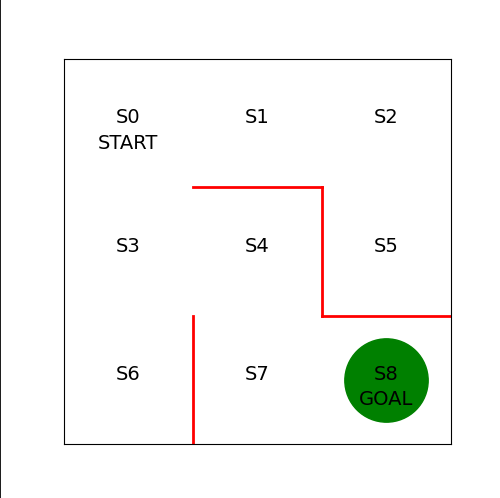
미로 구현
import numpy as np
import matplotlib.pyplot as plt
%matplotlib inline

fig = plt.figure(figsize=(5,5))
ax = plt.gca()

# 붉은 벽 그리기
plt.plot([1,1], [0,1], color = 'red', linewidth=2)
plt.plot([1,2], [2,2], color = 'red', linewidth=2)
plt.plot([2,2], [2,1], color = 'red', linewidth=2)
plt.plot([2,3], [1,1], color = 'red', linewidth=2)

plt.text(0.5, 2.5, "S0", size = 14, ha ='center')
plt.text(1.5, 2.5, "S1", size = 14, ha ='center')
plt.text(2.5, 2.5, "S2", size = 14, ha ='center')
plt.text(0.5, 1.5, "S3", size = 14, ha ='center')
plt.text(1.5, 1.5, "S4", size = 14, ha ='center')
plt.text(2.5, 1.5, "S5", size = 14, ha ='center')
plt.text(0.5, 0.5, "S0", size = 14, ha ='center')
plt.text(1.5, 0.5, "S0", size = 14, ha ='center')
plt.text(2.5, 0.5, "S0", size = 14, ha ='center')
plt.text(0.5, 2.3, "START", size = 14, ha ='center')
plt.text(2.5, 0.3, "GOAL", size = 14, ha ='center')

ax.set_xlim(0, 3)
ax.set_ylim(0, 3)
plt.tick_params(axis = "both", which ='both', bottom = False, top = False, labelbottom = False, right = False, left = False, labelleft = False)

line, =ax.plot([0.5], [2.5], marker = "o", color = 'g', markersize = 60)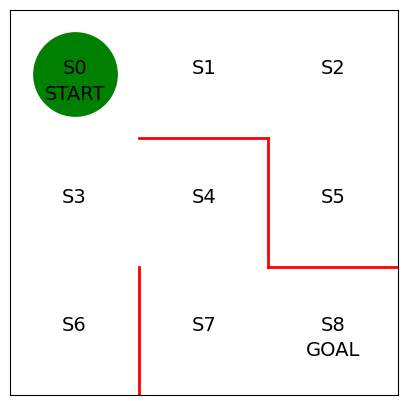
에이전트 구현
- 강화학습에서 에이전트가 어떻게 행동할지를 결정하는 규칙을
정책(Policy)이라고 한다 - : 상태가 일 때 행동 를 취할 확률을 파라미터 가 결정하는 정책 를 따른다
- 미로탐색의 경우 상태 는 에이전트의 미로 내 위치에 해당한다(S0 ~ S9 까지 9개의 상태)
- 행동 는 어떤 상태에 있을 때 에이전트가 취할 수 있는 행동을 나타낸다(상, 하, 좌, 우)
- 정책 는 함수나 신경망 등을 이용해 표현할 수 있다
- 여기서는 표형식 표현(tabular representation)을 사용할 것이다
- 행이 상태 , 열이 행동 를 나타낸다
- 가장 먼저 파라미터 의 초기값 을 구현한다
- 이동 가능한 방향에는 1
- 벽이 있어 이동할 수 없는 방향에는 np.nan을 대입
# 정책을 결정하는 파라미터의 초깃값 theta_0을 설정

# 줄은 상태 0~7, 열은 행동 방향(상, 우, 하, 좌)를 나타낸다
theta_0 = np.array([[np.nan, 1, 1, np.nan], # S0
                    [np.nan, 1, np.nan, 1], # S1
                    [np.nan, np.nan, 1, 1], # S1
                    [1, 1, 1, np.nan], # S3
                    [np.nan, np.nan, 1, 1], # S4
                    [1, np.nan, np.nan, np.nan], # S5
                    [1, np.nan, np.nan, np.nan], # S6
                    [1, 1, np.nan, np.nan], # S7, S8은 목표 지점이므로 정책이 없다
])- 이어서 파라미터 을 변환해서 정책 를 구한다
- 단순한 변환 방법을 택해서 이동 방향에 대한 값의 비율을 계산해서 확률로 삼는다
# 정책 파라미터 theta를 행동 정책 pi로 변환하는 함수

def simple_convert_into_pi_from_theta(theta):
    '''단순히 값의 비율을 계산'''

    [m, n] = theta.shape # theta의 행렬 크기를 구함
    pi = np.zeros((m, n))
    for i in range(0, m):
        pi[i, :] = theta[i, :] / np.nansum(theta[i, :]) # 비율 계산

    pi = np.nan_to_num(pi) # nan을 0으로 변환

return pi- 다음으로 정의한 변환 함수를 실행해 를 구한다
# 초기 정책 pi_0을 계산
pi_0 = simple_convert_into_pi_from_theta(theta_0)
pi_0
- 이번에는 에이전트가 정책 를 따라 행동하게끔 한다
- 이동 후 에이전트의 상태를 구하는 함수를 정의한다
- 미로의 위치는 0부터 8까지의 숫자로 정의, 에이전트 위로 이동시 상태의 값이 3감소하여 3을 뺀다
# 1단계 이동 후의 상태 s를 계산하는 함수

def get_next_s(pi, s):
    direction = ["up", "right", "down", "left"]

    next_direction = np.random.choice(direction, p=pi[s,:])
    # pi[s,:]의 확률에 따라, direction 값이 선택

    if next_direction == "up":
        s_next = s - 3 #위로 이동하면 상태 값 3 감소
    elif next_direction == "right":
        s_next = s + 1 # 오른쪽으로 이동하면 상태값 1 증가
    elif next_direction == "down" :
        s_next = s + 3 # 아래로 이동하면 상태 3 증가
    elif next_direction == 'left' :
        s_next = s - 1 # 왼쪽으로 이동하면 상태값이 1 줄어듬

return s_next- 마지막으로 에이전트가 목표에 도달할 때까지 에 따라 에이전트를 이동시키며 진행
- 상태 이력을
state_history리스트에 저장한다 - 마지막으로 리스트를 반환한다
# 목표 지점에 이를 때까지 에이전트를 계속 이동시킴

def goal_maze(pi):
    s = 0 # 시작 지점
    state_history = [0] # 에이전트의 경로를 기록하는 리스트

    while (1): # 목표 지점에 이를 때까지 반복
        next_s = get_next_s(pi, s)
        state_history.append(next_s) # 경로 리스트에 다음 상태(위치)를 추가

        if next_s == 8: # 목표 지점에 이르면 종료
            break
        else:
            s = next_s

return state_history- 그리고 정책 를 따라 에이전트를 이동시키고 그 과정에서 취한 행동이력을 저장한다
# 목표 지점에 이를 때까지 미로 안을 이동
state_history = goal_maze(pi_0)
print(state_history)
print("걸린 단계 수 " + str(len(state_history) - 1) + "단계")
- 마지막으로 에이전트 이동 애니메이션을 구현한다
from matplotlib import animation
from IPython.display import HTML
def init():
    '''배경 이미지 초기화'''
    line.set_data([], [])
    return (line,)

def animate(i):
    '''프레임 단위로 이미지 생성'''
    state = state_history[i] # 현재 위치
    x = (state % 3) + 0.5 # 상태의 x좌표: 3으로 나눈 나머지 + 0.5
    y = 2.5 - int(state / 3) # y 좌표 : 2.5에서 3으로 나눈 몫을 뺌
    line.set_data(x,y)
    return (line,)

# 초기화 함수와 프레임 단위 이미지 생성 함수를 이용 애니메이션 생성
anim = animation.FuncAnimation(fig, animate, init_func=init, frames=len(state_history), interval = 200, repeat = False)

AI, Security