출처: YOUTUBE: ROS 1 (07강 of 25강) - Developers and Creators
Intro
앞서 뜯어본 example_1.launch.
<?xml version="1.0" encoding="UTF-8"?>

<launch>
    <!-- launch first exmaple -->
    <node pkg="topic_tutorial" type="cmdvel_pub.py" name="drive_forward"  output="screen">
    </node>
</launch>
패키지/node/topic/launch file에 대해 배웠고,
이제 코딩에서 example1_publisher.py을 뜯어보고자 함.
publisher node 작성
cmdvel_pub.py
#! /usr/bin/env python

"""
Twist Publisher example

referenced from wiki.ros.org

url: http://wiki.ros.org/ROS/Tutorials/WritingPublisherSubscriber%28python%29
"""

import time
import rospy
from geometry_msgs.msg import Twist

rospy.init_node("drive_forward")
pub = rospy.Publisher("/cmd_vel", Twist, queue_size=1)
r = rospy.Rate(1)  # 1 Hz

forward = Twist()
stop = Twist()

forward.linear.x = 0.5
stop.linear.x = 0.0

start_time = time.time()

rospy.loginfo("==== DriveForward node Started, move forward during 5 seconds ====\n")


while not rospy.is_shutdown():
    if time.time() - start_time < 5.0:
        pub.publish(forward)
    else:
        rospy.logwarn(" 5 seconds left, Stop!! ")
        pub.publish(stop)
        break
r.sleep()- shebang line: python file임을 알려주기 위해 넣음. windows에서는 의미 없다고 함.
#! /usr/bin/env python- 파이썬 ros 프로그래밍을 위한
rospy: 전에 살펴본 message type인 Twist를 import 하고 있음.
	import time
	import rospy
	from geometry_msgs.msg import Twist
실제 구현 시 message type과 import 코드가 어떻게 작성되는지 확인하시길↓↓ $ rosnode info /drive_forward
--------------------------------------------------------------------------------
Node [/drive_forward]
Publications:
* /cmd_vel [geometry_msgs/Twist]
* /rosout [rosgraph_msgs/Log]- publisher node 생성
	rospy.init_node('drive_forward')
	pub = rospy.Publisher('/cmd_vel', Twist, queue_size=1 )
	r = rospy.Rate(1)
이때, init_node API를 통해 node를 생성하고, 이 안에 들어가는 node 이름으로 구별되기 때문에, 중복되면 안 됨!
-
publisher객체 생성
rospy.Publisher('< topic-name >', < message-type >, < queue-size >) -
publish할 Twist message 속도 값도 채워줌.
	forward = Twist()
	stop = Twist()

	forward.linear.x = 0.5
	stop.linear.x = 0.0
linear 단위: m/s
angular 단위: rad/s
pi = 3.14
pub.publish()
	start_time = time.time()

	rospy.loginfo("==== DriveForward node Started, move forward during 5 seconds ====\n")

	while not rospy.is_shutdown():
    	if time.time() - start_time < 5.0:
        	pub.publish(forward)
    	else:
        	rospy.logwarn(" 5 seconds left, Stop!! ")
        	pub.publish(stop)
        	break
    	r.sleep()
publish 할 message를 담음.
- log type
디버깅을 위해서 log 찍은 부분이 존재하는데,
rospy에는 다양한 log type을 제공함
- rospy.loginfo
- rospy.logdebug
- rospy.logwarn
- rospy.logerr
- rospy.logfatal
https://ros.fei.edu.br/roswiki/rospy(2f)Overview(2f)Logging.html

정도/단계에 따라 색깔이 구분되어 있는 것을 확인할 수 있음.
rospy.Rate()/r.sleep()
r = rospy.Rate(1) # 1 Hz

(...)
while (something):
    r.sleep()
임베디드 프로그래밍에서, "주기적"으로 작업할 일이 많음.
로봇에 제어 신호를 지속적으로 송신하는 경우, 센서 데이터를 수집하는 경우 등...
따라서, 적절한 값을 설정하여 사용하는 것이 중요함.
Subscriber node 작성
2D Lidar로부터 topic subscriber 구현해 보고자 함.
Laser Scan Subscriber 예제
$ roslaunch gcamp_gazebo gazebo_world.launch
$ roslaunch topic_tutorial example2.launch
하지만, 위 command 구현 시 2D Lidar의 RAW DATA가 출력되어, 굉장히 지저분함.
따라서, ROS는 센서 데이터뿐 아니라 로봇의 여러 상태를 3차원으로 시각화하여 볼 수 있는 rviz, ros의 3차원 visualization tool을 제공하고 있음.
laser_sub.py
#! /usr/bin/env python

"""
2D Lidar Subscriber example

referenced from wiki.ros.org

url: http://wiki.ros.org/ROS/Tutorials/WritingPublisherSubscriber%28python%29
"""

import rospy
from sensor_msgs.msg import LaserScan


def callback(data):
    # print(data.ranges[360])
    print(data)


rospy.loginfo(
    "==== Laser Scan Subscriber node Started, move forward during 10 seconds ====\n"
)

rospy.init_node("laser_scan")
sub = rospy.Subscriber("/scan", LaserScan, callback)
rospy.spin()- message type:
sensor_msgs/LaserScan형식 /scan topic추가 정보 필요 시 →rostopic info/scanLaserScan추가 정보 필요 시 →rosmsg info
$ rosmsg info sensor_msgs/LaserScan

std_msgs/Header header
  uint32 seq
  time stamp
  string frame_id
float32 angle_min
float32 angle_max
float32 angle_increment
float32 time_increment
float32 scan_time
float32 range_min
float32 range_max
float32[] ranges
float32[] intensities
위에서 실질적으로 lidar data를 담고 있는 부분: ranges
ranges는 길이 720의 list/0.25도의 분해능으로 scan된 값 저장.
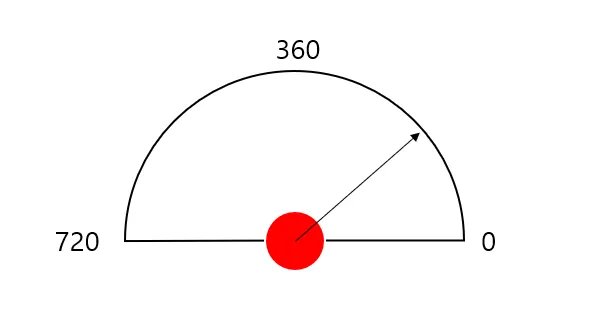
180도를 720으로 쪼개서 그만큼 레이저를 보내고 있다는 것.
- Subscriber 생성 부분
sub = rospy.Subscriber('/scan', LaserScan, callback)- callback: event가 발생할 때마다, 함수가 동작하도록 하는 것. (예시: 하단 코드)
>>> def exchange(val):
...     """The callback."""
...     return val * 1092.92
...
>>> def value_in(func, val):
...     return func(val)
...
>>> value_in(exchange, 5)
5464.60
우리의 Subscruber도 같은 방식으로 동작함.
rospy.spin()이 순환될 때마다 callback이 실행되는 구조.
def callback(data):
    # data.ranges
    print(data)

(...)
sub = rospy.Subscriber('/scan', LaserScan, callback)
rospy.spin()- subscribe 받은 data에서 ranges만 선택해서 작업하고 싶다면
def callback(data):
    laser_ranges =  data.ranges
print(laser_ranges)rospy.sleep()rospy.spin()
publish 예제에서는rospy.Rate()를 사용했는데, 이번 subscriber 예제에서는rospy.spin()을 사용했음.
일정한 시간 간격을 두고 작업해야 할 프로세스에는 시간 지정이 가능한 rospy.Rate()를 주로 사용한다고 함.
rostopic커맨드 사용
앞서 publish 되고 있는 데이터를 단순 확인이 필요할 때, 굳이 파이썬 코드를 안 짜도rviz를 통한 시각화가 가능했음. 그런데,rviz가 아닌터미널을 통해서도 topic을 다룰 수 있음.
	$ rostopic echo /scan
	(...)