가시다님의 T101 [4기] 스터디 내용을 정리한 포스트 입니다.
블로그의 실습 내용들은 ‘테라폼으로 시작하는 IaC’ 책을 기준하여 정리하였습니다.
3.9 반복문
- for-each는 반복(for)을 할 때 타입 값에 대해 하나하나 each object로 접근한다는 의미입니다.
- each object는 key, value 2개의 속성을 가지고 있습니다.
- each.key : 이 인스턴스에 해당하는 map 타입의 key 값
- each.value : 이 인스턴스에 해당하는 map의 value 값
- for_each는 모든 타입에 대해 each object로 접근 할 수 없고 map, set타입만 허용합니다.
- map, set타입이 아닌 expression은 map 또는 set으로 타입변환(toset 등)을 해야합니다.
실습: for-each 반복문
- for-each을 반복문을 활용해서 6개의 파일을 생성함
- 중간에 'b = "content b"' 값을 제거한 후 결과를 확인한다.
- main.tf
variable "abc" {
  type = map(string)
  default = {
    a = "content a"
    b = "content b"
    c = "content c"
  }
}

resource "local_file" "abc" {
  for_each = var.abc
  content = each.value
  filename = "${path.module}/abc-${each.key}.txt"
}

resource "local_file" "def" {
  for_each = local_file.abc
  content = each.value.content
  filename = "${path.module}/def-${each.key}.txt"
}- 실행 후 확인
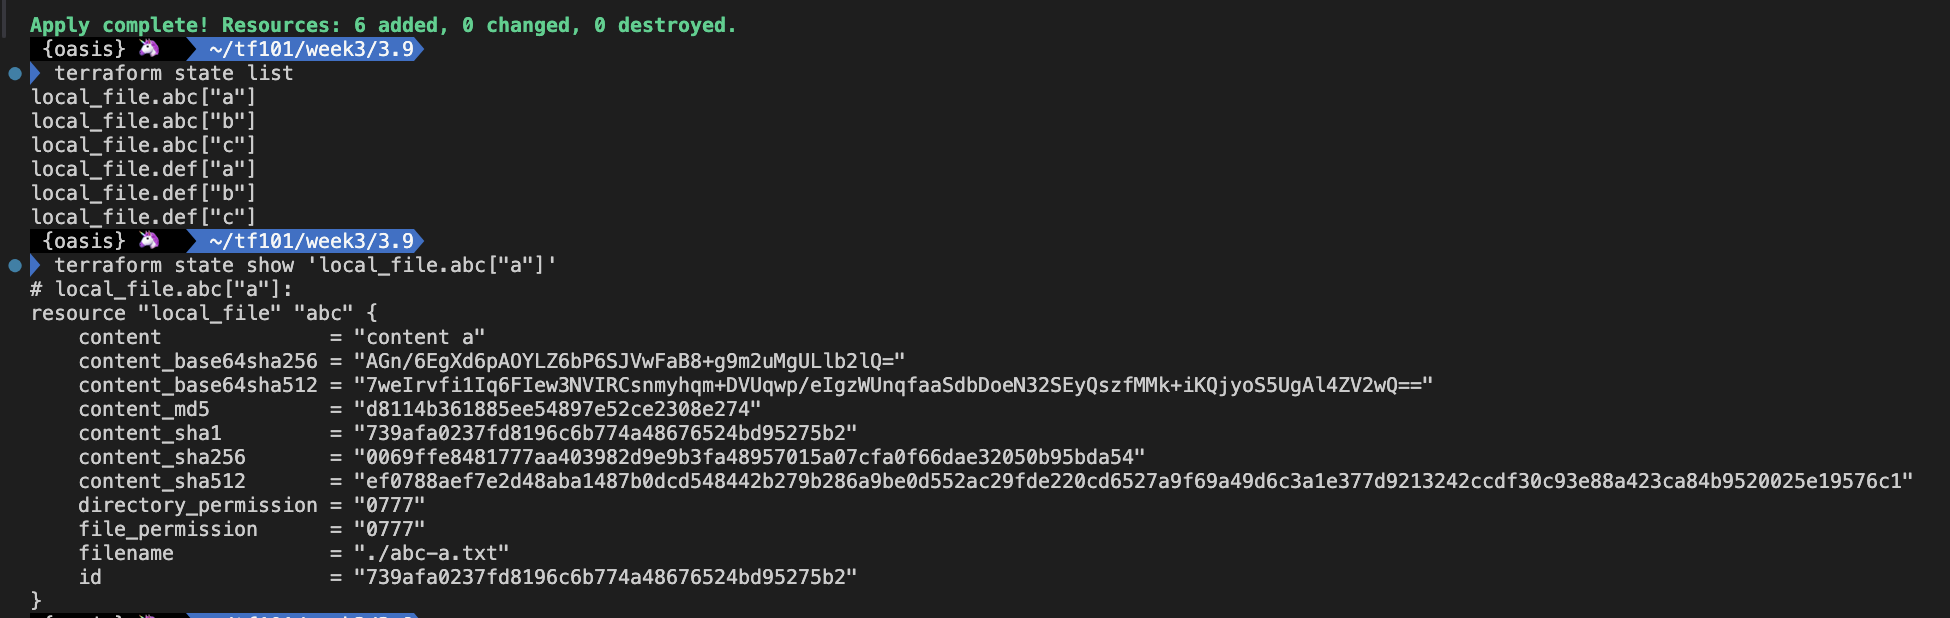
terraform.tfstate에서 생성된 리소스를 확인하면 "index_key"에 key값인 "a"가 지정된 것을 볼 수 있다.

- main.tf 수정
abc 변수에서 중간에 'b = "content b"'를 제거 후 실행
variable "abc" {
  type = map(string)
  default = {
    a = "content a"
    c = "content c"
  }
}

resource "local_file" "abc" {
  for_each = var.abc
  content = each.value
  filename = "${path.module}/abc-${each.key}.txt"
}

resource "local_file" "def" {
  for_each = local_file.abc
  content = each.value.content
  filename = "${path.module}/def-${each.key}.txt"
}- 실행 후 확인
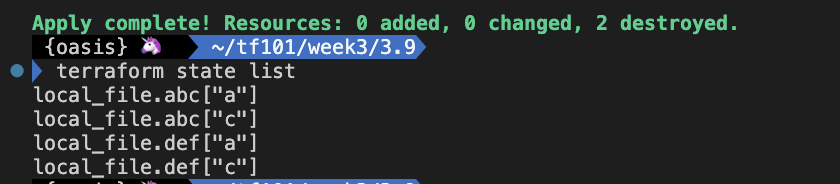
count 반복문과는 다르게 제거 한 값만 리소스에서 삭제된다.
실습: for-each 데이터 유형
for_each는 모든 타입에 대해 each object로 접근 할 수 없고 map, set타입만 허용합니다.
- main.tf
resource "aws_iam_user" "the-accounts" {
  for_each = ["Todd", "James", "Alice", "Dottie"]
  name     = each.key
}- 실행 후 확인
for_each는 map, set타입만 지원하기 때문에 에러가 발생된다.

- main.tf 수정
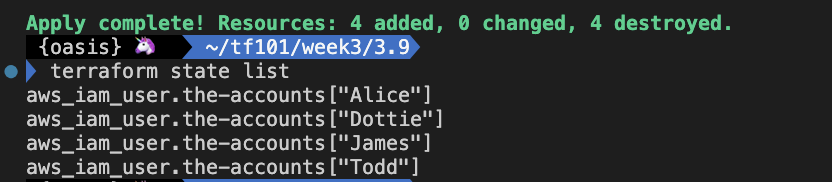
toset 함수를 사용해 set 타입으로 변환한다.
resource "aws_iam_user" "the-accounts" {
  for_each = toset(["Todd", "James", "Alice", "Dottie"])
  name     = each.key
}- 실행 후 확인
실습: for_each vs count 와 비교
- for_each 를 사용하여 3명의 IAM 사용자를 생성한다.
- var.user_names 리스트를 집합(set)으로 변환하기 위해 toset 사용
- main.tf
provider "aws" {
  region = "ap-northeast-2"
}

variable "iamuser" {
  type = list(string)
  default = [
    "user01",
    "user02",
    "user03"
  ]
}

resource "aws_iam_user" "iamuser" {
  for_each = toset(var.iamuser)
  name = each.value
}

output "all_users" {
    value = aws_iam_user.iamuser
}-
실행 후 확인
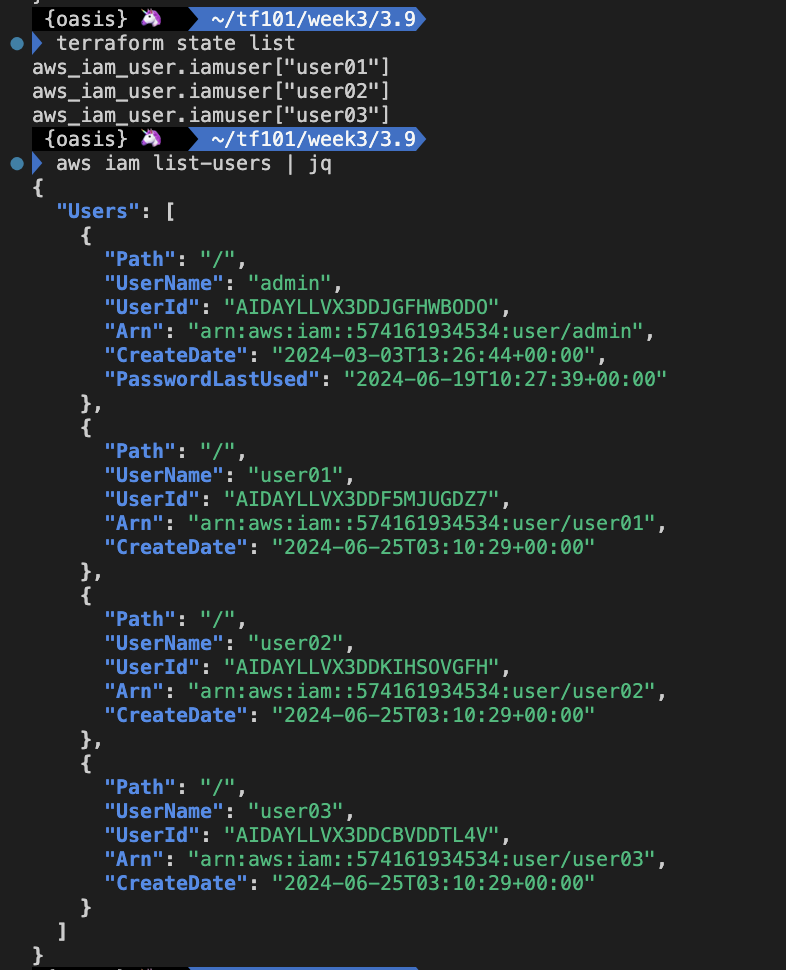
-
main.tf
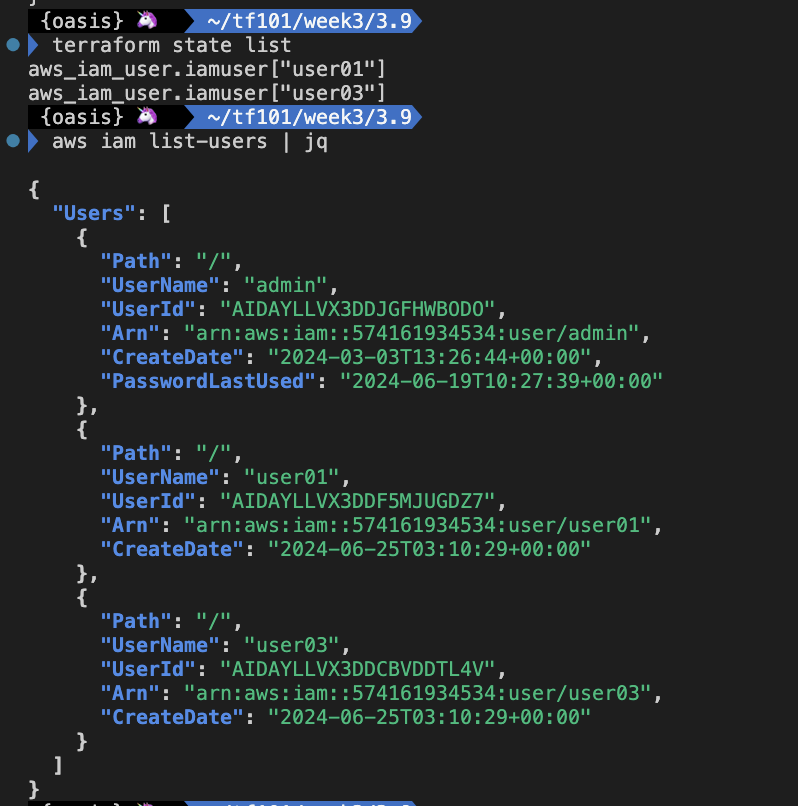
- 중간에 "user02"를 삭제한다.
provider "aws" {
  region = "ap-northeast-2"
}

variable "iamuser" {
  type = list(string)
  default = [
    "user01",
    "user03"
  ]
}

resource "aws_iam_user" "iamuser" {
  for_each = toset(var.iamuser)
  name = each.value
}

output "all_users" {
    value = aws_iam_user.iamuser
}- 실행 후 확인
주변 모든 리소스를 옮기지 않고 정확히 목표한 리소스만 삭제됨
실습: for_Expressions 1

- 복합 형식 값의 형태를 변환하는 데 사용
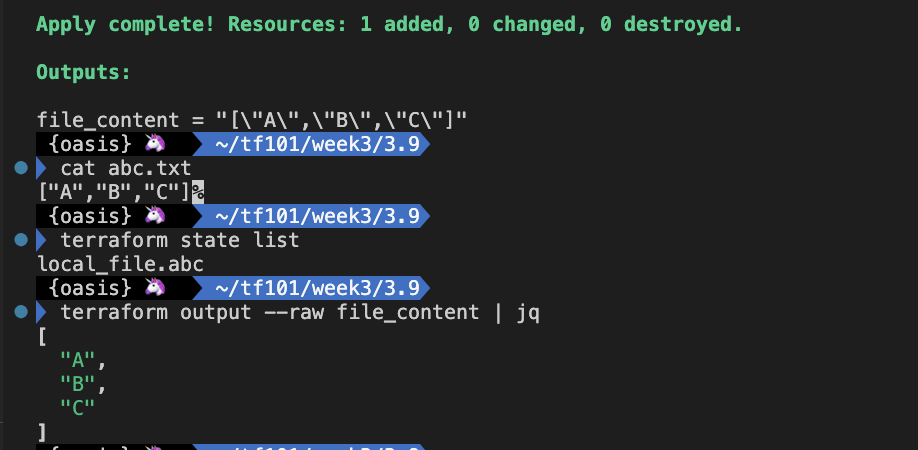
- 요건: list 변수의 값 소문자 a,b,c를 대문자로 변환
- main.tf
variable "names" {
  default = ["a", "b", "c"]
}

resource "local_file" "abc" {
  content  = jsonencode([for s in var.names : upper(s)]) # 결과 : ["A", "B", "C"]
  filename = "${path.module}/abc.txt"
}

output "file_content" {
  value = local_file.abc.content
}- 실행 후 확인
실습: for_Expressions 2(악분님 제공)
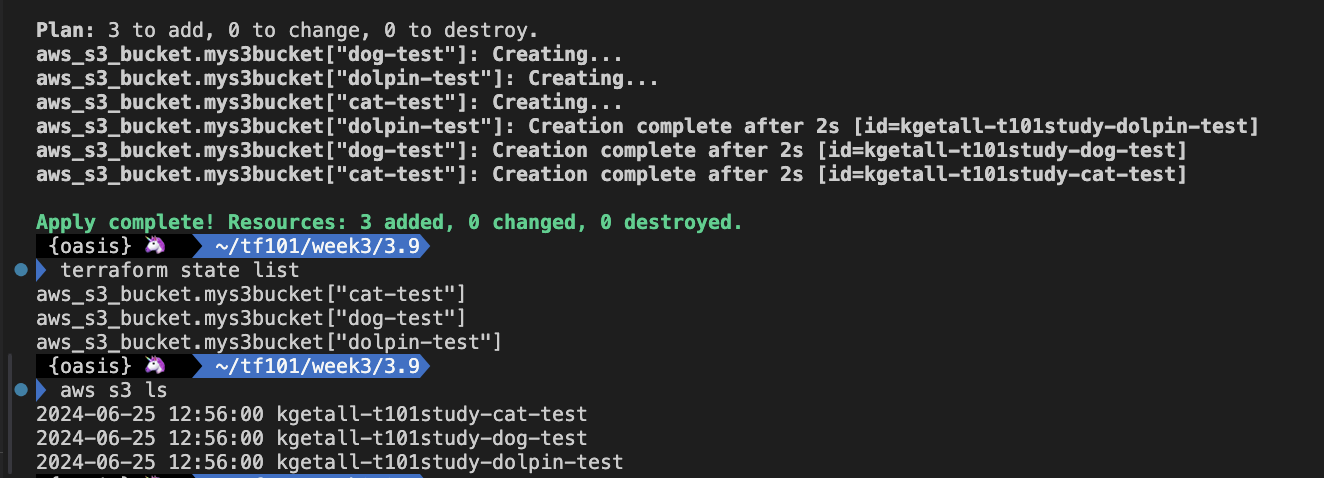
- for expression과 for_each를 활용해서 3개의 s3 버킷을 생성함
- 참고: https://www.youtube.com/watch?v=Hj_FGLNmXNI&t=414s
- main.tf
variable "fruits" {
  type        = set(string)
  default     = ["dog", "cat", "dolpin"]
  description = "fruit example"
}

variable "postfix" {
  type        = string
  default     = "test"
  description = "postfix"
}

provider "aws" {
  region = "ap-northeast-2"
}

resource "aws_s3_bucket" "mys3bucket" {
  for_each = toset([for fruit in var.fruits : format("%s-%s", fruit, var.postfix)])
  bucket   = "kgetall-t101study-${each.key}"
}- 실행 후 확인
3개의 s3 버킷이 생성됨

실습: dynamic
- dynamic을 활용해서 리소스 블록 내의 반복되는 블록을 dynamic 블록으로 적용해본다.
- main.tf 수정전
data "archive_file" "dotfiles" {
  type        = "zip"
  output_path = "${path.module}/dotfiles.zip"

  source {
    content  = "hello a"
    filename = "${path.module}/a.txt"
  }

  source {
    content  = "hello b"
    filename = "${path.module}/b.txt"
  }

  source {
    content  = "hello c"
    filename = "${path.module}/c.txt"
  }
}- main.tf 수정후
dynamic 블록으로 수정
variable "abc" {
  type = map(string)
  default = {
    a = "content a"
    b = "content b"
    c = "content c"
  }
}

data "archive_file" "dotfiles" {
  type = "zip"
  output_path = "${path.module}/dotfiles.zip"

  dynamic "source" {
    for_each = var.abc
    content {
      content = source.value
      filename = "${path.module}/${source.key}.txt"
    }
  }
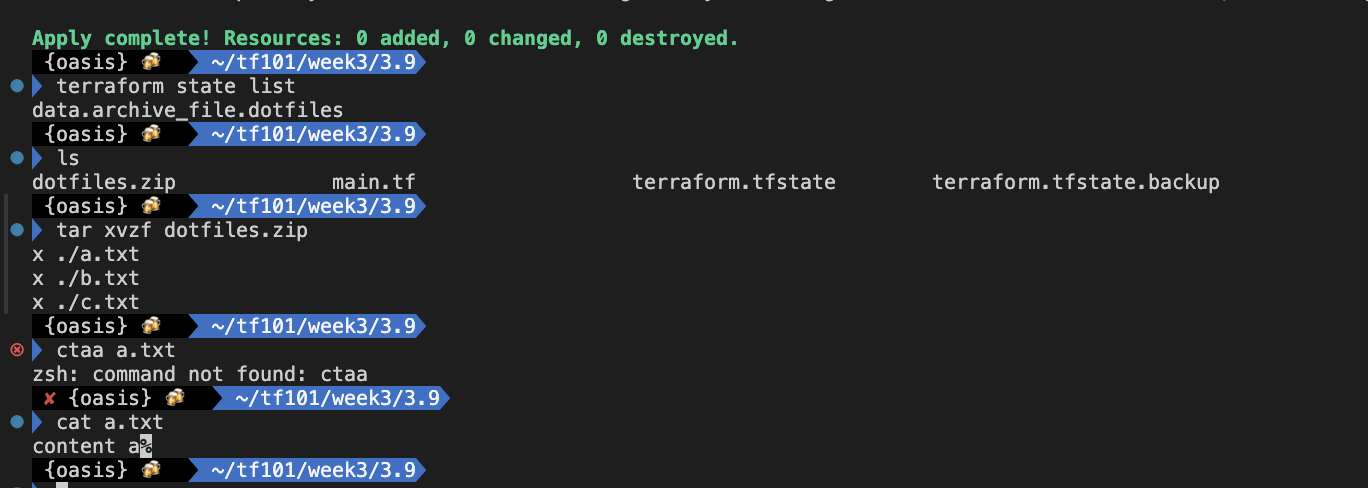
}- 실행 후 확인
3.10 조건문
조건식은 3항 연산자 형태를 갖는다. 조건은 true 또는 false로 확인되는 모든 표현식을 사용할 수 있다
# <조건 정의> ? <옳은 경우> : <틀린 경우>
var.a != "" ? var.a : "default-a"
실습: 조건문
count에 조건식을 결합하여 조건에 따라 리소스 생성 여부를 선택 할 수 있다.
- main.tf
variable "enable_file" {
  type = bool
  default = true
}

resource "local_file" "myfile" {
  count = var.enable_file ? 1 : 0
  content = "abc"
  filename = "${path.module}/abc.txt"
}

output "content" {
  value = var.enable_file ? local_file.myfile[0].content : ""
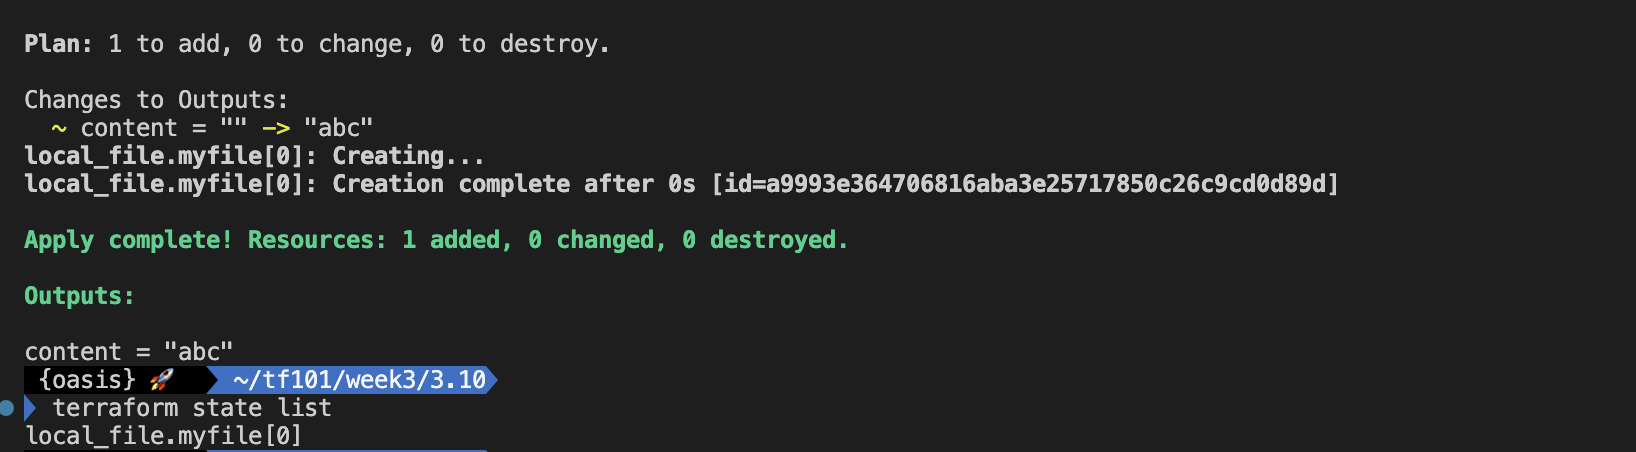
}- 실행 후 확인
3.10 함수
테라폼은 프로그래밍 언어적인 특성을 가지고 있어서, 값의 유형을 변경하거나 조합할 수 있는 내장 함수를 사용 할 수 있다.
terraform 공식 문서의 함수 목록
https://developer.hashicorp.com/terraform/language/functions
- 단, 내장된 함수 외에 사용자가 구현하는 별도의 사용자 정의 함수를 지원하지는 않는다.
- 함수 종류에는 숫자, 문자열, 컬렉션, 인코딩, 파일 시스템, 날짜/시간, 해시/암호화, IP 네트워크, 유형 변환이 있다.
- 테라폼 코드에 함수를 적용하면 변수, 리소스 속성, 데이터 소스 속성, 출력 값 표현 시 작업을 동적이고 효과적으로 수행할 수 있다.
실습: 함수
content를 대문자로 출력되도록 한다.
- main.tf
resource "local_file" "foo" {
  content  = upper("foo! bar!")
  filename = "${path.module}/foo.bar"
}- 실행 후 확인

3.12 프로비저너
프로비저너는 프로바이더와 비슷하게 ‘제공자’로 해석되나, 프로바이더로 실행되지 않는 커맨드와 파일 복사 같은 역할을 수행
- local-exec 프로비저너: 테라폼이 실행되는 환경에서 수행할 커맨드를 정의
- remote-exec 프로비저너 : 원격지 환경에서 실행할 커맨드와 스크립트를 정의
- file 프로비저너 : 테라폼을 실행하는 시스템에서 연결 대상으로 파일 또는 디렉터리를 복사하는 데 사용
실습: 프로비저너
- main.tf
variable "sensitive_content" {
  default   = "secret"
  #sensitive = true
}

resource "local_file" "foo" {
  content  = upper(var.sensitive_content)
  filename = "${path.module}/foo.bar"

  provisioner "local-exec" {
    command = "echo The content is ${self.content}"
  }

  provisioner "local-exec" {
    command    = "abc"
    on_failure = continue
  }

  provisioner "local-exec" {
    when    = destroy
    command = "echo The deleting filename is ${self.filename}"
  }
}-
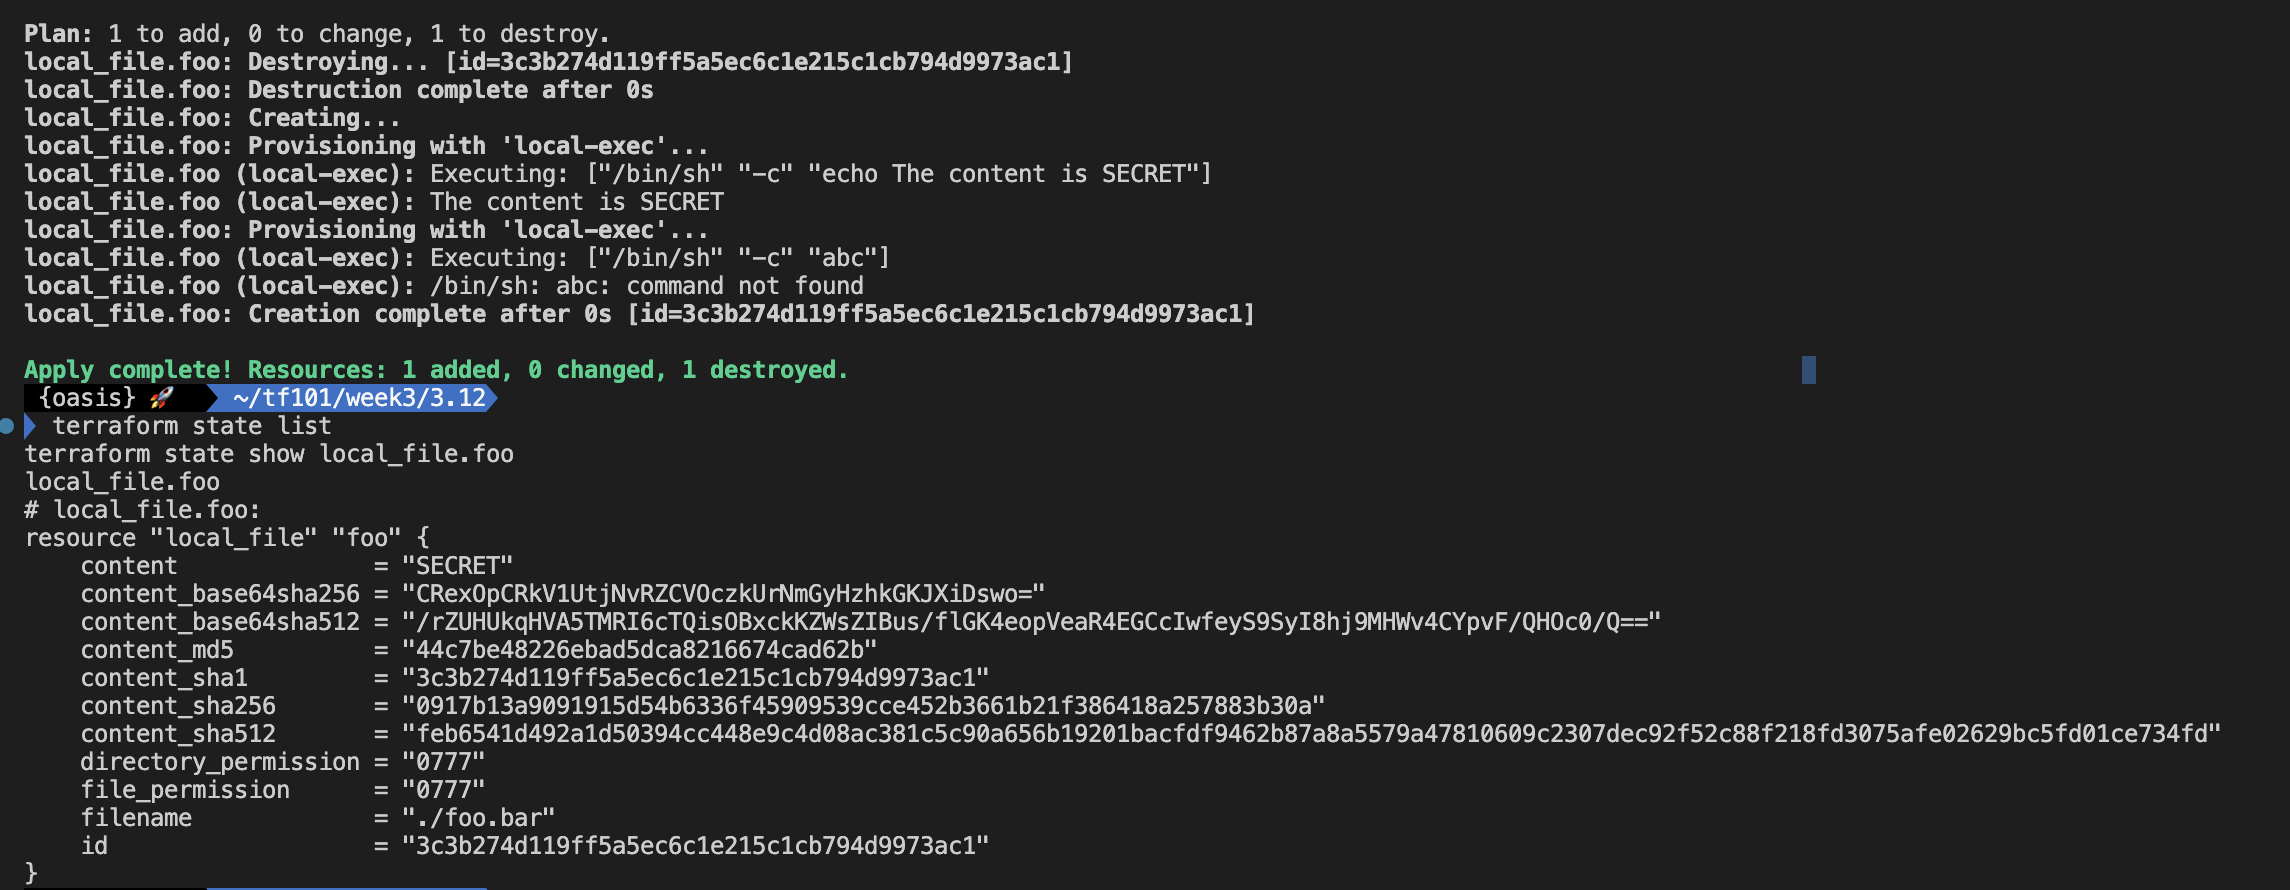
실행 후 확인
-
main.tf 수정
on_failure = continue 옵션을 주석처리 후 apply 해본다.
variable "sensitive_content" {
  default   = "secret"
  #sensitive = true
}

resource "local_file" "foo" {
  content  = upper(var.sensitive_content)
  filename = "${path.module}/foo.bar"

  provisioner "local-exec" {
    command = "echo The content is ${self.content}"
  }

  provisioner "local-exec" {
    command    = "abc"
    # on_failure = continue
  }

  provisioner "local-exec" {
    when    = destroy
    command = "echo The deleting filename is ${self.filename}"
  }
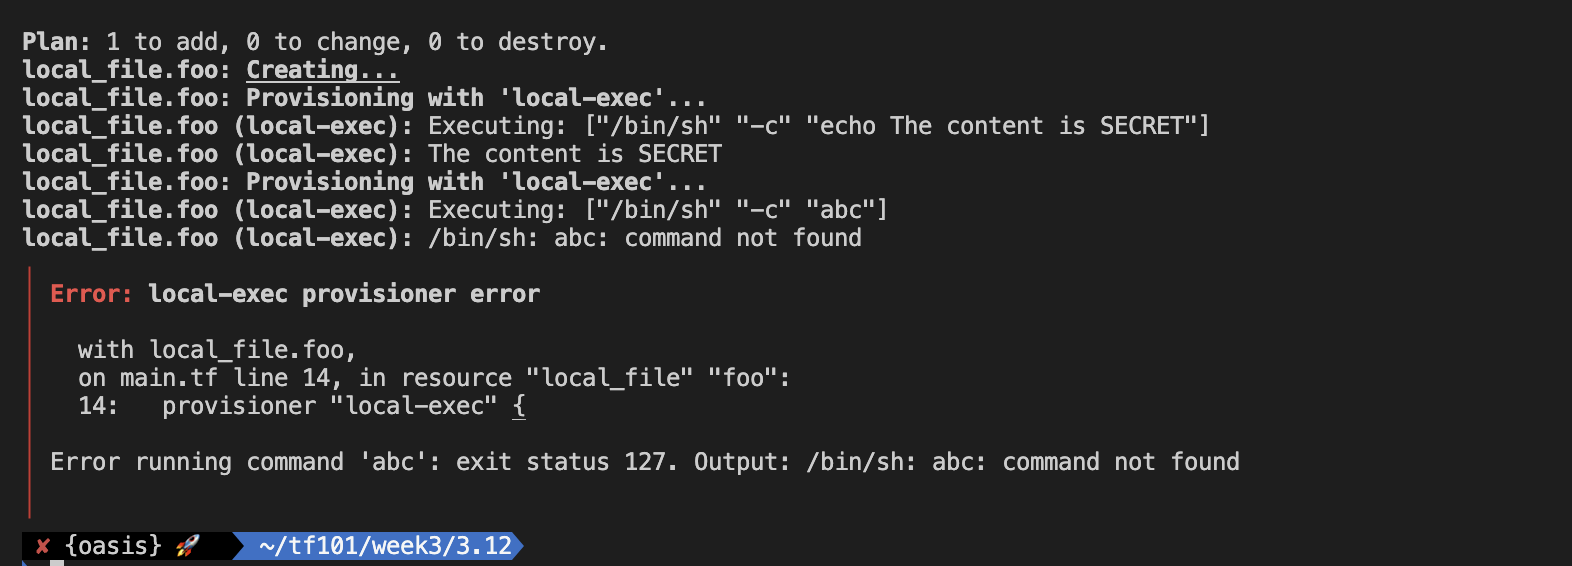
}- 실행 후 확인
"on_failure = continue" 옵션을 주석처리 이후 'abc' 명령어가 실행될 수 없기에 Error가 발생됨
실습: local-exec 프로비저너
- command(필수) : 실행할 명령줄을 입력하며 << 연산자를 통해 여러 줄의 커맨드 입력 가능
- working_dir(선택) : command의 명령을 실행할 디렉터리를 지정해야 하고 상대/절대 경로로 설정
- interpreter(선택) : 명령을 실행하는 데 필요한 인터프리터를 지정하며, 첫 번째 인수로 인터프리터 이름이고 두 번째부터는 인터프리터 인수 값
- environment(선택) : 실행 시 환경 변수 는 실행 환경의 값을 상속받으면, 추가 또는 재할당하려는 경우 해당 인수에 key = value 형태로 설정
- main.tf
resource "null_resource" "example1" {

  provisioner "local-exec" {
    command = <<EOF
      echo Hello!! > file.txt
      echo $ENV >> file.txt
      EOF

    interpreter = [ "bash" , "-c" ]

    working_dir = "/tmp"

    environment = {
      ENV = "world!!"
    }

  }
}
*실행 후 결과
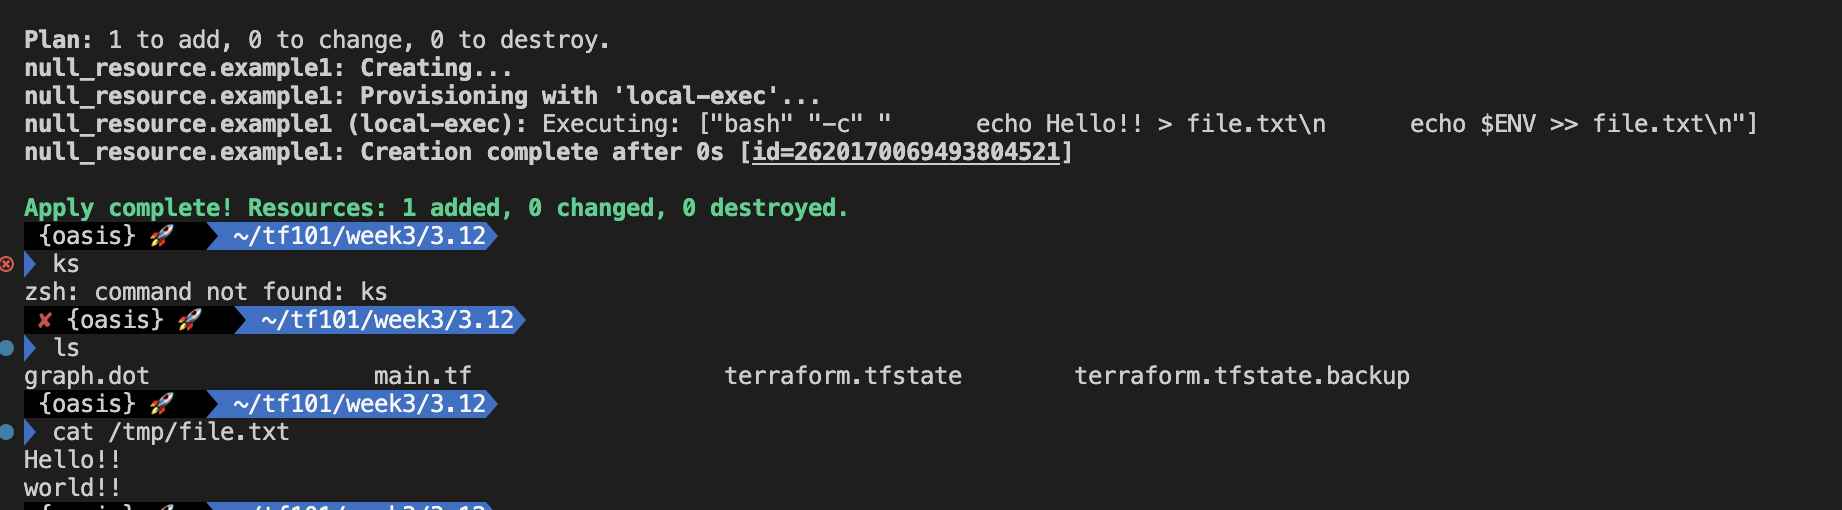
실습: file 프로비저너
- source : 소스 파일 또는 디렉터리로, 현재 작업 중인 디렉터리에 대한 상태 경로 또는 절대 경로로 지정할 수 있다. content와 함께 사용할 수 없다.
- content : 연결 대상에 복사할 내용을 정의하며 대상이 디렉터리인 경우 tf-file-content 파일이 생성되고, 파일인 경우 해당 파일에 내용이 기록된다. source와 함께 사용할 수 없다.
- destination : 필수 항목으로 항상 절대 경로로 지정되어야 하며, 파일 또는 디렉터리다.
- main.tf
resource "null_resource" "myfile" {
    provisioner "file" {
      content = "abcf"
      destination = "/tmp/abcf.txt"
    }
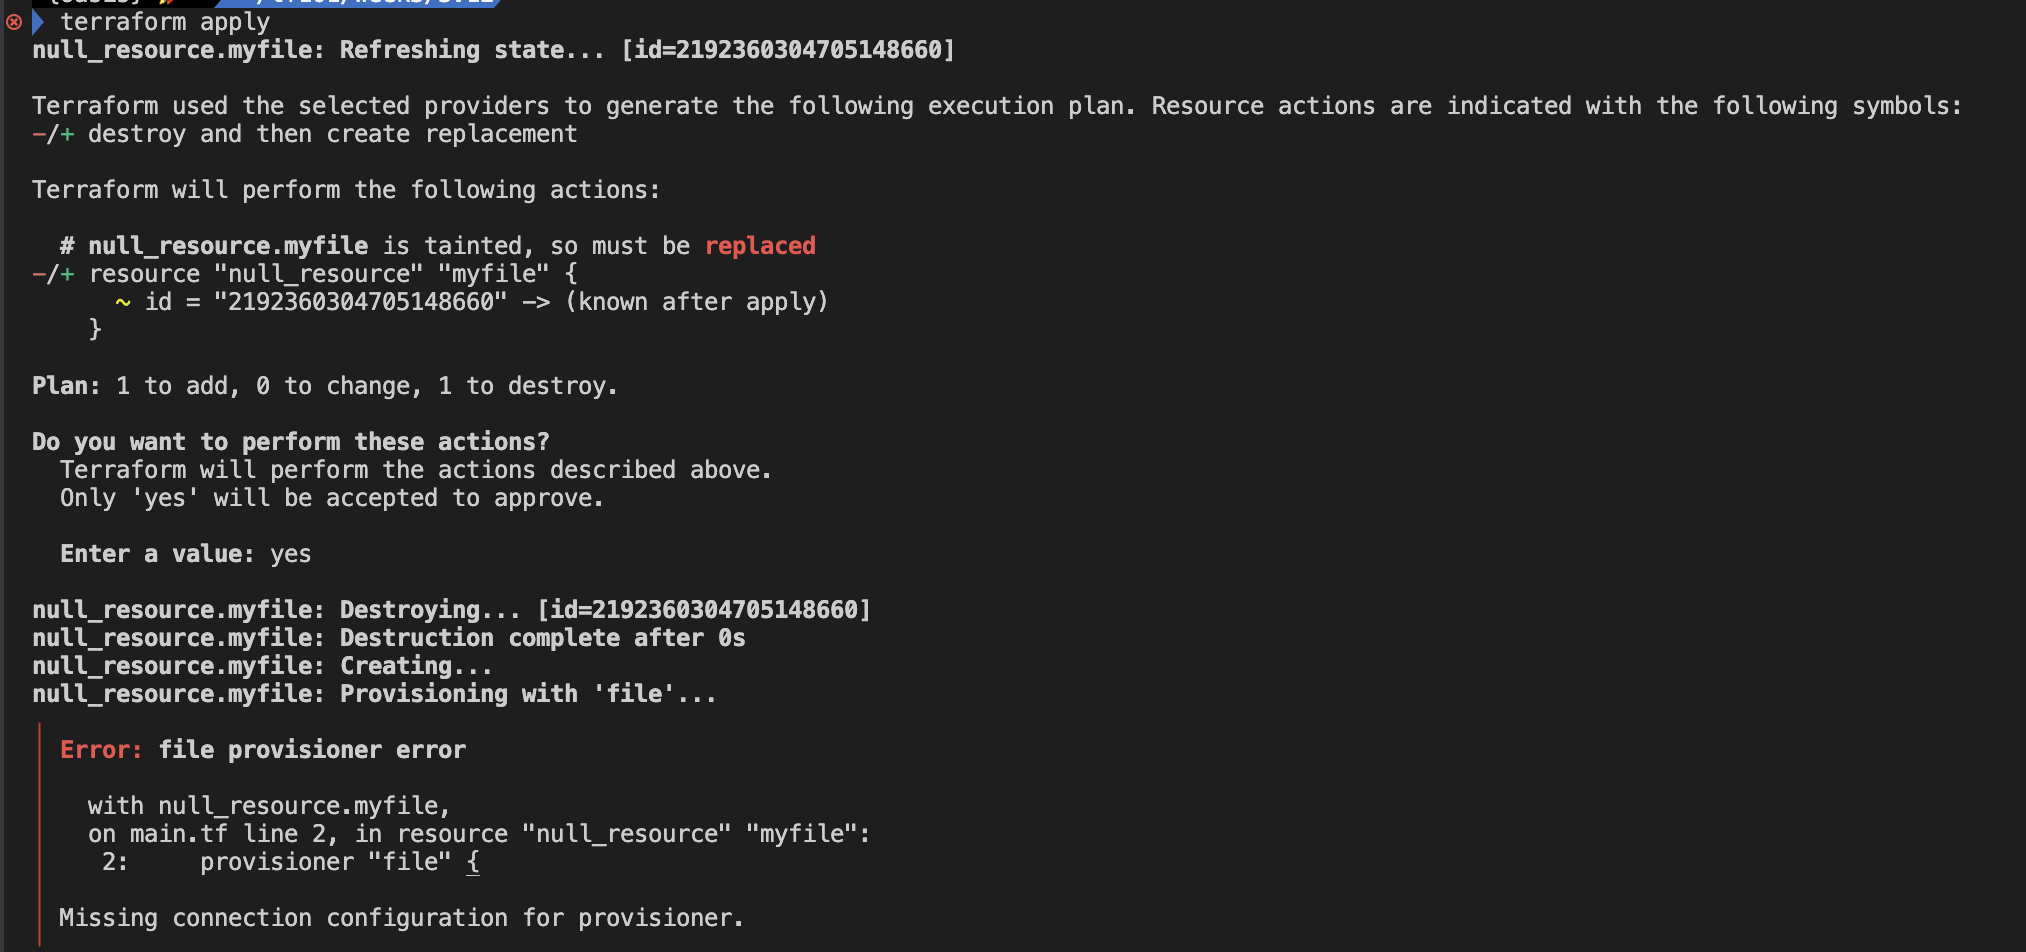
}- 실행 후 결과
file 프로비저너를 위해서는 원격지 연결 정보가 있어야한다. local에서 file 프로비저너를 사용하면 에러가 발생된다.
3.13 null_resource와 terraform_data
테라폼 1.4 버전이 릴리즈되면서 기존 null_resource 리소스를 대체하는 terraform_data 리소스가 추가되었다
- null_resource: 아무 작업도 수행하지 않는 리소스를 구현
- terraform_data: 이 리소스 또한 자체적으로 아무것도 수행하지 않지만 null_resource는 별도의 프로바이더 구성이 필요하다는 점과 비교하여 추가 프로바이더 없이 테라폼 자체에 포함된 기본 수명주기 관리자가 제공된다는 것이 장점이다.
실습: null_resource와 terraform_data
- main.tf
provider "aws" {
  region = "ap-northeast-2"
}

resource "aws_security_group" "instance" {
  name = "t101sg"

  ingress {
    from_port   = 80
    to_port     = 80
    protocol    = "tcp"
    cidr_blocks = ["0.0.0.0/0"]
  }

  ingress {
    from_port   = 22
    to_port     = 22
    protocol    = "tcp"
    cidr_blocks = ["0.0.0.0/0"]
  }

}

resource "aws_instance" "example" {
  ami                    = "ami-0c9c942bd7bf113a2"
  instance_type          = "t2.micro"
  subnet_id              = "subnet-dbc571b0"  # 각자 default VPC에 subnet ID 아무거나
  private_ip             = "172.31.1.100"
  vpc_security_group_ids = [aws_security_group.instance.id]

  user_data = <<-EOF
              #!/bin/bash
              echo "Hello, T101 Study" > index.html
              nohup busybox httpd -f -p 80 &
              EOF

  tags = {
    Name = "Single-WebSrv"
  }

  provisioner "remote-exec" {
    inline = [
      "echo ${aws_eip.myeip.public_ip}"
     ]
  }
}

resource "aws_eip" "myeip" {
  #vpc = true
  instance = aws_instance.example.id
  associate_with_private_ip = "172.31.1.100"
}

output "public_ip" {
  value       = aws_instance.example.public_ip
  description = "The public IP of the Instance"
}- 실행 및 확인
terraform init
terraform plan
Error: Cycle: aws_eip.myeip, aws_instance.example
- main.tf 수정
provider "aws" {
  region = "ap-northeast-2"
}

resource "aws_security_group" "instance" {
  name = "t101sg"

  ingress {
    from_port   = 80
    to_port     = 80
    protocol    = "tcp"
    cidr_blocks = ["0.0.0.0/0"]
  }

  ingress {
    from_port   = 22
    to_port     = 22
    protocol    = "tcp"
    cidr_blocks = ["0.0.0.0/0"]
  }

}

resource "aws_instance" "example" {
  ami                    = "ami-0c9c942bd7bf113a2"
  instance_type          = "t2.micro"
  subnet_id              = "subnet-0f36c6347b49c5d4f"
  private_ip             = "172.31.0.100"
  key_name               = "2024-03-11_eks" # 각자 자신의 EC2 SSH Keypair 이름 지정
  vpc_security_group_ids = [aws_security_group.instance.id]

  user_data = <<-EOF
              #!/bin/bash
              echo "Hello, T101 Study" > index.html
              nohup busybox httpd -f -p 80 &
              EOF

  tags = {
    Name = "Single-WebSrv"
  }

}

resource "aws_eip" "myeip" {
  #vpc = true
  instance = aws_instance.example.id
  associate_with_private_ip = "172.31.0.100"
}

resource "null_resource" "echomyeip" {
  provisioner "remote-exec" {
    connection {
      host = aws_eip.myeip.public_ip
      type = "ssh"
      user = "ubuntu"
      private_key =  file("/Users/kgetall/.ssh/2024-04-11_eks.pem") # 각자 자신의 EC2 SSH Keypair 파일 위치 지정
    }
    inline = [
      "echo ${aws_eip.myeip.public_ip}"
      ]
  }
}

output "public_ip" {
  value       = aws_instance.example.public_ip
  description = "The public IP of the Instance"
}

output "eip" {
  value       = aws_eip.myeip.public_ip
  description = "The EIP of the Instance"
}- 실행 후 결과
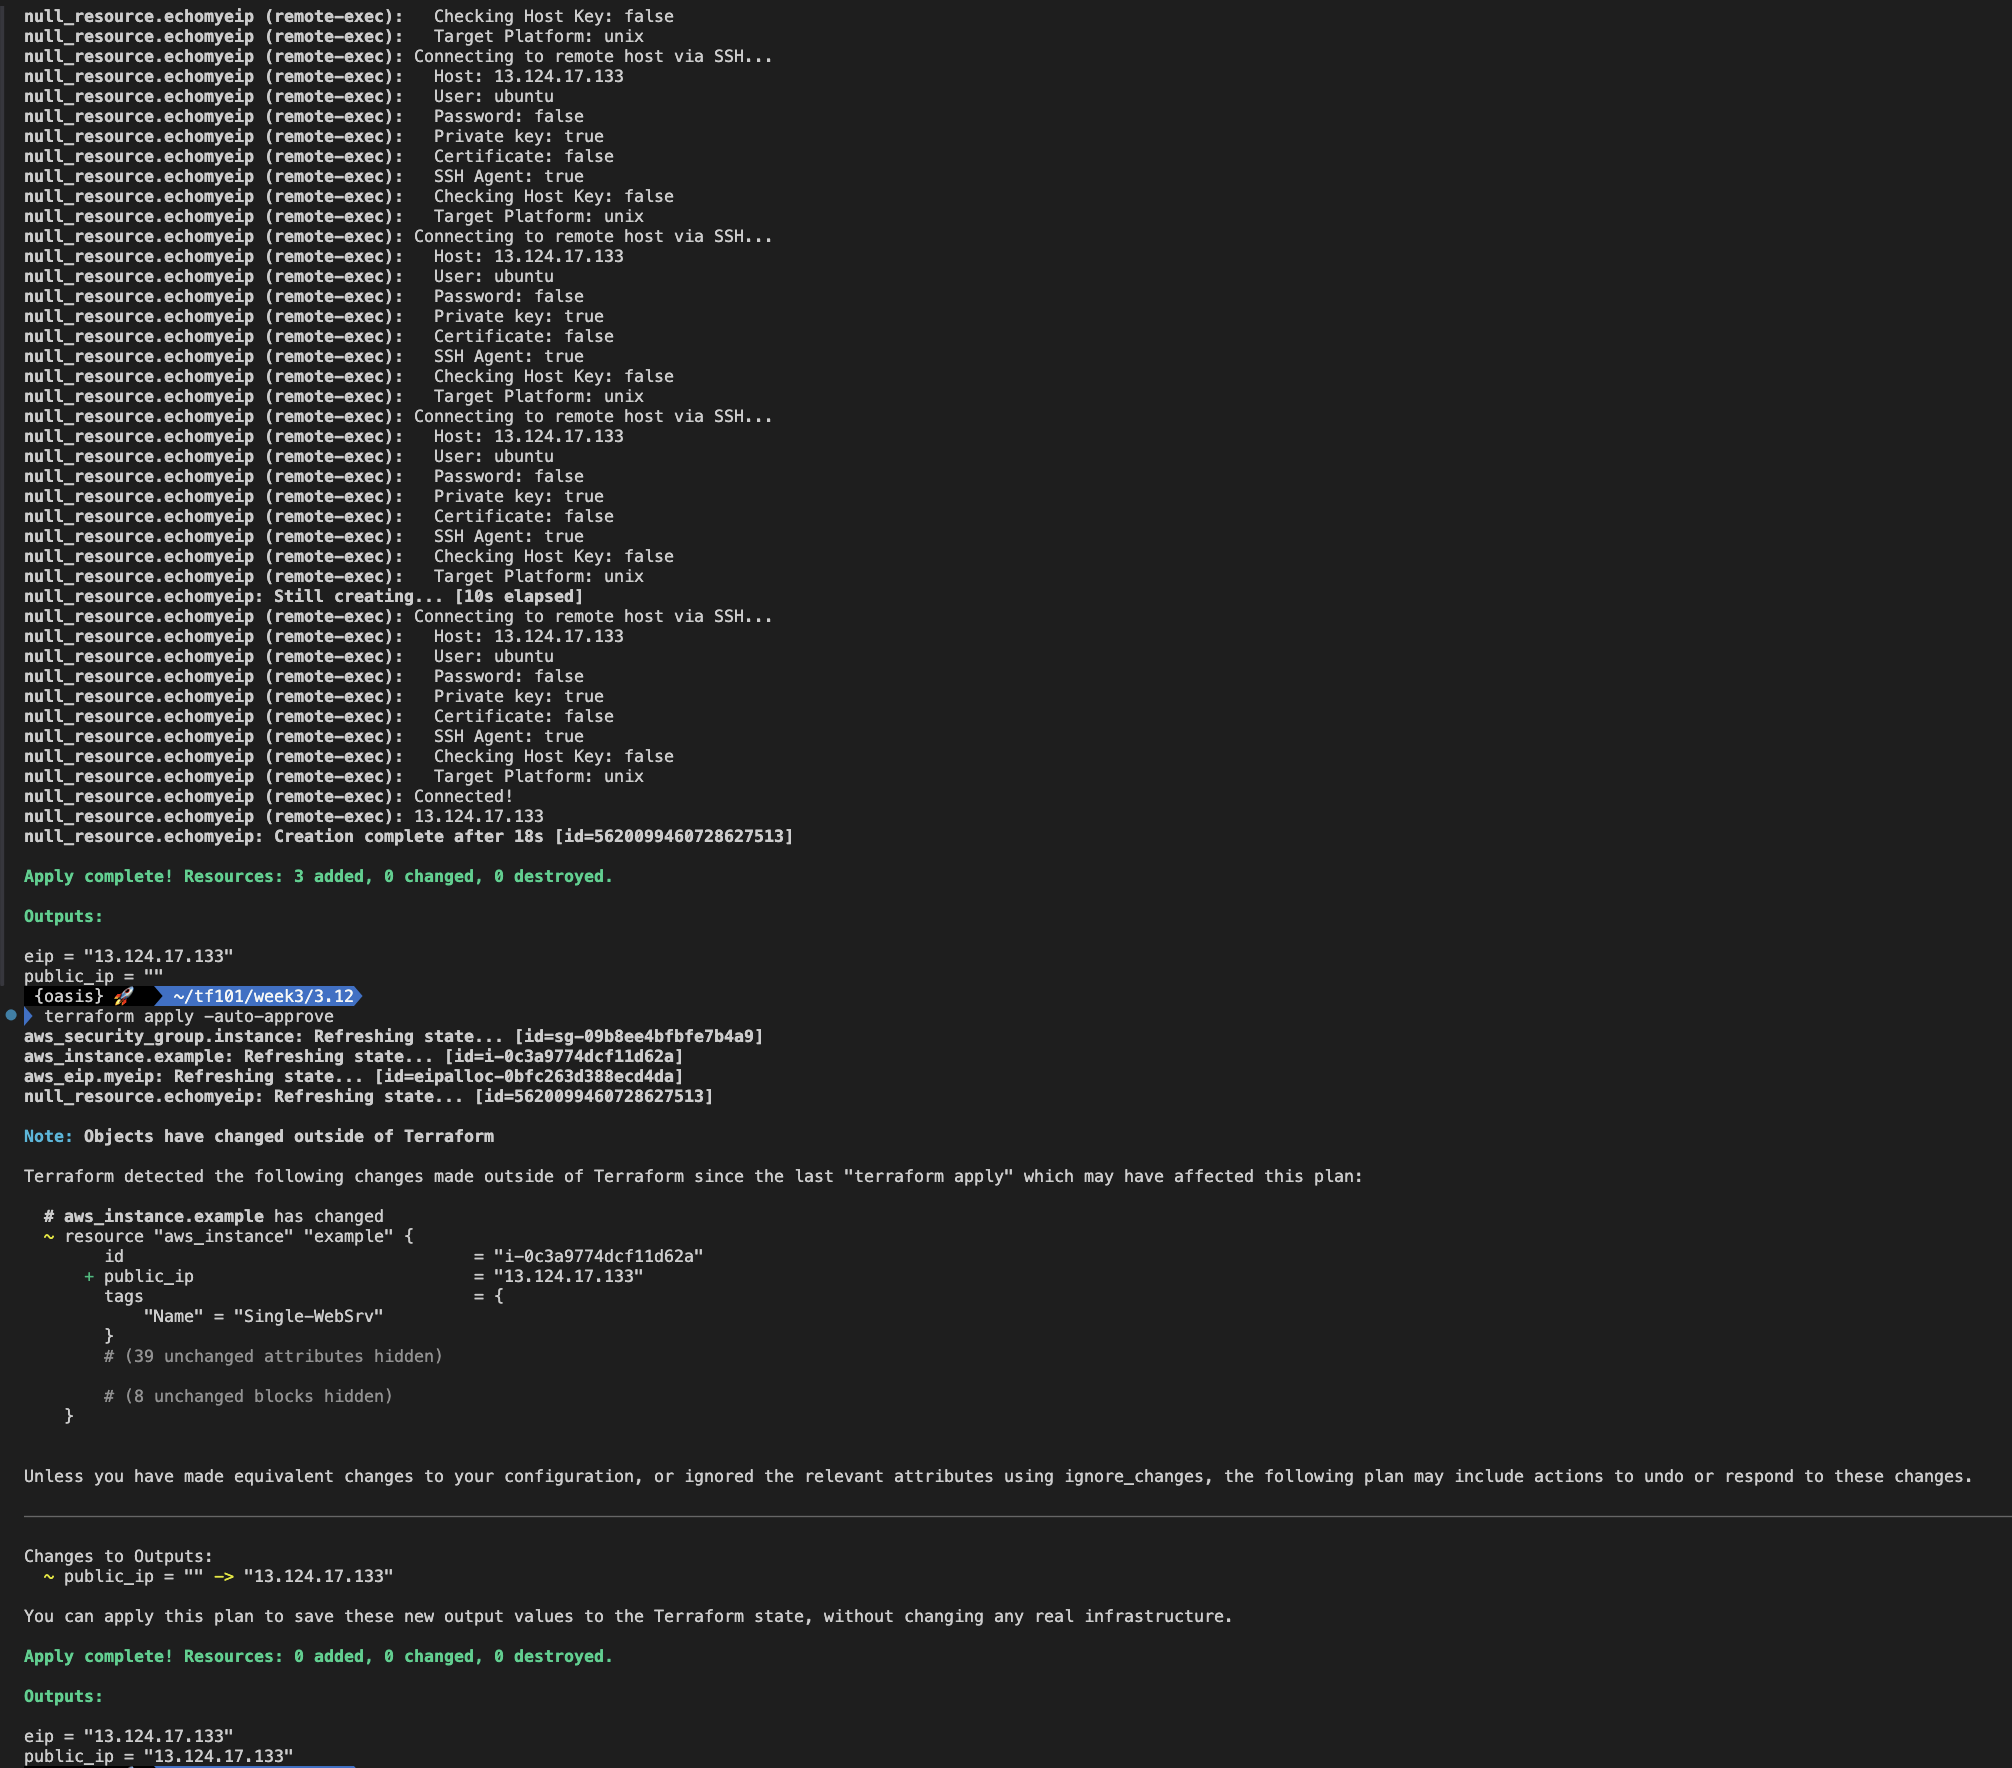
3.14 moved 블록
리소스의 이름은 변경되지만 이미 테라폼으로 프로비저닝된 환경을 그대로 유지하고자 하는 경우 테라폼 1.1 버전부터 moved 블록을 사용할 수 있다.
실습: moved 블록
- main.tf
resource "local_file" "a" {
  content  = "foo!"
  filename = "${path.module}/foo.bar"
}

output "file_content" {
  value = local_file.a.content
}- 실행
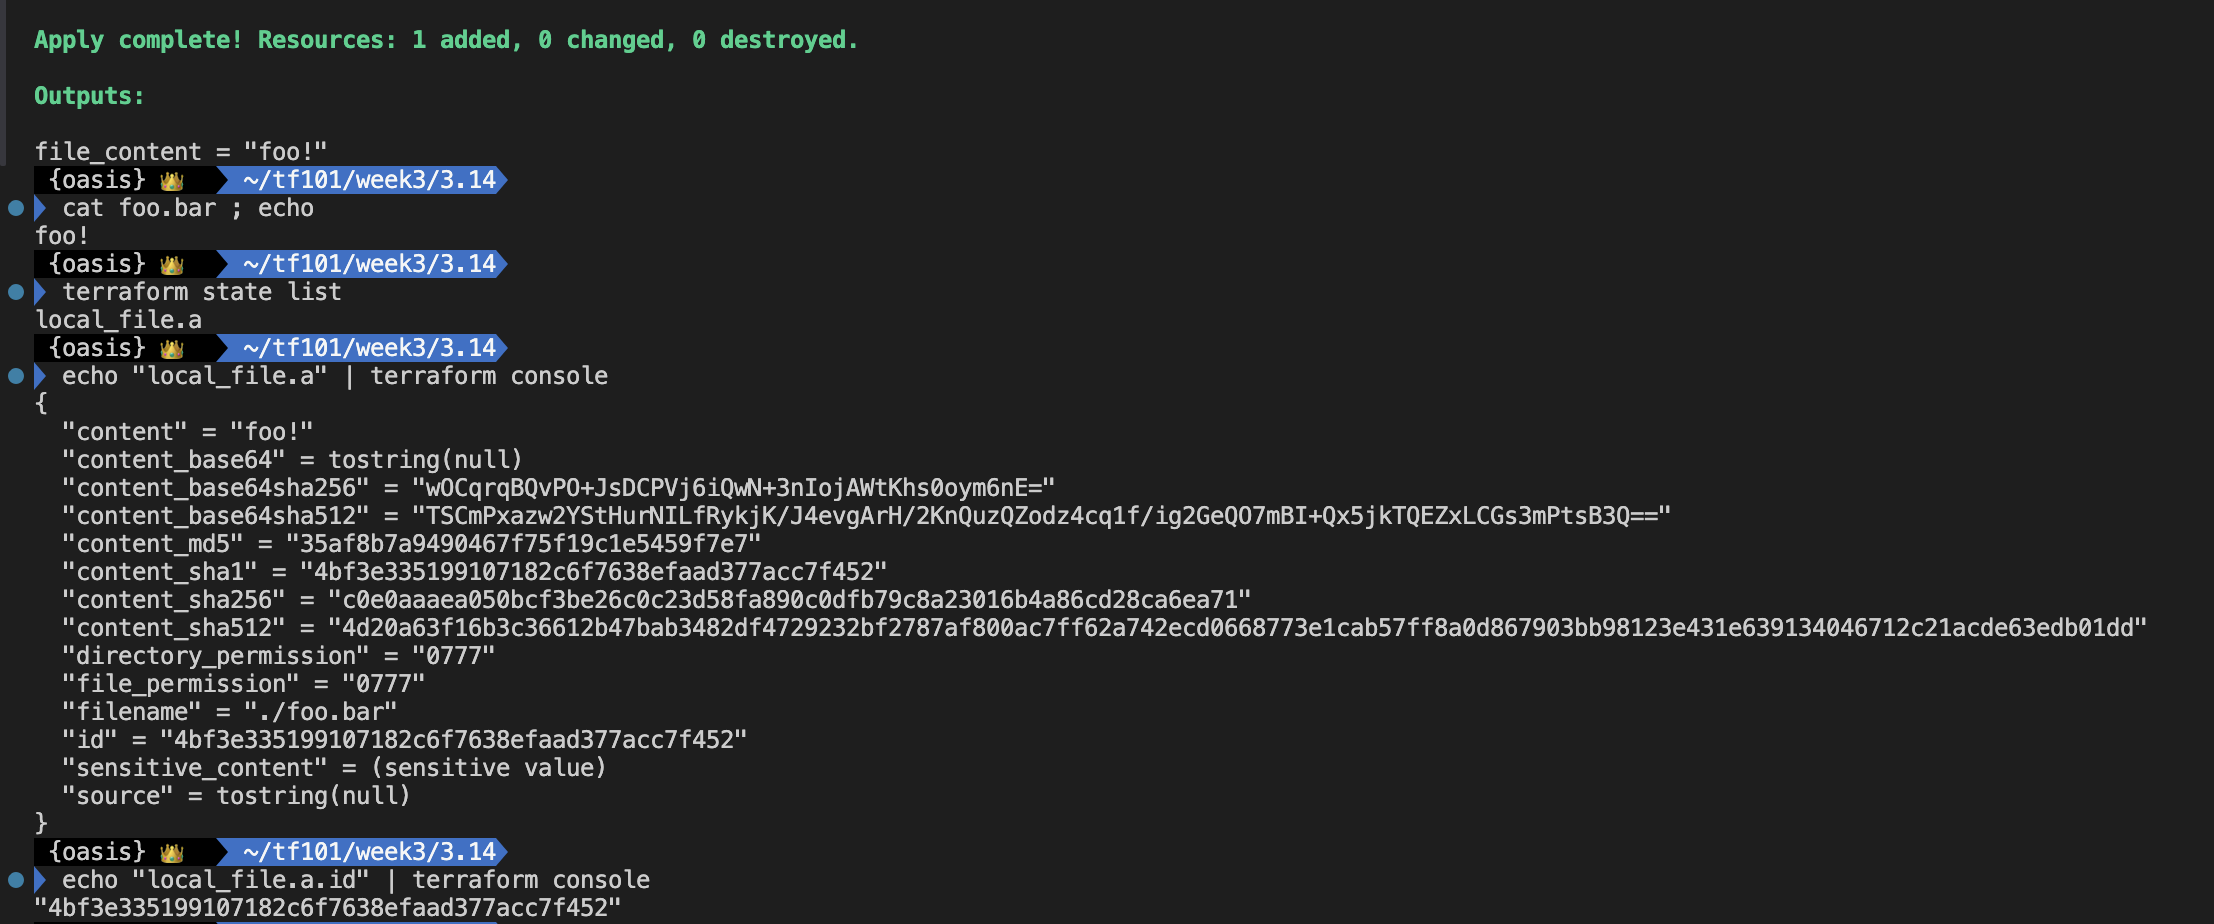
- main.tf 파일 내용 변경
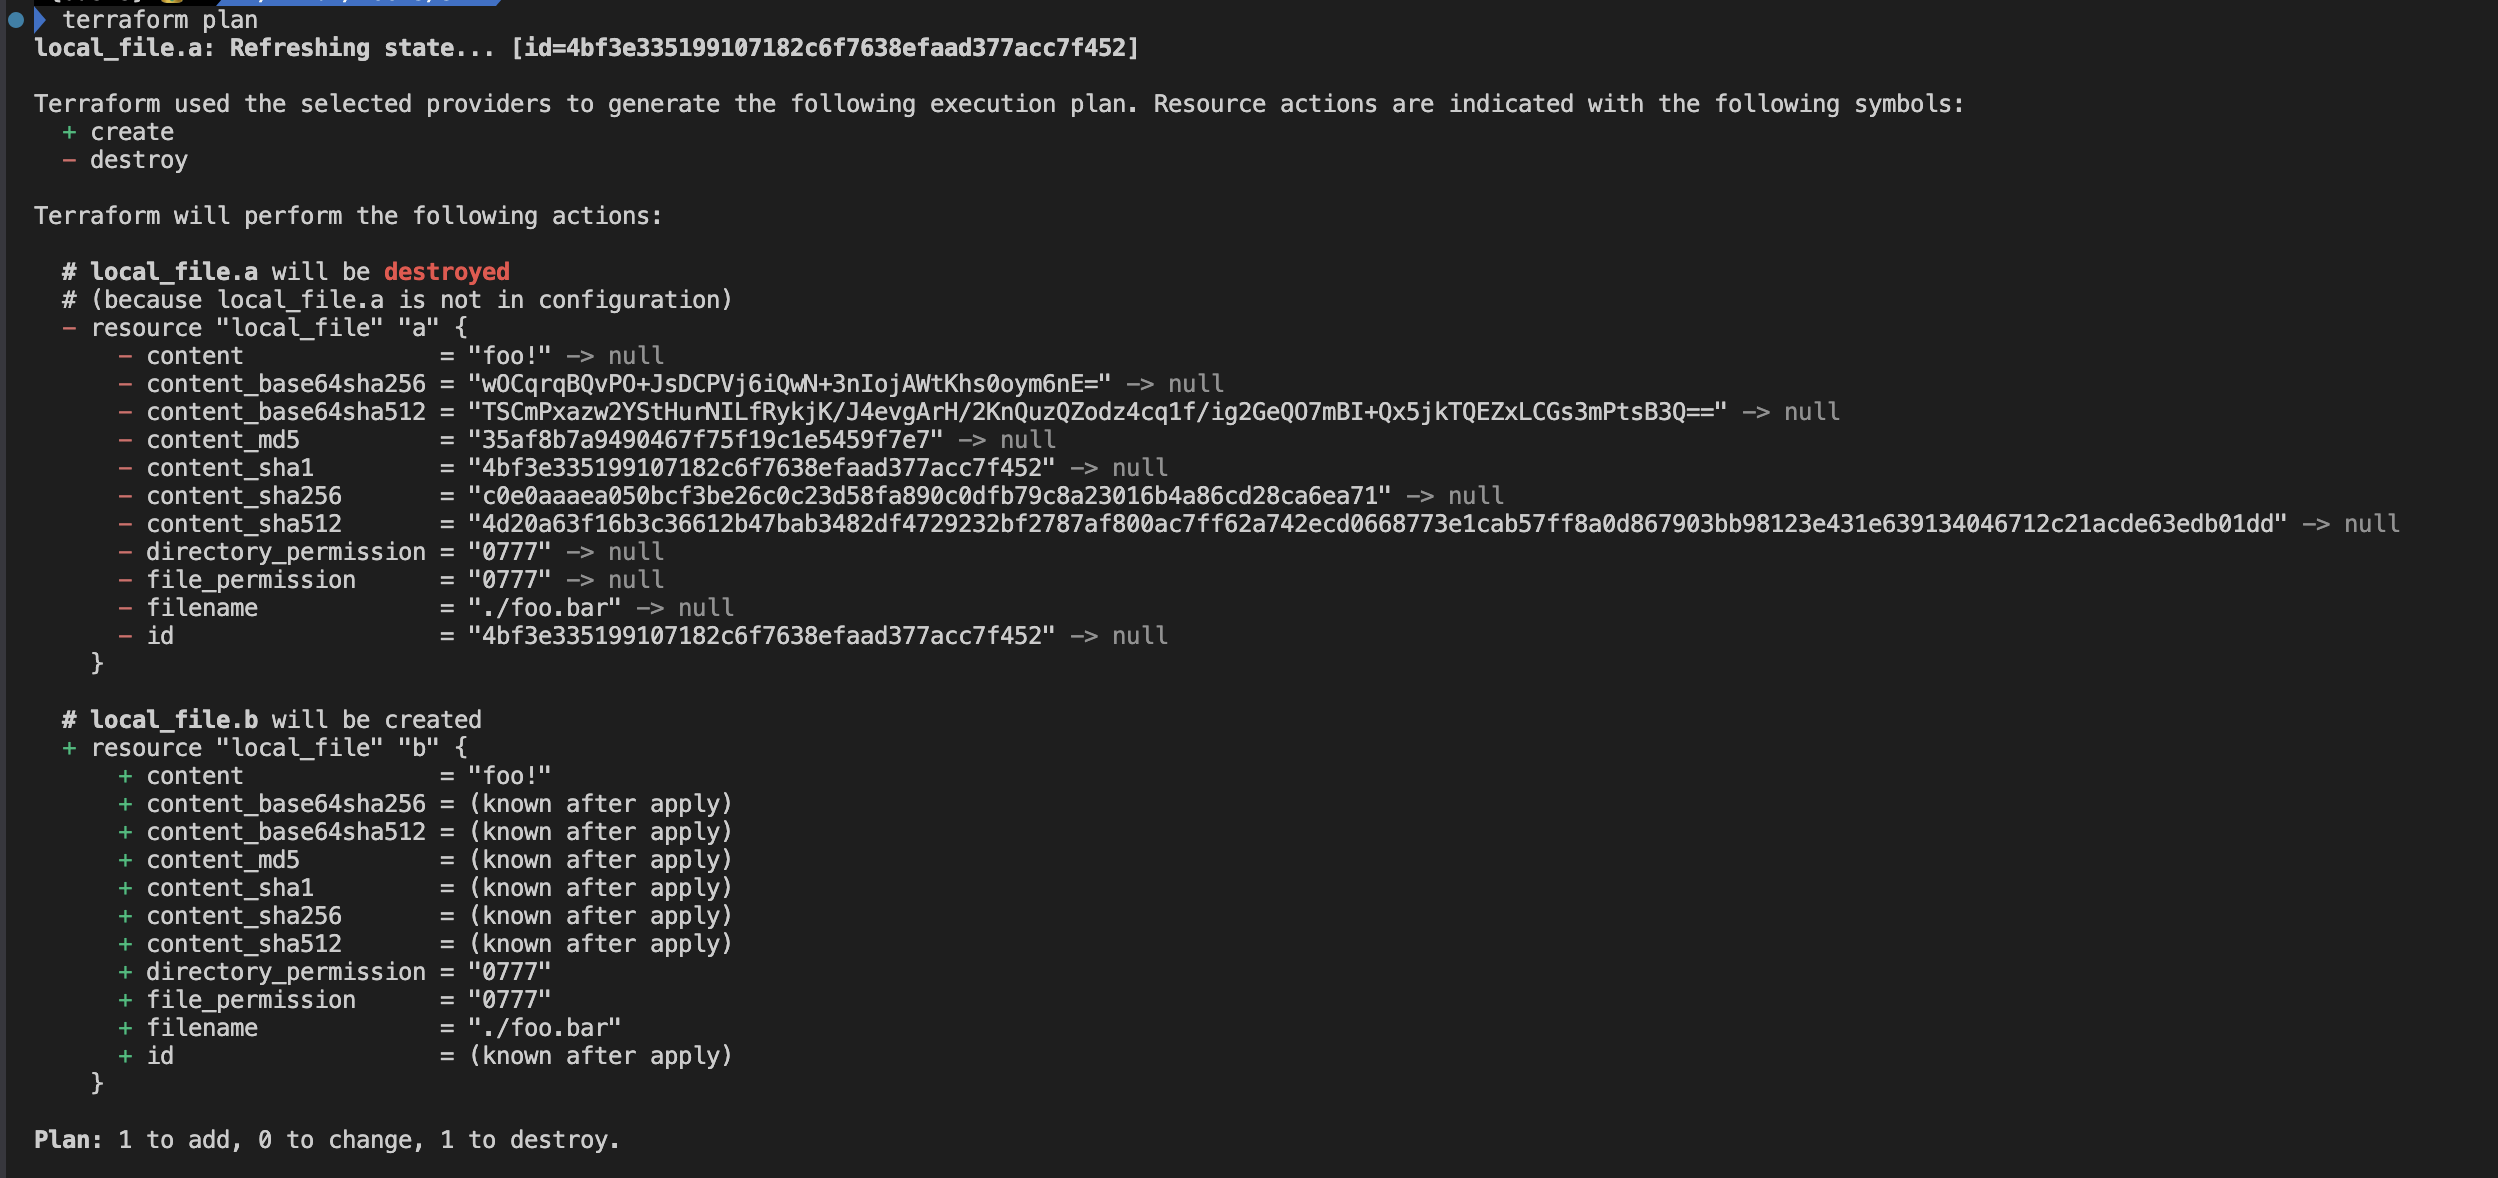
아래 local_file 의 이름을 a → b로 변경 가정
resource "local_file" "b" {
  content  = "foo!"
  filename = "${path.module}/foo.bar"
}

output "file_content" {
  value = local_file.b.content
}- plan 수행
- main.tf 파일 내용 변경
local_file.a 의 프로비저닝 결과를 유지한 채 이름을 변경하기 위해 moved 블록을 활용
resource "local_file" "b" {
  content  = "foo!"
  filename = "${path.module}/foo.bar"
}

moved {
  from = local_file.a
  to   = local_file.b
}

output "file_content" {
  value = local_file.b.content
}- 실행
제거나 생성되지 않고 이름만 변경됨