
부스팅 알고리즘 구현
Adaboost
import pandas as pd
import numpy as np

from sklearn.model_selection import train_test_split

import warnings
warnings.filterwarnings('ignore')

# 데이터셋을 구하는 함수 설정
def get_human_dataset():
    # 데이터 파일들은 공백문자로 필리딩이 있으므로 read_csv에서 공백문자를 분리문자로 할당
    feature_name_df = pd.read_csv('human_activity/features.txt', sep='\s+',
                                  header=None, names=['column_index', 'column_name'])

    # 데이터프레임의 피처명을 리스트 객체로 변환하기 위해 리스트 객체로 다시 반환
    feature_name = feature_name_df.iloc[:, 1].values.tolist()

    # 학습 데이터셋과 테스트 데이터셋 피처 데이터를 데이터프레임으로 로딩
    feature_name = feature_name

    X_train = pd.read_csv('human_activity/train/X_train.txt', sep='\s+', names=feature_name)
    X_test = pd.read_csv('human_activity/test/X_test.txt', sep='\s+', names=feature_name)

    # 학습 레이블과 테스트 레이블 데이터를 데이터 프레임으로 로딩, 칼럼명은 action으로 부여
    y_train = pd.read_csv('human_activity/train/y_train.txt', sep='\s+', names=['action'])
    y_test = pd.read_csv('human_activity/test/y_test.txt', sep='\s+', names=['action'])

    # 로드된 학습/테스트 데이터프레임을 모두 반환
    return X_train, X_test, y_train, y_test

# 학습/테스트 데이터 프레임의 반환
X_train, X_test, y_train, y_test = get_human_dataset()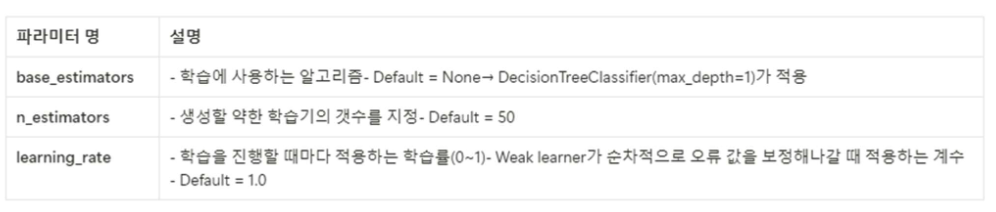
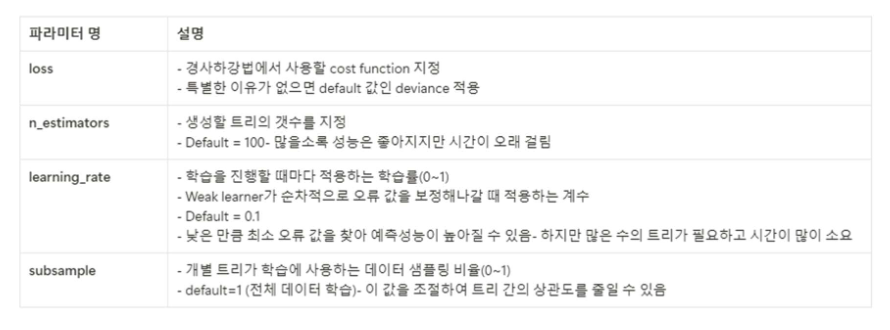
GRadient Boost Machine
# Gradient Boosting Classifier 불러오기
from sklearn.ensemble import GradientBoostingClassifier
from sklearn.metrics import accuracy_score
import time

# GBM 수행시간 측정을 위한 시작시간 설정
start_time = time.time()

# 예시 데이터셋 불러오기
gb_clf = GradientBoostingClassifier(random_state=0)
gb_clf.fit(X_train, y_train.values)
gb_pred = gb_clf.predict(X_test)
gb_accuracy = accuracy_score(y_test, gb_pred)

print('GBM 정확도: {:.4f}'.format(gb_accuracy))
print('GBM 수행 시간: {:.1f}초'.format(time.time() - start_time))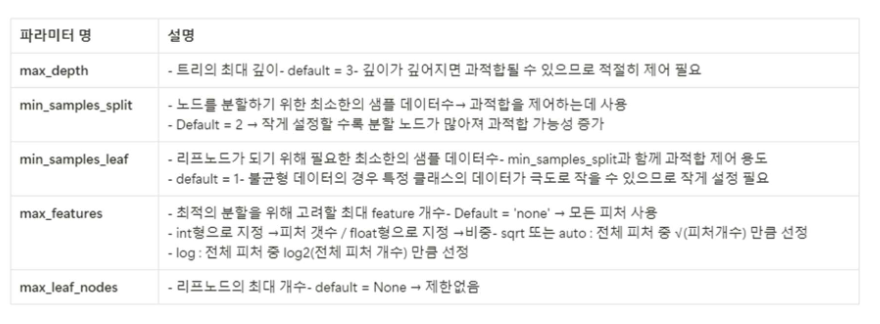
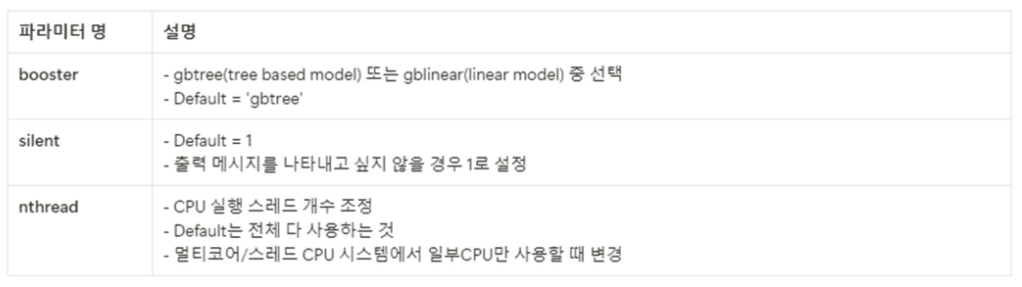
XGBoost
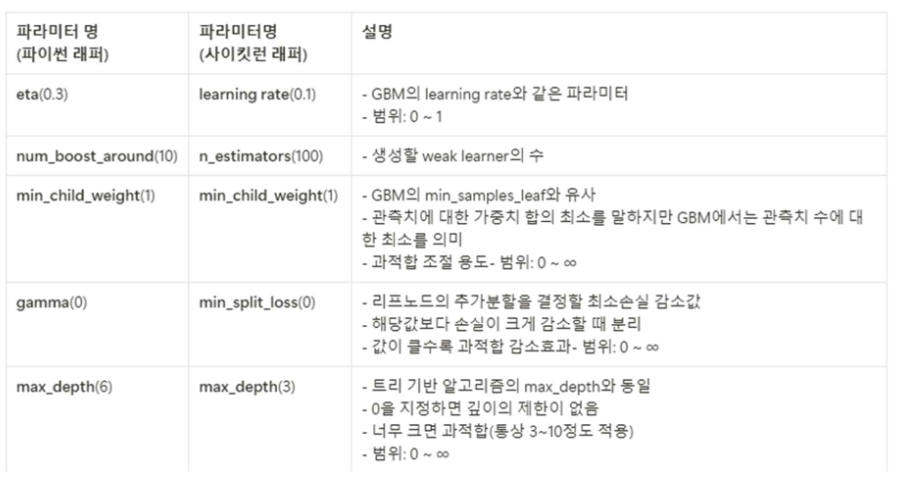
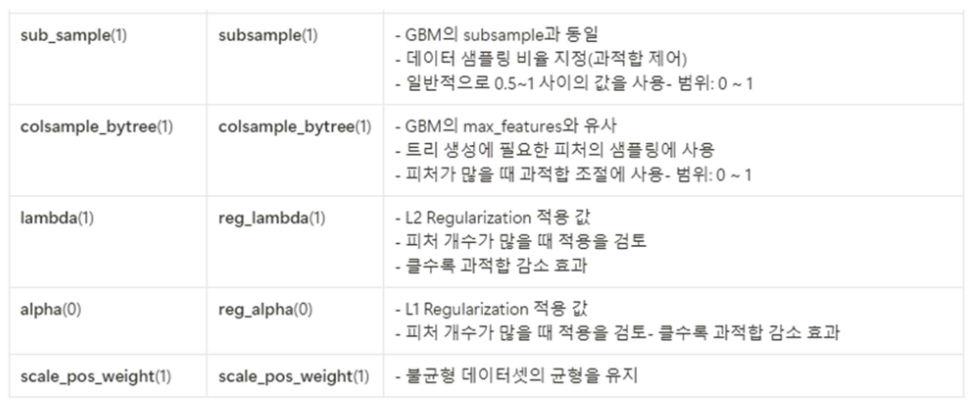
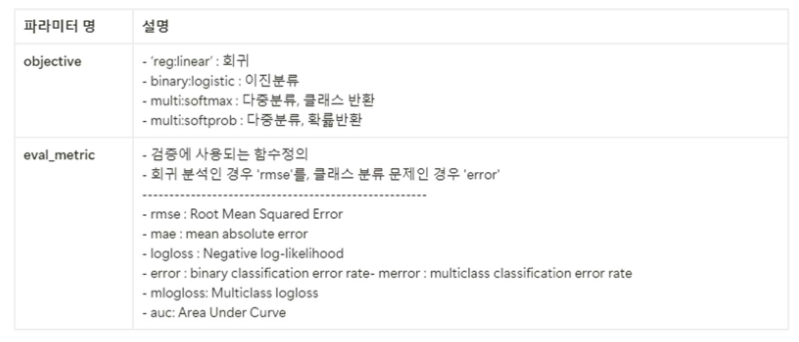
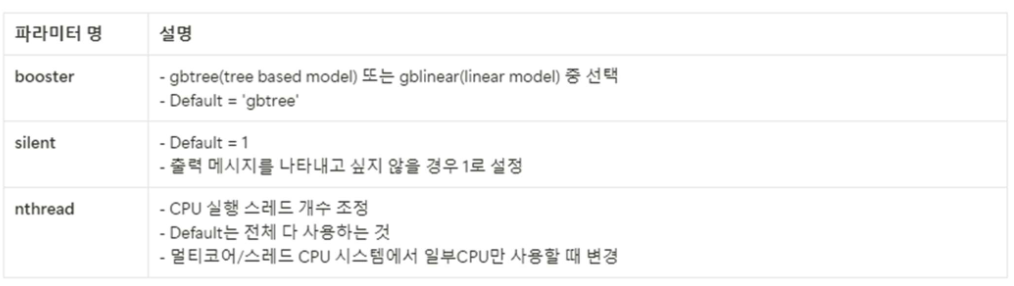
Santander Customer Satisfaction 실습
import pandas as pd
import numpy as np
import matplotlib.pyplot as plt
import matplotlib

cust_df = pd.read_csv('/content/train.csv', encoding='latin-1')
print('데이터셋 형태:', cust_df.shape)
cust_df.head(3)
cust_df.info()
<class 'pandas.core.frame.DataFrame'> RangeIndex: 76020 entries, 0 to 76019 Columns: 371 entries, ID to TARGET dtypes: float64(111), int64(260) memory usage: 215.2 MB
cust_df.isnull().sum().sum()0
print(cust_df['TARGET'].value_counts())
unsatisfied_cnt = cust_df[cust_df['TARGET']==1]['TARGET'].count()
total_cnt = cust_df['TARGET'].count()
print('unsatisfied한 비율은 {:.2f}%'.format(unsatisfied_cnt/total_cnt*100))
TARGET
0 73012
1 3008
Name: count, dtype: int64
unsatisfied한 비율은 3.96%
cust_df.describe()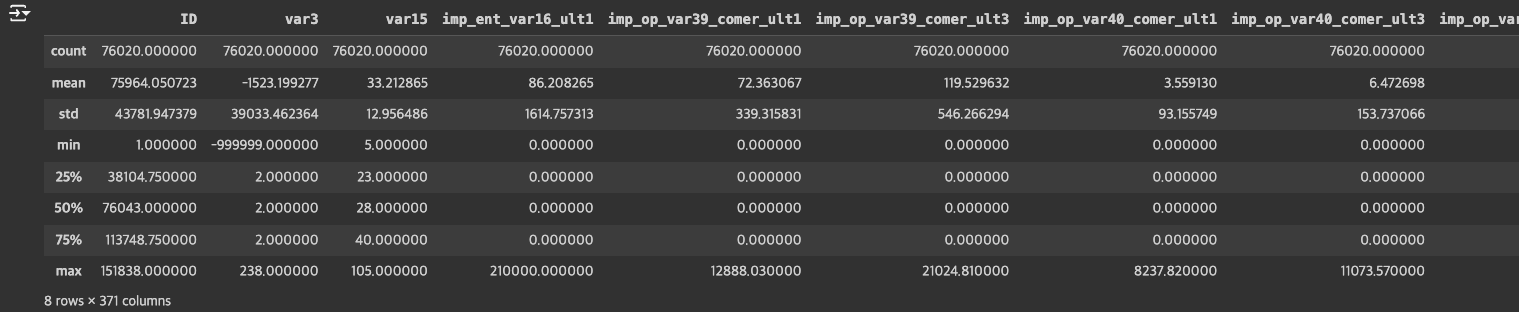
cust_df['var3'].value_counts(ascending=False).head(10)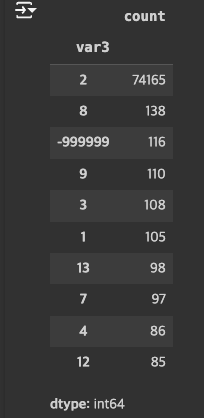
cust_df['var3'].replace(-999999, 2, inplace=True)
cust_df = cust_df.drop(['ID'], axis=1)

# 피처셋과 레이블 셋을 분리
X_features = cust_df.iloc[:, :-1]
y_labels = cust_df.iloc[:, -1]
print('피처 데이터 세트 형태: {}'.format(X_features.shape))
피처 데이터 세트 형태: (76020, 369)
from sklearn.model_selection import train_test_split

X_train, X_test, y_train, y_test = train_test_split(X_features, y_labels,
                                                    test_size=0.2, random_state=0)

train_cnt = y_train.count()
test_cnt = y_test.count()

print("학습 세트 형태: {}, 테스트 세트 형태: {}".format(X_train.shape, X_test.shape))

print("\n학습 세트 레이블 값 분포 비율: ")
print(y_train.value_counts()/train_cnt)

print("\n테스트 세트 레이블 값 분포 비율: ")
print(y_test.value_counts()/test_cnt)
학습 세트 형태: (60816, 369), 테스트 세트 형태: (15204, 369)
학습 세트 레이블 값 분포 비율:
TARGET
0 0.960964
1 0.039036
Name: count, dtype: float64
테스트 세트 레이블 값 분포 비율:
TARGET
0 0.9583
1 0.0417
Name: count, dtype: float64
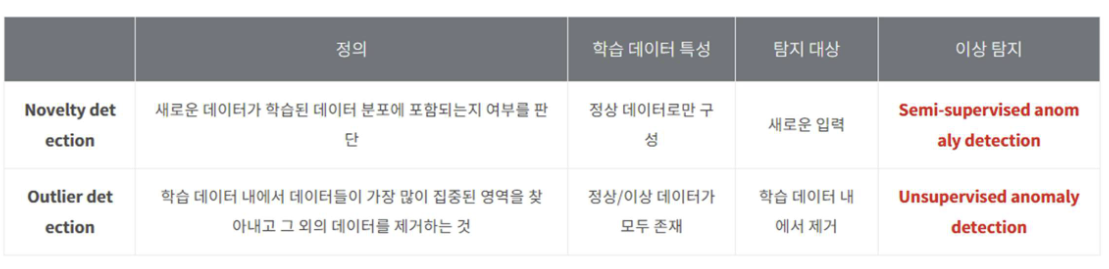
이상탐지(Anomaly Detection)
Local Outlier Factor
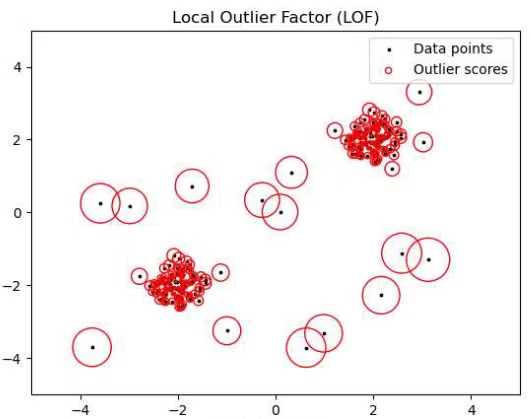
- LOF는 각각의 관측치가 데이터 안에서 얼마나 벗어나 있는가에 대한 정도(이상치 정도)를 냄. LOF의 가장 중요한 특징은 모든 데이터를 전체적으로 고려하는 것이 아니라, 해당 관측치의 주변 데이터(neighbor)를 이용하여 국소적(local) 관점으로 이상치 정도를 파악
IsolationForest
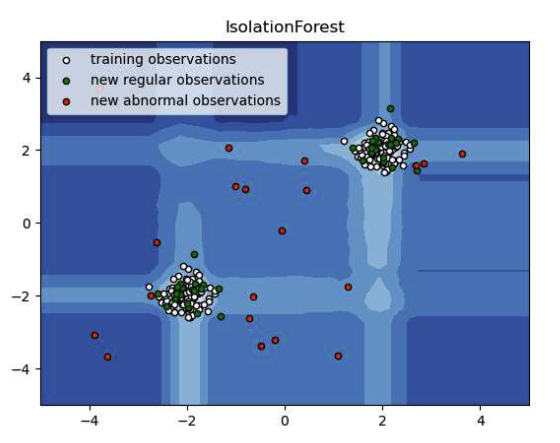
- Unsupervised Anomaly Detection 중 하나로 현재 갖고 있는 데이터 중 이상치를 탐지할 때 주로 사용. 이름에서 볼 수 있듯이 tree 기반으로 구현되며, 랜덤으로 데이터를 split하여 모든 관측치를 고립시키며 구현
- 학습 방법
- 정상 데이터는 tree의 terminal node와 근접하며, 경로길이가 큼
- 이상치는 tree의 root node와 근접하며, 경로길이가 작음
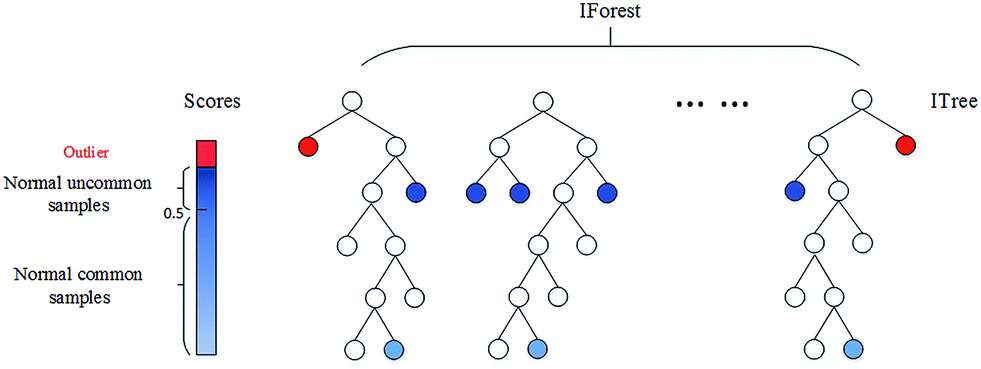
- Sub-sampling : 비복원 추출로 데이터 중 일부를 샘플링
- 변수 선택 : 데이터 X의 변수 중 q를 랜덤 선택
- split point 설정 : 변수 q의 범위(max~min) 중 uniform하게 split point를 선택
- 1~3번 과정을 모든 관측치가 split 되거나, 임의의 split 횟수까지 반복(=재귀 나무)하며, 경로길이를 모두 저장
교차 검증(Cross Validation)

-
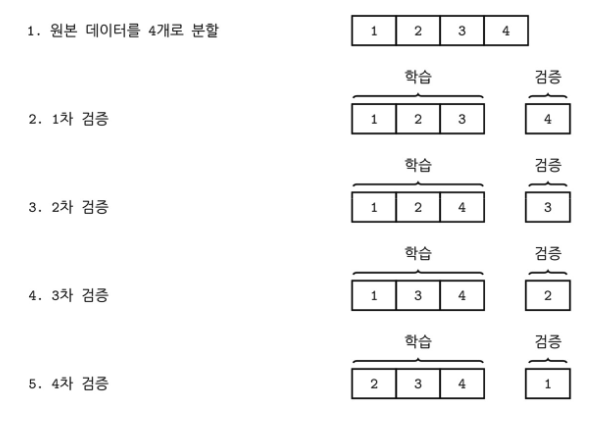
Train 과 Test 으로 구성이 되어 있음
-
Train set을 다시 Validation과 Train으로 나누지 않으면 모델 검증을 위해 Test을 사용해야하며 고정된 Test셋을 가지고 모델 성능을 확인하고 파라미터를 수정할 경우, Test set에 과적합이 올수가 있음
-
Cross Validation 기법 종류
- K-Fold Cross Validation(k-겹 교차 검증)
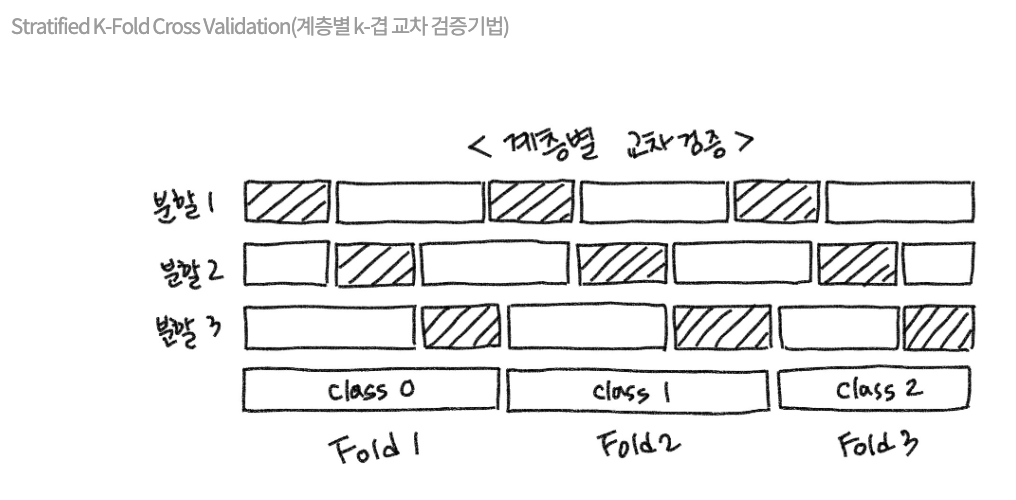
- Stratified k-fold cross validation(계층별 k-겹 교차검증)
- Hold-Out Cross Validation(홀드 아웃 교차 검증)
- Leave-p-Out Cross Validation
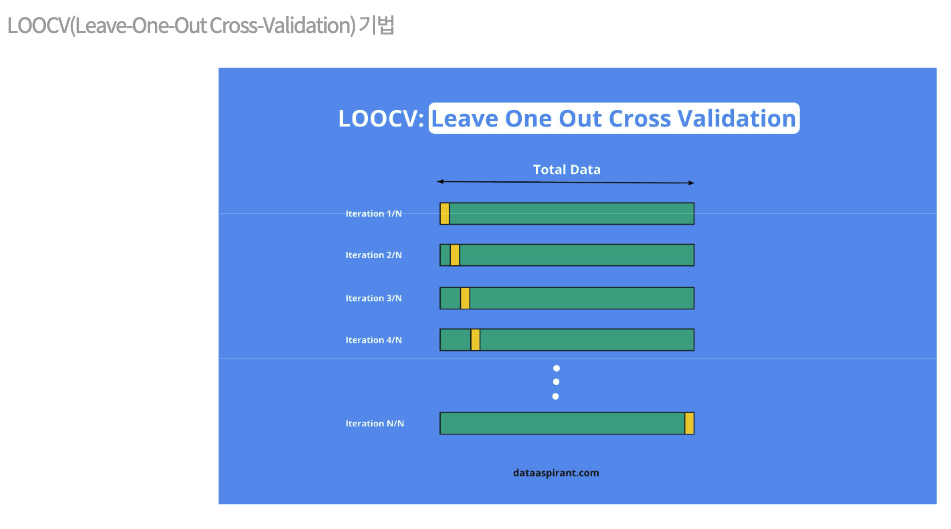
- Leave-One-Out Cross Validation
-
가중치 업데이트에는 영향을 미치지않지만 학습과정에서 참조하며, 성능에는 활용
K-Fold 교차검증기법
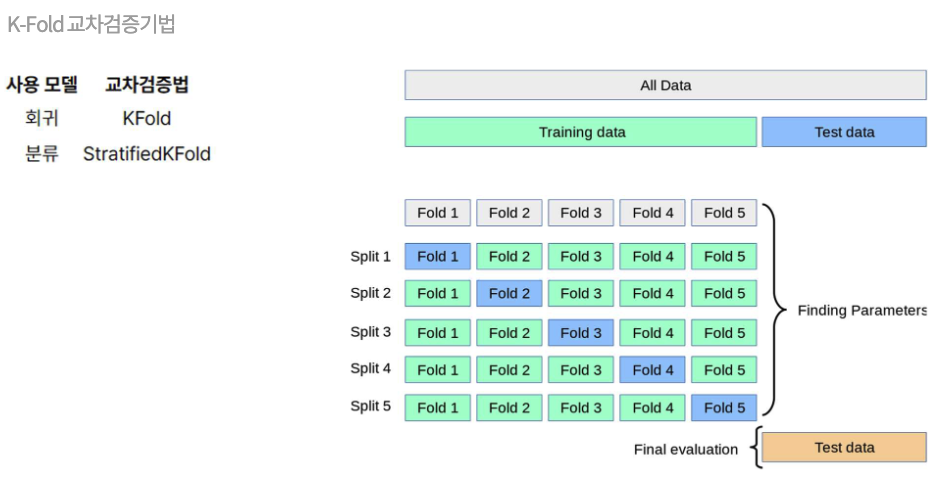
Stratified K-Fold Cross Validation기법
LOOCV기법
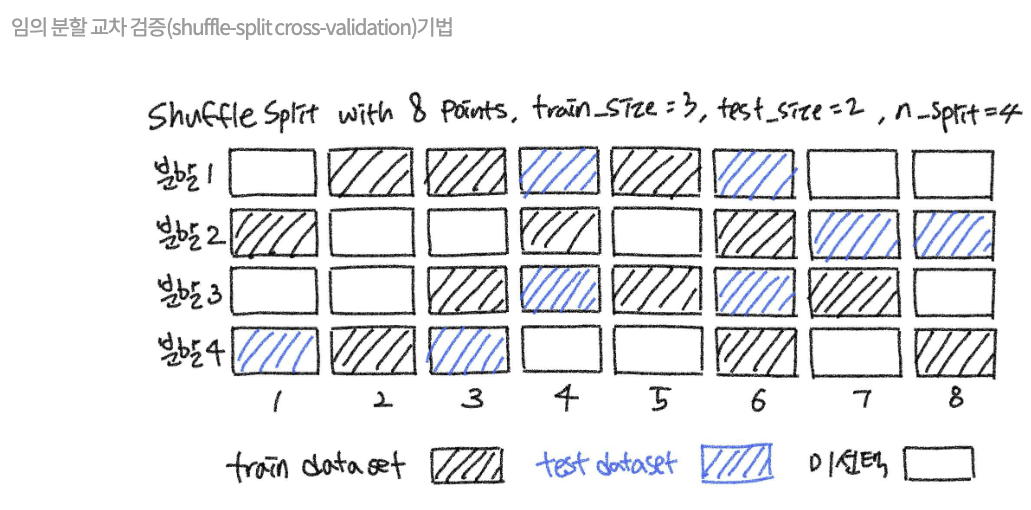
Shuffle-split cross-validation
자료참고
https://velog.io/@vvakki_/LOFLocal-Outlier-Factor
https://velog.io/@vvakki_/Isolation-Forest-미완성