RabbitMQ란?
메시지 브로커로 데이터(메시지)를 송신자(프로듀서)로 부터 수신자(컨슈머)에게 전달하는 중간 매개채 역할.
메시지를 큐(Queue)에 저장하고, 필요할 때 적절한 수신자에게 전달.
RabbitMQ 구성요소
- 메시지 : RabbitMQ를 통해 전달 되는 데이터 단위 ex) 사용자 등록정보, 주문 내역 등
- 프로듀서 : 메시지를 생성하고 RabbitMQ에 보내는 역할
- 큐 : 메시지를 큐에 저장하고 컨슈머에게 전달
- 컨슈머 : 큐에서 메시지를 가져와 처리하는 역할
- 익스체인지 : 메시지를 적절할 큐로 라우팅하는 역할. 프로듀서가 메시지를 익스체인지에 보내고 익스체인지가 메시지를 큐로 전달
AMQP(Advanced Message Queuing Protocol)
메시지 브로커를 위한 프로토콜.
메시지 생성, 전송, 큐잉, 라우팅 등을 표준화하여 메시지 브로커가 상호 운용될 수 있게 함.
- 메시지(Message): 전송되는 데이터 단위
- 큐(Queue): 메시지를 저장하고 전달하는 구조입
- 익스체인지(Exchange): 메시지를 큐로 라우팅하는 역할
- 바인딩(Binding): 익스체인지와 큐를 연결하는 설정. 바인딩을 통해 메시지가 어느 큐로 전달될지 정의( 큐의 이름과 바인딩의 이름을 통일)
RabbitMQ 실습
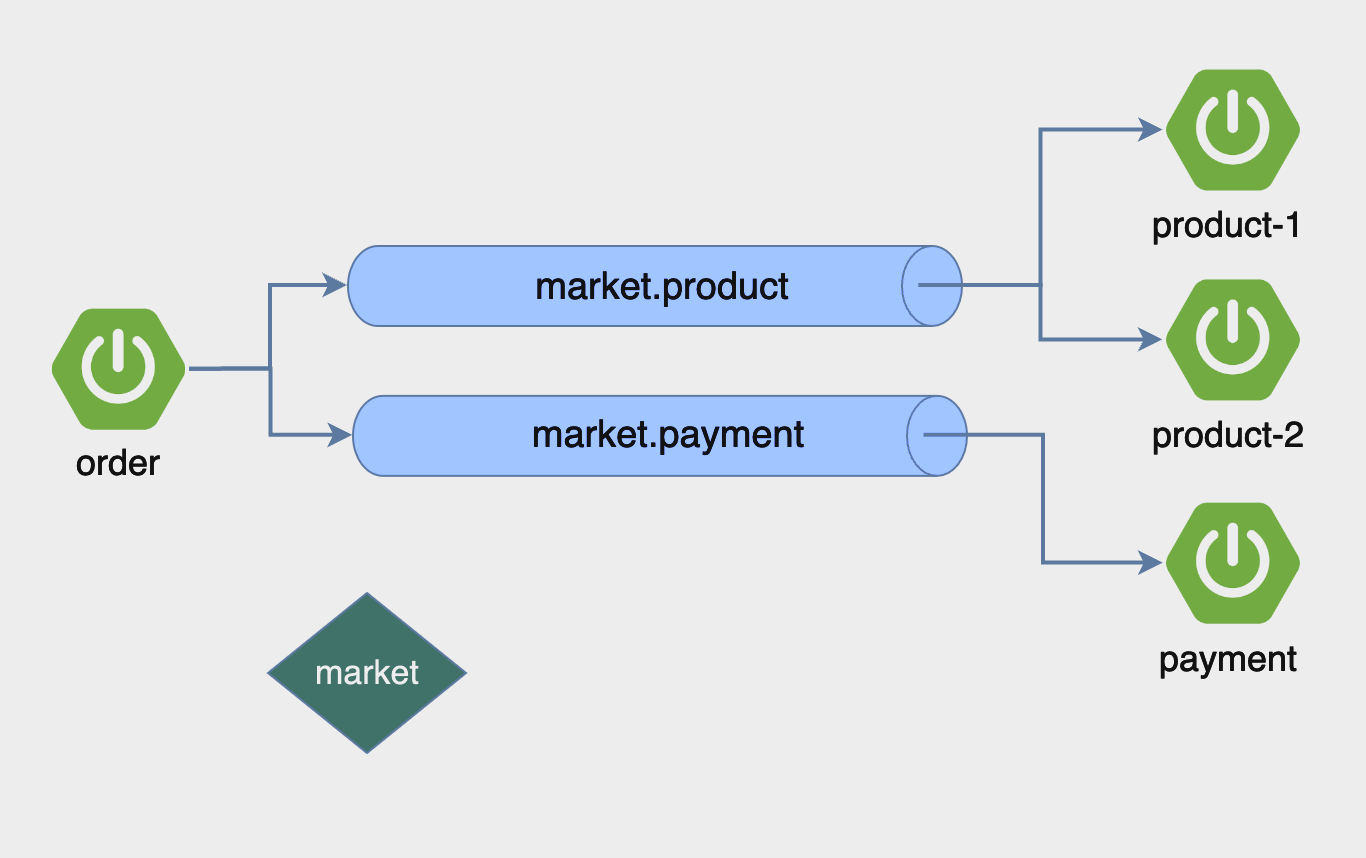 market == 익스체인지
RabbitMQ 도커 실행
5672 = AMQP 포트 15672 = 관리자포트
docker run -d --name rabbitmq -p5672:5672 -p 15672:15672 --restart=unless-stopped rabbitmq:managementlocalhost:15672 접속. 기본 username/password는 guest/guest.
Order Application(프로듀서) 실행
build.gradle rabbitmq 디펜던시 추가
dependencies {
	// rabbitMQ 설정
	implementation 'org.springframework.boot:spring-boot-starter-amqp'
	implementation 'org.springframework.boot:spring-boot-starter-web'
	compileOnly 'org.projectlombok:lombok'
	annotationProcessor 'org.projectlombok:lombok'
	testImplementation 'org.springframework.boot:spring-boot-starter-test'
	testImplementation 'org.springframework.amqp:spring-rabbit-test'
	testRuntimeOnly 'org.junit.platform:junit-platform-launcher'
}
application.properties
spring.application.name=order

#exchange 설정
message.exchange=market

# 큐이름 설정
message.queue.product=market.product
message.queue.payment=market.payment

spring.rabbitmq.host=localhost
spring.rabbitmq.port=5672
spring.rabbitmq.username=guest
spring.rabbitmq.password=guest
RabbitMQ config 설정
@Configuration
public class OrderApplicationQueueConfig {

    @Value("${message.exchange}")
    private String exchange;
    @Value("${message.queue.product}")
    private String queueProduct;
    @Value("${message.queue.payment}")
    private String queuePayment;

	// exchange 생성
    @Bean
    public TopicExchange exchange(){return new TopicExchange(exchange);}

	// Queue 생성
    @Bean public Queue queueProduct(){return new Queue(queueProduct);}
    @Bean public Queue queuePayment(){return new Queue(queuePayment);}


    // Queue와 exchange 바인딩 설정
    @Bean public Binding bindingProduct(){
        return BindingBuilder.bind(queueProduct()).to(exchange()).with(queueProduct);
    }
    @Bean public Binding bindingPayment(){
        return BindingBuilder.bind(queuePayment()).to(exchange()).with(queuePayment);
    }

}
orderService
@Service
@RequiredArgsConstructor
public class OrderService {


    @Value("${message.queue.product}")
    private String productQueue;
    @Value("${message.queue.payment}")
    private String paymentQueue;

    // rabbitMQ로 요청을 보낼 때 사용
    private final RabbitTemplate rabbitTemplate;

    public void createOrder(String orderId){
        // productQueue로 orderId 메시지를 보냄
        rabbitTemplate.convertAndSend(productQueue, orderId);
        // paymentQueue로 orderId 메시지를 보냄
        rabbitTemplate.convertAndSend(paymentQueue, orderId);
    }

}
orderController
@RestController
@RequiredArgsConstructor
public class OrderController {

    private final OrderService orderService;

    @GetMapping("/order/{id}")
    public String order(@PathVariable("id") String id){
        orderService.createOrder(id);
        return "Order complete";
    }
}
Payment Application(컨슈머) 실행
application.properties
spring.application.name=payment

# 큐이름 설정
message.queue.payment=market.payment

spring.rabbitmq.host=localhost
spring.rabbitmq.port=5672
spring.rabbitmq.username=guest
spring.rabbitmq.password=guest
Payment App은 컨슈머로 큐이름만 설정
PaymentEndpoint
@Slf4j
@Component
public class PaymentEndpoint {

    @Value("${spring.application.name}")
    private String appName;

    @RabbitListener(queues = "${message.queue.payment}")
    public void receiveMessage(String orderId){
        log.info("receive orderId: {}, appName: {}",orderId, appName);
    }
}
Product Application(컨슈머) 실행
application.properties
spring.application.name=product

# 큐이름 설정
message.queue.product=market.product

spring.rabbitmq.host=localhost
spring.rabbitmq.port=5672
spring.rabbitmq.username=guest
spring.rabbitmq.password=guest
PaymentEndpoint
@Slf4j
@Component
public class ProductEndpoint {
    @Value("${spring.application.name}")
    private String appName;

    @RabbitListener(queues = "${message.queue.product}")
    public void receiveMessage(String orderId){
        log.info("receive orderId: {}, appName: {}",orderId, appName);

    }
}
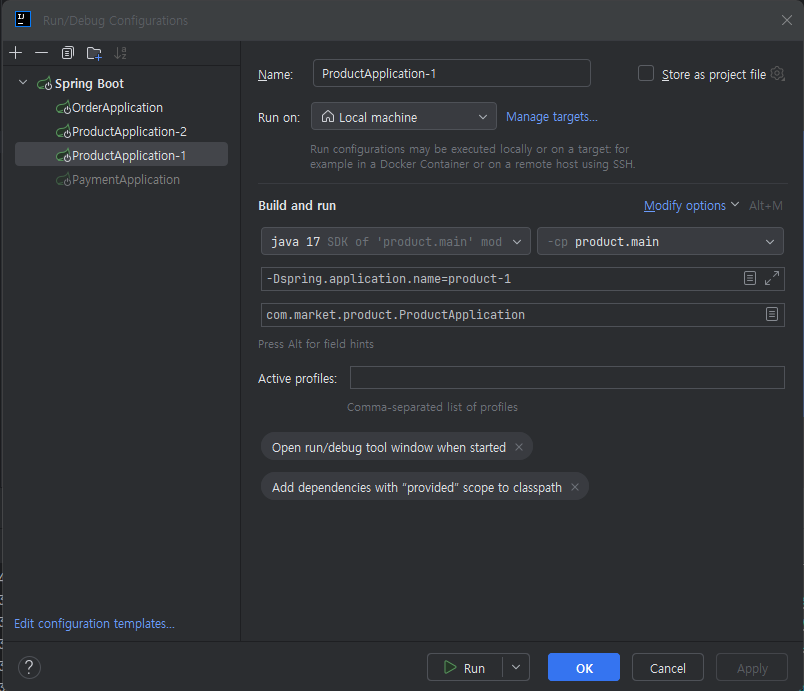
Product App을 두개 실행하기 위해 intellij 구성편집 설정
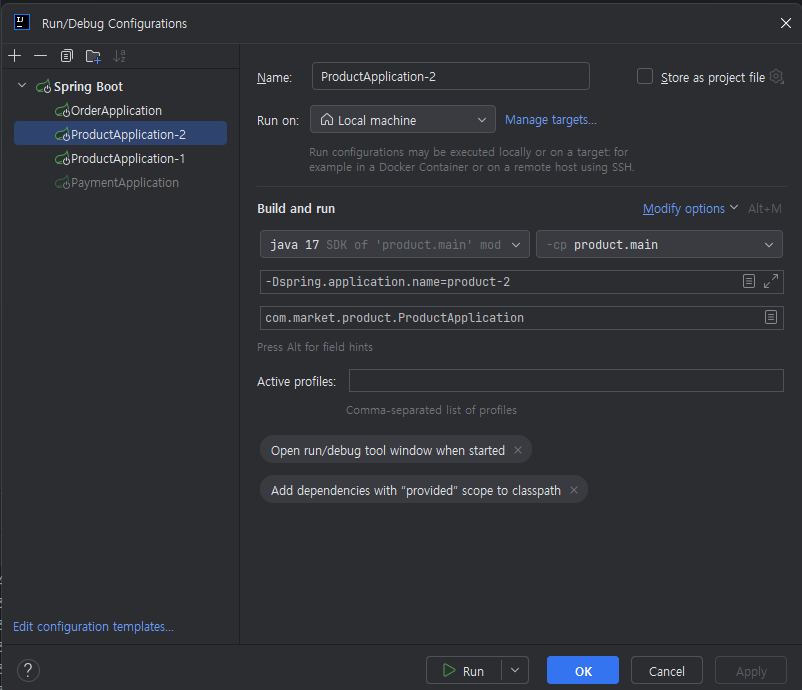
결과
Order App(프로듀서) 메시지 생성
Order App에서 localhost:8080/order/1로 요청을 보내서 orderId 메시지 생성
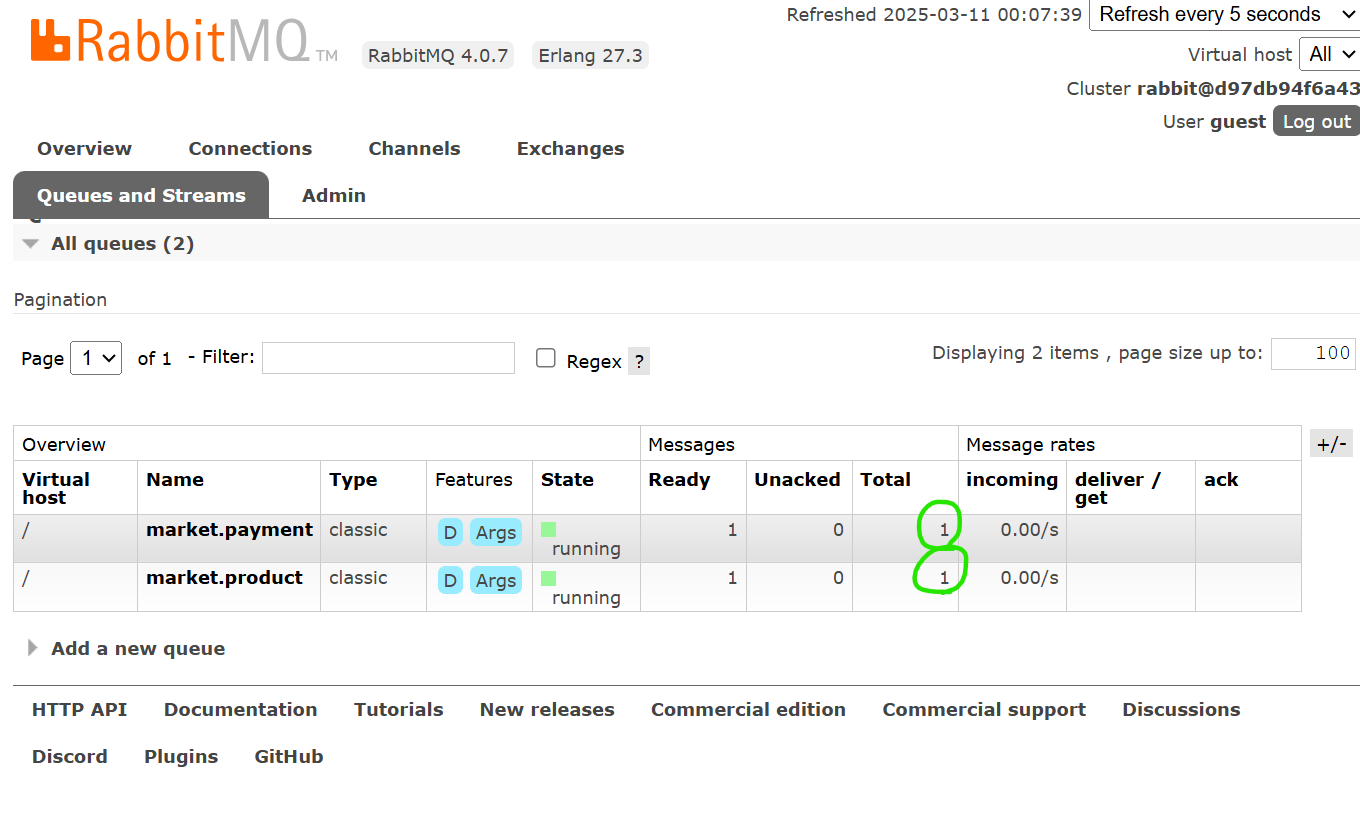 큐의 total을 보면 1로 patyment큐와 product큐에 메시지가 저장이 됨.
Payment App(컨슈머) 실행
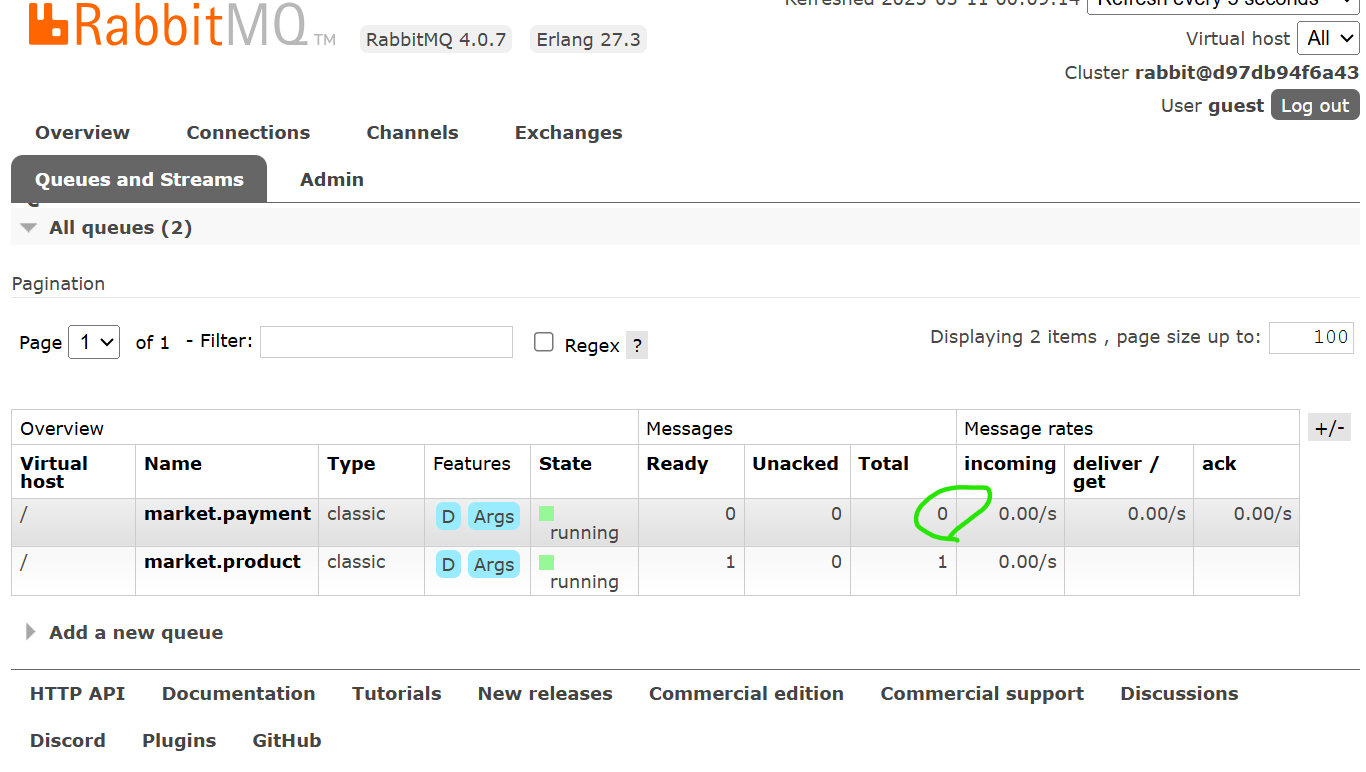
 Paymnet App 실행 시 큐의 total 0으로 바뀌고, 큐에서 메시지를 가져와 로그에 orderId가 찍힘.
Product-1 App(컨슈머) 실행
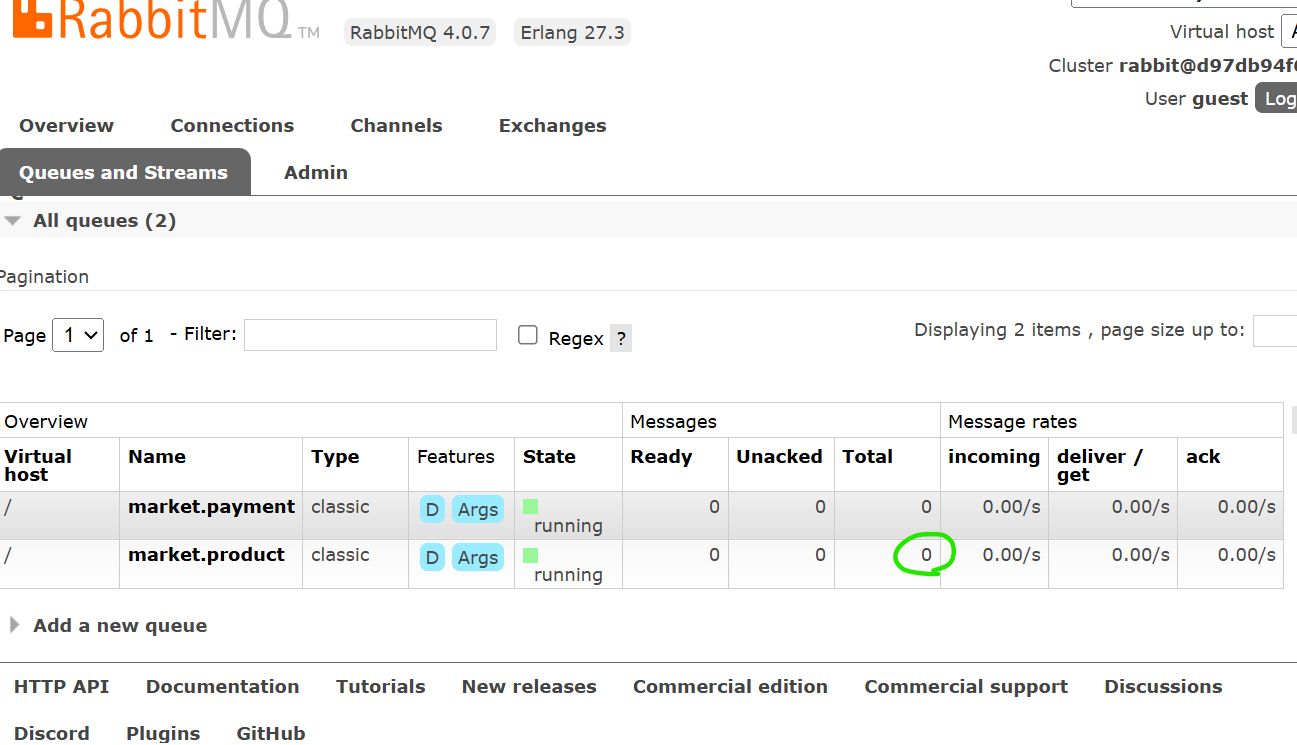
 Product-1 App 실행후 product큐에서 메시지를 가져와 로그 출력.
Product-2 App(컨슈머) 실행

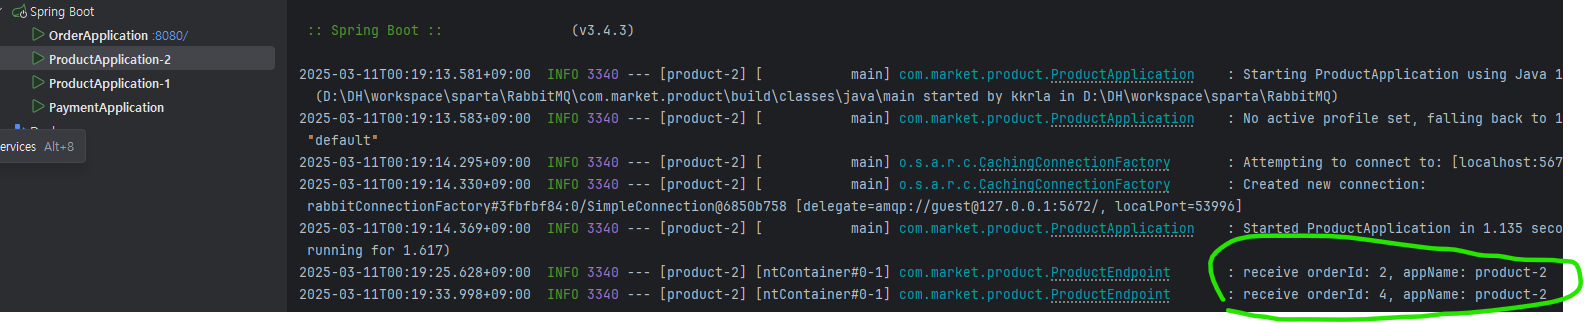 Order App에서 요청할 때 마다 Product1,2에서 번갈아 가며 메시지를 수신 받음.
