JSX
Introducing JSX (putting markup into JavaScript)
const name = 'Josh Perez’;
const element = <h1>Hello, {name}</h1>;- JSX is a syntax extension to JavaScript that allows us to define React elements using a tag-based syntax directly within our JavaScript code
- Even if they look very similar, JSX and HTML are two different things. JSX is just one way of creating React elements.
- React에서 UI를 정의하기 위해서 사용
- React API에서 직접 element creation도 가능하나, JSX로 정의하는 것이 직관적이어서 이 방법을 많이 사용
React.createElement(component, props, …children) functionThe rules of JSX (1)
반드시 부모 요소 하나가 감싸는 형태여야 한다.
- Return a single root element: to return multiple elements from a component, wrap them with a single parent tag.
< >is a fragment (<>...</>syntax or <React.Fragment>...</React.Fragment>)
<>
<img
        src="https://i.imgur.com/yXOvdOSs.jpg"
        alt="Hedy Lamarr"
        class="photo"
/>
<ul>
    <li>Invent new traffic lights</li>
    <li>Rehearse a movie scene</li>
    <li>Improve the spectrum technology</li>
</ul>
</>
export default function Avatar() {
const avatar = 'https://i.imgur.com/7vQD0fPs.jpg';
const description = 'Gregorio Y. Zara';
return (
<img
className="avatar"
src={avatar}
alt={description}
/>
);
}- Close all the tags : explicitly close all the tags like
The rules of JSX (2)
- Expressions in curly braces : embed JavaScript expressions within curly braces {} inside JSX elements
- Using “double curlies”: CSS and other objects in JSX
- JavaScript object inside the curly braces
export default function TodoList() {
   return (
       <ul style={{backgroundColor: 'black', color: 'pink'}}>
           <li>Improve the videophone</li>
       </ul>);
Components
What are Components in React?
- What are they?
- Components are JavaScript functions responsible for rendering content.
- React lets you build user interfaces out of individual pieces called components. Create your own React components like Thumbnail, LikeButton, and Video. Then combine them into entire screens, pages, and apps.
- How are Components and Props Utilized?
- Components, in the form of JavaScript functions, return a React element, which can also be defined as Class component.
- Typically, these components are constructed using HTML-like syntax in the JSX format to describe the structure and behavior of the user interface.
- Props, short for properties, are used to pass data from one component to another. They are attributes or parameters attached to elements within React.
- Props enable components to adapt and customize the content they render based on the data passed to them.
Props는 컴포넌트가 전달된 데이터를 기반으로 렌더링하는 내용을 적응하고 사용자 정의할 수 있게 합니다.
Define Components
function Welcome(props) {
    return <h1>Welcome Back, {props.name}</h1>;
}- This React component (a function) accepts a single “props” (which stands for properties) object argument with data and returns a React element.
- It is a “function component” because it is literally a JavaScript function.
- Props are read-only. All React components must act like pure functions with respect to their props.
React 컴포넌트는 자신의 props에 대해 순수 함수(pure function)처럼 동작해야 한다
- We can define a component using ES6 class
class Welcome extends React.Component {
    render() {
        return <h1>Hello, {this.props.name}</h1>;
    }
}
Composing Components
- Components can refer to other components in their output.
- A button, a form, a dialog, a screen: in React apps, all those are commonly expressed as components.
- props are the only argument to your component. React component functions accept a single argument, a props object:
- props are read-only snapshots
- i.e., props are immutable
function Welcome(props) {
    return <h1>Hello, {props.name}</h1>;
}
function App() {
    return (
        <div>
            <Welcome name="Sara" />
            <Welcome name="Cahal" />
            <Welcome name="Edite" />
        </div>
    );
}
Rules of props
- Parameter passing:
<Avatar person={{ name: 'Lin Lanying', imageId: '1bX5QH6' }} size={100} />// Avatar 컴포넌트 내부에서의 예상 코드
function Avatar({ person, size }) {
const { name, imageId } = person;
return (
<div>
<img
src={`https://example.com/images/${imageId}.jpg`}
alt={name}
style={{ width: size, height: size }}
/>
<p>{name}</p>
</div>
);
}
- Default prop
- The default value is only used if the size prop is missing or if you pass size={undefined}.
- But if you pass size={null} or size={0}, the default value will not be used
import React from 'react';

// Avatar 컴포넌트 정의
function Avatar({ size = 50 }) {
  return (
    <div>
      <p>Avatar Size: {size}</p>
    </div>
  );
}

// 부모 컴포넌트에서 Avatar를 사용하는 예제
function ParentComponent() {
  return (
    <div>
      {/* size 프롭을 전달하지 않을 경우, 디폴트 값인 50이 사용됨 */}
      <Avatar />

      {/* size 프롭을 명시적으로 전달하면 전달된 값이 사용됨 */}
      <Avatar size={100} />

      {/* size 프롭을 undefined로 전달하면 디폴트 값인 50이 사용됨 */}
      <Avatar size={undefined} />

      {/* size 프롭을 null로 전달하면 디폴트 값이 사용되지 않음 */}
      <Avatar size={null} />

      {/* size 프롭을 0으로 전달하면 디폴트 값이 사용되지 않음 */}
      <Avatar size={0} />
    </div>
  );
}

export default ParentComponent;
- Forwarding prop
function Profile(props) {
    return (
        <div className="card">
            <Avatar {...props} />
        </div>
    );
}
Avatar 컴포넌트에 프로필 정보를 forwarding
- Use spread syntax with restraint. If you’re using it in every other component, something is wrong. Often, it indicates that you should split your components and pass children as JSX.
"Spread syntax를 적절히 사용하세요. 만약 모든 다른 컴포넌트에서 사용하고 있다면, 어떤 문제가 있을 것입니다. 이는 종종 컴포넌트를 분리하고 JSX로 자식 컴포넌트를 전달해야 할 때를 나타냅니다
Importing and Exporting Components
- Make a new JS file to put the components in.
- Export your function component from that file (using either default or named exports).
- Import it in the file where you’ll use the component.
//App.js
import Gallery from './Gallery.js';
export default function App() {
    return (
        <Gallery />
    );
}
//Gallery.js
function Profile() {
return (
<img
src="https://i.imgur.com/QIrZWGIs.jpg"
alt="Alan L. Hart"
/>
);
}
export default function Gallery() {
return (
<section>
<h1>Amazing scientists</h1>
<Profile />
<Profile />
<Profile />
</section>
);
}Components and Props (Avatar Example)
import { getImageUrl } from './utils.js';
function Avatar(prop) {
    return (
        <img
            className="avatar"
            src={getImageUrl(prop.person)}
            alt={prop.person.name}
            width={prop.size}
            height={prop.size}
        />
    );
}
export default function Profile() {
    return (
        <div>
            <Avatar
                size={50}
                person={{
                    name: 'Lin Lanying',
                    imageId: '1bX5QH6'
                }}
            />
        </div>
    );
}
export function getImageUrl(person, size = 's') {
return (
'https://i.imgur.com/' +
person.imageId +
size +
'.jpg'
);
}- Default prop
- The default value is only used if the size prop is missing or if you pass size={undefined}.
- But if you pass size={null} or size={0}, the default value will not be used.
Conditional Rendering
Conditionally returning JSX
- If the isPacked prop is true, this code returns a different JSX tree. With this change, some of the items get a checkmark at the end.
- If you won’t want to render anything at all, you can return null
if (isPacked) {
    return null;
}
return <li className="item">{name}</li>;
체크된 자리에 null도 넣을수 있다~
function Item({ name, isPacked }) {
    if (isPacked) {
        return <li className="item">{name} ✔</li>;
    }
    return <li className="item">{name}</li>;
}
export default function PackingList() {
    return (
        <section>
            <h1>Sally Ride's Packing List</h1>
            <ul>
                <Item
                    isPacked={true}
                    name="Space suit"
                />
                <Item
                    isPacked={true}
                    name="Helmet with a golden leaf"
                />
                <Item
                    isPacked={false}
                    name="Photo of Tam"
                />
            </ul>
        </section>
    );
}- a compact(간결한) syntax for writing a conditional expression
Conditional (ternary) operator (? :)
function Item({ name, isPacked }) {
    return (
        <li className="item">
            {isPacked ? name + ' ✔' : name}
        </li>
    );
}
체크된 자리에 null을 넣을수 있다~ if문 대신 3항 연산자도 가능하다
Dynamic Rendering Lists
Rendering Data from Arrays
- Move the data into an array
- Map the people members into a new array of JSX nodes, listItems
- Return listItems from your component wrapped in a
<ul>
<ul>
    <li>Creola Katherine Johnson: mathematician</li>
    <li>Mario José Molina-Pasquel Henríquez: chemist</li>
    <li>Mohammad Abdus Salam: physicist</li>
    <li>Percy Lavon Julian: chemist</li>
    <li>Subrahmanyan Chandrasekhar: astrophysicist</li>
</ul>
를 아래처럼 바꿀 수 있다.
const people = [
    'Creola Katherine Johnson: mathematician',
    'Mario José Molina-Pasquel Henríquez: chemist',
    'Mohammad Abdus Salam: physicist',
    'Percy Lavon Julian: chemist',
    'Subrahmanyan Chandrasekhar: astrophysicist
];
export default function List() {
    const listItems = people.map(person =>
        <li>{person}</li>
    );
    return <ul>{listItems}</ul>;
}
Map()
- For dynamic rendering of the list (i.e., displaying multiple similar components), use map() function
- We assign the new array returned by the map() to the variable
- The use of map() function is as follows:
const numbers = [1, 2, 3, 4, 5];
const doubled = numbers.map((number) => number * 2);
console.log(doubled);
Filtering Arrays of Items
- The data can be extended like the below
- We may want to filter people. We can use filter() method (i.e., only show people whose profession is 'chemist‘)
const people = [{
    id: 0,
    name: 'Creola Katherine Johnson',
    profession: 'mathematician',
    accomplishment: 'spaceflight calculations',
    imageId: 'MK3eW3A'
}, {
    id: 1,
    name: 'Mario José Molina-Pasquel Henríquez',
    profession: 'chemist',
    accomplishment: 'discovery of Arctic ozone hole',
    imageId: 'mynHUSa'
}, {
    id: 2,
    name: 'Mohammad Abdus Salam',
    profession: 'physicist',
    accomplishment: 'electromagnetism theory',
    imageId: 'bE7W1ji'
}];
Filtering Arrays of Items
- Create a new array of just “chemist” people, chemists, by calling
filter()on thepeoplefiltering byperson.profession === 'chemist' map()overchemists- return the return the listItems from your component: from your component
//App.js
import { people } from './data.js';
import { getImageUrl } from './utils.js';
export default function List() {
    const chemists = people.filter(person =>
        person.profession === 'chemist'
    );
    const listItems = chemists.map(person =>
        <li>
            <img
                src={getImageUrl(person)}
                alt={person.name}
            />
            <p>
                <b>{person.name}:</b>
                {' ' + person.profession + ' '}
                known for {person.accomplishment}
            </p>
        </li>
    );
    return <ul>{listItems}</ul>;
}
Key
- A “key” is a string or a number that uniquely identifies it among other items in that array:
- Keys tell React which array item each component corresponds to, so that it can match them up later.
- This becomes important if your array items can move (e.g. due to sorting), get inserted, or get deleted.
- A well-chosen key helps React infer what exactly has happened, and make the correct updates to the DOM tree.
- Sources of keys
- Data from a database: If your data is coming from a database, you can use the database keys/IDs, which are unique by nature.
- Locally generated data: If your data is generated and persisted(지속되다) locally, use an incrementing counter, crypto.randomUUID() or a package like uuid when creating items.
Purity of your Components
Purity: Components as formulas (Pure Functions of JavaScript)
- A component must be pure, meaning:
- It should not change any objects or variables that existed before rendering.
- Same inputs, same output (for the same inputs, return the same JSX).
- You should not mutate(돌연변이하다) any of the inputs that your components use for rendering.
That(any of the inputs) includes props, state, and context. However, it is okay to mutate locally: change variables and objects that you just created while rendering.
React 컴포넌트에서 렌더링에 사용되는 입력값(Props, State, Context 등)을 직접 수정하거나 변경해서는 안 된다. 렌더링에 사용되는 입력값을 직접 변경하지 말고, 필요한 경우에는 지역적으로(mutate locally)만 변경해야 한다.
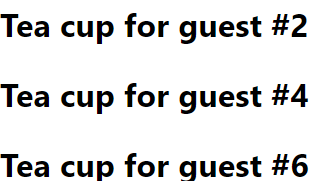
// Side Effect
let guest = 0;
function Cup() {
    guest = guest + 1;
    return <h2>Tea cup for guest #{guest}</h2>;
}
export default function TeaSet() {
    return (
        <>
            <Cup />
            <Cup />
            <Cup />
        </>
    );
}
이 코드가 두 번 실행되는 이유는 JSX에서 컴포넌트를 렌더링할 때 React는 먼저 컴포넌트 함수를 실행하여 반환 값(렌더링 될 JSX)을 얻고, 그 다음 실제로 JSX를 렌더링합니다.
따라서, guest = guest + 1; 코드는 한 번은 컴포넌트 함수를 실행할 때, 다른 한 번은 JSX를 렌더링할 때 실행되어 총 두 번 실행됩니다. 그래서 guest의 값이 2씩 증가하는 것입니다.
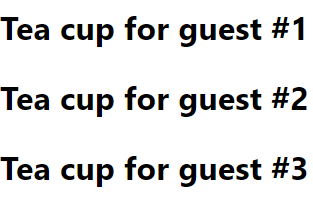
// No Side Effect
function Cup({guest}) {
    return <h2>Tea cup for guest #{guest}</h2>;
}
export default function TeaSet() {
    return (
        <>
            <Cup guest={1} />
            <Cup guest={2} />
            <Cup guest={3} />
        </>
    );
}