
💻 Vanilla JS를 이용한 서비스
Vanilla JS를 이용한 서비스
- vanilla js로 할 일 목록 만들기
- vanilla js로 내 위치의 날씨 만들기
HTML
- index.html
<html lang="en">
  <body>
    <header>
      <button class="change-name-btn hidden--visi">Change Name</button>
      <div class="weather"></div>
    </header>
    <main>
      <section class="clock">
        <h1 class="clock__title"></h1>
      </section>
      <section class="greeting">
        <h2 class="greeting__title">Hello, what's your name?</h2>
        <form class="greeting__form">
          <input type="text" class="greeting__form__input" />
        </form>
      </section>
      <section class="todo hidden">
        <form class="todo__form">
          <input
            type="text"
            class="todo__form__input"
            placeholder="Write a to do"
          />
        </form>
        <ul class="todo__list"></ul>
      </section>
    </main>

    <footer>
      <p class="quote"></p>
    </footer>
    <script src="./js/clock.js"></script>
    <script src="./js/background.js"></script>
    <script src="./js/greeting.js"></script>
    <script src="./js/weather.js"></script>
    <script src="./js/todo.js"></script>
  </body>
</html>
날씨를 포함시킬 태그와 할 일 목록을 등록할 form과 input태그 그리고 할 일들을 포함시킬 ul태그를 추가하였습니다.
JavaScript
vanilla js로 할 일 목록 만들기
- js/todo.js
let todos = [];

const TODO = "todo";

const setLocal = () => {
  localStorage.setItem(TODO, JSON.stringify(todos));
};

const onTodo = (event) => {
  event.preventDefault();
  const todoContent = todoInput.value;
  const todoId = Date.now();
  todos.push({ todo: todoContent, id: todoId, check: false });
  setLocal();
  printTodo(todoContent, todoId, false);
  todoInput.value = "";
};

todoForm.addEventListener("submit", onTodo);
할 일 목록을 적을 input을 가진 form 태그로부터 submit 이벤트를 받아 함수를 실행시킵니다.
그리고 할 일 목록을 출력할 함수에게 input의 value와 중복되지 않을 id값 그리고 boolean값인 check여부를 parameter로 보냅니다. 이 때 localStorage에 할 일 목록을 저장시키기 위해 todos배열에 담아 JSON 문자열로 변환시킨 후 localStorage에 저장합니다. 이는 localStorage는 JavaScript 객체를 저장하지 못하기 때문입니다.
웹 스토리지 객체(web storage object)인 localStorage는 브라우저 내에 키-값 쌍을 저장할 수 있게 해줍니다.
const printTodo = (text, id, check) => {
  const todoContainer = document.createElement("li");
  todoContainer.id = id;
  const todoText = document.createElement("span");
  todoText.innerText = text;
  if (check) {
    todoText.classList.add("check");
  }
  const checkBtn = document.createElement("button");
  checkBtn.innerText = "✓";
  if (check) {
    checkBtn.classList.add("check--btn");
  }
  checkBtn.addEventListener("click", checkTodo);
  const deleteBtn = document.createElement("button");
  deleteBtn.innerText = "❌";
  deleteBtn.addEventListener("click", deleteTodo);
  todoContainer.appendChild(todoText);
  todoContainer.appendChild(checkBtn);
  todoContainer.appendChild(deleteBtn);
  todoList.appendChild(todoContainer);
};
할 일 목록을 출력하는 함수는 parameter로 받은 text, id 그리고 check여부를 통해 할 일 목록을 출력합니다. 이때 체크 버튼과 삭제 버튼을 함께 생성하고 check 여부에 따라 다른 디자인을 부여합니다.
const deleteTodo = (event) => {
  const {
    target: { parentNode },
  } = event;
  parentNode.remove();
  todos = todos.filter((todo) => todo.id !== +parentNode.id);
  setLocal();
};

const checkTodo = (event) => {
  let index;
  const {
    target: { parentNode },
  } = event;
  todos.forEach((todo) => {
    if (todo.id === +parentNode.id) {
      index = todos.indexOf(todo);
    }
  });
  if (todos[index].check) {
    parentNode.children[0].classList.remove("check");
    parentNode.children[1].classList.remove("check--btn");
  } else {
    parentNode.children[0].classList.add("check");
    parentNode.children[1].classList.add("check--btn");
  }
  todos[index].check = !todos[index].check;
  setLocal();
};
삭제 버튼은 click시 받는 event를 통해 부모 태그를 찾아 삭제시키고 todos 배열로부터 부모 태크의 id를 비교하여 todos배열에서도 삭제시킨 후 localStorage에 저장시켜줍니다. 체크 버튼 또한 event를 통해 부모 태그를 찾은 후 디자인을 변경시킵니다. 그리고 id를 비교하여 todos 배열에서 해당하는 객체의 chec k값을 수정시킨 후 localStorage에 저장시켜줍니다.
const getLocal = () => {
  const localTodos = localStorage.getItem(TODO);
  if (localTodos) {
    todos = JSON.parse(localTodos);
    todos.forEach((todo) => {
      printTodo(todo.todo, todo.id, todo.check);
    });
  }
};

getLocal()
마지막으로 파일을 실행 후, 곧 바로 localStorage로부터 todos(JSON 문자열)를 가져와 객체화 시킨 후 todos가 존재하면 해당 값들로 할 일 목록을 출력시켜줍니다.
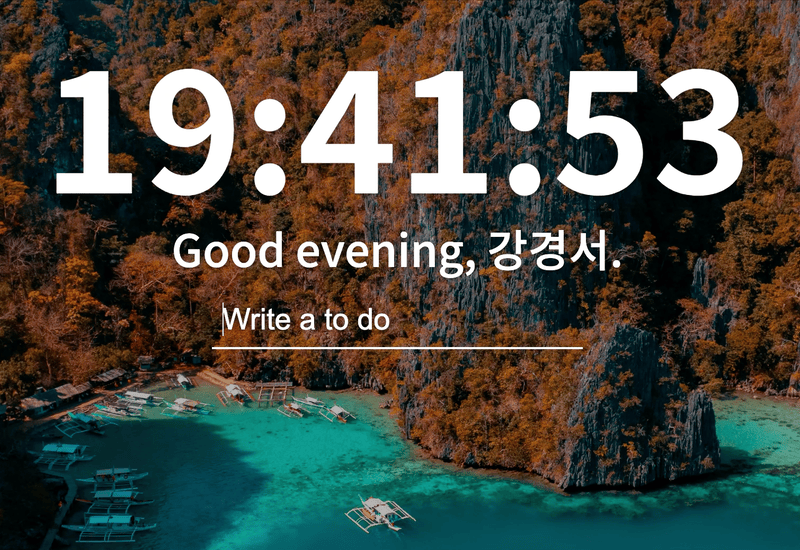
vanilla js로 할 일 목록 만들기 결과
vanilla js로 내 위치의 날씨 만들기
- js/weater.js
const weatherContainer = document.querySelector(".weather");

const API_KEY = "8b46d1d2fb5be43ae110f89a6e57cab0";

const getWeather = (lat, lon) => {
  fetch(
    `https://api.openweathermap.org/data/2.5/weather?lat=${lat}&lon=${lon}&appid=${API_KEY}&units=metric`
  )
    .then((response) => response.json())
    .then((json) => {
      const city = json.name;
      const temp = json.main.temp.toFixed(1);
      const weather = json.weather[0].main;
      const cityBox = document.createElement("span");
      const tempBox = document.createElement("span");
      const weatherBox = document.createElement("span");
      cityBox.innerText = city;
      tempBox.innerText = `${temp}°C`;
      weatherBox.innerText = weather;
      const container = document.createElement("div");
      container.appendChild(cityBox);
      container.appendChild(tempBox);
      container.appendChild(weatherBox);
      weatherContainer.appendChild(container);
    });
};

const init = () => {
  const onSuccess = (pos) => {
    getWeather(pos.coords.latitude, pos.coords.longitude);
  };
  const onError = (error) => {
    console.log(error);
  };
  navigator.geolocation.getCurrentPosition(onSuccess, onError);
};

init();
window의 navigator를 이용하면 현재 위치 정보를 구하고, 이를 통해 구한 위치 정보를 openweathermap에서 제공하는 API와 같이 담아 fetch를 이용해서 데이터를 가져올 수 있습니다.
vanilla js로 내 위치의 날씨 만들기 결과

📝후기
localStorage를 이용하여 할 일 목록을 만들고 fetch를 이용하여 데이터를 불러왔습니다. localStorage에 저장할 객체를 삭제 수정시키는 과정을 통해 JavaScript의 객체를 다루는데 많은 연습을 할 수 있었습니다. 또한 fetch를 통해 JavaScript의 비동기 과정을 이해할 수 있었습니다.
본 후기는 유데미-스나이퍼팩토리 10주 완성 프로젝트캠프 학습 일지 후기로 작성 되었습니다.
#프로젝트캠프 #프로젝트캠프후기 #유데미 #스나이퍼팩토리 #웅진씽크빅 #인사이드아웃 #IT개발캠프 #개발자부트캠프 #리액트 #react #부트캠프 #리액트캠프
