❓ 문제점
당근마켓의 고객센터 관련 기능을 담당해서
1. 문의 작성
2. 문의에 대한 상담원의 답변
3. 답변에 대한 유저의 평가
기능을 구현해둔 상태였다.
마지막으로 고객과 상담원 사이의 채팅 기능을 구현하려고 했다.
구체적인 구현 시나리오는
유저가 문의 신청
-> 상담원중 한명이 해당 문의에 대한 채팅을 수락
-> 채팅 진행. 의 방식으로 구현했다.
🔑 시도 && 해결 방법
1. 채팅방 생성 && 상담원 매칭
@Transactional
    public String createChatRoom(User reqUser) {

        UUID uid = UUID.randomUUID();
        inquiryRoomRepository.save(
               new InquiryRoom(reqUser.getUserId(), uid.toString())
        );


        return "안녕하세요 무엇을 도와드릴까요.";
    }
PK, userId(유저식별) ,agentId(관리자 식별), roomKey(채팅방 번호)
를 가지는 InquiryRoom 엔티티에 유저가 채팅방을 만들면 userId와 ,rookKey를 할당해서 저장한다. 이때 채팅방 번호는 UUID로 랜덤 생성한다.
@Transactional
    public String matchingAgent(User reqUser,String roomKey) {
        log.info("roomkey ========" + roomKey);
        InquiryRoom room = inquiryRoomRepository.findByRoomKey(roomKey).orElseThrow(() ->
                new CustomException(ErrorCode.NO_CHATROOM)
        );

        if(!reqUser.getRole().toString().equals("ADMIN")){
            throw new CustomException(ErrorCode.NO_ADMIN);
        }

        room.matchingAgent(reqUser.getUserId());

        return "상담원 " + reqUser.getUserId() + " 가 매칭됐습니다";
    }
방번호가 맞고, 관리자가 맞다면 해당 채팅방에 관리자를 배정해준다.
채팅시작...
설정 클래스 WebStompConfig
@Configuration
@EnableWebSocketMessageBroker
@RequiredArgsConstructor
public class WebStompConfig implements WebSocketMessageBrokerConfigurer {

    private final WebScoketInterceptor webScoketInterceptor;

    @Override
    public void registerStompEndpoints(StompEndpointRegistry registry) {
        registry.addEndpoint("/ws")
                .setAllowedOriginPatterns("*")
                .withSockJS();
    }

    @Override
    public void configureMessageBroker(MessageBrokerRegistry registry) {
        registry.enableSimpleBroker("/sub"); //구독
        registry.setApplicationDestinationPrefixes("/pub"); //메세지
    }

    @Override
    public void configureClientInboundChannel(ChannelRegistration registration) {
        registration.interceptors(webScoketInterceptor);
    }
}
-
WebSocketMessageBrokerConfigurer 인터페이스를 구현하여 WebSocket 관련 설정을 제공한다.
-
registerStompEndpoints : 클라이언트가 WebSocket에 연결 할 수 있는 엔드포인트를 (/ws)로 등록한다.
-
setAllowedOriginPatterns("*") : 모든 오리진이세 접근을 허용합니다.
-
withSockJS() : SockJs를 활성화 합니다.
-
registry.enableSimpleBroker("/sub") : /sub 을 구독하여 클라이언트에게 메세지를 뿌려줍니다.
registry.setApplicationDestinationPrefixes("/pub") : /pub 으로 시작하는 목적지로 들어오는 메세지를 처리하는 채널을 구성합니다.@Override public void configureClientInboundChannel(ChannelRegistration registration) { registration.interceptors(webScoketInterceptor); }
webScoketInterceptor을 등록하고 WebScoket 요청을 가로채서 처리합니다.
WebScoketInterceptor
: ChannelInterceptor 를 구현해서 WebSocket 채널에 인터셉터를 제공하는 클래스
@Slf4j
@Component
@RequiredArgsConstructor
public class WebScoketInterceptor implements ChannelInterceptor {

    private final ShopMessageService shopMessageService;
    private final InquiryMessageService inquiryMessageService;

    @Override
    public Message<?> preSend(Message<?> message, MessageChannel channel) {

        StompHeaderAccessor accessor = StompHeaderAccessor.wrap(message);
        MessageHeaders headers = message.getHeaders(); //메세지 들어올때 헤더
        MultiValueMap<String, String> map = headers.get(StompHeaderAccessor.NATIVE_HEADERS, MultiValueMap.class);

        //접속할때만 헤더에 roomKey 를 담고 그다음 메세지 줄때는 roomKey 를 가지고 통신.
        if (StompCommand.CONNECT == accessor.getCommand()) {
            String token = map.get("Authorization").get(0);
            System.out.println("접속함.");
            System.out.println("접속함 : "+token);

            if(map.getFirst("Chat-Type").equals("CustomerService")){
                System.out.println("Chat-Type  ===  " + map.getFirst("Chat-Type") );
                if(inquiryMessageService.checkVaild(token)){
                    System.out.println("고객센터 채팅 토큰 인증완료  " +  token );
                    inquiryMessageService.checkRoom(map.get("Authorization").get(0), map.get("roomKey").get(0));
                }
            }else{
                if(shopMessageService.checkVaild(token)){
                    shopMessageService.checkRoom(map.get("Authorization").get(0), map.get("roomKey").get(0));
                }
            }
        }
        return message;
    }

}
-
StompHeaderAccessor.wrap(message): message의 헤더 정보에 접근합니다. -
String token = map.get("Authorization").get(0);토큰 정보를 헤더에 Authorization에 실어서 보낼거임. 때문에 해당 방법으로 토큰을 얻어 올 수 있다.
if(map.getFirst("Chat-Type").equals("CustomerService")){
                System.out.println("Chat-Type  ===  " + map.getFirst("Chat-Type") );
                if(inquiryMessageService.checkVaild(token)){
                    System.out.println("고객센터 채팅 토큰 인증완료  " +  token );
                    inquiryMessageService.checkRoom(map.get("Authorization").get(0), map.get("roomKey").get(0));
                }
            }else{
                if(shopMessageService.checkVaild(token)){
                    shopMessageService.checkRoom(map.get("Authorization").get(0), map.get("roomKey").get(0));
                }
            }
chat-Type의 key를 가지는 헤더에 "고객센터" 에 대한 요청이면 CustomerSerice 라는 정보가 실려서 옵니다.
그러면 고객센터 관련 토큰 예외처리와 해당 채팅방에 적합한 유저인지에 대한 검증을 시작합니다 .
고객 센터에 대한 채팅이 아니라면 유저와 유저 사이의 채팅. 즉, 유저의 거래에 사용되는 채팅이 진행됩니다.
@Service
@RequiredArgsConstructor
public class InquiryMessageService {

    private final InquiryRoomRepository inquiryRoomRepository;
    private final JwtUtil jwtUtil;

    public boolean checkVaild(String token) {
        return jwtUtil.validateToken(token);
    }

    @Transactional
    public void checkRoom(String token, String roomKey) {
        String userId = jwtUtil.getUserInfoFromToken(token).getSubject();

        InquiryRoom inquiryRoom = inquiryRoomRepository.findByRoomKey(roomKey)
                .orElseThrow(() -> {
                    System.out.println("inquiryRoomKey 가 맞지 않다.");
                    throw new CustomException(ErrorCode.NO_CHATROOM);
                });

        System.out.println(userId);
        if (inquiryRoom.getUserId().equals(userId) ||
                inquiryRoom.getAgentId().equals(userId)) {

            System.out.println("유저 맞니?");
            return;
        }
        System.out.println("해당 유저가 아니다!");
        throw new CustomException(ErrorCode.NO_CHATROOM);
    }
}
checkValid : 토큰에 대한 검증 기능 수행 JwtUtil에 해당 로직을 작성해둠 .
checkRoom : RoomKey가 잘못되었는지, 채팅방에 입장하려는 사람이 유저 or 상담원이 맞는지를 검증한다.
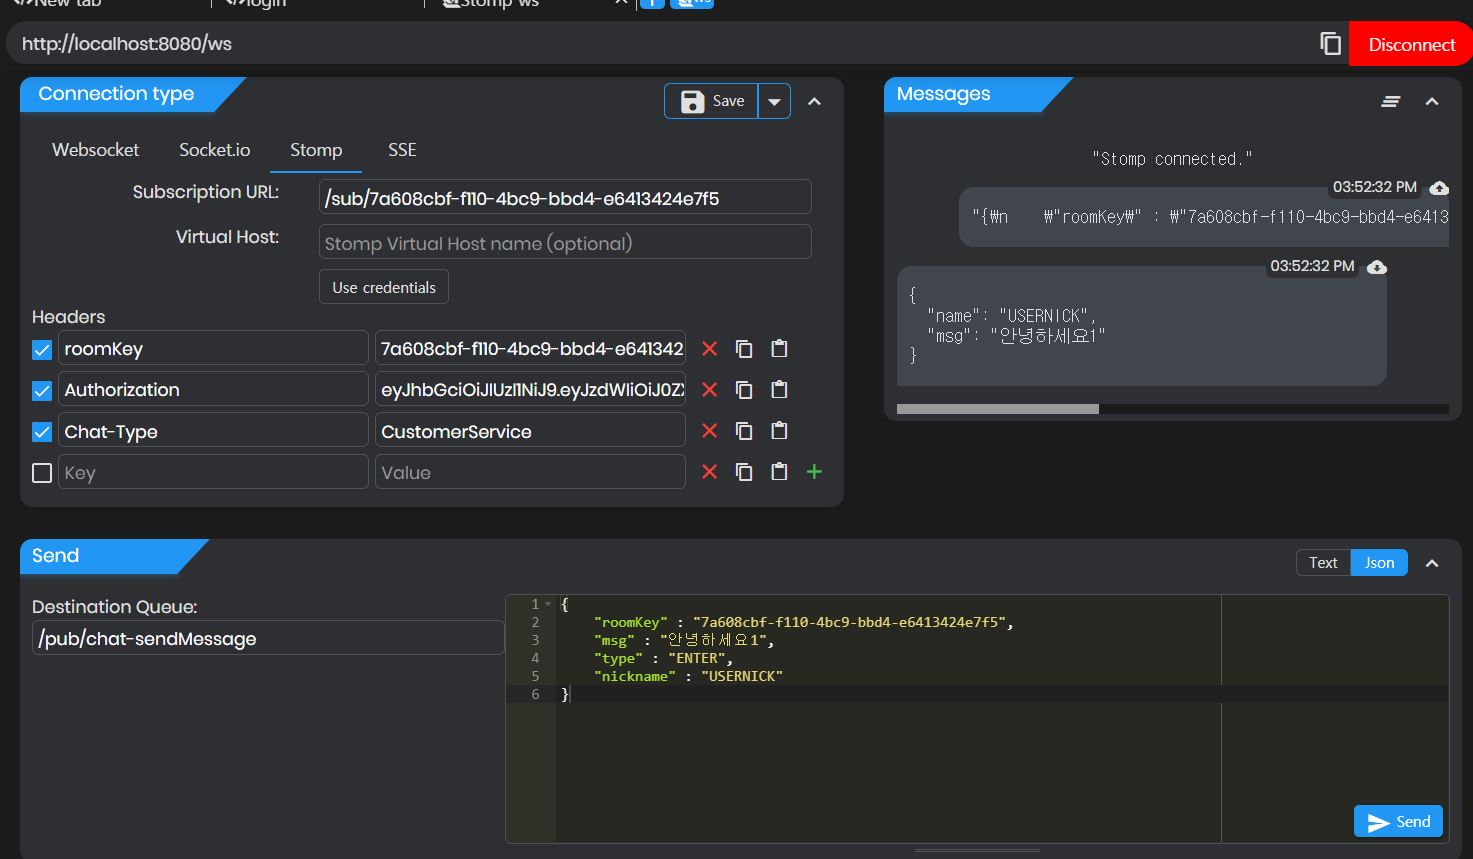
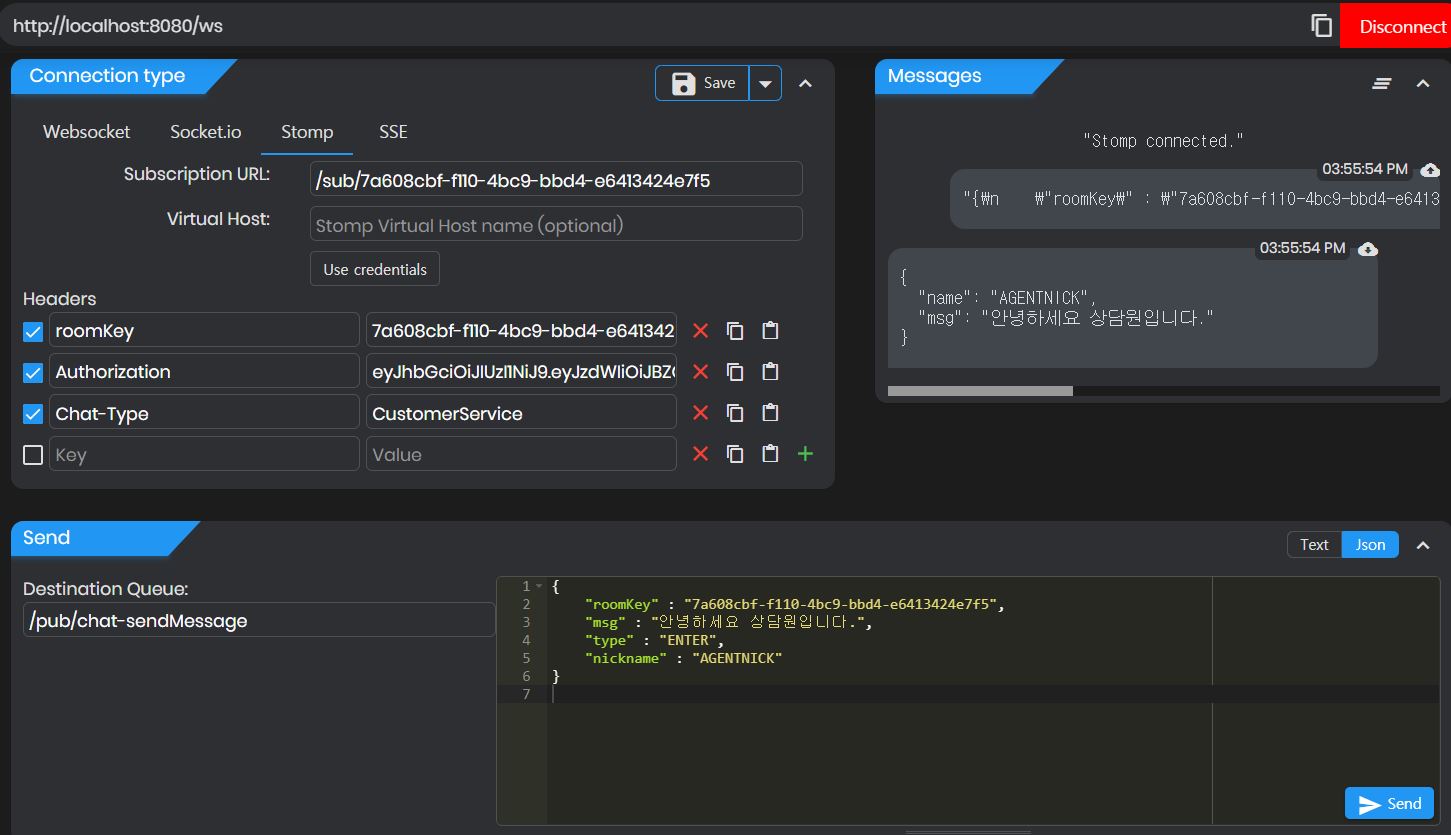
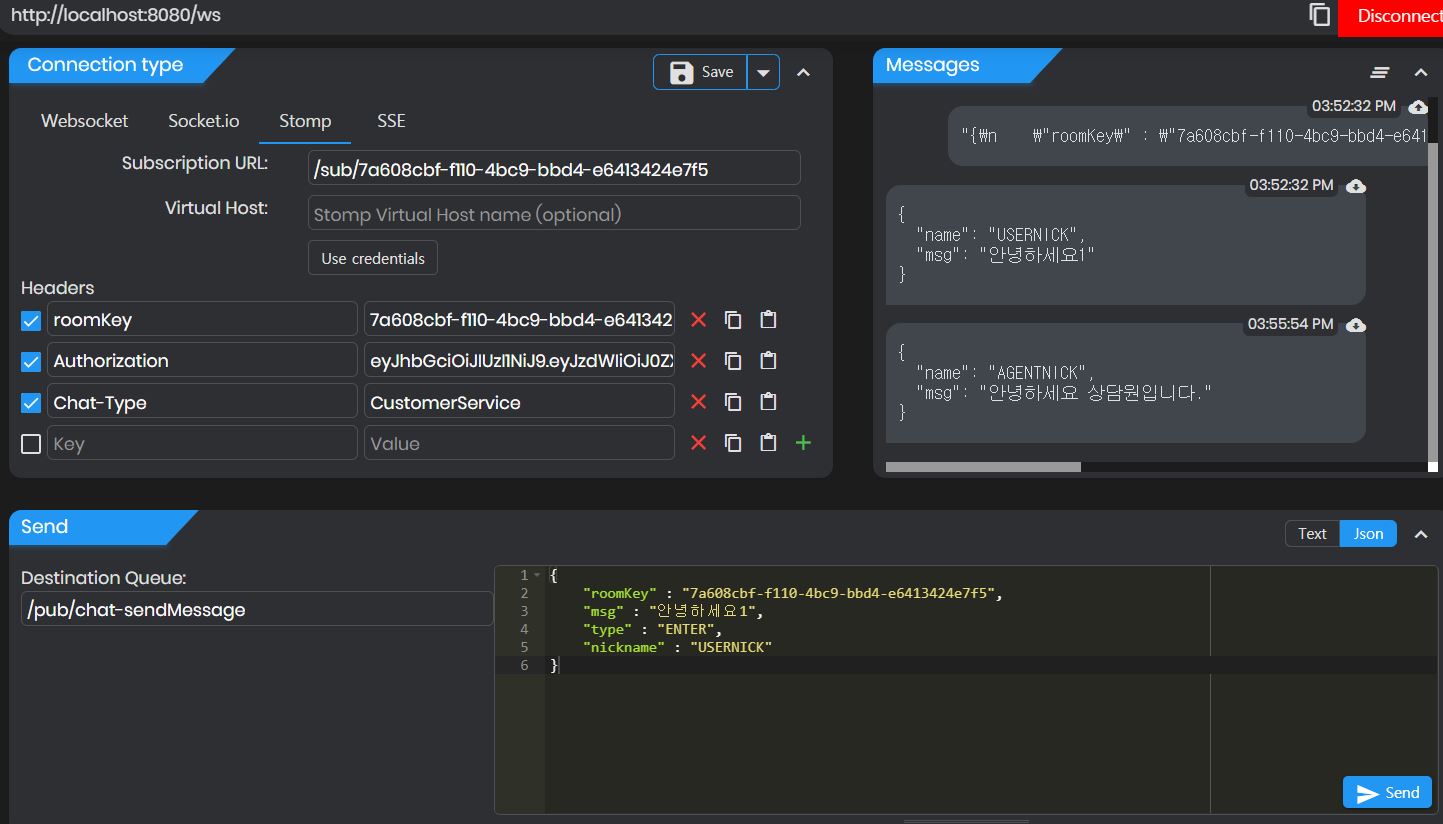
실행 결과이다. 물론 맨 위에서 말한 채팅방생성 && 관리자 생성을 마친 뒤
테스트 해야한다.