1. 설치
- 아래 링크에서 Windows 환경에 webots 설치
https://cyberbotics.com/- WSL 내의 Ubuntu 환경에 ROS2의 webots 패키지 설치
sudo apt-get install ros-iron-webots-ros2- Sample 환경 실행
$ export WEBOTS_HOME=/mnt/c/Program\ Files/Webots
$ ros2 launch webots_ros2_universal_robot multirobot_launch.py
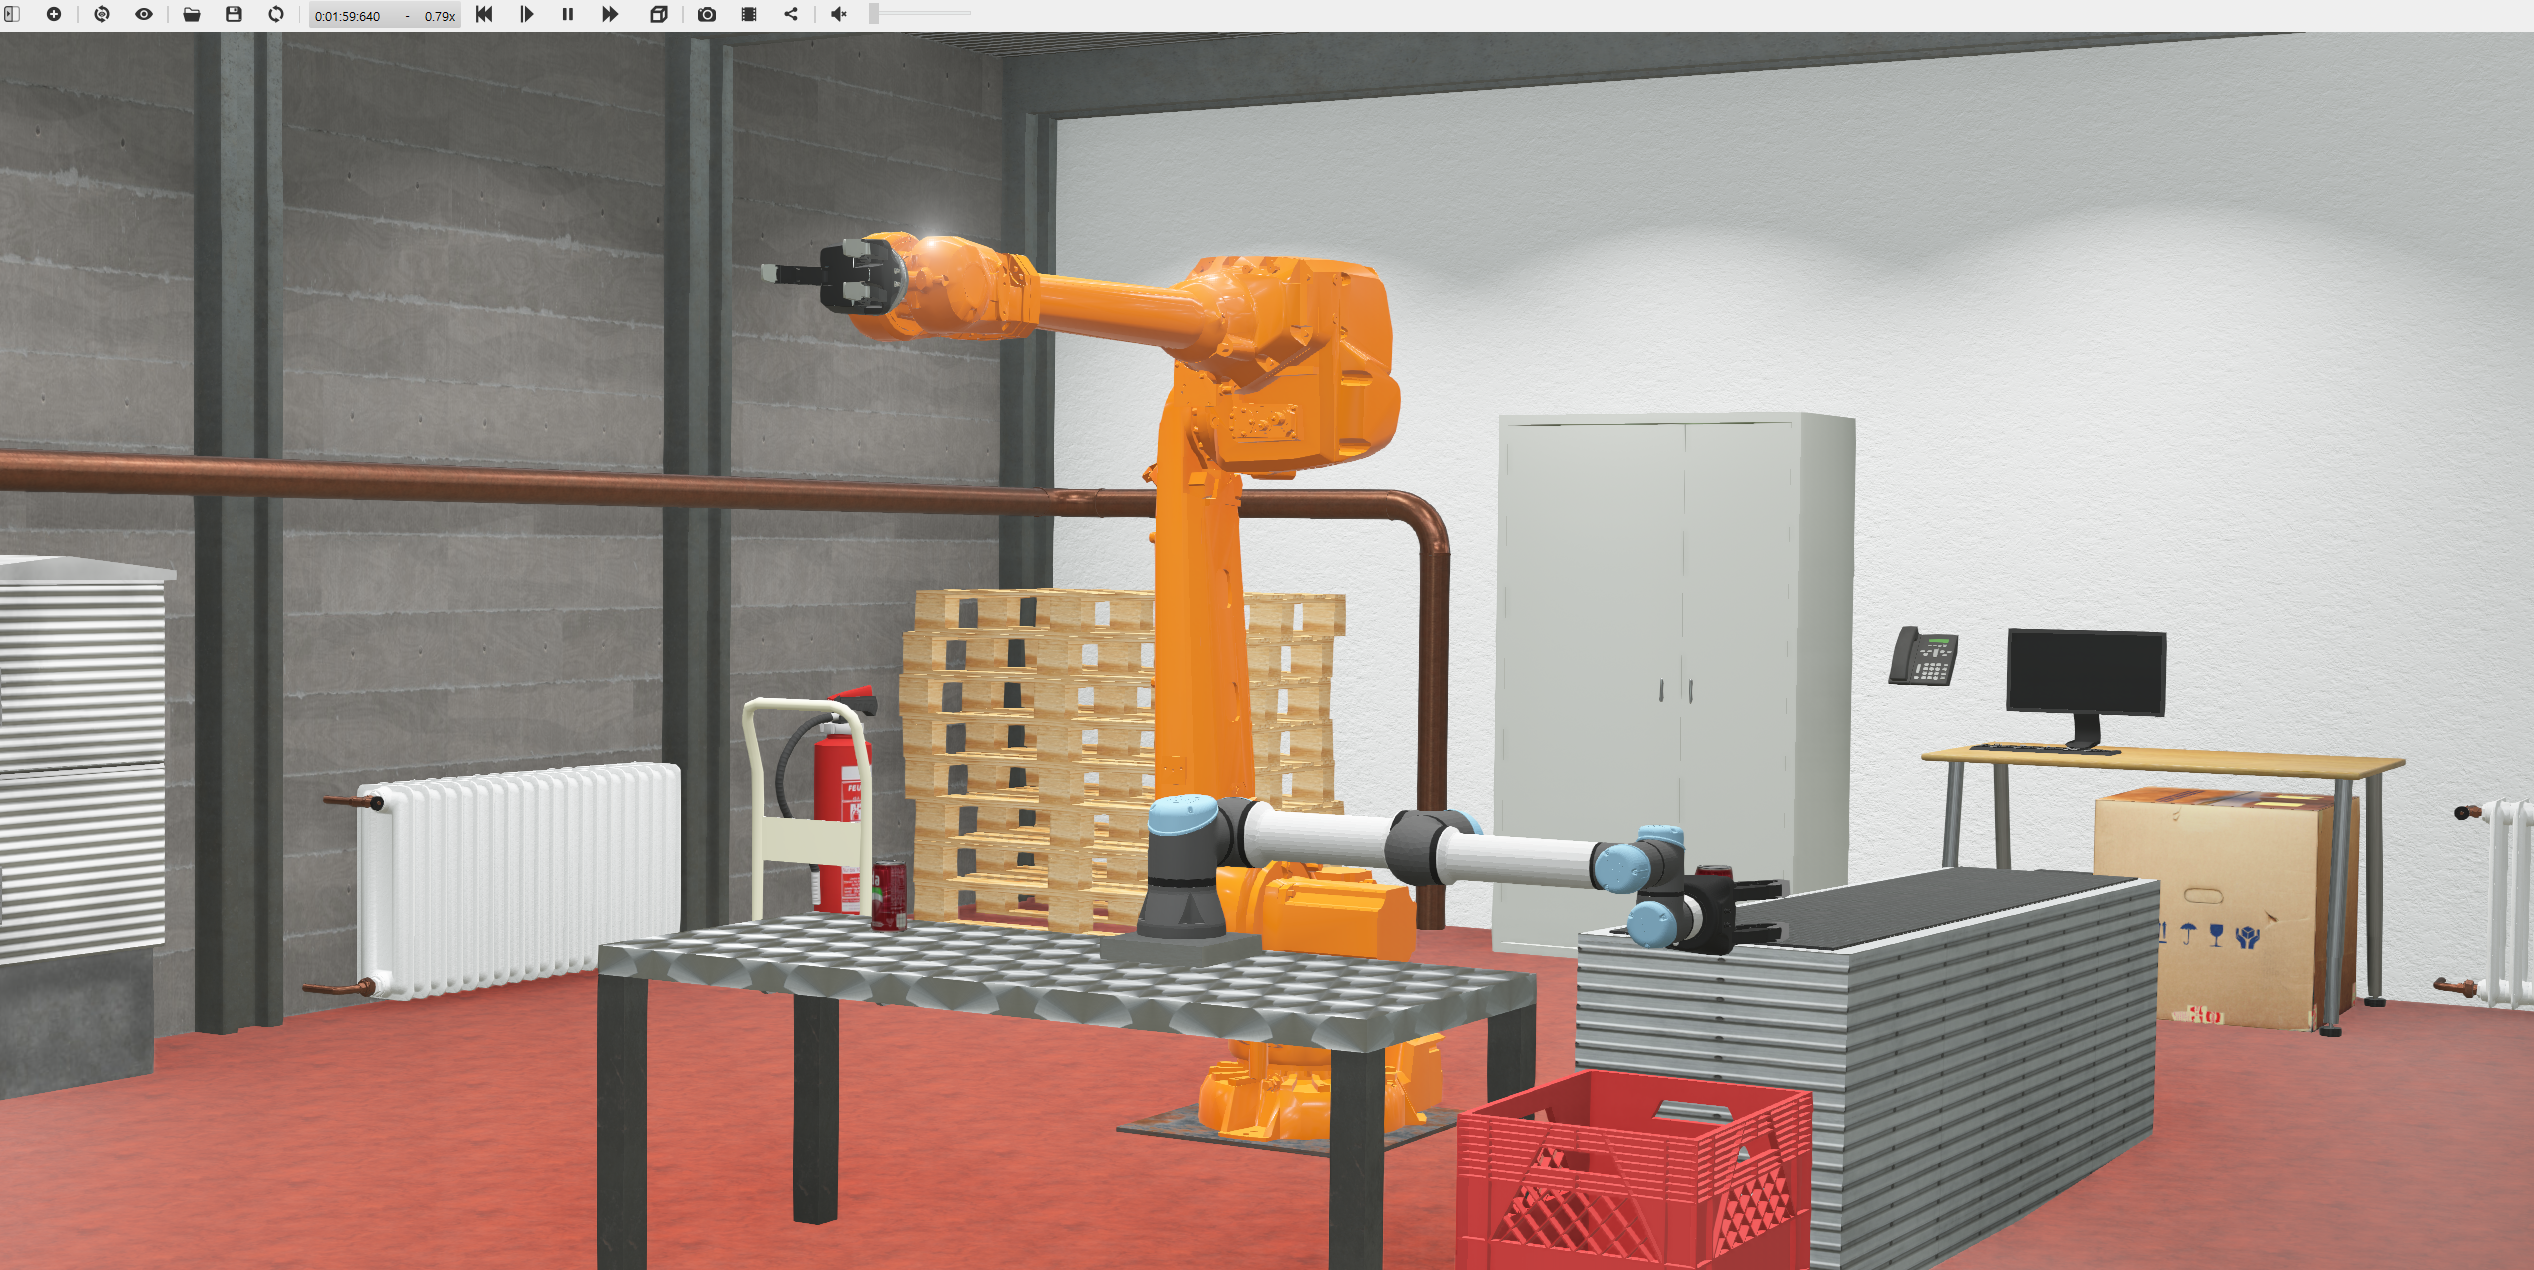
Webot 예제 실행
- Topic, service, action 확인
$ ros2 topic list
$ ros2 service list
$ ros2 action list-
이때, waiting for connection, retrying for another ? seconds 등의 메세지가 출력되며 로봇이 움직이지 않는 경우가 있으며, 이는 본 포스팅 작성일 기준 windows 11의 최신 빌드에서 발생하는 것으로 보임
-
이러한 문제는 wsl 버전을 2.1.5로 낮춰주면 해결됨. 링크에서 2.1.5 버전의 .msi 파일을 받아 실행
2. 기본 사용법
새로운 project 생성
새로운 프로젝트 생성
-
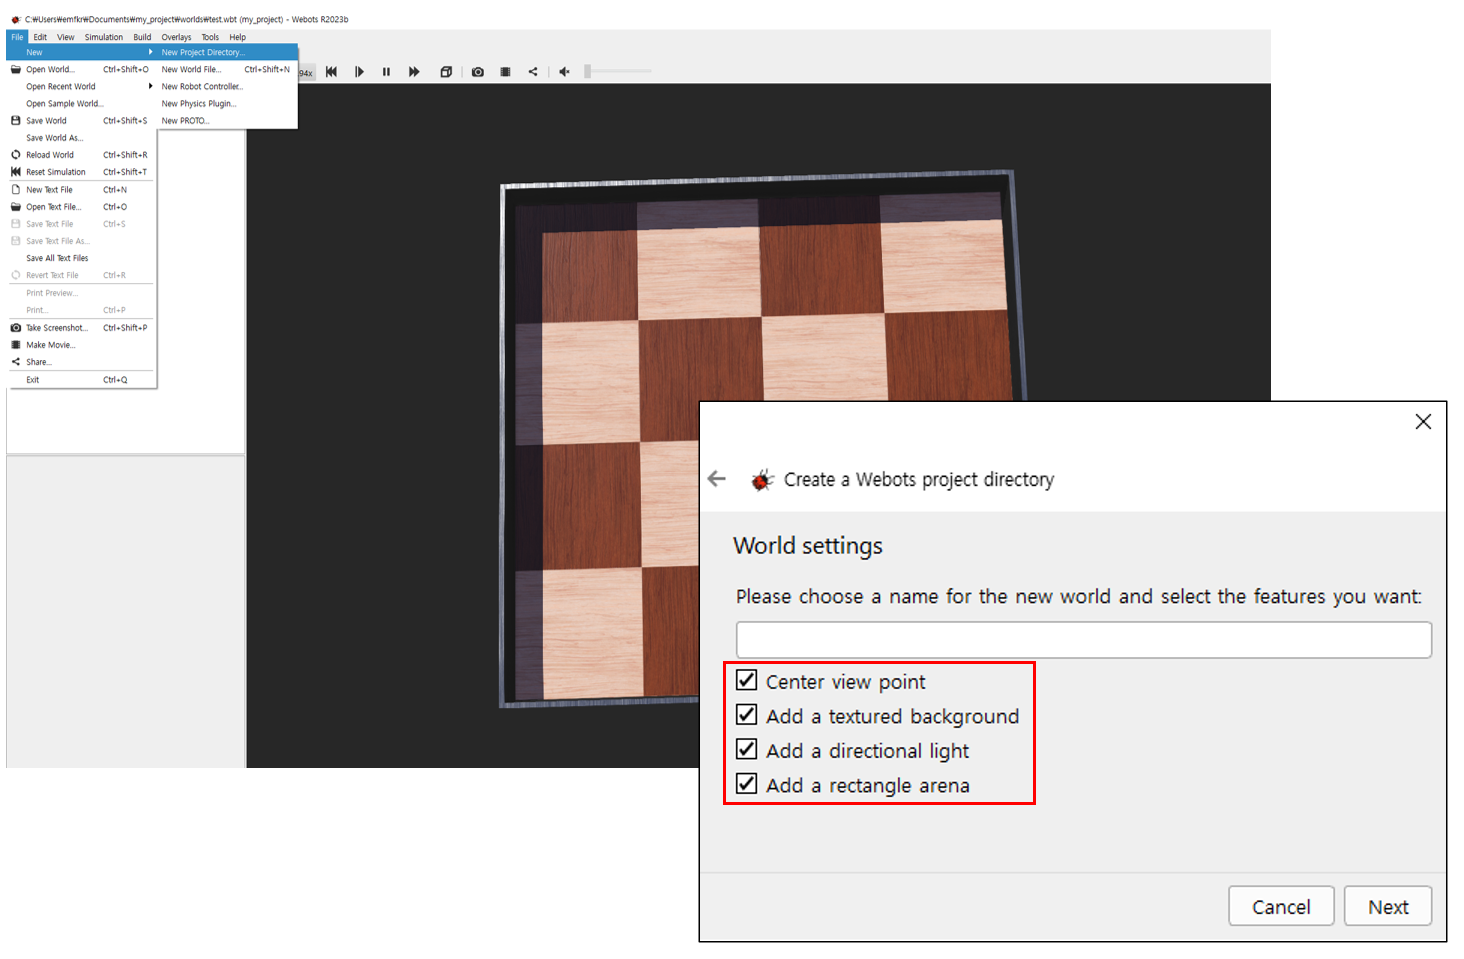
좌측 상단 "File-New-New Project Directory"
-
계속 Next 선택 및, "world settings" 단계에서 프로젝트 이름과 체크박스 확인
-
기본 뷰포트 조작법:
- 마우스 좌버튼을 누른 채로 마우스 이동: 뷰포트 회전
- 마우스 우버튼을 누른 채로 마우스 이동: 뷰포트 평행이동
- 마우스 휠 조작 또는 휠버튼 누른 채로 마우스 이동: 뷰포트 zoom in/out
-
시뮬레이터 창의 왼쪽, 객체들이 나열된 창을 scene tree라고 함
-
Webots 첫 실행 시, 시뮬레이션이 이미 시작되어 시간이 흐르고 있는 상태임
-
해당 시뮬레이션 환경에 어떠한 객체를 추가하기 위하여 우선 시뮬레이션을 정지하고, 초기 시간으로 되돌려야함(아래 그림과 같이 수행)
시뮬레이션 정지 및 초기화

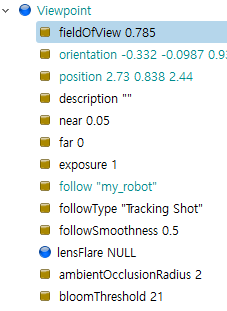
- 아래 그림과 같이 뷰포트의 중심을 로봇으로 지정하면 이후 시뮬레이션 시 뷰포트가 로봇을 중심으로 자동으로 따라 이동하여 편리함
뷰포트 설정
Objects Spawn
새로운 객체(노드) 생성
-
Webots에서는 각 객체를 노드(node)라고 부름: 객체 뿐만 아니라, 회전 시스템, 조명 등도 노드로 이루어져 있음
-
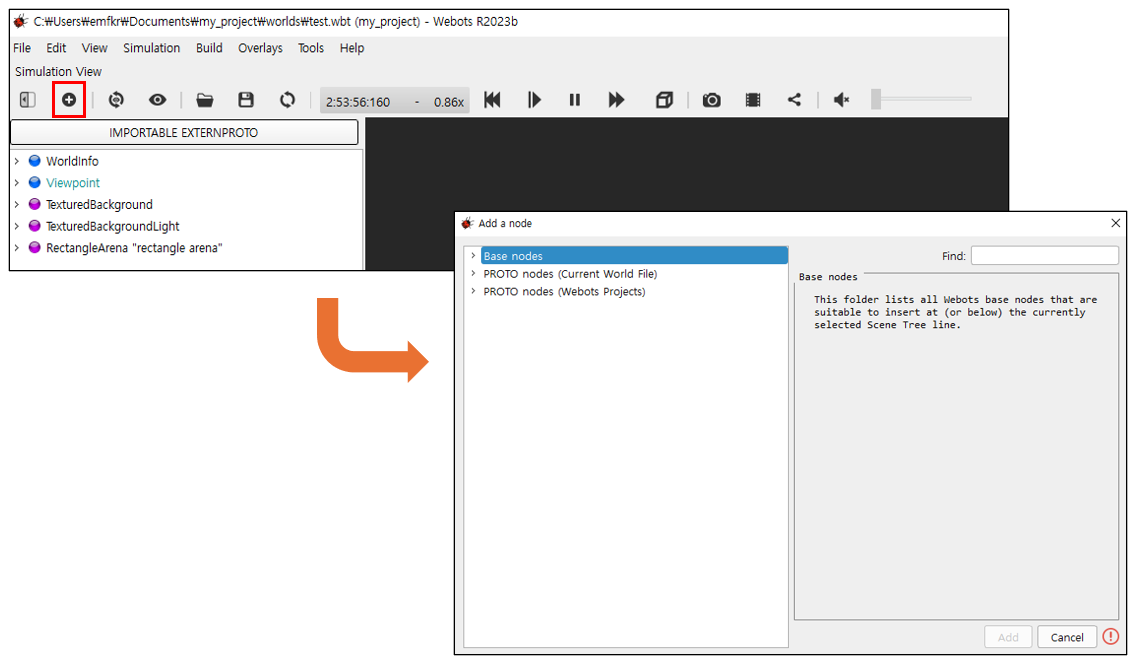
좌측 상단 + 버튼을 통해 새로운 노드 생성 가능
-
Base nodes: 새로운 노드를 만들고 싶을 때(본인이 원하는 로봇 모델을 직접 구현하고 싶을 때 사용)
-
PROTO nodes: webot에서 미리 만들어놓은 노드들
새로운 구체 객체 생성
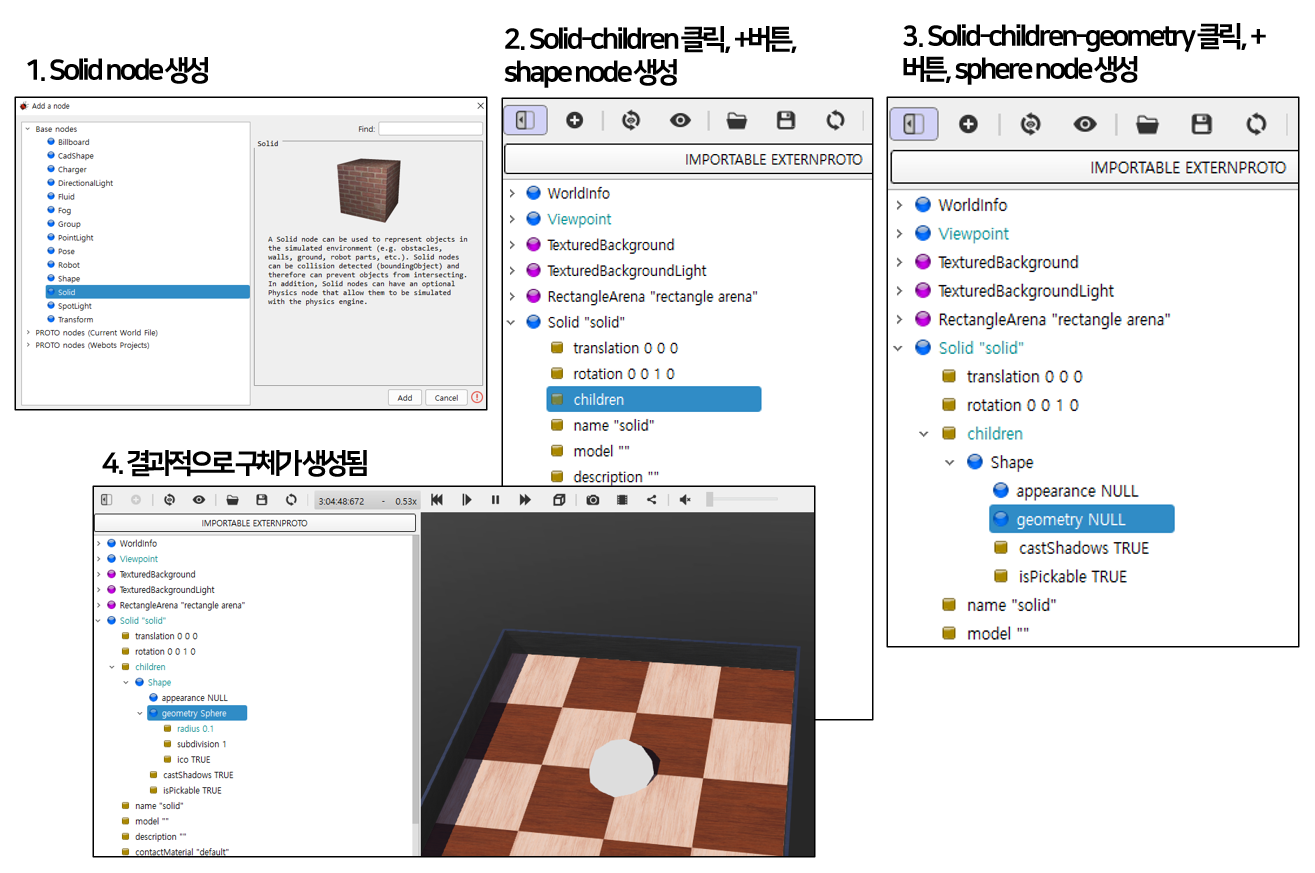
생성과정 요약
-
새로운 구체 객체 생성:
- solid 노드 생성
- 좌측 scene tree에서 solid 노드가 생성된 것을 확인
- 생성된 solid 노드의 하위 요소 중 children을 선택, +버튼, "Base nodes"-"shape" 노드 생성
- shape 노드가 "solid"-"children" 하위에 삽입된 것을 확인
- shape 노드 하위의 geometry 요소를 클릭, +버튼, "Base nodes"-"sphere" 노드 생성
- scene tree와 뷰포트에 구체가 생성된 것을 확인
- scene tree에서 sphere 노드 하위의 radius 값을 변경하여 구체 크기 변경 가능
- shape 노드 하위의 appearance 요소를 클릭, +버튼, "Base nodes"-"PBRAppearance" 노드 생성
- RBRAppearance 노드 하위의 baseColor 요소에서 Red=1, blue=0, green=0으로, roughness 요소를 1로, metalness 요소를 0으로 설정
- 뷰포트에 붉은 색 구체를 확인
- "solid"-"translation"에서 z값을 0.5로 변경
- 저장버튼을 눌러 저장
- 시뮬레이션 실행(상단 재생 버튼): 이 경우 구체가 공중에 그냥 떠있는 모습을 볼 수 있음. 구체가 중력 등의 영향을 받기 위해서는 구체에 물리적 특성을 추가해야함
- 시뮬레이션 정지 및 초기화
-
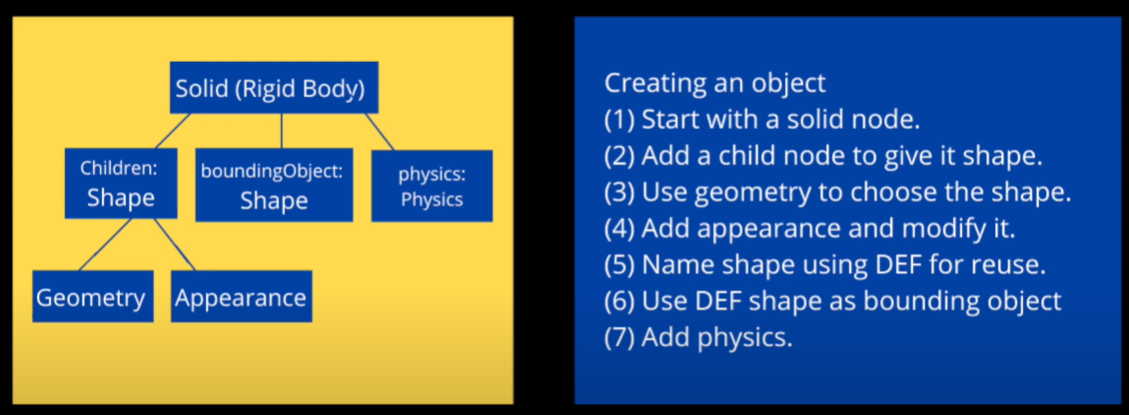
구체 객체의 물리적 특성 추가:
- "solid"-"children"-"shape" 노드를 클릭
- 하단의 DEF 칸에 "ball"이라고 작성(해당 노드의 이름을 부여하여, 다른 노드에서 ball 노드를 찾아 활용할 수 있도록 함)
- "solid"-"boundingObject" 요소를 클릭, +버튼, "USE"-"ball" 노드 생성(새롭게 생긴 USE 탭은 사용자가 이름을 지정한 새로운 노드를 포함함)
- "solid"-"physics" 요소 클릭, +버튼, "Base nodes"-"physics" 생성
- 저장버튼을 눌러 저장
- 시뮬레이션 실행(상단 재생 버튼): 이 경우 구체가 중력의 영향을 받아 아래로 떨어짐
-
PROTO 노드 추가(webot이 제공하는 로봇 모델)
- scene tree 빈공간 클릭, +버튼, "PROTO nodes"-"robots"-"gctronic"-"e-puck"-"E-puck"
- "scene tree"-"E-puck"-"translation"에서 x값을 0.2로 변경
- 저장
- 시뮬레이션 실행: 로봇에는 이미 간단한 controller(e-puck_avoid_obstacles, "E-puck"-"controller"확인)가 들어가 있어 장애물을 회피하며 주행하는 모습을 볼 수 있음
- "E-puck"-"controller" 클릭, 하단의 edit 버튼 클릭, 우측 text editor 창에 선택한 controller의 소스코드가 출력됨을 확인할 수 있으며, 해당 코드를 수정하거나 본인의 controller로 교체할 수도 있음
3. 간단한 이륜 이동 로봇 제작
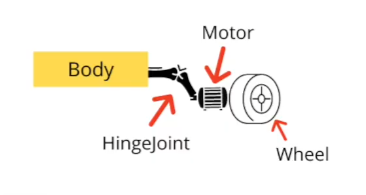
이륜 이동 로봇 구조
- 로봇 바디 제작
- +버튼, "Base nodes"-"Robot" 생성, 하위의 "name"에서 "my_robot"이라고 지정
- "scene tree"-"Robot"-"children" 클릭, + 버튼, "Base nodes"-"Pose" 생성
- "Pose"-"children" 클릭, + 버튼, "Base nodes"-"Shape" 생성, 하단의 DEF 칸에 "BODY"라고 작성
- "Shape"-"geometry" 클릭, + 버튼, "Base nodes"-"Cylinder" 생성: height를 0.08, radius를 0.045로 설정
- "Shape"-"Appearance" 클릭, + 버튼, "Base nodes"-"PBRAppearance" 생성: 색상을 blue로, roughness 1, metalness 0로 설정
- "Pose"-"translation"에서 z를 0.0415로 설정
- "Robot"-"boundingObject" 클릭, + 버튼, "Base nodes"-"Pose" 생성
- "boundingObject"-"translation"에서 z를 0.0415로 설정
- "boundingObject"-"children" 클릭, + 버튼, "USE"-"BODY" 생성
- "Robot"-"physics" 요소 클릭, +버튼, "Base nodes"-"physics" 생성
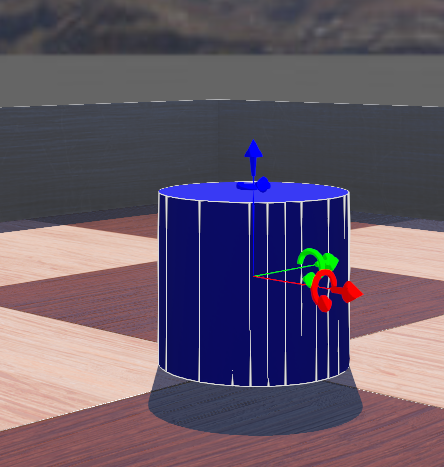
실린더 모양의 로봇 바디가 생성되었고, 물리적 특성 추가를 위한 bounding(하얀색 선)이 청색 실린더와 일치하는 것을 확인
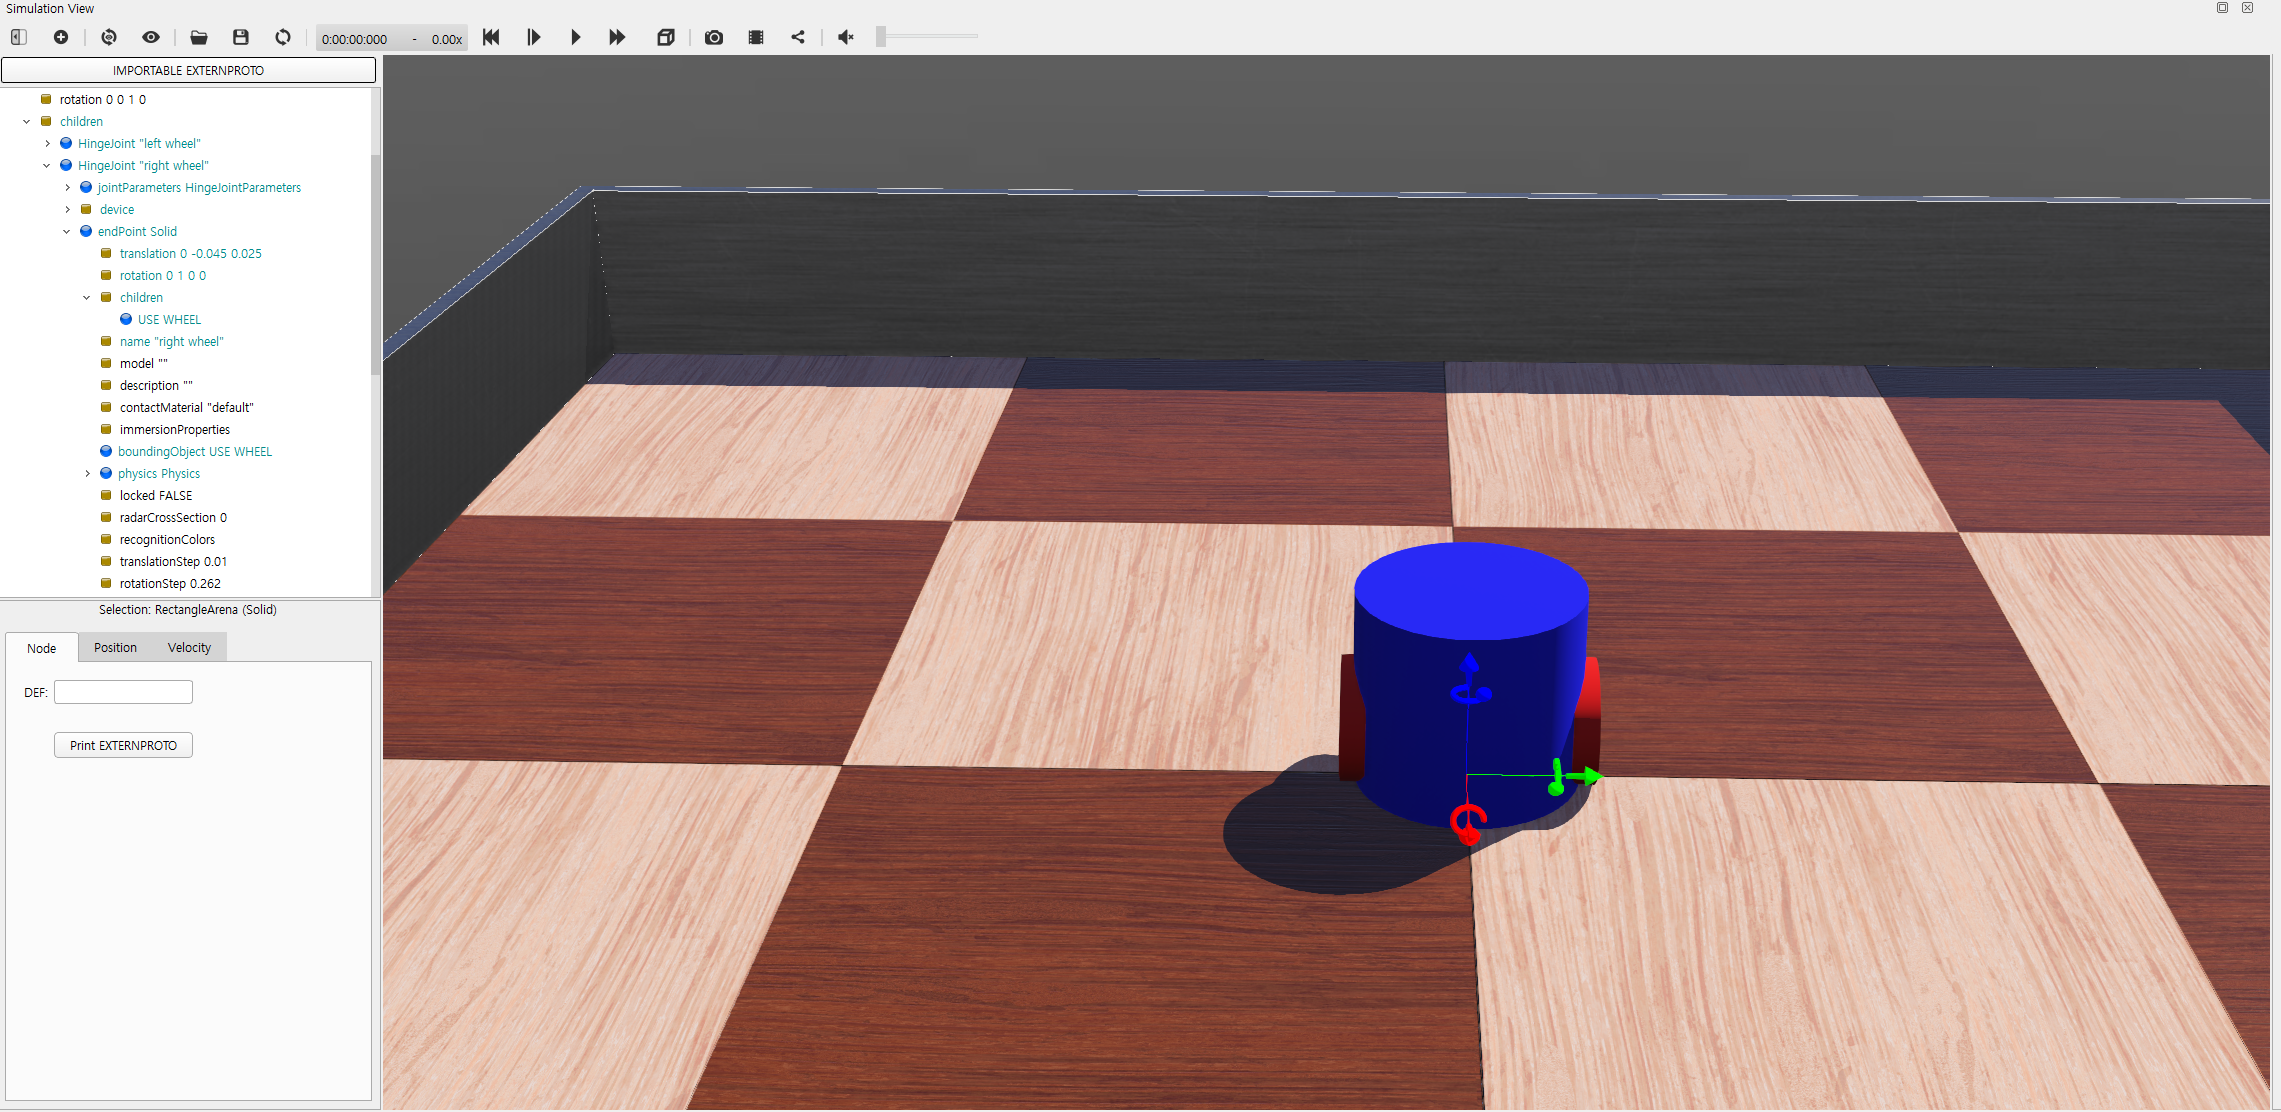
- 로봇 바퀴 제작
- "Robot"-"children" 클릭, + 버튼, "Base nodes"-"HingeJoint" 생성
- "HingeJoint"-"jointParameter" 클릭, + 버튼, "Base nodes"-"HingeJointParameters" 생성
- "HingeJoint"-"device" 클릭, + 버튼, "Base nodes"-"RotationalMotor" 생성
- "RotationalMotor"-"name" 클릭, 하단에서 이름을 "left wheel motor"로 변경
- "HingeJoint"-"endpoint" 클릭, + 버튼, "Base nodes"-"Solid"생성, "name"필드를 "left wheel"로 지정
- "endpoint"-"children" 클릭, + 버튼, "Base nodes"-"Pose" 생성, 하단의 DEF 칸에 "WHEEL"이라고 작성
- "Pose"-"children" 클릭, + 버튼, "Base nodes"-"Shape" 생성
- "Shape"-"geometry" 클릭, + 버튼, "Base nodes"-"Cylinder" 생성: height를 0.01, radius를 0.025로 설정
- "Shape"-"Appearance" 클릭, + 버튼, "Base nodes"-"PBRAppearance" 생성: 색상을 red로, roughness 1, metalness 0로 설정
- "HingeJoint "left wheel""-"endpoint"-"translation"을 (0, 0.045, 0.025)로, "rotation"을 (0, 0, 1, 0)으로, "HingeJoint "left wheel""-"endpoint"-"children"-"Pose"-"rotation"을 (1, 0, 0, 1.57)로 설정
- "jointParameter"내의 "anchor"를 (0, 0, 0.025)로, "axis"를 (0, 1, 0)으로 설정
- "endpoint"-"boundingObject"-"children" 클릭, + 버튼, "USE"-"WHEEL" 생성
- "endpoint"-"physics" 요소 클릭, +버튼, "Base nodes"-"physics" 생성(바퀴 1개 완성)
- 1~5를 다시 수행하여 "right wheel"로 생성(모터 및 endpoint 이름 변경).
- "endpoint"-"children" 클릭, + 버튼, "USE"-"WHEEL" 생성
- "HingeJoint "right wheel""-"endpoint"-"translation"을 (0, -0.045, 0.025)로, "rotation"을 (0, 0, 1, 0)으로 설정
- "jointParameter"내의 "anchor"를 (0, 0, 0.025)로, "axis"를 (0, 1, 0)으로 설정
- "endpoint"-"boundingObject"-"children" 클릭, + 버튼, "USE"-"WHEEL" 생성
- "endpoint"-"physics" 요소 클릭, +버튼, "Base nodes"-"physics" 생성(바퀴 2개 완성)
완성된 이륜 이동 로봇
4. ROS2를 통한 로봇 제어
- Webots 프로젝트 내에서 로봇의 컨트롤러를 외부 컨트롤러로 설정해야함
- "Robot "my_robot""-"controller"클릭, 하단에서 select 버튼 클릭, "extern"옵션 선택
- 처음에 설치한 webot-ros2 패키지를 통해 Webots 시뮬레이터 내의 로봇을 외부에서 ROS2를 통해 제어할 수 있음
패키지 생성
- Webot 시뮬레이터에서 구현한 이륜 이동 로봇을 제어하기 위한 패키지 생성
$ ros2 pkg create --build-type ament_python --license Apache-2.0 --node-name my_robot_driver my_package --dependencies rclpy geometry_msgs webots_ros2_driver$ cd my_package
$ mkdir launch
$ mkdir worlds- 위에서 제작한 webot world 파일을 "my_world.wbt"라는 이름으로 저장하여
~/my_ws/src/my_package/worlds/디렉토리 내에 저장
- 로봇 제어를 위한 로봇 드라이버 파일 작성
- 로봇이름, 모터이름 등이 위에서 로봇 제작시에 작성했던 이름과 반드시 동일해야함
$ code ~/my_ws/src/my_package/my_package/my_robot_driver.pyimport rclpy
from geometry_msgs.msg import Twist
HALF_DISTANCE_BETWEEN_WHEELS = 0.045
WHEEL_RADIUS = 0.025
class MyRobotDriver:
# 생성자에서 항상 2개의 인자를 받음
# webots_node: webots 시뮬레이터의 instance에 대한 reference
# properties: URDF파일에서 주어진 XML 태그로부터 생성된 dictionary. 이를 이용하여 여러 파라미터를 controller에 전달 할 수 있음
def init(self, webots_node, properties):
self.__robot = webots_node.robot
self.__left_motor = self.__robot.getDevice('left wheel motor')
self.__right_motor = self.__robot.getDevice('right wheel motor')
self.__left_motor.setPosition(float('inf'))
self.__left_motor.setVelocity(0)
self.__right_motor.setPosition(float('inf'))
self.__right_motor.setVelocity(0)
self.__target_twist = Twist()
rclpy.init(args=None)
self.__node = rclpy.create_node('my_robot_driver')
self.__node.create_subscription(Twist, 'cmd_vel', self.__cmd_vel_callback, 1)
def __cmd_vel_callback(self, twist):
self.__target_twist = twist
def step(self):
rclpy.spin_once(self.__node, timeout_sec=0)
forward_speed = self.__target_twist.linear.x
angular_speed = self.__target_twist.angular.z
command_motor_left = (forward_speed - angular_speed * HALF_DISTANCE_BETWEEN_WHEELS) / WHEEL_RADIUS
command_motor_right = (forward_speed + angular_speed * HALF_DISTANCE_BETWEEN_WHEELS) / WHEEL_RADIUS
self.__left_motor.setVelocity(command_motor_left)
self.__right_motor.setVelocity(command_motor_right)- 플러그인을 선언하기 위한 URDF 파일 작성
- 단, 본 예시에서는 webot 월드에 로봇이 구현되어 있기 때문에 URDF 파일이 매우 간단하나, 다른 경우, URDF 파일 내에 로봇의 joint, mesh, sensor 등의 정보가 모두 입력하여 패키지 실행시에 로봇이 구성됨
$ code ~/my_ws/src/my_package/resource/my_robot.urdf<?xml version="1.0" ?>
<robot name="My robot">
<webots>
<plugin type="my_package.my_robot_driver.MyRobotDriver" />
</webots>
</robot>- launch 파일 작성
$ code ~/my_ws/src/my_package/launch/robot_launch.pyimport os
import launch
from launch import LaunchDescription
from ament_index_python.packages import get_package_share_directory
from webots_ros2_driver.webots_launcher import WebotsLauncher
from webots_ros2_driver.webots_controller import WebotsController
def generate_launch_description():
package_dir = get_package_share_directory('my_package')
robot_description_path = os.path.join(package_dir, 'resource', 'my_robot.urdf')
webots = WebotsLauncher(
world=os.path.join(package_dir, 'worlds', 'my_world.wbt')
)
my_robot_driver = WebotsController(
robot_name='my_robot',
parameters=[
{'robot_description': robot_description_path},
]
)
return LaunchDescription([
webots,
my_robot_driver,
launch.actions.RegisterEventHandler(
event_handler=launch.event_handlers.OnProcessExit(
target_action=webots,
on_exit=[launch.actions.EmitEvent(event=launch.events.Shutdown())],
)
)
])- setup.py 수정
$ code ~/my_ws/src/my_package/setup.pyfrom setuptools import find_packages, setup
package_name = 'my_package'
data_files = []
data_files.append(('share/ament_index/resource_index/packages', ['resource/' + package_name]))
data_files.append(('share/' + package_name + '/launch', ['launch/robot_launch.py']))
data_files.append(('share/' + package_name + '/worlds', ['worlds/my_world.wbt']))
data_files.append(('share/' + package_name + '/resource', ['resource/my_robot.urdf']))
data_files.append(('share/' + package_name, ['package.xml']))
setup(
name=package_name,
version='0.0.0',
packages=find_packages(exclude=['test']),
data_files=data_files,
install_requires=['setuptools'],
zip_safe=True,
maintainer='user',
maintainer_email='user.name@mail.com',
description='TODO: Package description',
license='TODO: License declaration',
tests_require=['pytest'],
entry_points={
'console_scripts': [
'my_robot_driver = my_package.my_robot_driver:main',
],
},
)빌드 및 실행
- 빌드
$ cd ~/my_ws --symlink-install
$ colcon build
$ source install/local_setup.bash- 실행
$ ros2 launch my_package robot_launch.py- 로봇 제어를 위한 토픽 발행
$ ros2 topic pub /cmd_vel geometry_msgs/Twist "linear: { x: 0.1 }"4. 로봇에 센서 추가
로봇에 추가된 거리 센서

- 거리센서 추가
- "Robot"-"children" 클릭, + 버튼, "Base nodes"-"DistanceSensor" 생성
- "DistanceSensor"의 이름("name" 필드)을 "ds0"로 지정
- "DistanceSensor"-"children" 클릭, + 버튼, "Base nodes"-"Pose" 생성, 하단 DEF에 "SENSOR"입력
- "Pose"-"children" 클릭, + 버튼, "Base nodes"-"Shape" 생성
- "Shape"-"geometry" 클릭, + 버튼, "Base nodes"-"Cylinder" 생성: height를 0.004, radius를 0.008로 설정
- "Shape"-"Appearance" 클릭, + 버튼, "Base nodes"-"PBRAppearance" 생성: 색상을 (1, 1, 0)으로, roughness 1, metalness 0로 설정
- "DistanceSensor"-"translation"을 (0.042, 0.02, 0.063), "rotation"을 (0, 0, 1, 0.524), "DistanceSensor"-"children"-"Pose"-"rotation"을 (0, 1, 0, 1.57)로 설정
- "DistanceSensor"-"lookupTable"을 (0, 1020, 0), (0.05, 1020, 0), (0.15, 0, 0)로 설정(+버튼으로 row를 추가)
- "DistanceSensor"-"numberOfRays"를 2, "aperture"를 1로 설정
- 같은 방법으로 아래 그림과 같은 설정으로 반대쪽 센서 생성(이름은 ds1)
센서 생성 예시

5. 거리센서를 활용한 장애물 회피 제어
파일작성
- 장애물 회피 제어 코드 작성
$ code ~/my_ws/src/my_package/my_package/obstacle_avoider.pyimport rclpy
from rclpy.node import Node
from sensor_msgs.msg import Range
from geometry_msgs.msg import Twist
MAX_RANGE = 0.15
class ObstacleAvoider(Node):
def __init__(self):
super().__init__('obstacle_avoider')
self.__publisher = self.create_publisher(Twist, 'cmd_vel', 1)
self.create_subscription(Range, 'left_sensor', self.__left_sensor_callback, 1)
self.create_subscription(Range, 'right_sensor', self.__right_sensor_callback, 1)
def __left_sensor_callback(self, message):
self.__left_sensor_value = message.range
def __right_sensor_callback(self, message):
self.__right_sensor_value = message.range
command_message = Twist()
command_message.linear.x = 0.1
if self.__left_sensor_value < 0.9 * MAX_RANGE or self.__right_sensor_value < 0.9 * MAX_RANGE:
command_message.angular.z = -2.0
self.__publisher.publish(command_message)
def main(args=None):
rclpy.init(args=args)
avoider = ObstacleAvoider()
rclpy.spin(avoider)
# Destroy the node explicitly
# (optional - otherwise it will be done automatically
# when the garbage collector destroys the node object)
avoider.destroy_node()
rclpy.shutdown()
if __name__ == '__main__':
main()- URDF 파일 수정
$ code ~/my_ws/src/my_package/resource/my_robot.urdf<?xml version="1.0" ?>
<robot name="My robot">
<webots>
<device reference="ds0" type="DistanceSensor">
<ros>
<topicName>/left_sensor</topicName>
<alwaysOn>true</alwaysOn>
</ros>
</device>
<device reference="ds1" type="DistanceSensor">
<ros>
<topicName>/right_sensor</topicName>
<alwaysOn>true</alwaysOn>
</ros>
</device>
<plugin type="my_package.my_robot_driver.MyRobotDriver" />
</webots>
</robot>- launch 파일 수정
$ code ~/my_ws/src/my_package/launch/robot_launch.pyimport os
import launch
from launch_ros.actions import Node
from launch import LaunchDescription
from ament_index_python.packages import get_package_share_directory
from webots_ros2_driver.webots_launcher import WebotsLauncher
from webots_ros2_driver.webots_controller import WebotsController
def generate_launch_description():
package_dir = get_package_share_directory('my_package')
robot_description_path = os.path.join(package_dir, 'resource', 'my_robot.urdf')
webots = WebotsLauncher(
world=os.path.join(package_dir, 'worlds', 'my_world.wbt')
)
my_robot_driver = WebotsController(
robot_name='my_robot',
parameters=[
{'robot_description': robot_description_path},
]
)
obstacle_avoider = Node(
package='my_package',
executable='obstacle_avoider',
)
return LaunchDescription([
webots,
my_robot_driver,
obstacle_avoider,
launch.actions.RegisterEventHandler(
event_handler=launch.event_handlers.OnProcessExit(
target_action=webots,
on_exit=[launch.actions.EmitEvent(event=launch.events.Shutdown())],
)
)
])- setup.py 수정
$ code ~/my_ws/src/my_package/setup.py'console_scripts': [
'my_robot_driver = my_package.my_robot_driver:main',
'obstacle_avoider = my_package.obstacle_avoider:main'
],빌드 및 실행
- 빌드
$ colcon build --simlink-install
$ source install/local_setup.bash- 실행
$ ros2 launch my_package robot_launch.pyRviz
- 센서 데이터 등을 rviz를 통해 시각화 가능
$ rviz2- WSL을 사용할 경우, rviz(또는 타 GUI 어플리케이션)를 실행했을 때, 검정화면만 나오는 경우 아래의 내용을
./bashrc아래에 추가
export LIBGL_ALWAYS_INDIRECT=0
export LIBGL_ALWAYS_SOFTWARE=1