변형 가능한 객체와의 상호작용
Isaac Lab에서는 정말 다양한 예제를 제공한다.
코드와 코드에 대한 자세한 설명도 제공해주기 때문에 정말 좋다.
오늘은 'run_deformable_object.py' 스크립트에 대한 것을 배울것이다.
경로는 source/standalone/tutorials/01_assets 에 존재한다.
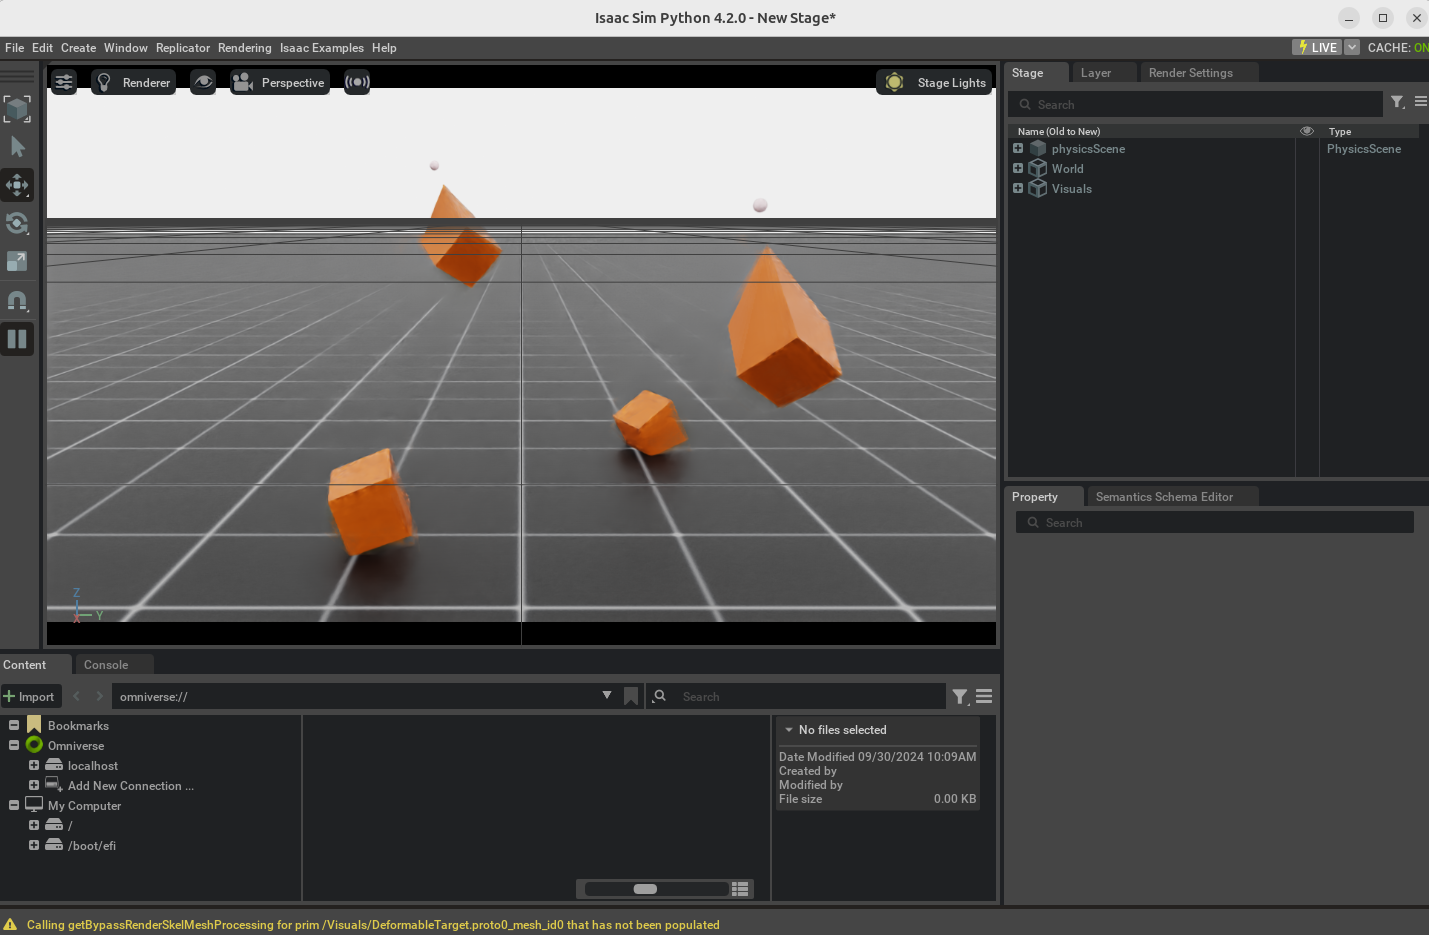
$ python source/standalone/tutorials/01_assets/run_deformable_object.py해당 튜토리얼에서는 soft 큐브 여러개를 생성하고 노드 위치와 속도를 설정하는 방법, mesh 노드에 운동 명령을 적용하여 soft body를 움직이는 방법을 본다.
코드 설명
import argparse # 명령줄 인터페이스를 쉽게 만들어주는 라이브러리
from omni.isaac.lab.app import AppLauncher # Isaac Sim 애플리케이션을 시작하고 관리하는데 사용

# add argparse arguments
# ArgumentParser 객체 생성. description 파라미터는 간단한 설명을 제공
parser = argparse.ArgumentParser(description="Tutorial on interacting with a deformable object.")

# append AppLauncher cli args
# Isaac Sim에는 다양한 설정 옵션을 가지고 있음(시뮬레이션, 해당도. GPU 사용 여부 등)
# 이 메서드는 이러한 특정 옵션들을 명령줄 인자로 사용할 수 있게함
# 예를 들어 python your_script.py --resolution 1920 1080
AppLauncher.add_app_launcher_args(parser)
# parse the arguments
# 만약 python your_script.py --resolution 1920 1080 를 실행했다면 args_cli 객체는 resolution 속성을 가지게 되고 그 값은 [1920, 1080]를 가짐
args_cli = parser.parse_args()

# launch omniverse app
# AppLauncher 객체를 생성하면서 파싱된 명령줄 인자 args_cli를 전달
app_launcher = AppLauncher(args_cli)
# simulation_app 객체를 통해 시뮬레이션 제어 가능
simulation_app = app_launcher.app
"""Rest everything follows."""
import torch
import omni.isaac.core.utils.prims as prim_utils # prim 유틸리티 함수를 임포트. 이 모듈을 통해 시뮬레이션 환경에서 객체를 생성, 수정, 삭제하는 등의 작업 수행
import omni.isaac.lab.sim as sim_utils # 시뮬레이션 환경 설정, 물리 속성 조정, 시뮬레이션 실행 등과 관련된 기능 제공
import omni.isaac.lab.utils.math as math_utils # 벡터 연산, 행렬 변환등의 시뮬레이션에 필요한 수학적 연산 기능 제공
from omni.isaac.lab.assets import DeformableObject, DeformableObjectCfg # 변형 가능한 객체를 생성하고 구성하는데 필요한 클래스
from omni.isaac.lab.sim import SimulationContext # 시뮬레이션의 전반적인 상태와 설정을 관리하며, 시뮬레이션 실행, 일시정지, 리세 등의 기능 제공
Designing the scene
- 기본 구성
- ground plane(지면)과 light source(광원)을 scene에 배치
- 변형 가능한 객체 추가
- assets.DeformableObject 클래스를 사용하여 변형 가능한 객체를 scene에 추가
- 이 클래스의 주요 기능 : 지정된 경로에 prim을 생성, 해당 prim에 대한 변형 가능한 객체의 물리 파라미터를 초기화
- 설정 방법
- assets.DefrmableObjectCfg 클래스를 사용하여 객체의 생성 설정을 정의
- 이 클래스는 기본 초기 상태의 정보를 포함
- 객체 생성 과정
- assets.DeformableObjectCfg로 설정한 객체를 assets.DeformableObject 클래스의 생성자에게 전달
- 이 과정을 통해 객체가 scene에 생성되고 시뮬레이션 실행 시 해당하는 물리 파라미터가 초기화됨
def design_scene():
    """Designs the scene."""
    # Ground-plane
    # GroundPlaneCfg()를 사용하여 지면 생성
    cfg = sim_utils.GroundPlaneCfg()
    cfg.func("/World/defaultGroundPlane", cfg)
    # Lights
    # DomeLightCfg()를 사용하여 광원 설정
    cfg = sim_utils.DomeLightCfg(intensity=2000.0, color=(0.8, 0.8, 0.8))
    cfg.func("/World/Light", cfg)

    # Create separate groups called "Origin1", "Origin2", "Origin3"
    # Each group will have a robot in it
    origins = [[0.25, 0.25, 0.0], [-0.25, 0.25, 0.0], [0.25, -0.25, 0.0], [-0.25, -0.25, 0.0]]
    for i, origin in enumerate(origins):
        prim_utils.create_prim(f"/World/Origin{i}", "Xform", translation=origin)
    """ 1. 원점 그룹 생성
		- 4개의 원점 위치를 정의
    	- 각 원점에 대해 "/World/Origin{i}"라는 이름으로 Xform 프림을 생성
    	- 여러 객체를 다른 위치에 배치하기 위한 준비 단계
    """

    # Deformable Object
    cfg = DeformableObjectCfg(
        prim_path="/World/Origin.*/Cube",
        spawn=sim_utils.MeshCuboidCfg(
            size=(0.2, 0.2, 0.2),
            deformable_props=sim_utils.DeformableBodyPropertiesCfg(rest_offset=0.0, contact_offset=0.001),
            visual_material=sim_utils.PreviewSurfaceCfg(diffuse_color=(0.5, 0.1, 0.0)),
            physics_material=sim_utils.DeformableBodyMaterialCfg(poissons_ratio=0.4, youngs_modulus=1e5),
        ),
        init_state=DeformableObjectCfg.InitialStateCfg(pos=(0.0, 0.0, 1.0)),
        debug_vis=True,
    )
    """
    2. 변형 가능한 객체 설정
 	- **DeformableObjectCfg** 를 사용하여 변형 가능한 객체의 설정을 정의
    - **prim_path** : 객체가 생성될 경로 지정. 여기서는 모든 Origin 그룹 아래에 Cube를 생성
    - **spawn** : 객체의 생성 설정을 정의
   			- **size** : 큐브 크기를 (0.2,0.2,0.2)로 정의
        	- **deformable_props** : 변형 가능한 물체의 속성 설정
            	- rest_offset=0.0 : 물체가 정지 상태의 표면과 접촉 표면 사이에 유지하는 거리를 설정한다. 0.0은 기본적으로 간격이 없음을 의미
                - contact_offset=0.001 : 변형 가능한 개체 표면 주변의 접촉을 감지하기 위한 여백을 설정하여 물리적 상호작용을 안정화하는데 도움이 됨 여기서는 0.001미터(1mm)로 설정
            - **visual_material** : 객체의 시각적 재질을 설정. 여기서는 붉은색으로 설정
            - **physics_material** : 객체의 물리적 재질을 설정. 푸아송 비와 영 계수를 지정
            - **init_state** : 객체의 초기 위치를 (0.0, 0.0, 1.0)으로 설정
            - **debug_vis** : 디버그 시각화 활성화
    """
    # 앞서 정의한 cfg를 사용하여 DeformableObject 인스턴스 생성
    cube_object = DeformableObject(cfg=cfg)

    # return the scene information
    # 생성된 변형 가능한 객체를 딕셔너리 형태로 저장
    # 객체 정보와 원점 위치 정보를 함께 반환
    scene_entities = {"cube_object": cube_object}
    return scene_entities, origins
physics_material의 Poissin's ratio와 Young's modulus
physics_material 설정은 변형 가능한 객체의 물리적 특성을 정의함
푸아송 비와 영 계수 두 값은 물체의 탄성 특성을 결정하는 핵심 파라미터이다.
1. Poisson's ratio
- 정의 : 물체가 한 방향으로 늘어날 때 다른 방향으로 수축하는 정도를 나타내는 비율
- 범위 : 대부분의 재료에서 0~0.5의 값을 가짐
- 예시 값 의미 : 0.4라는 의미는 물체가 한 방향으로 늘어날 때 다른 방향으로 상당히 수축한다는 의미
- Young's modulus
- 정의 : 물체의 stiffness(강성)을 나타내는 지표로, 물체가 얼마나 쉽게 변형되는지를 나타냄
- 단위 : 보통 파스칼(Pa) 또는 뉴턴/제곱미터(N/m²)로 표현
- 예시 값 의미 : 1e5가 값임. 이 값이 클수록 물체가 더 단단하고 변형이 어려워짐
고무, 천 등을 시뮬레이션 할 때 이 값들을 조정하여 원하는 재질의 특성을 얻어야함
Running the simulation loop
- 시뮬레이션 루프의 주요 단계
-
정기적으로 시뮬레이션 리셋
-
변형 가능한 물체에 kinematic commands 적용
-
시뮬레이션을 한 스텝 진행
-
변형 가능한 객체의 내부 버퍼를 업데이트
"""
sim - simulationContext 객체로, 시뮬레이션 환경을 관리
entities - DeformableObject를 포함하는 딕셔너리
origins - 객체들의 원점 위치를 나타내는 텐서
"""
def run_simulator(sim: sim_utils.SimulationContext, entities: dict[str, DeformableObject], origins: torch.Tensor):
   """Runs the simulation loop."""
   # Extract scene entities
   # note: we only do this here for readability. In general, it is better to access the entities directly from
   #   the dictionary. This dictionary is replaced by the InteractiveScene class in the next tutorial.
   cube_object = entities["cube_object"] # 객체 추출
   # Define simulation stepping
   sim_dt = sim.get_physics_dt() # 물리 시뮬레이션의 시간 간격을 가져옴
   sim_time = 0.0 # 총 시뮬레이션 시간을 0으로 초기화
   count = 0 # 시뮬레이션 스템 카운터를 0으로 초기화

   # Nodal kinematic targets of the deformable bodies
   nodal_kinematic_target = cube_object.data.nodal_kinematic_target.clone() # 변형 가능한 물체를 복제

   # Simulate physics
   while simulation_app.is_running(): # 시뮬레이션 애플리케이션이 실행중인 동안 무한 반복
       # 250 스텝마다 카운터와 시뮬레이션 시간을 0으로 초기화
       if count % 250 == 0:
           # reset counters
           sim_time = 0.0
           count = 0

           # reset the nodal state of the object
           # 객체의 기본 노드 상태를 복제
           nodal_state = cube_object.data.default_nodal_state_w.clone()
           # apply random pose to the object
           # 랜덤한 위치와 방향을 생성
           pos_w = torch.rand(cube_object.num_instances, 3, device=sim.device) * 0.1 + origins
           # pos_1 : 각 인스턴스에 대해 랜덤한 위치를 생성 (원점 주변 0.1 범위 내)
           quat_w = math_utils.random_orientation(cube_object.num_instances, device=sim.device)
           # quat_w : 각 인스턴스에 대해 랜덤한 방향 생성
           nodal_state[..., :3] = cube_object.transform_nodal_pos(nodal_state[..., :3], pos_w, quat_w)
           # transform_nodal_pos : 새로운 위치와 방향을 적용하여 노드 위치를 변환

           # write nodal state to simulation
           cube_object.write_nodal_state_to_sim(nodal_state)
           # write_nodal_state_to_sim : 변환된 노드 상태를 시뮬레이션에 적용

           # write kinematic target to nodal state and free all vertices
           nodal_kinematic_target[..., :3] = nodal_state[..., :3]
           # 노드 위치를 운동학 타겟으로 설정
           nodal_kinematic_target[..., 3] = 1.0
           # 모든 정점을 자유롭게 설정 (1.0 자유, 0.0 구속)
           cube_object.write_nodal_kinematic_target_to_sim(nodal_kinematic_target)
           # write_nodal_kinematic_target_to_sim : 운동학적 타겟을 시뮬레이션에 적용

           # 객체 내부 버퍼를 리셋
           cube_object.reset()

           print("----------------------------------------")
           print("[INFO]: Resetting object state...")

       # update the kinematic target for cubes at index 0 and 3
       # we slightly move the cube in the z-direction by picking the vertex at index 0
       nodal_kinematic_target[[0, 3], 0, 2] += 0.001 # 인덱스 0과 3에 해당하는 큐브들의 첫번째 정점(인덱스 0)을 z 방향으로 약간 이동 시킴
       # set vertex at index 0 to be kinematically constrained
       # 0: constrained, 1: free
       # 이 정점들을 운동학적으로 구속
       nodal_kinematic_target[[0, 3], 0, 3] = 0.0
       # write kinematic target to simulation
      # 업데이트된 타겟을 시뮬레이션에 적용 cube_object.write_nodal_kinematic_target_to_sim(nodal_kinematic_target)

       # write internal data to simulation
      # 내부 데이터 업데이트 cube_object.write_data_to_sim()
       # 시뮬레이션 한단계 진행
       sim.step()
       # 총 시뮬레이션 시간 업데이트
       sim_time += sim_dt
       # 스템 카운터 증가
       count += 1
       # 객체의 버퍼 업데이트
       cube_object.update(sim_dt)
       # 50 스텝마다 객체의 루트 위치를 출력
       if count % 50 == 0:
           print(f"Root position (in world): {cube_object.data.root_pos_w[:, :3]}")

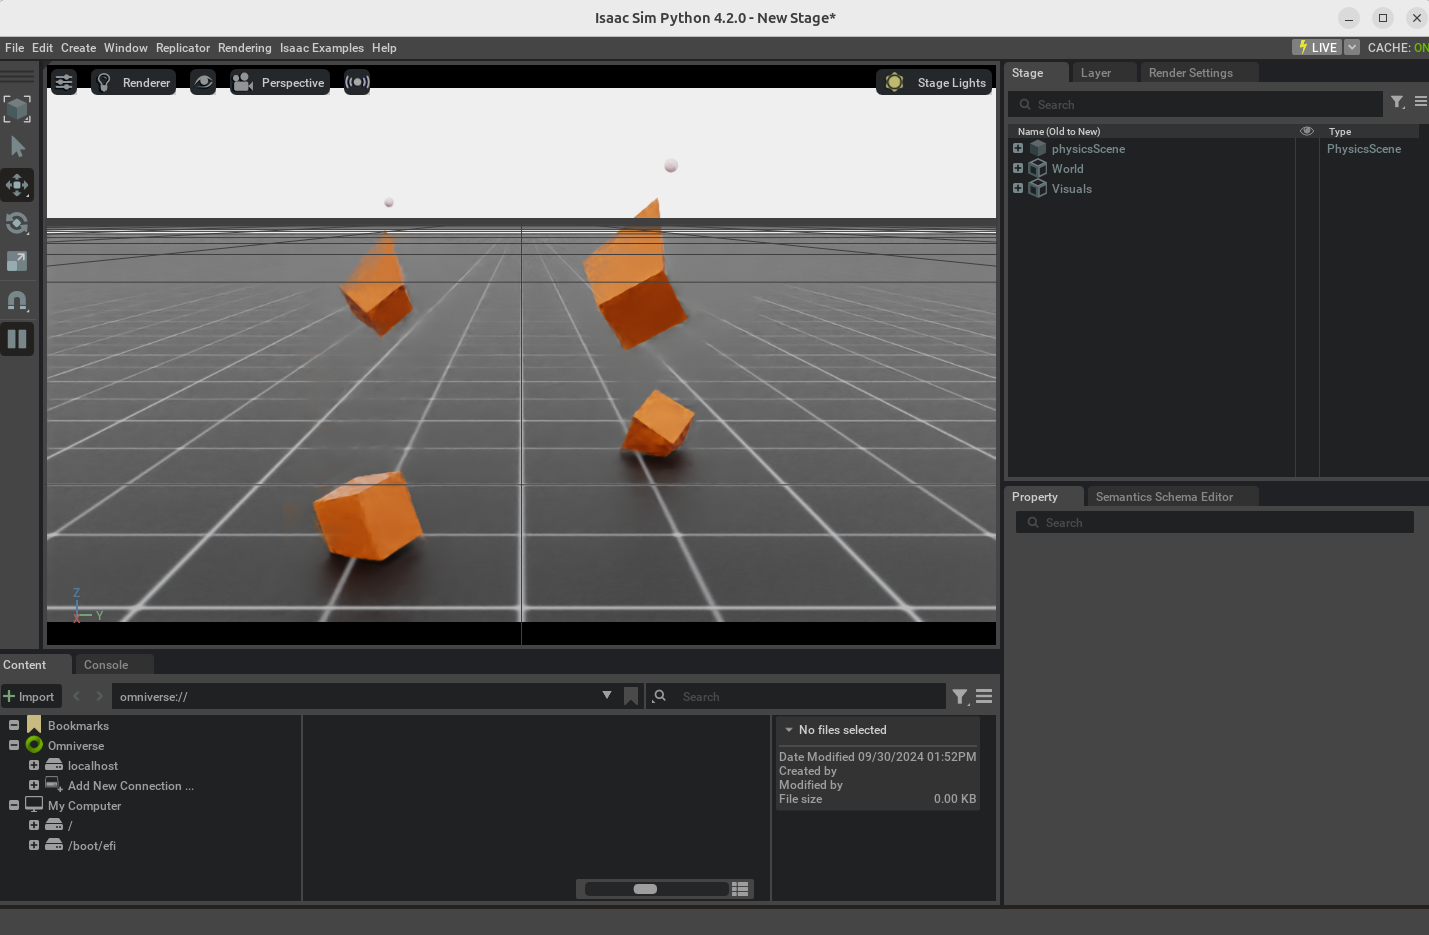
해당 코드를 실행하면 soft한 cube들이 바닥에서 떨어지면서 변형을 일으킨다.
해당 코드를 활용해서 변형 시키면서 다른 것도 해봐야겠다. 
데이터사이언스정복