Pytorch 기반 주요 Obeject Detection/Segmentation 패키지
-
torchvision: Code 기반, 지원 알고리즘이 많지않음.
-
Detectron2: Config 기반, Facebook Research 에서 주도.
-
MMDetection: Config 기반, OpenMMLab 주도.
현재는 MMDetection 을 자세히 알아보고 실습을 수행할 것이다!
MMDetection

- 2018년 MS COCO 챌린지에서 우승, 다수의 알고리즘 수용
- 최신의 다양한 Object Detection, Segmentation 알고리즘을 패키지로 구현
- 뛰어난 구현 성능, 효율적인 모듈 설계, Config 기반으로 데이터부터 모델, 학습, 평가까지 이어지는 간편한 파이프라인
- Pytorch 기반 구현
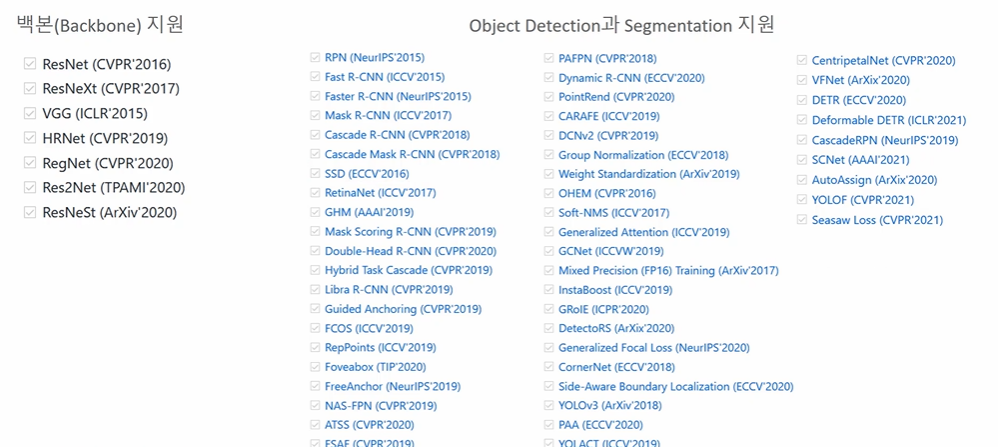
다음과 같이 많은 backbone 과 Obejct Detection, Segementation 모델이 구현되어 있다. 대부분 다 좋으나 아쉬운 점으로 SSD 모델의 백본으로 mobileNet 을 사용할 수 없다는 것이 있었으나 최근에 추가되었다!
✅ 아키텍쳐
매우 많은 Prebuilt 모델들이 있는데, 결국 MMDetection 모델 아키텍처는 이를 일반화된 모델 아키텍쳐로 묶어내는 역할을 한다. 구성요소로는
(one-stage detector)
- backbones: 피처 extractor 로, 이미지를 인풋으로 받고 Feature Map 을 반환하는 역할을 한다.
- Neck: backbone과 head 를 연결하는 요소로, head 가 피처맵의 특성을 보다 잘 해석하고 처리할 수 있도록 한다.
- DenseHead: 피처맵을 인풋으로 회귀와 분류문제 해결
(two-stage detector)
- RoIExtractor: 피처맵에서 ROI 정보를 뽑아내는 부분.
- RoIHead : ROI 정보를 기반으로 회귀와 분류문제 해결.
one-stage 의 경우 Neck 에서 받은 피처맵을 바탕으로 바로 예측에 들어가지만, two-stage의 경우 성능상의 문제 때문에 ROI 정보를 한 번 더 뽑고 그 후 ROIhead 를 통해 예측을 수행하는 차이가 있다.
✅ MMDetection 구성요소
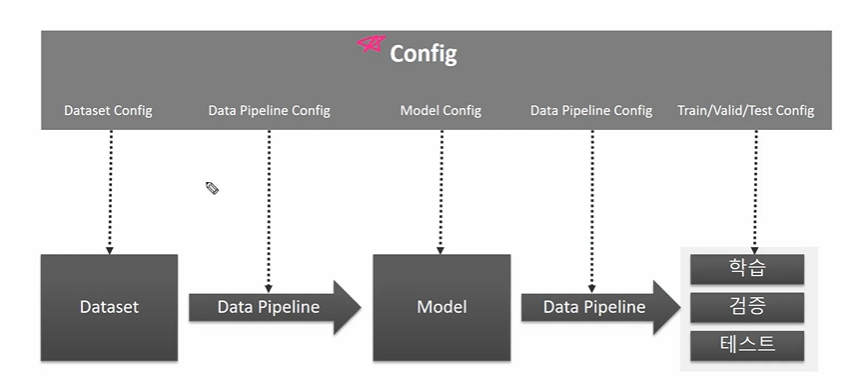
- 데이터셋,파이프라인,모델에 대한 정보가 config에 저장되어 있다.
- Model Config 에는 우리가 아는 Object Detection 모델 중 어떤 것을 사용할 것인지에 대한 정보가 들어가 있다.
- 따라서 config 자체도 매우 크다.
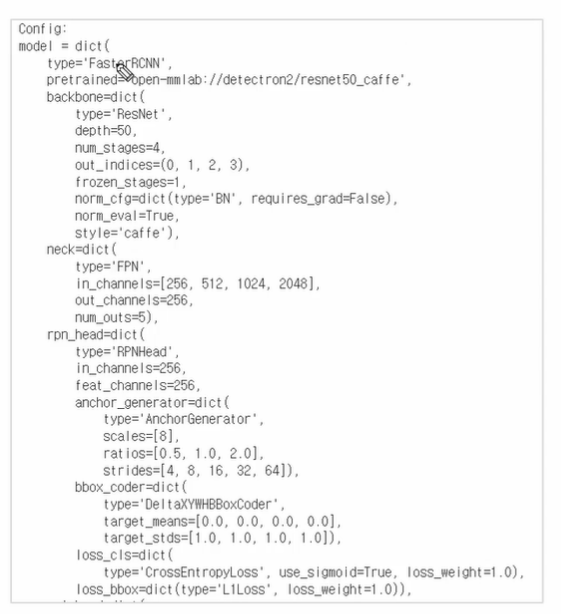
< 모델 config 예시 >
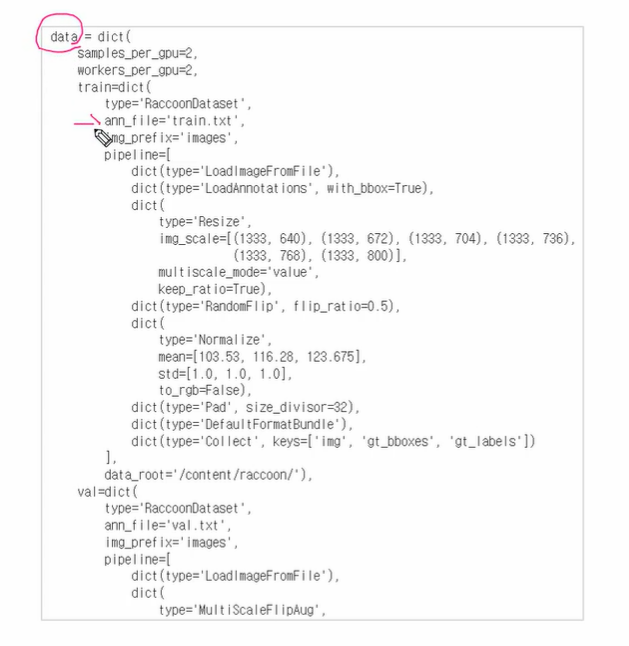
< data config 예시 >
✅ Training Pipeline
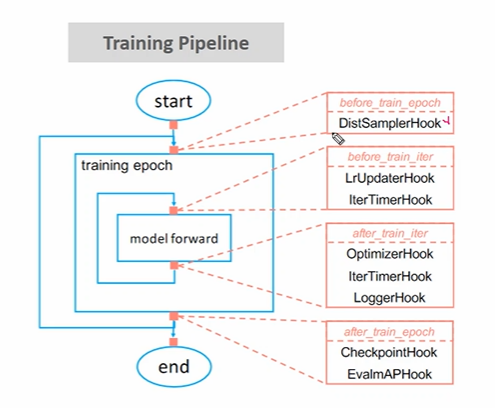
반복문을 도는 도중 event 을 만나면 특정 작업을 수행하는 것을 Callback, Hook 이라고 하는데, 이를 통해 학습에 필요한 여러 설정들을 Customization 하게 된다. 이도 역시나 Config 에서 수정하게 된다!
실습환경
본격적으로 실습을 진행하기 전에 맞춘 실습 환경은 다음과 같다. (자주 버전 업이 되니 주의하자.)
- pytorch-1.13+cu116
- torchvision-0.14+cu116
- mmcv-full-1.7.1
- mmdetection-2.82.2
from mmdet.apis import init_detector, inference_detector
import mmcv
MS-COCO 데이터로 Faster RCNN Pretrained 모델을 활용하여 Inference 수행

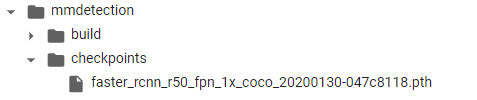
mmdetection 깃헙의 /configs/faster_rcnn을 보면 다음과 같이 모델 config, pretrained model 을 모아둔 곳이 있다. 우리가 필요한 2가지 이므로 pretrained 모델을 다운받도록 하자. config 의 경우 clone 하면 자동으로 .py 파일로 따라오니 다운이 필요가 없다.
# pretrained weight 모델을 다운로드 받기 위해서 mmdetection/checkpoints 디렉토리를 만듬.
!cd mmdetection; mkdir checkpoints

!wget -O /content/mmdetection/checkpoints/faster_rcnn_r50_fpn_1x_coco_20200130-047c8118.pth http://download.openmmlab.com/mmdetection/v2.0/faster_rcnn/faster_rcnn_r50_fpn_1x_coco/faster_rcnn_r50_fpn_1x_coco_20200130-047c8118.pth
checkpoints 디렉토리를 만든 후 아까 본 pretrained 모델을 여기에 다운받아준다. 확장자는 .pth 이다.
✅ 모델 생성 init_detector()
모델을 생성할 땐 init_detector(config, pretrained_model, device='cuda:0') 을 사용한다. 현재 config 파일은 /mmdetection/configs/faster_rcnn/ 밑에 있는 모델을 가져왔다.
# config 파일을 설정하고, 다운로드 받은 pretrained 모델을 checkpoint로 설정.
config_file = '/content/mmdetection/configs/faster_rcnn/faster_rcnn_r50_fpn_1x_coco.py'
checkpoint_file = '/content/mmdetection/checkpoints/faster_rcnn_r50_fpn_1x_coco_20200130-047c8118.pth'

# config 파일과 pretrained 모델을 기반으로 Detector 모델을 생성.
from mmdet.apis import init_detector, inference_detector
# 체크포인트와 config 을 받아 모델을 만드는 init_detector
model = init_detector(config_file, checkpoint_file, device='cuda:0')
✅ 이미지 로드와 예측 inference_detector()
이미지는 우리가 알던대로 로드해주고, 예측을 위해 inference_detector(모델, 이미지) 를 입력해주자.
img = '/content/mmdetection/demo/demo.jpg'
# inference_detector의 인자로 string(file경로), ndarray가 단일 또는 list형태로 입력 될 수 있음.
results = inference_detector(model, img)
그러면 results 에 어떤 내용이 저장될까? 80개 요소의 리스트가 반환되며, 각 요소 안에 또다른 정보들이 있다. 간략히 하면
object class 가 80개라 요소도 80개인 것이고 -> 해당 class 로 인식된 물체마다 각각의 리스트로 들어가 있고 -> 따라서 하나의 리스트 안에는 [좌, 상단, 우, 하단, confidence] 정보가 들어있다.
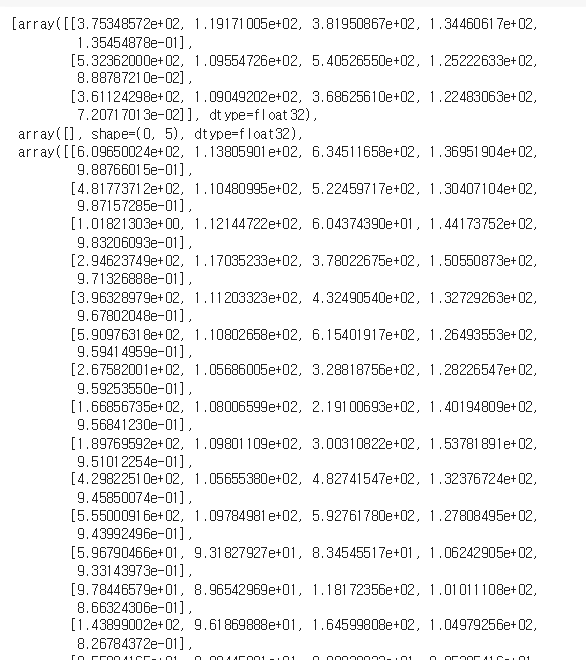
- result[0] 을 하면 class 0인 사람이 나올 것이고, 현재 이미지에서 detect 한 사람 수는 3명이다.
- 3명 중 하나의 각각 리스트는 좌, 상단, 우, 하단, confidence 정보가 포함되어 있다.
- class 로 인식되지 않으면 아예 빈 리스트가 담겨있다.
- class number 2인 자동차가 이 사진에선 많은 것을 확인할 수 있다.
✅ show_result_pyplot 으로 이미지에 띄우기
결과를 이미지에 띄우려면 mmdet.apis 에서 show_result_pyplot(모델, 이미지, 결과 을 임포트하여 사용하면 된다. 여기서 결과란 이미지와 별개로 방금 확인한 80개 요소의 리스트를 말한다. 기본적으로 default score threshold 0.3 이상인 object 만 detect 할 수 있게 적용해놨다.
from mmdet.apis import show_result_pyplot
# inference 된 결과를 원본 이미지에 적용하여 새로운 image로 생성(bbox 처리된 image)
# Default로 score threshold가 0.3 이상인 Object들만 시각화 적용. show_result_pyplot은 model.show_result()를 호출.
show_result_pyplot(model, img, results)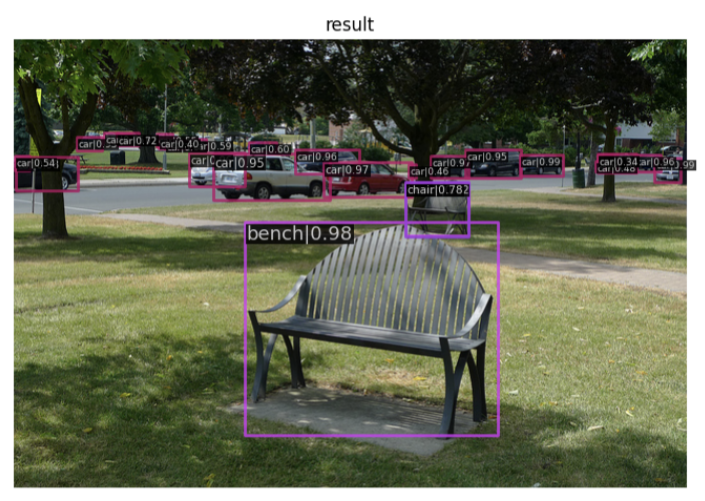
from mmdet.apis import show_result_pyplot
# inference 된 결과를 원본 이미지에 적용하여 새로운 image로 생성(bbox 처리된 image)
# Default로 score threshold가 0.3 이상인 Object들만 시각화 적용. show_result_pyplot은 model.show_result()를 호출.
show_result_pyplot(model, img, results, score_thr = 0.97, title = 'park')
이번엔 threshold 를 0.97로 바꾸고 title park를 주어 띄워봤다. 사실 result 잡아낸 결과는 고정이고, 띄워주는 임계값만 바꾼 것이다.
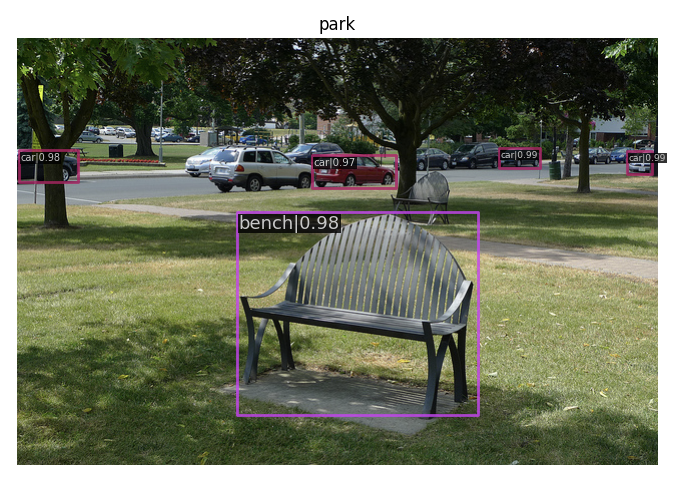
확실히 잡아낸 물체가 적어진 것을 확인할 수 있었다.
Video Inference 수행
mmdetection 에서 제시하고 있는 처리로직이 있으나, 이것이 오래 걸리므로 로직을 조금 변경해서 사용할 것이다. 기본적으로 mmdetection 에서 구현한 faster rcnn 을 가져오고, mmdet.api 의 init_detector 와 inference_detector 을 사용하는 것 외에 큰 차이는 없으나 초당 처리하는 fps 속도에서 차이가 난다!
✅ 모델 로드
from mmdet.apis import init_detector, inference_detector
import mmcv

config_file = '/content/mmdetection/configs/faster_rcnn/faster_rcnn_r50_fpn_1x_coco.py'
checkpoint_file = '/content/mmdetection/checkpoints/faster_rcnn_r50_fpn_1x_coco_20200130-047c8118.pth'
model = init_detector(config_file, checkpoint_file, device='cuda:0')
✅ 기존 mmdetection demo에서 제시하는 대로 video detection 수행 (시간 오래걸림)
import cv2

# cv2.VideoCapture -> mmcv.VideoReader
video_reader = mmcv.VideoReader('/content/data/John_Wick_small.mp4')
video_writer = None
fourcc = cv2.VideoWriter_fourcc(*'mp4v') # -> 코덱
# cv2 유지 (쓸 위치, 코덱, fps, (너비,높))
video_writer = cv2.VideoWriter('/content/data/John_Wick_small_out1.mp4', fourcc, video_reader.fps,(video_reader.width, video_reader.height))

# 한 프레임씩 가져오는 mmcv.track_iter_progress(video_reader)
for frame in mmcv.track_iter_progress(video_reader):
  result = inference_detector(model, frame) # -> inference_detector
  frame = model.show_result(frame, result, score_thr=0.4) # -> model.show_result(프레임, result, treshold)

  video_writer.write(frame)

if video_writer:
        video_writer.release()
시간이 오래걸리나 아래 4가지는 알아둬야 할 부분이다.
mmcv.VideoReader(읽을경로): 영상을 읽어올 경로를 표시하여 cv2.VideoCapture 와 같이 한 프레임씩 읽어오는 것을 가능하게 한다.cv2.VideoWriter(쓸경로, 코덱, fps, (너비,높이)): 인자로 경로, 코덱, fps, (너비, 높이) 정보를 주어 어떤 포맷으로 쓸 것인지 결정한다. (.write로 쓸 수 있다.)inference_detector(model, frame): mmdet.api 에서 제공하는 api 로 반복문 안에서 (mmcv.track_iter_progress(video_reader))모델과 frame 인자를 주면 result 를 반환한다.model.show_result(frame, reuslt, score_thr=0.4): 약간 재귀적(?)으로 inference_detector 가 반환한 result 을 다시한번 인자로 전달한다. 인자로 전달해야 할 것은 frame, result, threshold 이다. 반환된 결과를 실제 이미지에 띄우는 부분.
싹 다 외울 필요는 없지만 로직을 이해하자. reader 와 writer 가 필요하고, 반복문 안에서 reader 로 읽은 프레임으로 예측을 수행하며, 프레임과 예측을 담은 그림을 writer 로 쓴다는 것! 정도가 중요하겠다.
✅ Custom 된 frame 처리 로직을 이용하여 Video Inference 수행
import numpy as np

# 0부터 순차적으로 클래스 매핑된 label 적용.
labels_to_names_seq = {0:'person',1:'bicycle',2:'car',3:'motorbike',4:'aeroplane',5:'bus',6:'train',7:'truck',8:'boat',9:'traffic light',10:'fire hydrant',
                        11:'stop sign',12:'parking meter',13:'bench',14:'bird',15:'cat',16:'dog',17:'horse',18:'sheep',19:'cow',20:'elephant',
                        21:'bear',22:'zebra',23:'giraffe',24:'backpack',25:'umbrella',26:'handbag',27:'tie',28:'suitcase',29:'frisbee',30:'skis',
                        31:'snowboard',32:'sports ball',33:'kite',34:'baseball bat',35:'baseball glove',36:'skateboard',37:'surfboard',38:'tennis racket',39:'bottle',40:'wine glass',
                        41:'cup',42:'fork',43:'knife',44:'spoon',45:'bowl',46:'banana',47:'apple',48:'sandwich',49:'orange',50:'broccoli',
                        51:'carrot',52:'hot dog',53:'pizza',54:'donut',55:'cake',56:'chair',57:'sofa',58:'pottedplant',59:'bed',60:'diningtable',
                        61:'toilet',62:'tvmonitor',63:'laptop',64:'mouse',65:'remote',66:'keyboard',67:'cell phone',68:'microwave',69:'oven',70:'toaster',
                        71:'sink',72:'refrigerator',73:'book',74:'clock',75:'vase',76:'scissors',77:'teddy bear',78:'hair drier',79:'toothbrush' }


# mmdetection 예측을 수행하고 (inference_detector) 예측을 바탕으로 이미지에 사각형과 캡션을 넣어주는 함수.
def get_detected_img(model, img_array,  score_threshold=0.3, is_print=True):
  # 인자로 들어온 image_array를 복사.
  draw_img = img_array.copy()
  bbox_color=(0, 255, 0)
  text_color=(0, 0, 255)

  # inference_detector: mmdetection 에서 예측을 만드는 과정으로, 이전 cv_net.forward() 와 같은 역할
  # results는 80개의 2차원 array(shape=(오브젝트갯수, 5))를 가지는 list.
  results = inference_detector(model, img_array)

  # 결과를 바탕으로 반복문 순회. class id 는 결국 0-79까지 고정이므로 result_ind 에 자동할당, 클래스 안에서 detect 된 오브젝트 결과가 result
  for result_ind, result in enumerate(results):
    # 결과가 없으면 해당 id의 오브젝트는 없는 것임.
    if len(result) == 0:
      continue

    # 결과가 있다면 [:,4] 즉 confidence 가 임계점을 넘는 것만 저장.
    result_filtered = result[np.where(result[:, 4] > score_threshold)]

    # 임계점을 넘는 오브젝트에 한해 바운딩박스 추출
    for i in range(len(result_filtered)):
      # 좌상단, 우하단 좌표 추출.
      left = int(result_filtered[i, 0])
      top = int(result_filtered[i, 1])
      right = int(result_filtered[i, 2])
      bottom = int(result_filtered[i, 3])
      caption = "{}: {:.4f}".format(labels_to_names_seq[result_ind], result_filtered[i, 4]) # -> 이전에 추출한 id와 confidence 가 캡션
      cv2.rectangle(draw_img, (left, top), (right, bottom), color=bbox_color, thickness=2)
      cv2.putText(draw_img, caption, (int(left), int(top - 7)), cv2.FONT_HERSHEY_SIMPLEX, 0.37, text_color, 1)
      if is_print:
        print(caption)

  return draw_img
결국 mmdetection 을 사용했다고 할 수 있는 것이, 모델을 로드하는 과정 (init_detector) 와 여기서 모델로 예측하는 과정(inference_detector) 를 mmdet.apis 를 활용했기 때문이다. 위의 함수를 조금 말로 간소화하자면, get_detected_img 는 프레임 하나에서 바운딩박스를 예측하고, 이미지로 띄워주는 함수로써
- 예측을 수행하고
- 한 프레임에서 예측 또한 여러 오브젝트들에 대해 수행되어야 하므로 반복문을 돌며
- 좌상단우하단 좌표를 가져와서 박스를 그리고
- class id 와 confidence 를 가져와서 캡션을 넣는 역할을 한다.
import time
# 전체 영상을 object detection 하는 mmdetect
def do_detected_video(model, input_path, output_path, score_threshold, do_print=True):
    # capture 과 writer 만들기
    cap = cv2.VideoCapture(input_path) # -> capture 만듦

    codec = cv2.VideoWriter_fourcc(*'XVID')
    vid_size = (round(cap.get(cv2.CAP_PROP_FRAME_WIDTH)),round(cap.get(cv2.CAP_PROP_FRAME_HEIGHT)))
    vid_fps = cap.get(cv2.CAP_PROP_FPS)
    vid_writer = cv2.VideoWriter(output_path, codec, vid_fps, vid_size) # -> writer 만듦.

	# 프레임 개수와 시간 측정
    frame_cnt = int(cap.get(cv2.CAP_PROP_FRAME_COUNT))
    print('총 Frame 갯수:', frame_cnt)
    btime = time.time()

    # 반복문을 돌며 cap으로 읽어온 프레임에 대해 (예측, 결과반환), writer 로 해당프레임 쓰기
    while True:
    	# 1. cap.read() 로 읽기
        hasFrame, img_frame = cap.read()
        if not hasFrame:
            print('더 이상 처리할 frame이 없습니다.')
            break
        stime = time.time()
        # 2. get_detected_img 로 프레임단위로 예측, 이미지 만들고
        img_frame = get_detected_img(model, img_frame,  score_threshold=score_threshold, is_print=False)
        if do_print:
          print('frame별 detection 수행 시간:', round(time.time() - stime, 4))
         # 3. writer() 로 쓰기
        vid_writer.write(img_frame)

	# 종료
    vid_writer.release()
    cap.release()

    print('최종 detection 완료 수행 시간:', round(time.time() - btime, 4))
이전에 mmdetection 을 사용하지 않았던 코드와 비교해서 img_frame = get_detect_img(model, img_frame ~) 부분만 바뀌었다. 그런데 속도가 훨씬 올라갔다는 점!
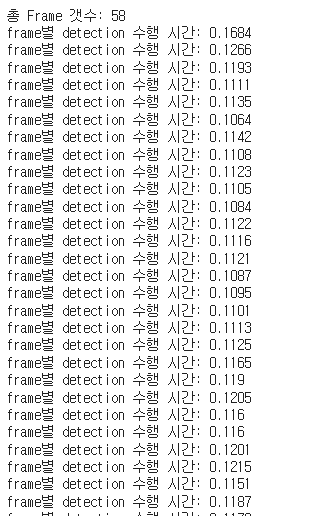
frame별 detection 수행시간을 보면 0.1XX 대니까 못해도 8~9 프레임을 초당 처리할 수 있다는 것이다. 속도가 많이 올랐다! 2초짜리 영상 총 58Frame 을 처리하는데 7.7초가 걸렸다.
정리
확실히 MMDetection 이나, DetectTron2 등 패키지를 구축하고 가져와서 쓰면 쉽게 Inference 가 가능하단 점이 인상깊었다. 다른 모델들도 config 정도만 조작하면 쉽게 불러와서 사용하는 게 가능할 거 같은데.. 시간을 내어서 살펴보지 않은 다른 모델들에 대해서도 적용해보면서 익히고자 한다.
