MMDetection 의 주요구성 요소
mmdet 을 가져와서 사용하기 위해선 config에 대해 잘 아는 것이 중요하다고 했다. 데이터든, 모델, 학습검증테스트 등의 일련의 딥러닝 파이프라인을 모두 config에서 정의하고 다루고 있기 때문이다. 단순히 사항 몇가지만 바꾼다고 되는 것이 아니라, 내가 만든 데이터를 가지고 훈련시키려면 이 복잡하게 얽힌 config 를 이해하고 만질 수 있는 능력을 가지는 게 매우 중요하다. 결국 config 만 제대로 알아도 mmdetection 을 사용할 줄 안다고 할 수 있는 것.
훈련에 들어가기에 앞서, 데이터셋의 경우 대표적으로 PASCAL VOC, COCO 등이 있었다. transformation을 통해 이 데이터를 변환해야 하는데, 여기서 dataset class 를 이해하는 것도 중요하다.
MMDetection Dataset
mmdetection 은 다양한 유형이 dataset을 변환클래스를 통해 지원한다.

가장 중요한 것은 CustomDataset 을 잘 쓸 수 있도록 한 것이다. 각각의 Dataset 에 맞게, 디렉토리 구조에 맞게 class 가 짜여져 있는데 이를 하나하나 수정할 수 없으니 냅두고, CustomDataset 을 수정하는 방향을 택했다.
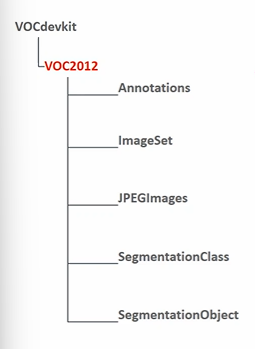
PASCAL VOC의 경우 이미지 1개당 1개의 annotation 파일을 가진다. (<> 모든 이미지에 대해서 1개의 annotation 파일) 따라서 1개의 이미지에 대해서 여러개의 object 들이 annotation 파일에 담긴다.
MS COCO 데이터의 경우 모든 이미지에 대해서 단 1개의 Annotation 파일을 가진다. (JSON) 따라서 이 JSON 파일 안에서 몇개의 대분류로 구성되어 있었다.
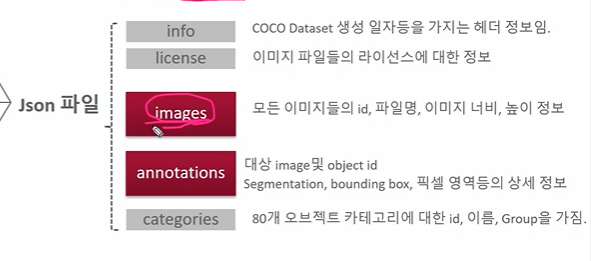
- 이미지와 annotation 매핑
- category 의 경우 coco면 80개
Custom Dataset 에서 사용되는 포맷을 보자.
- 모든 이미지들에 대한 Annotation 정보들을 list 객체로 가진다
- list 내의 개별 원소는 dict 로 구성, 개별 dict 는 이미지 1개에 대한 annotation 정보
- 개별 dict 로 여러 정보들을 저장
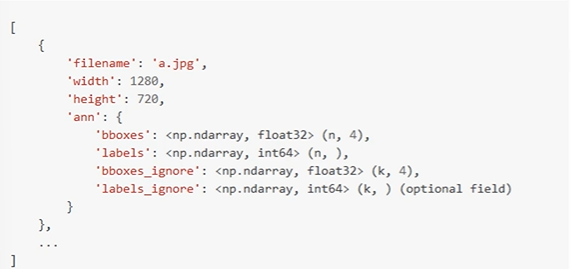
- boxes, labels 의 n은 이미지 1개당 object 를 말한다.
- boxes_igoner, labels_ignore 의 k는 클래스가 아닌 object 를 말한다.
Custom Dataset 준비
내가 선택한 데이터셋으로 훈련시키기 위해서는 일정한 형태로 데이터를 준비하는 과정이 필요했다. mmdetection 에서 제공하는 튜토리얼 을 확인해보면, mmdetection에 기존 유명한 데이터 (COCO, PASCAL VOC) 가 아니라 나의 데이터를 사용하려면 다음과 같은 형태여야 한다고 말하고 있다.
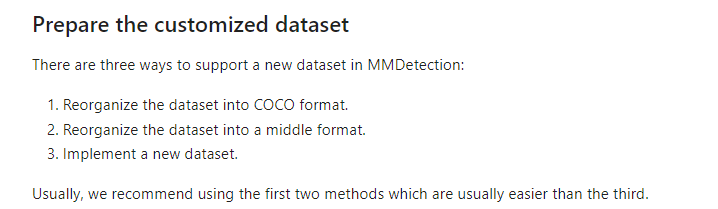
여기서 3가지 방법 중 2번에 해당하는 middle format 에 따라 데이터셋을 만들기로 결정하였다. 2번 방법으로 결정한 이유는 COCO format 으로 넣어도 결국 COCO Dataset class 가 하는 일이 2번의 middle format 으로 변환하는 일이기 때문이다. COCO dataset class 는 해당 링크 에서 확인할 수 있다. 그렇다면 middle format 이란 무엇인가? 아래의 이미지와 같다.
✅ middle format
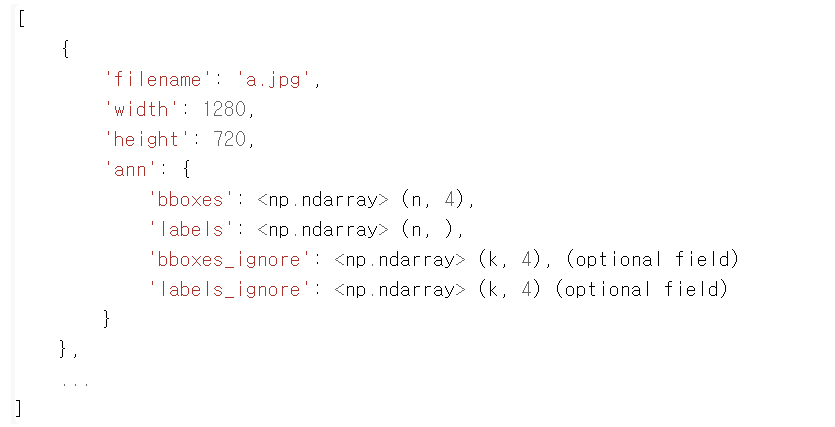
- filename: 이미지 파일명(디렉토리는 포함하지 않음)
- width: 너비
- height: 높이
- ann: bbounding box와 label에 대한 정보를 묶는 Dictionary
- bboxes: 하나의 이미지에 있는 여러 Object 들의 numpy array. 4개의 좌표값(좌상단, 우하단)을 가지고, 해당 이미지에 n개의 Object들이 있을 경우 array의 shape는 (n, 4)
- labels: 마찬가지로 하나의 이미지에 있는 여러 Object들의 numpy array. shape는 (n, )
- bboxes_ignore: 학습에 사용되지 않고 무시하는 bboxes. 무시하는 bboxes의 개수가 k개.
- labels_ignore: 마찬가지로 학습에 사용되지 않고 무시하는 labels. 무시하는 bboxes의 개수가 k개.
✅ KITTI Dataset 다운로드
KITTI Dataset 다운로드는 다음 링크에서 할 수 있다.
!wget https://download.openmmlab.com/mmdetection/data/kitti_tiny.zip
!unzip kitti_tiny.zip > /dev/null
KITTI Dataset 의 구조는 다음과 같았다.
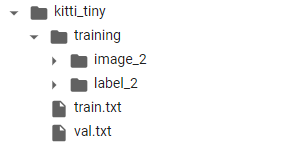
- KITTI_tiny 밑에 training, train.txt(메핑 0-49) val.txt(50-74)
- training 밑에 image_2, label_2 이미지 png 파일 75개와 라벨 txt 파일 75개가 다 따로 있었다.
label 아래에 있는 파일 하나의 예시이다.
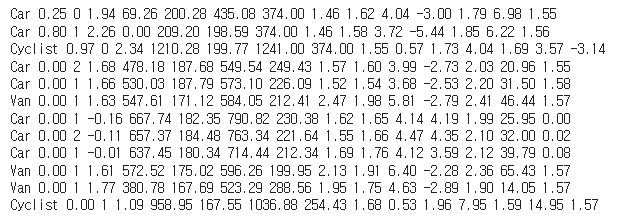
- 첫번째 컬럼은 오브젝트의 클래스 id이고, 5번째에서 8번째가 bounding box 의 정보이다.
✅ MMDetection Custom Dataset 생성 주요 로직
CustomDataset 이라는 것은 객체이다. 객체를 생성해서 올바르게 사용하려면 어떻게 해야할까? 다음의 로직을 거쳐야 한다.

-
Dataset 을 위한 Config 를 설정한다. 이 과정에서 중요한 config 로는 data_root, ann_file, img_prefix 가 있다.
-
CustomDataset 객체를 MMDetectionFramework 에 등록한다. 등록을 위해선 다음과 같이 @ 표시를 쓴다.

-
DATASETS 밑에 등록이 되었다면 자동으로 config 에 설정된 주요 값을 따라 CustomDataset 객체를 생성해준다. 이 과정은 MMDetection 프레임웍에서 담당하니 0, 1 과정을 잘 해주자.
추가적으로 KittyDatset 을 만들기 위해 원래있던 CustomDatset 클래스 말고도 나만의 클래스를 만들어야 했다. 이때는 인자 설정 등 도움을 받기 위해 CustomDataset을 상속받았고, 따라서 config 를 수정하게 된다면 수정된 정보가 customDataset -> (새로만든) KittyTinyDatset 으로 전달되게 될 것이다.
✅ data_root, ann_file, img_prefix 활용
먼저 Dataset 은 학습, 검증, 테스트 용으로 각각 만들져야한다. 이 경우 데이터마다 3가지 데이터 유형이 각 디렉토리에 있는 경우도 있고 / 2개의 디렉토리로 데이터, 라벨만 구분되어 있고 무엇이 학습,검증,테스트인지 나뉘지 않은 경우도 있다. (PASCAL VOC) / 또한 train, valid 가 디렉토리로 구분되어 jpg 파일이 들어가있고 annotation 의 경우 train용 파일 1개, valid용 파일 1개로 몰아들어간 경우도 있다. (MS COCO) 현재 다운받은 kitty 데이터의 경우 굵은 표시로 해둔 2번째 경우에 속했고, txt 별도의 메타파일에서 train.txt 와 val.txt 로 이미지와 annotation 파일을 지정해주고 있었다.
따라서 이때 data_root, ann_file, img_prefix 가 활용된다.
만약 내가 클래스 KittiTinyDataset 를 정의하게 된다면, 그 다음으로 할 일은 config 를 세팅하는 일이다. 이때는 내가 가지고 있는 소스 데이터셋의 디렉토리 구조에 따라 config를 지정해서, train-val-test 를 나눠주면 된다. 나의 경우
학습 config 세팅
- train.data_root=/content/kitti_tiny/ # -> 전체 데이터 디렉토리 중
- train.ann_file='train.txt' # -> /content/kitti_tiny/train..txt 위치에 있는 annotation 파일 하나의 리스트를 참고하여
- train.img_prefix=training/image_2 # -> /content/kitti_tiny/training/image_2 디렉토리 헤당 이미지 파일들 을 가져옴
검증 config 세팅
- val.data_root=/content/kitti_tiny/
- val.ann_file='val.txt'
- val.img_prefix=training/image_2
로 설정했다. config 로 설정한 train.data_root, train.ann_file, train.img_prefix 와 val. 3가지는 각각 클래스 선언 시 인자로 들어가서(정확히 말하면 CustomDataset 에서 받아서 KittiTinyDataset 으로 들어가게 된다), train_dataset 과 val_dataset 을 만든다. 해당 config 를 받아 연결하는 부분은 CustomDatset 클래스에 있다.

🚨 ann_file 은 파일, img_prefix 는 디렉토리에서 오는 문제 (-> 메타파일로 해결)
여기서 루트는 그렇다쳐도, ann_file 이 약간 꼬이는 것이 annotation 은 분명 바운딩박스 정보를 포함해야 하는데 내가 다운받은 kitty 는 이 ann 파일이 파일 개수만큼 있다. (label_2에) 그러나 train.ann_file 은 말그대로 디렉토리가 아닌 파일 하나만 받을 수 있기에, ann 파일 대신 ann 파일을 가리키는 메타 데이터 파일 하나의 이름을 적는다. 그것이 train.txt, val.txt 고, 해당 txt 파일을 열어보면 lebel_2 로 갈 수 있는 이름들이 리스트 형태로 간단히 들어가있다.
데이터셋 생성 클래스 만들기
위의 middle format 에 맞워서 데이터를 만드는 클래스이다. 주석을 열심히 달아놨다.
import copy
import os.path as osp
import cv2

import mmcv
import numpy as np

from mmdet.datasets.builder import DATASETS
from mmdet.datasets.custom import CustomDataset

# 1.클래스를 만들고 객체를 MMDetection 프레임웍에 등록하려면 @가 필요하다. DATASETS 밑에다가 등록하게 될 . force=True를 입력하지 않으면 Dataset 재등록 불가.
# 2.그러면 프레임웍의 build_dataset() 함수에서 config 에 맞게 객체를 실제로 생성해준다. (자동 )
@DATASETS.register_module(force=True) # DATASETS 에 객체 등록
class KittyTinyDataset(CustomDataset): # CustomDatset 상속 (config 들 가져와서 사용)
  CLASSES = ('Car', 'Truck', 'Pedestrian', 'Cyclist')

  # self.data_root: /content/kitti_tiny/
  # self.ann_file: /content/kitti_tiny/train.txt
  # self.img_prefix: /content/kitti_tiny/training/image_2
  # ann_file: /content/kitti_tiny/train.txt
  # annotation에 대한 모든 파일명을 가지고 있는 텍스트 파일을 __init__(self, ann_file)로 입력 받고, 이 self.ann_file이 load_annotations()의 인자로 입력
  def load_annotations(self, ann_file):
    print('##### self.data_root:', self.data_root, 'self.ann_file:', self.ann_file, 'self.img_prefix:', self.img_prefix)
    print('#### ann_file:', ann_file)
    cat2label = {k:i for i, k in enumerate(self.CLASSES)} #-> Car:0, Truck:1, Pedestrain: 2, Cyclist: 3
    image_list = mmcv.list_from_file(self.ann_file) # -> 다 읽어서 리스트로만 (0-49)

    # 포맷 중립 데이터를 담을 list 객체 (주인공: 개별 이미지당 딕셔너리)
    data_infos = []

    for image_id in image_list: # 000000 으로 시작
      filename = '{0:}/{1:}.jpeg'.format(self.img_prefix, image_id) # /content/kitti_tiny/training/image_2/0000000.jpeg
      # 높이와 너비 구한 후
      image = cv2.imread(filename)
      height, width = image.shape[:2]
      # filename, width, height 완성 (이미지 1개 당)
      data_info = {'filename': str(image_id) + '.jpeg',
                   'width': width, 'height': height}

      # 나머지 정보 완성하기 위해 annotation label 찾아감.
      label_prefix = self.img_prefix.replace('image_2', 'label_2')
      # label 주소 완성 (하나 파일에 리스트 하나를 만듦)
      lines = mmcv.list_from_file(osp.join(label_prefix, str(image_id)+'.txt'))
      # 반복문을 돌면서 라인별로 정보 습득. (object 개수대로 리스트를 만듦)
      content = [line.strip().split(' ') for line in lines]
      # 1. 반복문을 돌면서 사물 이름은 bbox_names 에 저장
      bbox_names = [x[0] for x in content]
      # 2. 반복문을 bbox 좌표를 저장(오브젝트 별로 [좌 상단 우 하단])
      bboxes = [ [float(info) for info in x[4:8]] for x in content]

      # 최종 4가지 정보 준비
      gt_bboxes = [] # 1
      gt_labels = [] # 2
      gt_bboxes_ignore = [] # 3
      gt_labels_ignore = [] # 4

      # bboxes, labels, bboxes_ignore, labels_ignore
      for bbox_name, bbox in zip(bbox_names, bboxes): # car [좌표], car [좌표] .. 반환
        # 만약 오브젝트 이름이 있는 라벨이라면 이름과 좌표 어펜드, 그렇지 않다면 ignore 에 각각 어펜드
        if bbox_name in cat2label:
          gt_bboxes.append(bbox) # 2. 좌표
          gt_labels.append(cat2label[bbox_name]) # 1. 이름 cat2labe['Car'] -> 0 반환
        else:
          gt_bboxes_ignore.append(bbox) # 4. 좌표
          gt_labels_ignore.append(-1) # 3. 이름

      # 개별 image별 annotation 정보를 가지는 Dict 생성. 해당 Dict의 value값은 모두 np.array임.
      data_anno = {
          'bboxes': np.array(gt_bboxes, dtype=np.float32).reshape(-1, 4), # 2차원
          'labels': np.array(gt_labels, dtype=np.long), # 1차원
          'bboxes_ignore': np.array(gt_bboxes_ignore, dtype=np.float32).reshape(-1, 4), # 2차원
          'labels_ignore': np.array(gt_labels_ignore, dtype=np.long) # 1차원
      }
      # 'ann' 이란 이름 아래 data_anno 4가지 키가 있는 해당 딕셔너리 넣어줌
      data_info.update(ann=data_anno)
      # 'ann' 은 이미지 당 사물 수만큼 추가
      data_infos.append(data_info)

    return data_infos
Config 수정
✅ config 파일, pretrained 모델 다운로드
링크 에서 Faster RCNN R-50-FPN 을 다운받을 수 있다.
### Config 설정하고 Pretrained 모델 다운로드
config_file = '/content/mmdetection/configs/faster_rcnn/faster_rcnn_r50_fpn_1x_coco.py'
checkpoint_file = '/content/mmdetection/checkpoints/faster_rcnn_r50_fpn_1x_coco_20200130-047c8118.pth'
해당 모델을 /content/mmdetection/checkpoints/ 밑에 풀어준다.
!cd mmdetection; mkdir checkpoints
!wget -O /content/mmdetection/checkpoints/faster_rcnn_r50_fpn_1x_coco_20200130-047c8118.pth http://download.openmmlab.com/mmdetection/v2.0/faster_rcnn/faster_rcnn_r50_fpn_1x_coco/faster_rcnn_r50_fpn_1x_coco_20200130-047c8118.pth
✅ import Config
mmcv 에서 Config 를 임포트해주고 config 파일을 가져와서 cfg 를 만들자.
from mmcv import Config

cfg = Config.fromfile(config_file)
print(cfg.pretty_text)
config 파일의 경로를 따라가보면 사실 다음과 같이 생겼다.
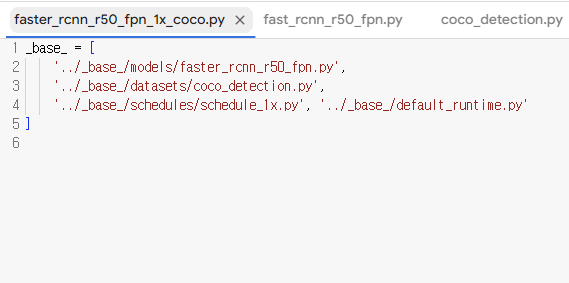
복잡하게 길게 써있는 것이 아니라 모델, 데이터셋, 스케줄러의 config 파일의 주소를 또다시 지정해주고 있다. fromfile 을 쓰면 이 파일들을 쭉 따라갈 수 있게 설정해놓았나보다. 수동으로 파일을 하나하나씩 열어서 확인해보자.
✅ Config 파일에 대해 대략적으로 알아보자
1. fast_rcnn_r50_fpn.py
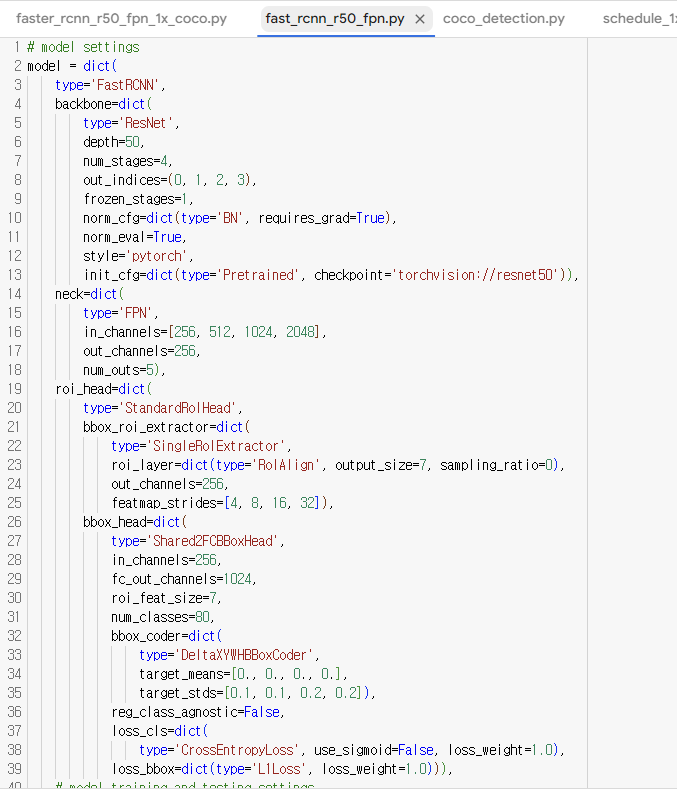
먼저 모델에 속하는 해당 파일은 다음과 같이 딕셔너리 형태로 저장되어 있다. (거의 모든 cfg가 딕셔너리라 생각하면 편하다!) 파일을 요약하자면 다음과 같다.
- model: backbone(ResNet50), neck(FPN), roi_head(StandardRoIhead)
- train_cfg: 훈련 세팅에 관한 것들이다.
- test_cfg: 테스트 세팅에 관한 것들이다.
train_cfg 나 test_cfg 는 아직 무슨 말인지 잘 알아먹지 못했다.. 그러나 모델의 백본부터 전체적인 구조와 사용한 init 모델 정도는 확인할 수 있는 상태가 되었다.
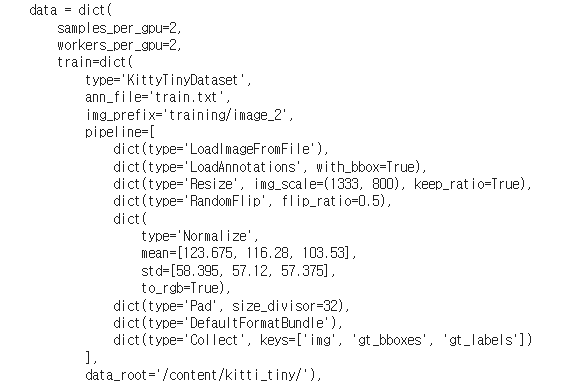
2. coco_detection.py
다음은 데이터 cfg 를 정의하는 파일이다. 크게는
- dataset_type: 데이터셋 이름 (수정필요)
- data_root: ann_file 또는 img_prefix 와 결합할 데이터가 위치한 상위 디렉토리 (수정필요)
- img_norm_cfg: normalization 에 관한, 평균과 std 를 무엇으로 줄 지 값 설정
- train_pipeline: augumentation 과 normalization
- test_pieline: augumentation 과 normalization
- data: train, val, test 데이터의 경로를 설정하는 부분 (수정필요)
- evaluation: eval metric
로 구성되어 있었다. 현재 나의 데이터에 맞게 수정이 필요한 부분은 (수정필요)로 표시를 해두었다.
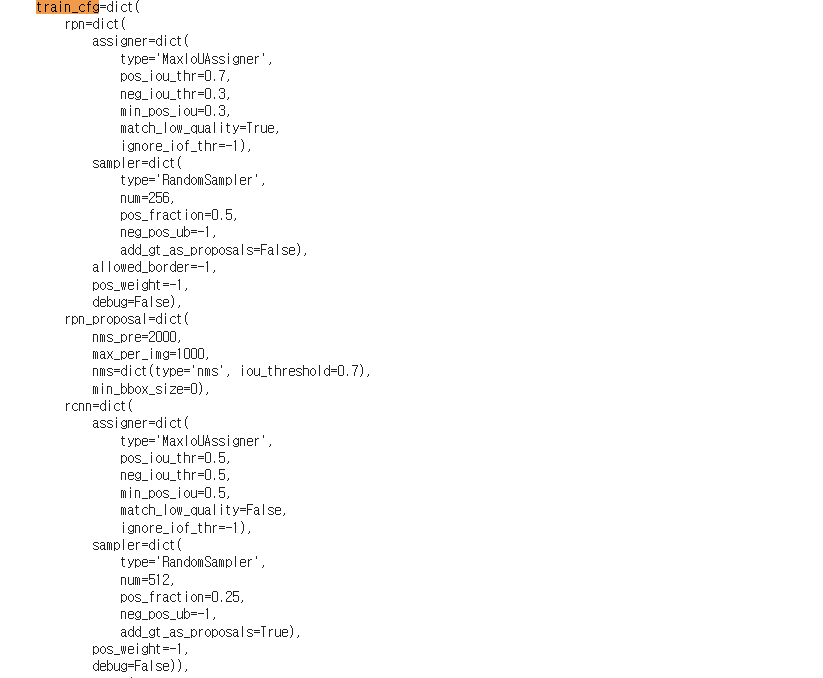
3. schedule_1x.py
- optimizer: optimizer type 결정. 현재는 SGD 였다.
- optimizer_config
- lr_config: policy 와 warm up 등 세부사항 결정
- runner: 몇 번의 에폭을 돌 건지 설정, 현재는 1x 파일이므로 12 로 설정되어있었고, 2x파일을 들어가보니 24였다.
✅ Config 수정
config 를 하나하나 수정해보는 단계이다. 편의를 위해 아까 1, 2, 3 번 순으로 어디에서 어떻게 변경되었는지 정리해보겠다.
-
모델
model.roi_head.num_classes: 클래스의 개수를 4개로 수정 -
데이터
- evaluation.metric: mAP 로 수정
- evaluation.interval: 마지막인 12
- checkpoint_config.interval: 12
- 이외에 dataset_type 과 data_root, data 에 관한 경로 수정 (절대경로, 상대경로 주의하자.)
- 스케줄러
- optimizer.lr: GPU 1개를 사용하므로 /8
- lr_config.warmup: None
- log_config.interval: 10
- lr_config.policy: 원래 지정되어 있으나 새로 지정해주지 않으면 오류
- load_from 을 faster_rnn_r50_fpn_1x_coco ~ 로 수정
- work_dir: tutorial_exps 로 수정
결과는 다음과 같다.
from mmdet.apis import set_random_seed

# dataset에 대한 환경 파라미터 수정.
cfg.dataset_type = 'KittyTinyDataset' # -> 클래스 명
cfg.data_root = '/content/kitti_tiny/'

# train, val, test dataset에 대한 type, data_root, ann_file, img_prefix  파라미터 수정.
cfg.data.train.type = 'KittyTinyDataset'
cfg.data.train.data_root = '/content/kitti_tiny/'
cfg.data.train.ann_file = 'train.txt'
cfg.data.train.img_prefix = 'training/image_2'

cfg.data.val.type = 'KittyTinyDataset'
cfg.data.val.data_root = '/content/kitti_tiny/'
cfg.data.val.ann_file = 'val.txt'
cfg.data.val.img_prefix = 'training/image_2'

cfg.data.test.type = 'KittyTinyDataset'
cfg.data.test.data_root = '/content/kitti_tiny/'
cfg.data.test.ann_file = 'val.txt'
cfg.data.test.img_prefix = 'training/image_2'


# class의 갯수 수정.
cfg.model.roi_head.bbox_head.num_classes = 4
# pretrained 모델
cfg.load_from = 'checkpoints/faster_rcnn_r50_fpn_1x_coco_20200130-047c8118.pth'

# 학습 weight 파일로 로그를 저장하기 위한 디렉토리 설정.
cfg.work_dir = './tutorial_exps'

# 학습율 변경 환경 파라미터 설정.
cfg.optimizer.lr = 0.02 / 8

cfg.lr_config.warmup = None
cfg.log_config.interval = 10

# config 수행 시마다 policy값이 없어지는 bug로 인하여 설정.
cfg.lr_config.policy = 'step'

# Change the evaluation metric since we use customized dataset.
cfg.evaluation.metric = 'mAP'
# We can set the evaluation interval to reduce the evaluation times
cfg.evaluation.interval = 12
# We can set the checkpoint saving interval to reduce the storage cost
cfg.checkpoint_config.interval = 12

# Set seed thus the results are more reproducible
cfg.seed = 0
set_random_seed(0, deterministic=False)
cfg.gpu_ids = range(1)

# ConfigDict' object has no attribute 'device 오류 발생시 반드시 설정 필요. https://github.com/open-mmlab/mmdetection/issues/7901
cfg.device='cuda'


# We can initialize the logger for training and have a look
# at the final config used for training
print(f'Config:\n{cfg.pretty_text}')
모델 학습
모델 학습에 있어서 알아야 할 것은
- build_dataset(cfg)
- build_detector(cfg, train_cfg = , test_cfg = )
- train_detector(mdoel, datasets, cfg)
두 가지이며, 예측에 있어서 알아야 할 것은
- inference_detector(model, cfg)
- show_result_pyplot(model, img, result) 이다.
✅ 데이터셋 생성 (build_dataset)
from mmdet.datasets import build_dataset
from mmdet.models import build_detector
from mmdet.apis import train_detector

# train용 Dataset 생성.
datasets = [build_dataset(cfg.data.train)]
다음 build_dataset 은 데이터셋을 생성해주는 메서드로, 인자로는 cfg를 받는다. cfg.data.train이 무엇인지 확인하자.
이 부분이다! 여기서 train으로 접근하면 KittyTinyDataset 을 마주치게 되는데, 이는 객체로써 여기서 클래스를 인식하고 자동으로 설정해둔 ann_file, img_prefix 에 맞게 데이터를 생성해주게 된다. 뿌듯한 순간이다...
✅ 모델 생성 (build_detector)
model = build_detector(cfg.model, train_cfg=cfg.get('train_cfg'), test_cfg=cfg.get('test_cfg'))
model.CLASSES = datasets[0].CLASSES
모델을 만들 땐 build_detector 을 이용하고, 모델과, train_cfg, test_cfg 를 넣어주게 된다. (train, test_cfg 에는 훈련과 테스트 데이터 세팅 정보들이 담겨있다.)
✅ 모델 훈련 (train_detector)
받아온 모델로 훈련을 돌린다.
%cd mmdetection
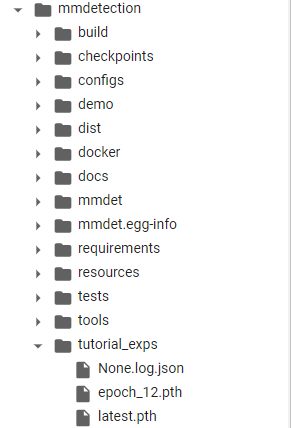
mmcv.mkdir_or_exist(osp.abspath(cfg.work_dir)) # 작업 저장 경로
# epochs는 config의 runner 파라미터로 지정됨. 기본 12회
train_detector(model, datasets, cfg, distributed=False, validate=True)성능은 다음과 같았다.

전체적인 성능 mAP는 0.584였고, 그렇게 나쁘진 않았으나 Cyclist 가 많이 까먹었다. 아마 훈련 데이터에 충분한 cyclist 가 포함되지 않았기 때문인 걸로 추정된다.. 저장된 모델은 여기있다.
✅ Inference - image (inference_detector)
from mmdet.apis import inference_detector, init_detector, show_result_pyplot

# BGR Image 사용
img = cv2.imread('/content/kitti_tiny/training/image_2/000068.jpeg')

model.cfg = cfg

result = inference_detector(model, img)
show_result_pyplot(model, img, result)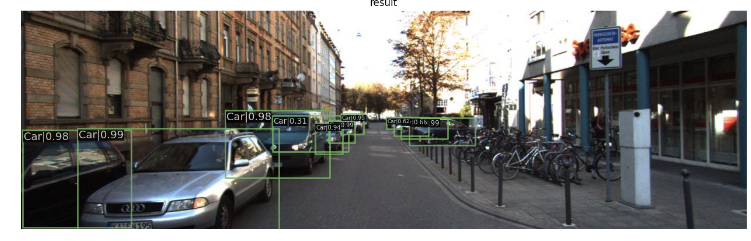
오른쪽에 잘 보면 희미하게라도 보이는 싸이클을 타는 사람이 있는데, 이는 인식하지 못한 것을 확인할 수 있다.
✅ Inference - video
CLASSES = ('Car', 'Truck', 'Pedestrian', 'Cyclist')
cat2label = {k:i for i, k in enumerate(CLASSES)}

def get_detected_img(model, img_array,  score_threshold=0.3, is_print=True):
  # 인자로 들어온 image_array를 복사.
  draw_img = img_array.copy()
  bbox_color=(0, 255, 0)
  text_color=(0, 0, 255)
  # inference_detector 로 예측
  results = inference_detector(model, img_array)

  # 결과 프레임을 보며 각각 object detection
  for result_ind, result in enumerate(results):
    if len(result) == 0:
      continue
    # threshold 이상인 것만 리스트로 가져오기
    result_filtered = result[np.where(result[:, 4] > score_threshold)]

    # 해당 클래스 별로 Detect된 여러개의 오브젝트 정보가 2차원 array에 담겨 있으며, 이 2차원 array를 row수만큼 iteration해서 개별 오브젝트의 좌표값 추출.
    for i in range(len(result_filtered)):
      # 좌상단, 우하단 좌표 추출.
      left = int(result_filtered[i, 0])
      top = int(result_filtered[i, 1])
      right = int(result_filtered[i, 2])
      bottom = int(result_filtered[i, 3])
      caption = "{}: {:.4f}".format(labels_to_names_seq[result_ind], result_filtered[i, 4])
      cv2.rectangle(draw_img, (left, top), (right, bottom), color=bbox_color, thickness=2)
      cv2.putText(draw_img, caption, (int(left), int(top - 7)), cv2.FONT_HERSHEY_SIMPLEX, 0.37, text_color, 1)
      if is_print:
        print(caption)

  return draw_img
함수는 이전과 같고, 바뀐 부분은 labels_to_names_seq[result_ind] 로 결과를 가져오고 캡션을 달아주는 코드이다.
import time

def do_detected_video(model, input_path, output_path, score_threshold, do_print=True):

    cap = cv2.VideoCapture(input_path)

    codec = cv2.VideoWriter_fourcc(*'XVID')

    vid_size = (round(cap.get(cv2.CAP_PROP_FRAME_WIDTH)),round(cap.get(cv2.CAP_PROP_FRAME_HEIGHT)))
    vid_fps = cap.get(cv2.CAP_PROP_FPS)

    vid_writer = cv2.VideoWriter(output_path, codec, vid_fps, vid_size)

    frame_cnt = int(cap.get(cv2.CAP_PROP_FRAME_COUNT))
    print('총 Frame 갯수:', frame_cnt)
    btime = time.time()
    while True:
        hasFrame, img_frame = cap.read()
        if not hasFrame:
            print('더 이상 처리할 frame이 없습니다.')
            break
        stime = time.time()
        img_frame = get_detected_img(model, img_frame,  score_threshold=score_threshold, is_print=False)
        if do_print:
          print('frame별 detection 수행 시간:', round(time.time() - stime, 4))
        vid_writer.write(img_frame)
    # end of while loop

    vid_writer.release()
    cap.release()

    print('최종 detection 완료 수행 시간:', round(time.time() - btime, 4))
역시나 같은 코드이다.
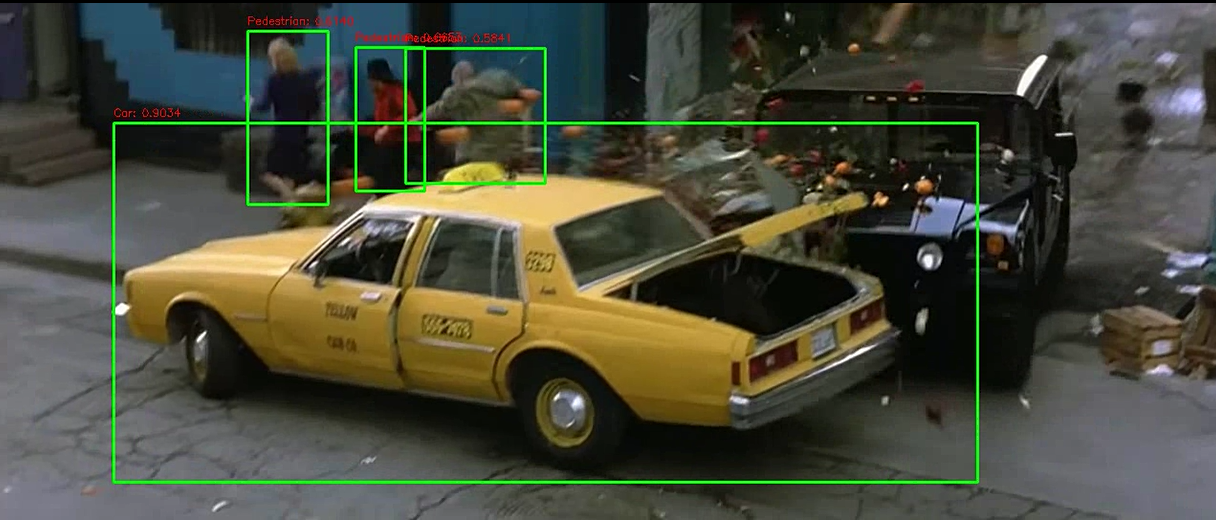
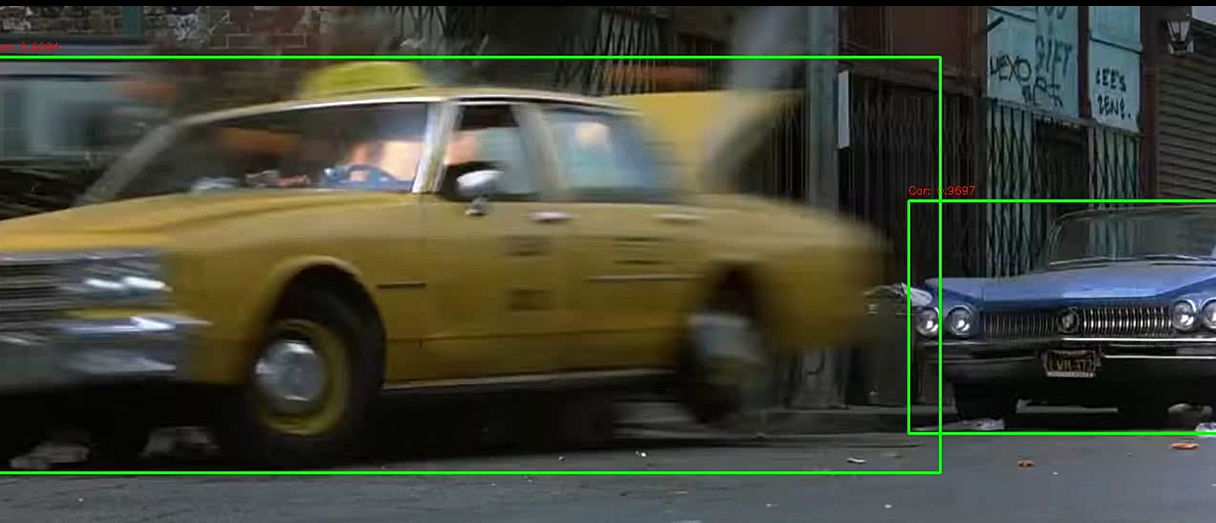
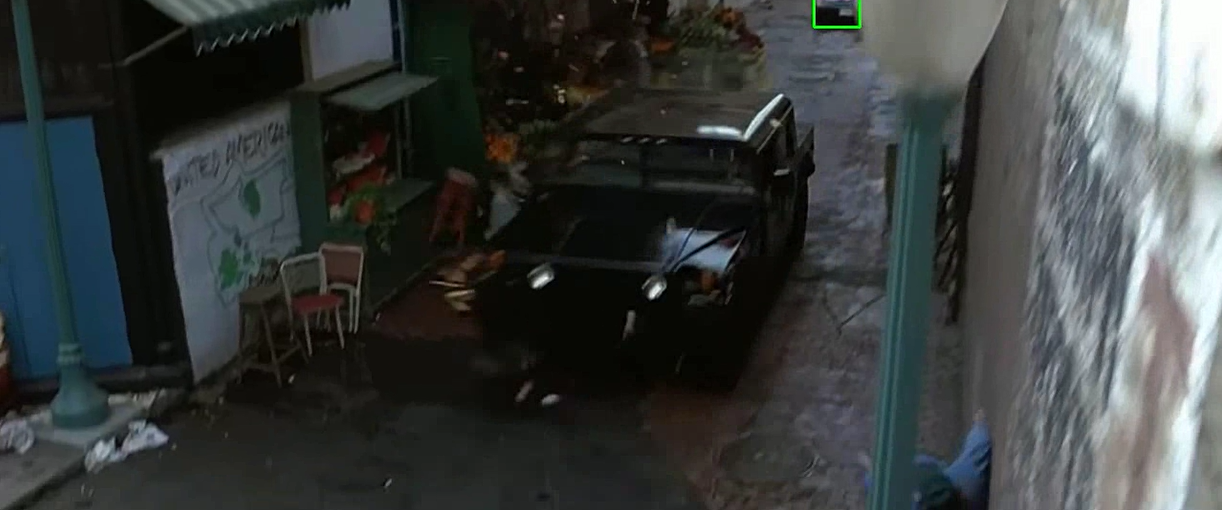
이렇게 정상적으로 잘 되나, 성능이 아쉬운 점이 있긴하다.
정리
새로운 데이터를 구해서 모델을 학습시키는 과정까지 진행해보았는데, 굉장히 호흡히 길고 어려웠다. 특히나 config 조작만큼이나 Dataset 을 middle form 에 맞게 코드를 구현하는 것이 고달팠다... 아마 해당 코드는 버리지 않고 또 새로운 데이터로 학습시킬 일이 있을 때 디렉토리, anntation 파일 구조 맞춰서 조금씩 변형하는 식으로 다시 쓸 수 있을 거 같다.
++ 그것 외에도 config 에 대한 체계적(?) 까진 아니더라도 전반의 이해를 할 수 있어서 좋은 경험이었다.
