BCCD Dataset 이용
이번에 활용할 데이터셋은 BCCD Dataset 이다. BCCD Dataset 해당 링크의 깃헙에서 확인할 수 있다!
BCCD Dataset 은 다음과 같은 특징이있다.
- PASCAL VOC 형태이다. (annotation 파일이 여러개이고 이를 가리키는 메타파일이 따로 있음)
- 백혈구 (WBC), 적혈구 (RBC), 혈소판 (Platelets) 세가지 유형의 class 를 가진다.
이러한 데이터를 유틸리티를 이용하여 MS COCO 형태로 변환하는 작업을 수행한 후, 훈련을 진행할 것이다.
✅ 데이터 다운로드
!git clone https://github.com/Shenggan/BCCD_Dataset.git✅ VOC 를 COCO 로 변환하는 패키지 적용하기
이번에 살펴본 패키지는 VOC 형태를 곧바로 COCO로 변환해주는 패키지였다. 해당 패키지는 voc2coco 깃헙 에서 다운받아 사용할 수 있었다.
voc2coco 다운로드
!git clone https://github.com/yukkyo/voc2coco.gitvoc2coco 를 적용하기 위해선 3가지 정보를 입력해주어야 한다.
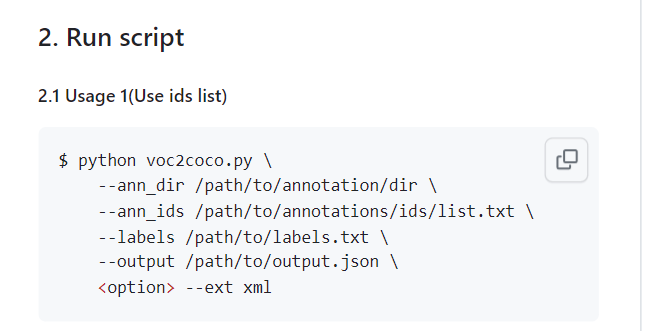
- ann_dir: VOC 의 경우 결과적으로 많은 ann 파일들을 하나로 정리하는 것이 목표이므로, ann 디렉토리의 이름을 적어야한다
- ann_ids: VOC 의 경우 많은 ann 파일을 가리키는 메타파일이 있다. 메타파일의 위치를 적어주자. (메타이므로 train, val, test 를 구분되게 적을 수 있을 것이다)
- labels: 하고싶은 task 의 클래스 명들을 적어준다. 라벨만 적은 txt 파일 주소를 적는다.
- output: 완성된 json 파일을 저장할 위치를 지정해준다.
현재 데이터셋에서는 labels 이 없는 상태이므로 간단히 만들어준 후,
import os

# labels.txt 파일을 만들고, BC, RBC, Platelets 를 써준다
with open('/content/BCCD_Dataset/BCCD/labels.txt', "w") as f:
    f.write("WBC\n")
    f.write("RBC\n")
    f.write("Platelets\n")

!cat /content/BCCD_Dataset/BCCD/labels.txt
VOC ➡️ COCO 로 변환을 수행해줬다.
 VOC를 COCO로 변환 수행. 학습/검증/테스트 용 json annotation을 생성.
%cd voc2coco
!python voc2coco.py --ann_dir /content/BCCD_Dataset/BCCD/Annotations --ann_ids /content/BCCD_Dataset/BCCD/ImageSets/Main/train.txt --labels /content/BCCD_Dataset/BCCD/labels.txt --output /content/BCCD_Dataset/BCCD/train.json --ext xml

!python voc2coco.py --ann_dir /content/BCCD_Dataset/BCCD/Annotations --ann_ids /content/BCCD_Dataset/BCCD/ImageSets/Main/val.txt --labels /content/BCCD_Dataset/BCCD/labels.txt --output /content/BCCD_Dataset/BCCD/val.json --ext xml

!python voc2coco.py --ann_dir /content/BCCD_Dataset/BCCD/Annotations --ann_ids /content/BCCD_Dataset/BCCD/ImageSets/Main/test.txt --labels /content/BCCD_Dataset/BCCD/labels.txt --output /content/BCCD_Dataset/BCCD/test.json --ext xml
✅ 완성된 json 파일 확인
완성된 json 파일은 다음과 같다.
딕셔너리 안에는 images, annotations, categories 가 있고 각각에는
- images: file_name, height, width, id
- annotations: area, iscrowd, bbox (좌상단우하단), category_id, ignore, segmentation, image_id, id
- categories: WBC, RBC, Platelets 가 있지만 사용 안함. (클래스 -> 라벨 숫자 지정은 mmdetection 내부에서.)
정보가 있었다.
BCCDataset 로딩
이제는 COCO dataset 을 실제로 사용하기 위한 로딩 과정이다. 클래스 명은 BCCDDataset 이라하고, CocoDataset 을 상속받으면 된다. (coco와 형식을 맞췄기 때문에)
여기서 중요한 것은 coco 형태로 맞췄을 경우 mmdetection 은 굉장히 간편한 로딩을 지원한다는 점이다. 다른 코드 없이 클래스 이름만 지정해주면 된다!
%cd /content

from mmdet.datasets.builder import DATASETS
from mmdet.datasets.coco import CocoDataset

@DATASETS.register_module(force=True)
class BCCDDataset(CocoDataset):
  CLASSES = ('WBC', 'RBC', 'Platelets')
  # 단일 클래스인 경우 CLASSES = ('WBC', ) -> 2차원 표시
모델 다운로드, config 수정
이전에 했던 과정을 다 거치자.
✅ config 파일과 checkpoint 파일 다운로드
config_file = '/content/mmdetection/configs/faster_rcnn/faster_rcnn_r50_fpn_1x_coco.py'
checkpoint_file = '/content/mmdetection/checkpoints/faster_rcnn_r50_fpn_1x_coco_20200130-047c8118.pth'

# checkpoints 디렉토리 밑에 다운로드
!cd /content/mmdetection; mkdir checkpoints
!wget -O /content/mmdetection/checkpoints/faster_rcnn_r50_fpn_1x_coco_20200130-047c8118.pth http://download.openmmlab.com/mmdetection/v2.0/faster_rcnn/faster_rcnn_r50_fpn_1x_coco/faster_rcnn_r50_fpn_1x_coco_20200130-047c8118.pth

# Config 객체 생성
from mmcv import Config

cfg = Config.fromfile(config_file)
print(cfg.pretty_text)
✅ Config 수정
- dataset_type 에는 아까 지정한 클래스 명을 등록해주자
- data_root 는 ann_file, img_prefix 상단의 디렉토리이다
- ann_file 은 하나로 만든 json 파일
- img_prefix 는 이미지가 있는 디렉토리
- load_from 을 절대경로로 주게되면 모델 로드 시에 별도의 cd가 필요없다
- CocoDataset 의 경우 evaluation.metric 을 bbox 로 설정해야 mAP 를 변경해가며 측정한다
from mmdet.apis import set_random_seed

# dataset에 대한 환경 파라미터 수정.
cfg.dataset_type = 'BCCDDataset' # -> 클래스 명으로 지정
cfg.data_root = '/content/BCCD_Dataset/BCCD/' #

# train, val, test dataset에 대한 type, data_root, ann_file, img_prefix 환경 파라미터 수정.
cfg.data.train.type = 'BCCDDataset'
cfg.data.train.data_root = '/content/BCCD_Dataset/BCCD/' # 아래에 ann_file 과 img_prefix 가 있어야
cfg.data.train.ann_file = 'train.json' # 모든 정답 (훈련용)
cfg.data.train.img_prefix = 'JPEGImages' # 모든 데이터

cfg.data.val.type = 'BCCDDataset'
cfg.data.val.data_root = '/content/BCCD_Dataset/BCCD/'
cfg.data.val.ann_file = 'val.json'
cfg.data.val.img_prefix = 'JPEGImages'

cfg.data.test.type = 'BCCDDataset'
cfg.data.test.data_root = '/content/BCCD_Dataset/BCCD/'
cfg.data.test.ann_file = 'test.json'
cfg.data.test.img_prefix = 'JPEGImages'

# class의 갯수 수정.
cfg.model.roi_head.bbox_head.num_classes = 3

# pretrained 모델 (절대 경로로 주게되면 모델 로드 시에 cd 필요없음)
cfg.load_from = '/content/mmdetection/checkpoints/faster_rcnn_r50_fpn_1x_coco_20200130-047c8118.pth'

# 학습 weight 파일로 로그를 저장하기 위한 디렉토리 설정.
cfg.work_dir = './tutorial_exps'

# 학습율 변경 환경 파라미터 설정.
cfg.optimizer.lr = 0.02 / 8
cfg.lr_config.warmup = None
cfg.log_config.interval = 10

# CocoDataset의 경우 metric을 bbox로 설정해야 함.(주의, mAP아님. bbox로 설정하면 mAP를 iou threshold를 0.5 ~ 0.95까지 변경하면서 측정)
cfg.evaluation.metric = 'bbox'
cfg.evaluation.interval = 12
cfg.checkpoint_config.interval = 12

# 두번 config를 로드하면 lr_config의 policy가 사라지는 오류로 인하여 설정.
cfg.lr_config.policy='step'
# Set seed thus the results are more reproducible
cfg.seed = 0
set_random_seed(0, deterministic=False)
cfg.gpu_ids = range(1)
# ConfigDict' object has no attribute 'device 오류 발생시 반드시 설정 필요. https://github.com/open-mmlab/mmdetection/issues/7901
cfg.device='cuda'
모델 학습 & Inference
✅ build_dataset
from mmdet.datasets import build_dataset
from mmdet.models import build_detector
from mmdet.apis import train_detector

# train용 Dataset 생성.
datasets = [build_dataset(cfg.data.train)]
dataset 에는 다음과 같은 키들이 저장된다. (datasets[0].키이름 으로 찍어볼 수 있다.)

✅ build_detector
model = build_detector(cfg.model, train_cfg=cfg.get('train_cfg'), test_cfg=cfg.get('test_cfg'))
model.CLASSES = datasets[0].CLASSES
✅ train_detector
import os.path as osp
mmcv.mkdir_or_exist(osp.abspath(cfg.work_dir))
train_detector(model, datasets, cfg, distributed=False, validate=True)
✅ 성능확인
IOU 를 변경해가며 성능을 측정할 수 있는데, 결과는 다음과 같았다.
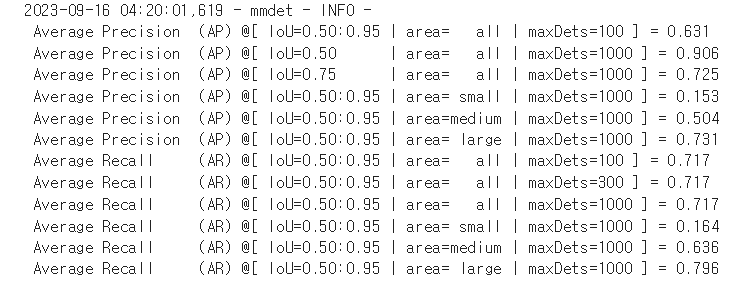
mmdet - INFO - Epoch(val) [12][87]	bbox_mAP: 0.6309, bbox_mAP_50: 0.9057, bbox_mAP_75: 0.7253, bbox_mAP_s: 0.1535, bbox_mAP_m: 0.5039, bbox_mAP_l: 0.7305, bbox_mAP_copypaste: 0.6309 0.9057 0.7253 0.1535 0.5039 0.7305
DONE (t=0.60s).
✅ Inferecne
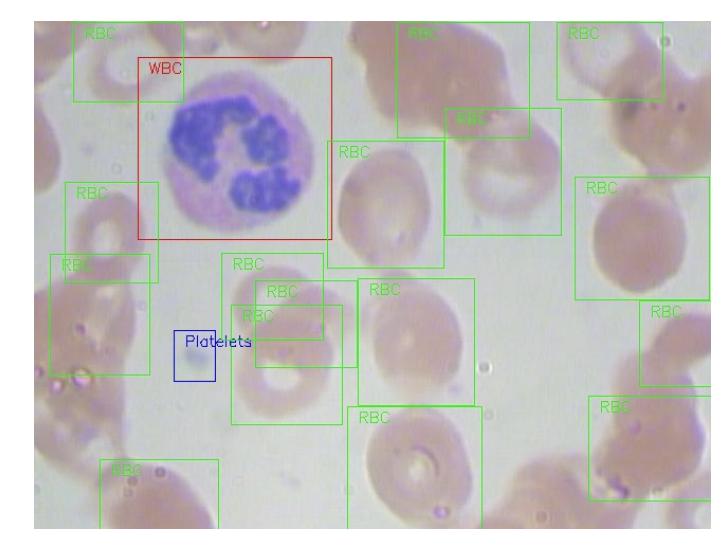
model 에 현재 가중치들이 저장되어 있으니 바로 결과를 확인할 수 있었다.
import cv2
from mmdet.apis import inference_detector, init_detector, show_result_pyplot

img = cv2.imread('/content/BCCD_Dataset/BCCD/JPEGImages/BloodImage_00007.jpg')

model.cfg = cfg

result = inference_detector(model, img)
show_result_pyplot(model, img, result)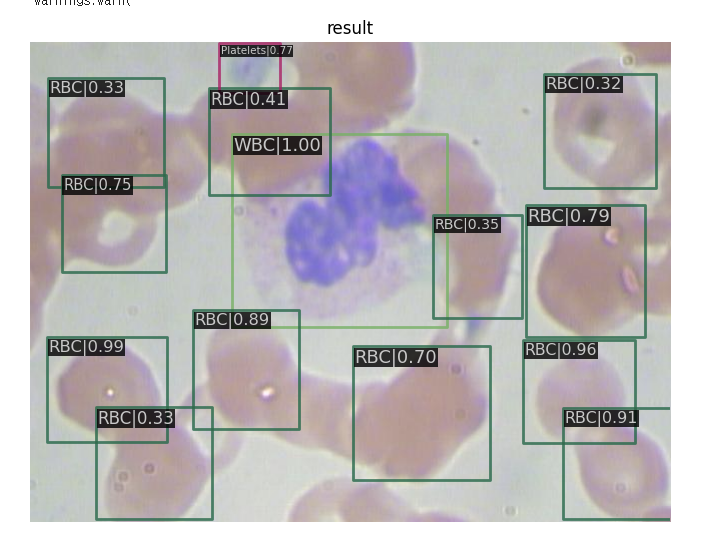
테스트 데이터 세트에 Inference 및 Evaluation
방금 본 성능 지표는 validation 데이터에 관한 것이었기 때문에, 예측과 평가를 테스트 셋에 관해서도 수행해보자. 이 경우 런타임 초기화를 먼저 누른 후 아래의 코드를 실행했다.
✅ test 데이터셋 생성 (build_datset, build_dataloader)
from mmdet.datasets import (build_dataloader, build_dataset,
                            replace_ImageToTensor)

# test용 Dataset과 DataLoader 생성.
# build_dataset()호출 시 list로 감싸지 않는 것이 train용 dataset 생성시와 차이.
dataset = build_dataset(cfg.data.test)
# build_dataloader 를 새로 만들어, samples_per_gpu 와 workers 생성
data_loader = build_dataloader(
        dataset,
        # 반드시 아래 samples_per_gpu 인자값은 1로 설정
        samples_per_gpu=cfg.data.samples_per_gpu,
        workers_per_gpu=cfg.data.workers_per_gpu,
        dist=False,
        shuffle=False)

# 반드시 아래 코드에서 'img' 키값이 tensor로 출력되어야 함.
next(iter(data_loader))- 기존 train 과의 차이는 build_datset 외에도 build_dataloader 를 설정해주었다는 점
- build_dataset 에 리스트로 감싸지 않았다는 점이있다.
✅ 모델 불러오기 (init_detector)
모델을 불러올 땐 init_detector 을 그대로 사용하면 된다.
from mmdet.apis import inference_detector, init_detector, show_result_pyplot

checkpoint_file = '/content/tutorial_exps/epoch_12.pth'

# checkpoint 저장된 model 파일을 이용하여 모델을 생성, 이때 Config는 위에서 update된 config 사용.
model_ckpt = init_detector(cfg, checkpoint_file, device='cuda:0')
✅ 예측 수행
예측을 수행할 땐 inference_detector 가 아닌 이번엔 테스트이므로 single_gpu_test 를 사용한다.
from mmdet.apis import multi_gpu_test, single_gpu_test
from mmcv.parallel import MMDataParallel, MMDistributedDataParallel
from mmdet.apis import inference_detector, init_detector, show_result_pyplot
model_ckpt = MMDataParallel(model_ckpt, device_ids=[0])
# single_gpu_test() 를 호출하여 test데이터 세트의 interence 수행. 반드시 batch size는 1이 되어야 함.
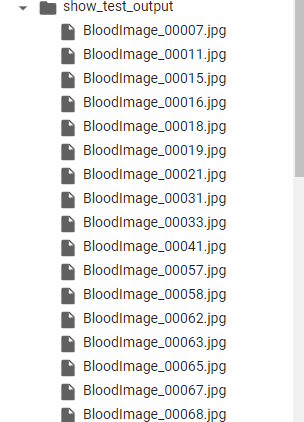
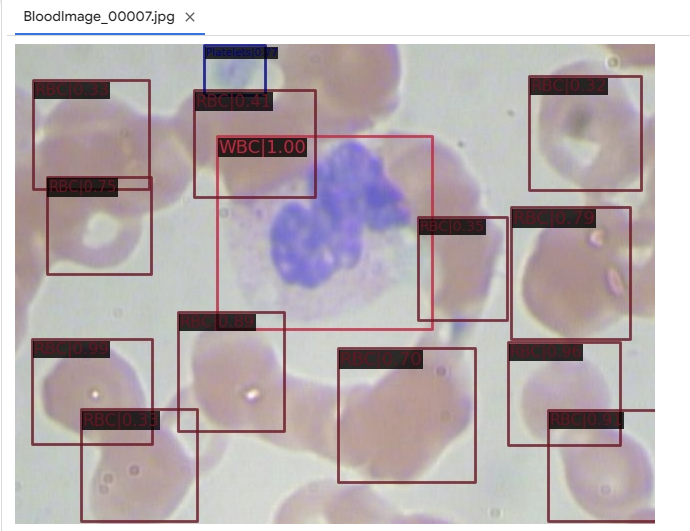
# 위에서 만든 /content/show_test_output 디렉토리에 interence 결과가 시각화된 이미지가 저장됨.
outputs = single_gpu_test(model_ckpt, data_loader, True, '/content/show_test_output', 0.3)- model_ckpt 를 gpu 연산을 위해 MMDataParallel 을 한 번 씌운다
- single_gpu_test 로 예측한다. 인자로는 모델, 데이터, 결과 저장 디렉토리, threshold 가 있었다.
- True 로 설정하면 해당 디렉토리 안에 이미지들이 예측된다.
병렬적으로 연산이 되므로 현재 /content/show_test_output 에 들어가면 많은 이미지들이 이미 예측이 끝난 것을 확인할 수 있다.
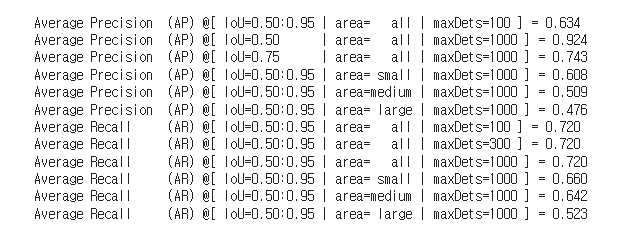
✅ test 데이터에 대해 eval
설정한 IOU에 따른 다양한 mAP 결과를 테스트 데이터셋에 대해 살펴볼 수 있다.
metric = dataset.evaluate(outputs, metric='bbox')
print(metric)