- 엘라스틱서치의 유료 상품으로는 CLIP 내장 모델을 사용하여 쉽게 하는방법이 있다
이미지 유사성 검색을 구현하는 방법 | Elastic.co
eland elastic eland 깃허브
Machine Learning | Eland Python Client | Elastic
flask-elastic-image_search
위 방법들을 사용하면
클러스터 로그인으로 쉽게 clip 내장모델이 사용 가능하다

모델 외장사용
나는 무료사용을 위하여 CLIP 을 외장으로 따로 사용해본다.
https://github.com/openai/CLIP
CLIP 기본 예제
image_path = 'clip2.jpg' # 위에 사진이 clip2
text_list = ["a smile dog", "a foot smile with shoes and boys shoes and Indoor shoes", "a foot", "a smile", "a dog"]
코드를 실행하게 되면 이미지 - 텍스트들의 유사도를 출력
- 코드예제
import torch
import clip
from PIL import Image
import time

device = "cpu"
model, preprocess = clip.load("ViT-B/32", device=device)

start_time = time.time()  # 코드 실행 시작 시간 기록

image = preprocess(Image.open(image_path)).unsqueeze(0).to(device)
text = clip.tokenize(text_list).to(device)

with torch.no_grad():
    image_features = model.encode_image(image)
    text_features = model.encode_text(text)

    logits_per_image, logits_per_text = model(image, text)
    probs = logits_per_image.softmax(dim=-1).cpu().numpy()

end_time = time.time()  # 코드 실행 종료 시간 기록
execution_time = end_time - start_time  # 실행 시간 계산

for i in range(len(text_list)):
    print(f"{text_list[i]}: {probs[0][i]}")
print(f"코드 실행 시간: {execution_time:.2f} 초")
a smile dog: 2.682575177459512e-05
a foot smile with shoes and boys shoes and Indoor shoes: 0.9562979340553284
a foot: 0.04305826127529144
a smile: 8.919781248550862e-05
a dog: 0.0005279548931866884
코드 실행 시간: 0.45 초
해당 예제를 바탕으로 프로젝트를 시작하였다.
1. 개요
서비스 단에서 사용자가 생각하는 제품의 모습을 기반으로 검색을 하면 더 좋을것이다…라는 아이디어로 시작
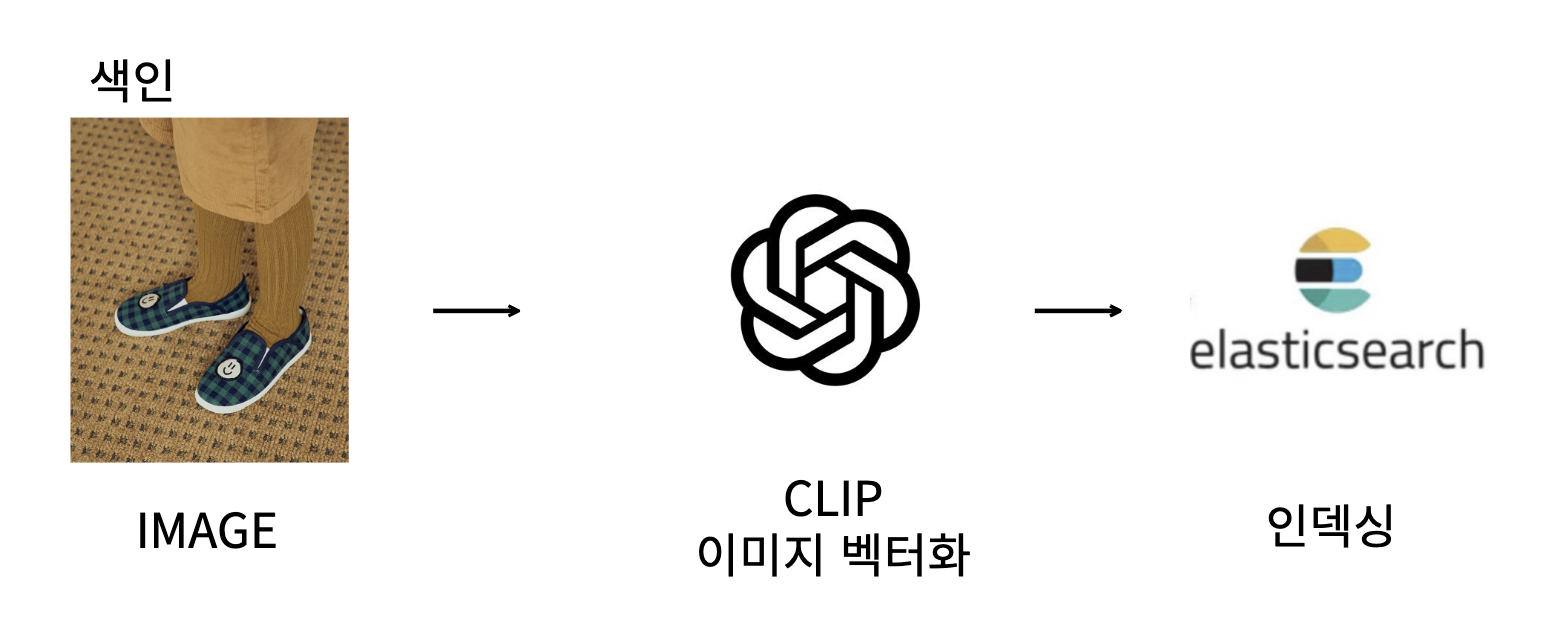
인덱싱, 검색 두 단계로 검색을 진행하며, 인덱싱 과정에서 미리 CLIP 을 사용하여 이미지 벡터를 인덱싱한다
인덱싱
- 이미지를 CLIP 벡터화 시켜서 엘라스틱서치 인덱스에 삽입
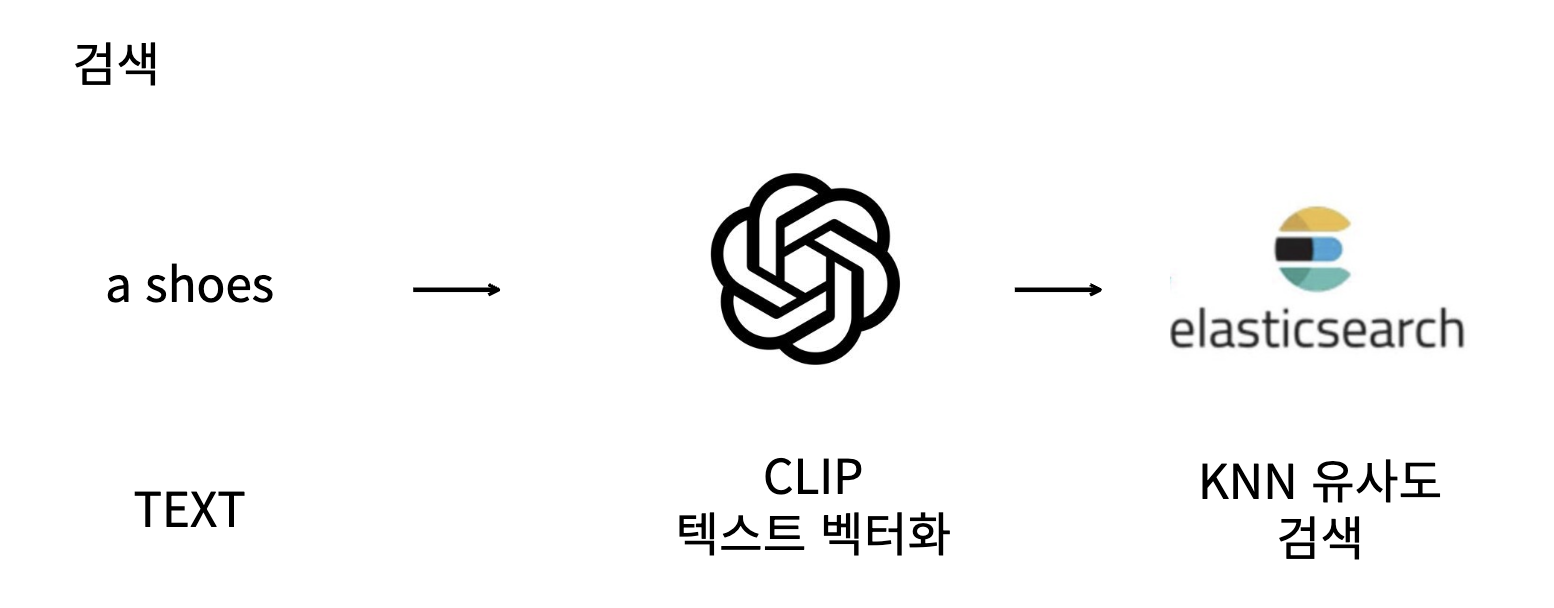
검색
- 사용자에게 검색 텍스트를 입력 받고 CLIP 벡터화 시켜서 유사도 검색
2. 엘라스틱서치 설치
모든 ELK 프로젝트들과 마찬가지로 엘라스틱서치 및 키바나 설치가 되어야 한다.
7.17.8v 사용
도커로 설치
docker pull docker.elastic.co/elasticsearch/elasticsearch:7.17.8
docker run -d -p 9200:9200 -p 9300:9300 -e "discovery.type=single-node" docker.elastic.co/elasticsearch/elasticsearch:7.17.8
docker pull docker.elastic.co/kibana/kibana:7.17.8
docker run -d --link 40b957e37b43bcc7066aed9b3a7479631fd4b41247c87ef50a02da71c0c1f37f:elasticsearch -p 5601:5601 docker.elastic.co/kibana/kibana:7.17.8
3. 엘라스틱서치 knn 플러그인 설치
knn 검색을 하기 위해서는 플러그인 설치가 필요했다.
플러그인 설치 후 컨테이너 재시작
- 주의사항
- 도커로 띄운 엘라스틱서치는 재시작하면 데이터가 모두 날라가기에 작업 시작전 플러그인 설치 필수
docker exec -it 40b957e37b43bcc7066aed9b3a7479631fd4b41247c87ef50a02da71c0c1f37f bin/elasticsearch-plugin install https://github.com/alexklibisz/elastiknn/releases/download/7.17.8.0/elastiknn-7.17.8.0.zip
docker restart <엘라스틱서치 컨테이너명>
docker restart <키바나 컨테이너명>
4. 데이터셋
테스트 데이터셋으로는 cifar-10의 일부를 사용
데이터셋은 아래 방법으로 다운이 가능하다
- 데이터셋 다운 예제
CIFAR 10 데이터셋 이미지로 저장하는 방법
5. 데이터 색인
엘라스틱서치 객체를 생성하고,
class ElasticsearchIndexing:
    def __init__(self, hosts: str):
        self.es = Elasticsearch(hosts=hosts)

    def create_index(self, index_name: str, body: dict):
        return self.es.indices.create(index=index_name, body=body)

    def input_feature(self, index_name: str, doc: dict):
        return self.es.index(index=index_name, body=doc)

 index_name = "image-vector2"
 body = { # doc 벡터를 사용할 수 있게 매핑
    "settings": {
        "index": {
        "elastiknn": True
        }
    },
    "mappings": {
        "properties": {
            "image_vector": {
                "type": "elastiknn_dense_float_vector",
                "elastiknn": {
                    "dims": 512,
                    "model": "lsh",
                    "similarity": "cosine",
                    "L": 99,
                    "k": 1
                }
            }
        }
    }
    }
    es = ElasticsearchIndexing(hosts)
    es.create_index(index_name=index_name, body=body)
이미지 파일 CLIP으로 벡터화 진행
class ClipFeatures:
    def __init__(self, clip_name: str, device: str):
        self.device = device
        self.model, self.preprocess = clip.load(clip_name, device=self.device)

    def feature_extract(self, image_path: str) -> list[float]:
        image = self.preprocess(Image.open(image_path)).unsqueeze(0).to(self.device)
        with torch.no_grad():
            features =  self.model.encode_image(image)[0].cpu().numpy()
        return features.tolist()
뽑은 이미지 벡터를 인덱스에 삽입
image_features = clip_model.feature_extract(image_path)
doc = {
         'pic_name': img_file,
         'image_vector': image_features
      }
es.input_feature(index=index_name, body=doc)
6. 검색
# 텍스트 검색
text_list = ["a stealth fighter"]
text = clip.tokenize(text_list).to(device)

with torch.no_grad():
    text_features = model.encode_text(text)

text_features_np = text_features[0].cpu().numpy()

body = {
    "query": {
        "elastiknn_nearest_neighbors": {
            "field": "image_vector",
            "vec": {
                "values": text_features_np
            },
            "model": "lsh",
            "similarity": "cosine",
            "candidates": 50
        }
    },
    "_source": ["pic_name"]
}

response = es.search(index=index, body=body)

pprint(response["hits"]["hits"])
텍스트를 벡터로 변경 뒤 knn유사도 검색을 진행한다
# 인덱스 안에 입력 텍스트와 유사도가 높은 이미지들을 반환한다
>>>
[{'_id': 'xz0II4sBQQHX5P6A-Ndy',
  '_index': 'image-vector2',
  '_score': 1.2897254,
  '_source': {'pic_name': 'stealth_fighter_s_000533.png'},
  '_type': '_doc'},
 {'_id': '2j0HI4sBQQHX5P6A-dQ3',
  '_index': 'image-vector2',
  '_score': 1.2719953,
  '_source': {'pic_name': 'dive_bomber_s_000304.png'},
  '_type': '_doc'},
 {'_id': '5T0II4sBQQHX5P6Aq9aF',
  '_index': 'image-vector2',
  '_score': 1.271774,
  '_source': {'pic_name': 'stealth_fighter_s_001100.png'},
  '_type': '_doc'},
 {'_id': 'hT0II4sBQQHX5P6A39d3',
  '_index': 'image-vector2',
  '_score': 1.269616,
  '_source': {'pic_name': 'stealth_bomber_s_000268.png'},
  '_type': '_doc'},
 {'_id': 'pD0II4sBQQHX5P6A69c_',
  '_index': 'image-vector2',
  '_score': 1.2643611,
  '_source': {'pic_name': 'stealth_fighter_s_001029.png'},
  '_type': '_doc'},
 {'_id': 'Lj0II4sBQQHX5P6Awdec',
  '_index': 'image-vector2',
  '_score': 1.2631285,
  '_source': {'pic_name': 'stealth_fighter_s_000480.png'},
  '_type': '_doc'},
 {'_id': 'xz0II4sBQQHX5P6AStUC',
  '_index': 'image-vector2',
  '_score': 1.2601613,
  '_source': {'pic_name': 'dive_bomber_s_001294.png'},
  '_type': '_doc'},
 {'_id': 'KT0II4sBQQHX5P6AE9Xy',
  '_index': 'image-vector2',
  '_score': 1.253594,
  '_source': {'pic_name': 'airplane_s_000003.png'},
  '_type': '_doc'},
 {'_id': 'Yz0II4sBQQHX5P6AgNbR',
  '_index': 'image-vector2',
  '_score': 1.2496381,
  '_source': {'pic_name': 'biplane_s_000039.png'},
  '_type': '_doc'},
 {'_id': 'QT0II4sBQQHX5P6Ax9e-',
  '_index': 'image-vector2',
  '_score': 1.2482628,
  '_source': {'pic_name': 'attack_aircraft_s_001674.png'},
  '_type': '_doc'}]
이미지 이름을 확인해보면 전투기, 스텔스 등 비슷한 이름들을 확인할수 있었다.
이것을 활용하고 최적화 해보면 사용자가 원하는 텍스트와 유사한 이미지를 검색 할 수 있을것같다.
첨부자료
[ElasticSearch] Elastiknn 플러그인 설치 및 실행
k-nearest neighbor (kNN) search | Elasticsearch Guide [8.10] | Elastic
https://github.com/openai/CLIP
이미지 유사성 검색을 구현하는 방법 | Elastic.co
https://github.com/elastic/eland
Machine Learning | Eland Python Client | Elastic
https://github.com/radoondas/flask-elastic-image-search
