
9.7일
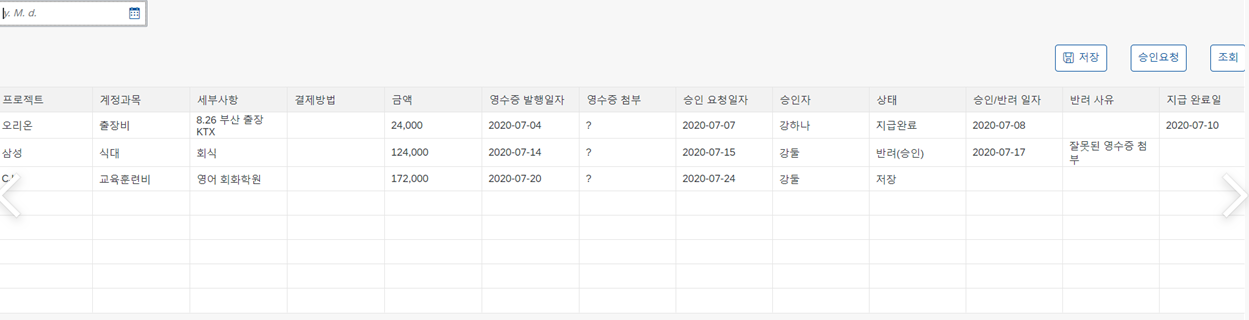
data.picker을 이용해 날짜필드를 만들고 button 3개를 만들어 저장,승인요청,조회 버튼을 만들었다. 테이블은 json 파일을 통해 값을 채워넣음 !
CONTROLELR
onInit : function(){
	1		var odata = {};
			var oModel = new JSONModel(odata);
			this.getView().setModel(oModel);
			// oninit setting
			this.getView().getModel().setProperty("/comboData","저장");
			this.getView().getModel().setProperty("/tableRow",6);
		},
VIEW
 id="AppId"
	            selectionMode="MultiToggle"
	            rows="{products>/ProductCollection}"
	            visibleRowCount="{/tableRow}"
	            selectionBehavior="Row"
	            rowSelectionChange=".rowSelection">
9.9일
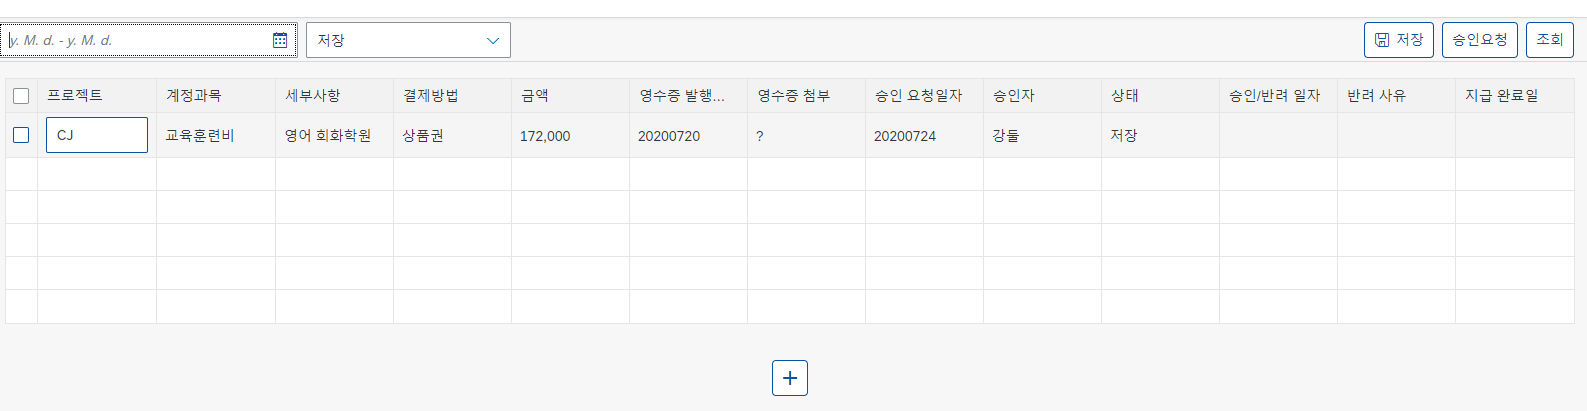
comboBox를 통해 상태필드를 첨부하였다. view의 table 에 <table:Column visible="{/input}"으로 input 필드를 만들어 주었다.
날짜 필터링
 if(startDate && endDate){
               var sFromDate = new Date(startDate);
               var sToDate = new Date(endDate);

               var sFromYear = sFromDate.getFullYear();
               var sFromMonth = sFromDate.getMonth()+1 >= 10 ? sFromDate.getMonth()+1 : "0"+(sFromDate.getMonth()+1);
               var sToYear = sToDate.getFullYear();
               var sToMonth = sToDate.getMonth()+1 >= 10 ? sToDate.getMonth()+1 : "0"+(sToDate.getMonth()+1);
               var sToDate = sToDate.getDate() >= 10 ? sToDate.getDate() : "0"+sToDate.getDate();

               var sFromDateInfo = sFromYear.toString()+sFromMonth.toString()+sFromDate.toString();
               var sToDateInfo = sToYear.toString()+sToMonth.toString()+sToDate.toString();
            }
상태코드 필터링
 if(comboData === "저장" || comboData === "반려(지급)" || comboData === "반려(승인)"){
			this.getView().getModel().setProperty("/input",true);
			this.getView().getModel().setProperty("/text",false);
          }else{
			this.getView().getModel().setProperty("/input",false);
			this.getView().getModel().setProperty("/text",true);
          }
row추가
onRowAdd : function(){
			var rowTableData = this.getView().getModel().getProperty("/tableRow");
			rowTableData +=1;
			this.getView().getModel().setProperty("/tableRow",rowTableData);
有志竟成