JS 기초
ES 6에서는 var 키워드를 권장하지 않는다. 이유는 이하 ES 5의 코드를 실행하고 콘솔을 확인해보면 알 수 있다.
따라서 변수는 let 상수는 const를 사용한다.
fucntion hi(){
  message = 'hello';
  console.log(message);
  let message;
}

hi();
물론 let과 const도 호이스팅의 대상이 된다. 그러나 var처럼 사용하면 안되는데 위의 코드의 message는 var로 선언하는 것과 달리 달리 에러를 발생시킨다. 이는 TDZ 때문인데 변수는 초기화 단계에서 메모리내의 공간을 확보하는데 호이스팅을 통해 위로 끌어 올려진 message는 초기화가 진행되지 않아 메모리내의 공간을 확보하지 못했기 때문이다.
- TDZ(Temporal Dead Zone: 일시적 사각 지대)
따라서 ES 6 부터는 선언에 있어서도 정밀하게 위치를 지켜야한다.
Data type
Primitive value
- number : 부터 까지의 범위내의 크기를 갖는 숫자 자료형
- 범위 밖의 수는 가까운 수나 0으로 반올림
- bigint :number 보다 큰 정수를 표현할 수 있는 숫자 자료형
- string : 문자 자료형
- boolean : 논리 자료형
- undefined : 값이 할당되지 않음을 나타내는 독립 자료형
- null : 값이 존재하지 않음을 나타내는 독립 자료형
- symbol : 고유(유일성 보장) 식별자 지원 자료형
Objects
객체 자료형은 다양한 자료형을 담을 수 있다. 프로퍼티 구성은 key:value 형태이며 key는 문자형 value는 모든 자료형이 가능하다.
객체는 다음 두가지 방식으로 만들 수 있지만 본질적으로는 같다.
// constructor
let objectByConstructor = new Object();

// literal
let objectByLiteral = {};
edit constant
const 키워드를 이용해 만든 상수는 재할당이 불가능하지만 프로퍼티를 수정할 수는 있다.
const dog = {
  name : "100-9",
  color : "white"
}

dog.name = "TT-9";

console.log(dog);

dog = {name: "gold-9", color:"yello"};
// error
위 코드와 같이 백구를 만들고 이름을 흑구로 바꾸는 것은 가능하지만 황구로 재할당하는 것은 불가능하다.
내부의 프로퍼티를 백구에서 흑구로 바꿀 때 기존의 객체 내부의 새로운 name : "TT-9" 메모리 영역이 할당되고 기존의 name : "100-9"는 새로운 영역을 가리키는 주소값을 가지며 dog라는 상수의 참조 값이 변경되는 것은 아니다.
이러한 것을 객체의 프로퍼티는 보호받지 못한다고 표현한다.
function
메소드와 함수는 다르다. java의 경우 클래스를 벗어날 수 없는 멤버라는 의미로 메소드를 멤버 함수라고 부른다. java 8에 람다와 더불어 익명 함수가 도입되며 더욱 그 구별이 중요해졌다.
그러나 함수는 스스로 객체이기 때문에 값으로 취급된다. 이런 성질을 FCC(First Class Citizen : 일급객체)라 한다. 이를 응용하여 함수의 코드 자체를 전달하거나 복사할 수 있다. 메소드는 메소드가 속한 객체를 통해서만 실행할 수 있고 실행된 결과만을 받을 수 있는 것과 구분된다.
자바스크립트의 함수는 return이 없는한 기본적으로 undifined를 반환한다.
함수는 다음과 같이 만든다.
// 선언문
function functionByDeclaration(){
  console.log("functionByDeclaration");
}

// 생성자
let functionByConstructor = new Function("console.log('functionByConstructor')");

// 표현식
let functionByExpression = fuction(){
  console.log("functionByExpression");
}

// 화살표(표현식의 단축형)
let functionByArrow = () => {
  console.log("functionByArrow");
}
callback function
함수는 일급객체이므로 전달이 가능하다. 이러한 특징을 이용해 콜백문에서 사용할 수 있다.
function drunk(who) {
  console.log(who, "is drunk");
}

function drinkMojito(who, state){
  state(who);
}

drinkMojito("likerdo", drunk);
위의 코드에서 drinkMojito에 전달된 인수인 drunk를 콜백함수로 볼 수 있다.
prototype
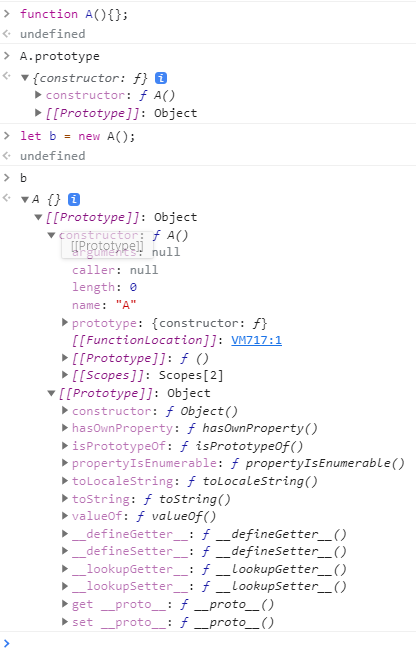
자바스크립트는 프로토타입 기반의 언어로 모든 객체를 자신의 원형인 프로토타입을 복제하여 내부의 기능을 위임받아 사용하고 어떤 프로토타입으로부터 왔는지 알 수 있다. 이러한 프로토타입 참조를 프로토타입 링크라고 한다.

위와 같이 함수를 만들기만 해도 해당 객체의 프로토타입이 자동 생성되고 A타입의 새로운 객체 b의 내부를 보면 프로토타입을 확인할 수 있다. b→A→Object 와 같이 상위의 포로토타입을 가리키는 것을 프로토타입 체인이라고 한다.
리액트 셋팅
위의 내용을 숙지한 상태로 간단한 이미지 커뮤니티를 만들어 볼텐데 그전에 앞서 개발 환경을 세팅 해보자.
크롬 확장
원활한 디버깅을 위해 크롬 확장에서 React Developer Tools 와 Redux DevTools를 설치하자.


스니펫과 린트 지원을 위해 vs-code에서 React Extension Pack 과 Prettier 를 설치하자.


프로젝트 생성
yarn create react-app image-community
yarn add react-router-dom
yarn add styled-components
폴더 구조
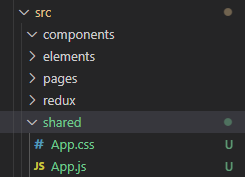
src 밑에 새로운 폴더들을 추가한다.

elemanets: 최소 단위 컴포넌트components: 엘리먼트를 조합한 컴포넌트pages: 페이지 시작점redux: 리덕스 모듈, 스토어shared: 공용으로 사용할 코드,App.js,Request.js,Time.js,Cookie.js,firebase.js등 시작점으로 사용되거나 전역으로 쓸 객체가 이에 해당된다.
App.js 와 App.css 는 shared 폴더로 이동시키고 index.js 파일 내부의 경로를 수정한다.
// index.js
...
 import App from './shared/App';
...
Post UI 형태 잡기
src>shared>App.js파일에서 라우터를 적용하자.
import './App.css';
import React from 'react';
import { BrowserRouter, Route } from "react-router-dom";
import { PostList } from '../pages/PostList';

function App() {
  return (
    <React.Fragment>
      <BrowserRouter>
        <Route path="/" exact component={ PostList}/>
      </BrowserRouter>
    </React.Fragment>
  );
}

export default App;
src>components>Post.js파일에서 보여줄 엘리먼트들을 적어보자.
import React from 'react'

export const Post = () => {
    return (
        <React.Fragment>
            <div>user profile / user naem / insert_dt / is_me btn</div>
            <div>contents</div>
            <div>image</div>
            <div>comment cnt</div>
        </React.Fragment>
        )
}
src>components>PostList.js파일에서props가 없을 경우를 대비해 기본값(defaultProps)을 작성해보자.
import React from 'react'
import { Post } from '../components/Post'

Post.defaultProps = {
    user_info: {
        user_name: "likerdo",
        user_profile: "https://likerdo-bucket-list.s3.ap-northeast-2.amazonaws.com/yui.jpg"
    },
    image_url: "https://likerdo-bucket-list.s3.ap-northeast-2.amazonaws.com/yui.jpg",
    contents: "hello",
    comment_cnt: 10,
    insert_dt: "2021-02-27 10:00:00"
}

export const PostList = () => {
    return (
        <React.Fragment>
            <Post></Post>
        </React.Fragment>
    )
}
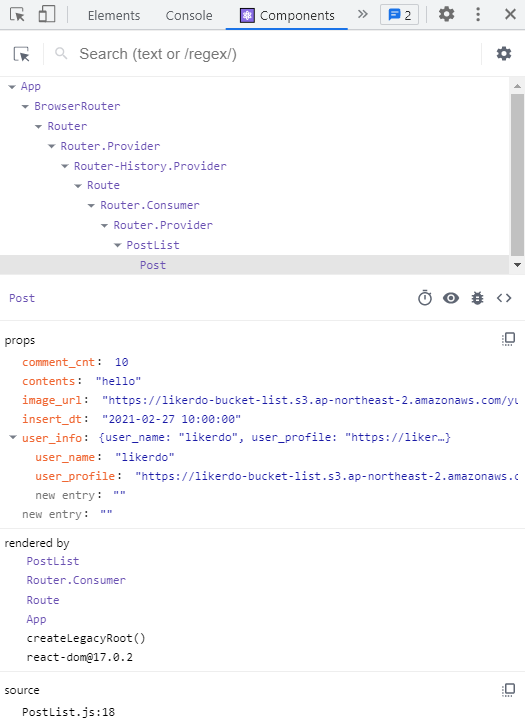
아까 설치한 크롬 확장 기능을 이용해 쉽게 확인 할 수 있다.

Grid 적용하기
src>elements>Grid.js파일을 다음과 같이 작성한다.defaultProps을 이용해 기본 스타일을 정의하고GridBox로 props의 값에 따라 스타일이 변하도록 한다.
import React from 'react'
import styled from 'styled-components'


export const Grid = (props) => {
    const { is_flex, width, margin, padding, bg, children } = props;
    const styles = {
        is_flex: is_flex,
        width: width,
        margin: margin,
        padding: padding,
        bg:bg
    }
    return (
        <React.Fragment>
            <GridBox {...styles}>
                { children}
            </GridBox>
        </React.Fragment>
    )
}

Grid.defaultProps = {
    is_flex: false,
    width: "100%",
    padding: false,
    margin: false,
    bg: false,
    children: null
}

const GridBox = styled.div`
    width: ${(props) => props.width};
    height: 100%;
    box-sizing: border-box;
    ${(props) => (props.padding? `padding: ${props.padding}` : "")};
    ${(props) => (props.margin? `margin: ${props.margin}` : "")};
    ${(props) => (props.bg ? `background-color: ${props.bg}` : "")};
    ${(props) => (props.is_flex ?
        `display:flex; align-items: center; justify-content: space-between`
         : "")};
`;
src>elements>Image.js파일을 다음과 같이 작성한다.shape의 형태에 따라 원형인 프로파일 이미지와 사각형인 포스트 이미지로 나뉘어서 동작하도록 구성한다.
import React from 'react'
import styled from 'styled-components'

export const Image = (props) => {
    const { shape, src, size } = props;
    const styles = {
        src: src,
        size: size
    }

    if (shape === "circle") {
        return <ImageCircle {...styles}></ImageCircle>
    }
    if (shape === "rectangle") {
        return (
            <AspectOutter>
                <AspectInner {...styles}></AspectInner>
            </AspectOutter>
        )
    }

    return (
        <div>

        </div>
    )
}

Image.defaultProps = {
    shape: "circle",
    src: "https://likerdo-bucket-list.s3.ap-northeast-2.amazonaws.com/yui.jpg",
    size:36,
}

const ImageCircle = styled.div`
    --size: ${(props) => props.size}px;
    width : var(--size);
    height: var(--size);
    border-radius: var(--size);
    background-image: url("${(props) => props.src}");
    background-size: cover;
    margin: 4px;
`;

const AspectOutter = styled.div`
    width: 100%;
    min-width: 250px;
`;

const AspectInner = styled.div`
    position: relative;
    padding-top: 75%;
    overflow: hidden;
    background-image: url("${(props) => props.src}");
    background-size: cover;
`;
src>components>Post.js파일에서 이미지들이 보이도록 다음과 같이 수정한다.
import React from 'react'
import { Grid } from '../elements/Grid'
import { Image } from '../elements/Image'

export const Post = (props) => {
    return (
        <React.Fragment>
            <Grid>
                <Grid is_flex>
                    <Image shape="circle" src={props.src}></Image>
                </Grid>
                <Grid padding="16px"></Grid>
                <Grid>
                    <Image shape="rectangle" src={props.src}></Image>
                </Grid>
                <Grid padding="16px"></Grid>
                <Grid></Grid>
                <div>user profile / user naem / insert_dt / is_me btn</div>
                <div>contents</div>
                <div>image</div>
                <div>comment cnt</div>
            </Grid>
        </React.Fragment>
        )
}
Text
elements폴더에 아이디, 본문, 댓글 등을 담당하게 될 Text 컴포넌트를 만들어 보자.
import React from 'react'
import styled from 'styled-components'

export const Text = (props) => {
    const { bold, color, size, children } = props;
    const styles = {
        bold: bold,
        color: color,
        size: size
    };
    return (
        <P {...styles}>
          {children}
        </P>
    )
}

Text.defaultProps = {
    bold: false,
    color: '#222831',
    size: '14px'
};

const P = styled.p`
    color: ${(props) => props.color};
    font-size: ${(props) => props.size};
    font-weight: ${(props) => (props.bold? 600:400 )};
`;
src>components>Post.js파일에서 텍스트들이 보이도록 다음과 같이 수정한다.
import React from 'react'
import {Grid, Image, Text} from "../elements"

export const Post = (props) => {
    return (
        <React.Fragment>
            <Grid>
                <Grid is_flex>
                    <Image shape="circle" src={props.src} />
                    <Text bold>{props.user_info.user_name}</Text>
                    <Text>{props.insert_dt}</Text>
                </Grid>
                <Grid padding="16px">
                    <Text>{props.contents}</Text>
                </Grid>
                <Grid>
                    <Image shape="rectangle" src={props.src}></Image>
                </Grid>
                <Grid padding="16px">
                    <Text bold>댓글 {props.comment_cnt}개</Text>
                </Grid>
                <Grid></Grid>
                <div>user profile / user naem / insert_dt / is_me btn</div>
                <div>contents</div>
                <div>image</div>
                <div>comment cnt</div>
            </Grid>
        </React.Fragment>
        )
}
src>elements>index.js파일을 만들어서 늘어난 엘리먼트들을 하나로 묶자.
import { Grid } from "./Grid";
import { Image } from "./Image";
import { Text } from "./Text";

export { Grid, Image, Text };
Button
src>elements>Button.js파일을 만들고 버튼 컴포넌트를 디자인하자.
import React from 'react'
import styled from 'styled-components'

export const Button = (props) => {
    const { text, _onClick } = props;

    return (
        <React.Fragment>
            <ElButton onClick={_onClick}>{text}</ElButton>
        </React.Fragment>
    )
}

Button.defaultProps = {
    text: "텍스트",
    _onClick: () => { }
}

const ElButton = styled.button`
    width: 100%;
    background-color: #212121;
    color: #ffffff;
    padding: 12px 0px;
    box-sizing: border-box;
    border: none;
`;
Input
src>elements>Input.js파일도 만든다.
import React from 'react'
import styled from 'styled-components';
import { Text} from './index'

export const Input = (props) => {
    const { label, placeholder, _onChange } = props;
    return (
        <React.Fragment>
            <Text margin="0px">{label}</Text>
            <ElInput placeholder={placeholder} onChange={_onChange}/>
        </React.Fragment>
    )
}

Input.defaultProps = {
    label: '텍스트',
    placeholder: '텍스트를 입력해주세요.',
    _onChange: () => { }
}

const ElInput = styled.input`
    border: 1px solid #212121;
    width: 100%;
    padding: 12px 4px;
    box-sizing: border-box;
`;
Login
이제 버튼과 인풋을 조합해 로그인 페이지를 만들자.
src>pages>Login.js파일을 만들어 아래와 같이 입력하고App.js의 라우터 부분에도 로그인 루트를 추가한다.<Route path="/login" exact component={Login}/>
import React from 'react'
import { Text, Input, Grid, Button } from '../elements'

export const Login = () => {
    return (
          <React.Fragment>
      <Grid padding="16px">
        <Text size="32px" bold>
          로그인
        </Text>

        <Grid padding="16px 0px">
          <Input
            label="아이디"
            placeholder="아이디를 입력해주세요."
            _onChange={() => {
              console.log("아이디 입력");
            }}
          />
        </Grid>

        <Grid padding="16px 0px">
          <Input
            label="패스워드"
            placeholder="패스워드 입력해주세요."
            _onChange={() => {
                console.log("패스워드 입력");
            }}
          />
        </Grid>

        <Button
          text="로그인하기"
          _onClick={() => {
            console.log("로그인");
          }}
        />
      </Grid>
    </React.Fragment>
    )
}
Header
src>components>Header.js파일을 만들고 다음과 같이 작성하자.
import React from 'react';
import { Grid, Text, Button } from '../elements';

export const Header = () => {
    return (
        <React.Fragment>
            <Grid is_flex padding="4px 16px">
                <Grid>
                    <Text margin="0px" size="24px" bold>Hello</Text>
                </Grid>
                <Grid is_flex>
                    <Button text="로그인" bg="#2f4f4f"></Button>
                    <Button text="회원가입" bg="#2f4f4f"></Button>
                </Grid>
            </Grid>
        </React.Fragment>
    )
}

Header.defaultProps = {}
src>shared>App.js파일에 그리드와 헤더를 추가하고 수정한다.
import './App.css';
import React from 'react';
import { BrowserRouter, Route } from "react-router-dom";
import { PostList } from '../pages/PostList';
import { Login } from "../pages/Login";
import { Header } from '../components/Header';
import { Grid } from '../elements'

function App() {
  return (
    <React.Fragment>
      <Grid>
        <Header></Header>
        <BrowserRouter>
          <Route path="/" exact component={ PostList}/>
          <Route path="/login" exact component={Login}/>
        </BrowserRouter>
      </Grid>
    </React.Fragment>
  );
}

export default App;
SignUp
마지막으로
src>pages>Signup.js파일을 만들어 회원가입 화면을 추가하고App.js에서도<Route path="/signup" exact component={Signup}/>를 라우터에 추가해준다.
import React from 'react';
import { Grid, Text, Input, Button } from "../elements";

export const Signup = () => {
    return (
        <React.Fragment>
            <Grid padding="16px">
                <Text size="32px" bold>회원가입</Text>
                <Grid padding="16px 0px">
                    <Input
                        label="아이디"
                        placeholder="아이디를 입력해주세요."
                        _onChange={() => { console.log("아이디 입력"); }}></Input>
                </Grid>
                <Grid padding="16px 0px">
                    <Input
                        label="닉네임"
                        placeholder="닉네임을 입력해주세요."
                        _onChange={() => { console.log("닉네임 입력"); }}></Input>
                </Grid>
                <Grid padding="16px 0px">
                    <Input
                        label="비밀번호"
                        placeholder="비밀번호를 입력해주세요."
                        _onChange={() => { console.log("비밀번호 입력"); }}></Input>
                </Grid>
                <Grid padding="16px 0px">
                    <Input
                        label="비밀번호 확인"
                        placeholder="비밀번호를 다시 입력해주세요."
                        _onChange={() => { console.log("비밀번호 확인 입력"); }}></Input>
                </Grid>
                <Button text="회원가입"></Button>
            </Grid>
        </React.Fragment>
    )
}

Signup.degaultProps = {}