Cookie
shared>Cookie.js파일에 쿠키 생성, 조회, 삭제 함수를 작성한다.
const getCookie = (name) => {
  let value = "; " + document.cookie;
  let parts = value.split(`; ${name}=`);
  if (parts.length === 2) {
    return parts.pop().split(";").shift();
  }
};

const setCookie = (name, value, exp = 5) => {
  let date = new Date();
  date.setTime(date.getTime() + exp * 24 * 60 * 60 * 1000);
  document.cookie = `${name}=${value};expires=${date.toUTCString()}`;
};

const deleteCookie = (name) => {
  let date = new Date("2020-01-01").toUTCString();
  console.log(date);
  document.cookie = name + "=; expires=" + date;
};

export { getCookie, setCookie, deleteCookie };
redux-history
컴포넌트들의 히스토리(뒤로 가기나 새로고침 방지)를 리덕스에서도 사용하기 위해 다음을 설치한다.
yarn add redux react-redux redux-thunk redux-logger history@4.10.1 connected-react-router@6.8.0immer
리덕스의 리듀서 액션 코드를 간소화하고 편하게 개발하기 위해
redux-actions를, 불변성 유지를 편하게 하기 위해immer를 설치한다.
yarn add immer redux-actionsreducer
기존의 리듀서는 액션, 액션 크리에이터, 리듀서로 구성된다. 이 구조에서는 필연적으로 반복 생성되는 부분이 있는데 이러한 구조를 개선하기 위해 제공되는것이
redux-actions와immer이다.
redux > modeles >user.js 파일을 다음과 같이 작성한다.
import { createAction, handleActions } from "redux-actions";
import { produce } from "immer";
import { setCookie, getCookie, deleteCookie } from "../../shared/Cookie";
const LOG_IN = "LOG_IN";
const LOG_OUT = "LOG_OUT";
const GET_USER = "GET_USER";

const logIn = createAction(LOG_IN, (user) => ({ user }));
const logOut = createAction(LOG_OUT, (user) => ({ user }));
const getUser = createAction(GET_USER, (user) => ({ user }));

const initialState = {
  user: null,
  is_login: false,
};

export default handleActions(
  {
    [LOG_IN]: (state, action) =>
      produce(state, (draft) => {
        setCookie("is_login", "success");
        draft.user = action.payload.user;
        draft.is_login = true;
      }),
    [LOG_OUT]: (state, action) => produce(state, (draft) => {}),
    [GET_USER]: (state, action) => produce(state, (draft) => {}),
  },
  initialState
);

const actionCreators = {
  logIn,
  logOut,
  getUser,
};

export { actionCreators };
store
redux>configureStore.js파일을 다음과 같이 설정한다.
import { createStore, combineReducers, applyMiddleware, compose } from "redux";
import thunk from "redux-thunk";
import { createBrowserHistory } from "history";
import { connectRouter } from "connected-react-router";

import User from "./modules/user";

// 컴포넌트 이동 경로: ex) 뒤로가기
export const history = createBrowserHistory();

// reducer에서 history 사용
const rootReducer = combineReducers({
  user: User,
  router: connectRouter(history),
});

// axios → then → history 절차적 경로 제공
// 새로운 미들웨어 추가는 여기서
const middlewares = [thunk.withExtraArgument({ history: history })];

// 현재 환경 정의
const env = process.env.NODE_ENV;

// 개발환경 한정으로 로거를 가져와서 사용
if (env === "development") {
  const { logger } = require("redux-logger");
  middlewares.push(logger);
}

// 리덕스 개발자 도구 설정
const composeEnhancers =
  typeof window === "object" && window.__REDUX_DEVTOOLS_EXTENSION_COMPOSE__
    ? window.__REDUX_DEVTOOLS_EXTENSION_COMPOSE__({
        // Specify extension’s options like name, actionsBlacklist, actionsCreators, serialize...
      })
    : compose;

// 미들웨어에 리덕스 개발자 도구 적용
const enhancer = composeEnhancers(applyMiddleware(...middlewares));

let store = (initialStore) => createStore(rootReducer, enhancer);

export default store();
route index
index.js파일에서redux를 불러오고App을Provider로 감싸도록 수정한다.
import React from "react";
import ReactDOM from "react-dom";
import "./index.css";
import App from "./shared/App";
import reportWebVitals from "./reportWebVitals";
import { Provider } from "react-redux";
import store from "./redux/configureStore";

ReactDOM.render(
  <Provider store={store}>
    <App />
  </Provider>,
  document.getElementById("root")
);

reportWebVitals();
history
App.js파일에history와ConnectedRouter를 불러오고 기존에Roouter를 감싸고 있던BrowserRouter를ConnectedRouter로 바꿔준다.
import "./App.css";
import React from "react";
import { BrowserRouter as ConnectRouter, Route } from "react-router-dom";
import { PostList } from "../pages/PostList";
import { Login } from "../pages/Login";
import { Header } from "../components/Header";
import { Grid } from "../elements";
import { Signup } from "../pages/Signup";
import { ConnectedRouter } from "connected-react-router";
import { history } from "../redux/configureStore";

function App() {
  return (
    <React.Fragment>
      <Grid>
        <Header></Header>
        <ConnectedRouter history={history}>
          <Route path="/" exact component={PostList} />
          <Route path="/login" exact component={Login} />
          <Route path="/signup" exact component={Signup} />
        </ConnectedRouter>
      </Grid>
    </React.Fragment>
  );
}

export default App;
page 이동
리덕스에서의 페이지 이동을 위해
redux>modules>user.js파일을 다음과 같이 수정해서 로그인이 되었을 때 메인으로 돌아가도록 작성한다.
...
// middleware actions
const loginAction = (user) => {
  return function (dispatch, getState, { history }) {
    console.log(history);
    dispatch(logIn(user));
    history.push("/");
  };
};
...
// exports
const actionCreators = {
  logIn,
  logOut,
  getUser,
  loginAction,
};
...
LogIn
pages>Login.js파일에서actionCreators와useDispatch를 불러오고login함수를 추가한다.
import React from "react";
import { Text, Input, Grid, Button } from "../elements";
import { useDispatch } from "react-redux";
import { actionCreators as userActions } from "../redux/modules/user";

export const Login = () => {
  const dispatch = useDispatch();
  const login = () => {
    dispatch(userActions.loginAction({ user_name: "perl" }));
  };

  return (
    <React.Fragment>
      <Grid padding="16px">
        <Text size="32px" bold>
          로그인
        </Text>

        <Grid padding="16px 0px">
          <Input
            label="아이디"
            placeholder="아이디를 입력해주세요."
            _onChange={() => {
              console.log("아이디 입력");
            }}
          />
        </Grid>

        <Grid padding="16px 0px">
          <Input
            label="패스워드"
            placeholder="패스워드 입력해주세요."
            _onChange={() => {
              console.log("패스워드 입력");
            }}
          />
        </Grid>

        <Button
          text="로그인하기"
          bg="#5e7e9b"
          _onClick={() => {
            console.log("log in");
            login();
          }}
        />
      </Grid>
    </React.Fragment>
  );
};
LogOut
redux>modules>user.js에 로그아웃 액션을 추가한다.
// reducer
...
export default handleActions(
  {
    [LOG_IN]: (state, action) =>
      produce(state, (draft) => {
        setCookie("is_login", "success");
        draft.user = action.payload.user;
        draft.is_login = true;
      }),
    [LOG_OUT]: (state, action) =>
      produce(state, (draft) => {
        deleteCookie("is_login");
        draft.user = null;
        draft.is_login = false;
      }),
    [GET_USER]: (state, action) => produce(state, (draft) => {}),
  },
  initialState
);
...
기존의
useState와useEffect를 삭제하고actionCreatorsuseSelectoruseDispatch를 불러와서 로그아웃 버튼에서 액션을 호출하도록 작성한다.
import React from "react";
import { Grid, Text, Button } from "../elements";
import { useSelector, useDispatch } from "react-redux";
import { actionCreators as userActions } from "../redux/modules/user";

export const Header = () => {
  const is_login = useSelector((state) => state.user.is_login);
  const dispatch = useDispatch();
  if (is_login) {
    return (
      <React.Fragment>
        <Grid is_flex padding="4px 16px">
          <Grid>
            <Text margin="0px" size="24px" bold>
              Hello
            </Text>
          </Grid>
          <Grid is_flex>
            <Button text="내 정보" bg="#2f4f4f"></Button>
            <Button text="알림" bg="#2f4f4f"></Button>
            <Button
              text="로그아웃"
              bg="#2f4f4f"
              _onClick={() => {
                dispatch(userActions.logOut({}));
              }}
            ></Button>
          </Grid>
        </Grid>
      </React.Fragment>
    );
  }
  return (
    <React.Fragment>
      <Grid is_flex padding="4px 16px">
        <Grid>
          <Text margin="0px" size="24px" bold>
            Hello
          </Text>
        </Grid>
        <Grid is_flex>
          <Button text="로그인" bg="#2f4f4f"></Button>
          <Button text="회원가입" bg="#2f4f4f"></Button>
        </Grid>
      </Grid>
    </React.Fragment>
  );
};

Header.defaultProps = {};
firestore - authentication
firestore의authentication메뉴로 진입하여이메일/비밀번호를 선택하고사용 설정을 토글한 뒤저장한다.
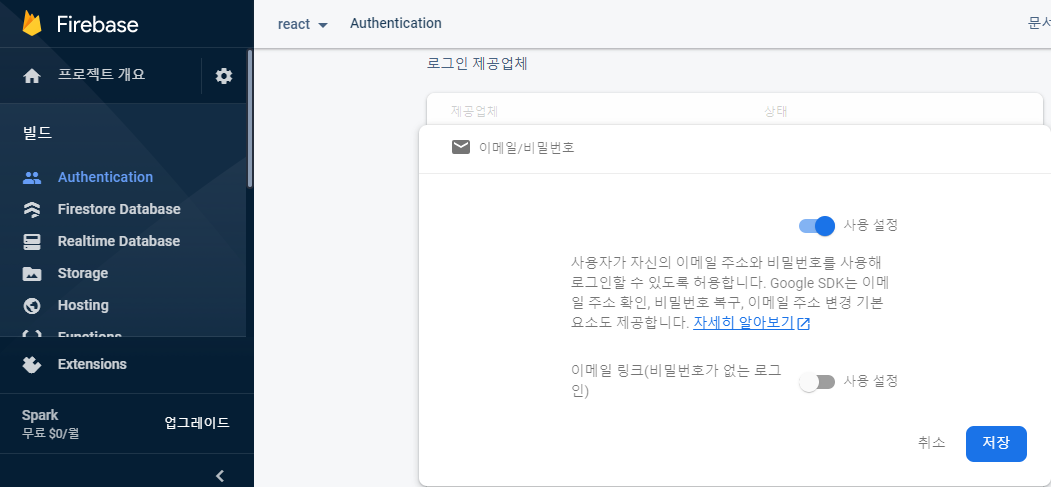
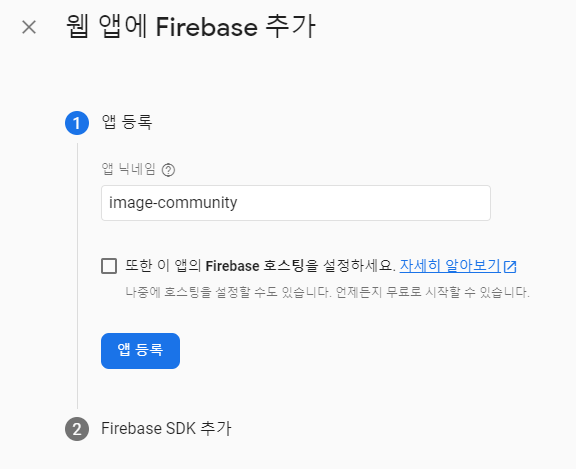
image-community프로젝트에 진입하여앱 등록을 누른다.
이후 나타나는
firebaseConfig변수 내의 키값들을 통째로 복사한다.

firebase를 설치한다.
yarn add firebase
shared>firebase.js파일을 만들고 다음과 같이 작성한다.
import firebase from "firebase/app";
import "firebase/auth";

const firebaseConfig = {
  // 복사해온 값
};

firebase.initializeApp(firebaseConfig);

const auth = firebase.auth();

export { auth };
SignUp - FB
회원가입 기능을
firebase와 연결하기 위해redux>modules>user.js를 다음과 같이 수정한다. 이 때LOG_IN은SET_USER로 대체된다. 리덕스 입장에서 로그인은 스토어에 유저정보를 저장하는 것 뿐이기 때문에 회원가입과 로그인 모두SET_USER를 호출하여 정보를 저장하게 된다.
import { createAction, handleActions } from "redux-actions";
import { produce } from "immer";
import { setCookie, getCookie, deleteCookie } from "../../shared/Cookie";
import { auth } from "../../shared/firebase";

// actions
const SET_USER = "SET_USER";
const LOG_OUT = "LOG_OUT";
const GET_USER = "GET_USER";

// action creators
const setUser = createAction(SET_USER, (user) => ({ user }));
const logOut = createAction(LOG_OUT, (user) => ({ user }));
const getUser = createAction(GET_USER, (user) => ({ user }));

// initialState
const initialState = {
  user: null,
  is_login: false,
};

const user_initial = {
  user_name: "likerdo",
};

// middleware actions
const loginAction = (user) => {
  return function (dispatch, getState, { history }) {
    console.log(history);
    dispatch(setUser(user));
    history.push("/");
  };
};

const signUpFB = (id, pwd, user_name) => {
  return function (dispatch, getState, { history }) {
    auth
      .createUserWithEmailAndPassword(id, pwd)
      .then((user) => {
        console.log(user);
        auth.currentUser
          .updateProfile({
            displayName: user_name,
          })
          .then(() => {
            dispatch(
              setUser({ user_name: user_name, id: id, user_profile: "" })
            );
            history.push("/");
          })
          .catch((error) => {
            console.log(error.code, error.message);
          });
      })
      .catch((error) => {
        console.log(error.code, error.message);
      });
  };
};

// reducer
export default handleActions(
  {
    [SET_USER]: (state, action) =>
      produce(state, (draft) => {
        setCookie("is_login", "success");
        draft.user = action.payload.user;
        draft.is_login = true;
      }),
    [LOG_OUT]: (state, action) =>
      produce(state, (draft) => {
        deleteCookie("is_login");
        draft.user = null;
        draft.is_login = false;
      }),
    [GET_USER]: (state, action) => produce(state, (draft) => {}),
  },
  initialState
);

// exports
const actionCreators = {
  setUser,
  logOut,
  getUser,
  loginAction,
  signUpFB,
};

export { actionCreators };
pages>Signup.js를 다음과 같이 수정한다.useState를 통해 입력값을 저장하고 이를 모아signUpFB액션에 전달한다.
import React from "react";
import { Grid, Text, Input, Button } from "../elements";
import { useDispatch } from "react-redux";
import { actionCreators as userActions } from "../redux/modules/user";

export const Signup = () => {
  const dispatch = useDispatch();

  const [id, setId] = React.useState("");
  const [pwd, setPwd] = React.useState("");
  const [pwd_check, setPwdCheck] = React.useState("");
  const [user_name, setUserName] = React.useState("");

  const signup = () => {
    if (pwd !== pwd_check) {
      return;
    }
    if (id === "" || pwd === "" || user_name === "") {
      return;
    }
    dispatch(userActions.signUpFB(id, pwd, user_name));
  };

  return (
    <React.Fragment>
      <Grid padding="16px">
        <Text size="32px" bold>
          회원가입
        </Text>
        <Grid padding="16px 0px">
          <Input
            label="아이디"
            placeholder="아이디를 입력해주세요."
            _onChange={(e) => {
              setId(e.target.value);
            }}
          ></Input>
        </Grid>
        <Grid padding="16px 0px">
          <Input
            label="닉네임"
            placeholder="닉네임을 입력해주세요."
            _onChange={(e) => {
              setUserName(e.target.value);
            }}
          ></Input>
        </Grid>
        <Grid padding="16px 0px">
          <Input
            label="비밀번호"
            placeholder="비밀번호를 입력해주세요."
            _onChange={(e) => {
              setPwd(e.target.value);
            }}
          ></Input>
        </Grid>
        <Grid padding="16px 0px">
          <Input
            label="비밀번호 확인"
            placeholder="비밀번호를 다시 입력해주세요."
            _onChange={(e) => {
              setPwdCheck(e.target.value);
            }}
          ></Input>
        </Grid>
        <Button text="회원가입" _onClick={signup}></Button>
      </Grid>
    </React.Fragment>
  );
};

Signup.degaultProps = {};
LogIn - FB
redux>modules>user.js파일에서 기존의LoginAction액션을 대체하는logInFB함수를 추가한다.
...
const logInFB = (id, pwd) => {
  return function (dispatch, getState, { history }) {
    auth
      .signInWithEmailAndPassword(id, pwd)
      .then((user) => {
        dispatch(
          setUser({
            user_name: user.user.displayName,
            id: id,
            user_profile: "",
          })
        );
        history.push("/");
      })
      .catch((error) => {
        console.log(error.code, error.message);
      });
  };
};
...
// exports
const actionCreators = {
  setUser,
  logOut,
  getUser,
  signUpFB,
  logInFB,
};
...
session - FB
인증 상태 확인을 위해
redux>modules>user.js파일에loginCheckFB함수를 추가한다. 또한, 갱신이 발생되어도 리덕스가 정보를 유지 할 수 있도록setUser를 호출한다.
...
const loginCheckFB = () => {
  return function (dispatch, getState, { history }) {
    auth.onAuthStateChanged((user) => {
      if (user) {
        dispatch(
          setUser({
            user_name: user.displayName,
            user_profile: "",
            id: user.email,
            uid: user.uid,
          })
        );
      } else {
        dispatch(logOut());
      }
    });
  };
};
...
// exports
const actionCreators = {
  setUser,
  logOut,
  getUser,
  signUpFB,
  logInFB,
  loginCheckFB,
};
...
인증키를 추출하기 위해
shared>firebase.js파일에 다음 코드를 추가한다.
...
const apiKey = firebaseConfig.apiKey;

export { auth, apiKey };
...
components>Header.js파일에서 세션을 인증키로 체크 하여 UI가 변경되도록 작성한다.
...
import { apiKey } from "../shared/firebase";

export const Header = () => {
  const is_login = useSelector((state) => state.user.is_login);
  const dispatch = useDispatch();
  const session_key = `firebase:authUser:${apiKey}:[DEFAULT]`;
  const is_session = sessionStorage.getItem(session_key) ? true : false;

  if (is_login && is_session) {
...
어플리케이션이 첫 로드될 때도 확실하게 체크하기 위해서
App.js를 수정한다.
...
import { actionCreators as userCreators } from "../redux/modules/user";
import { useDispatch } from "react-redux";
import { apiKey } from "./firebase";

function App() {
  const dispatch = useDispatch();
  const session_key = `firebase:authUser:${apiKey}:[DEFAULT]`;
  const is_session = sessionStorage.getItem(session_key) ? true : false;
  React.useEffect(() => {
    if (is_session) {
      dispatch(userCreators.loginCheckFB());
    }
  });
  return (
...
LogOut - FB
redux>modules>user.js파일에logoutFB함수를 추가한다.
...
const logoutFB = () => {
  return function (dispatch, getState, { history }) {
    auth.signOut().then(() => {
      dispatch(logOut());
      history.replace("/");
    });
  };
};
...
const actionCreators = {
  setUser,
  logOut,
  getUser,
  signUpFB,
  logInFB,
  loginCheckFB,
  logoutFB,
};
...
components>Header.js파일의 로그아웃 버튼을 수정한다.
...
<Button
              text="로그아웃"
              bg="#2f4f4f"
              _onClick={() => {
                dispatch(userActions.logoutFB());
              }}
            ></Button>
...
세션 체크의 중복성을 해소하기 위해 별도 컴포넌트로 분리해보자.
shared>Permit.js파일을 만들어 기존의 세션 체크 코드를 작성한다.
import React from "react";
import { useSelector } from "react-redux";
import { apiKey } from "./firebase";

export const Permit = (props) => {
  const is_login = useSelector((state) => state.user.is_login);
  const session_key = `firebase:authUser:${apiKey}:[DEFAULT]`;
  const is_session = sessionStorage.getItem(session_key) ? true : false;

  let childNumber = 0;
  if (is_session && is_login) {
  } else {
    childNumber = 1;
  }
  return <React.Fragment>{props.children[childNumber]}</React.Fragment>;
};
components>Header.js헤더 파일을 수정한다.
import React from "react";
import { Grid, Text, Button } from "../elements";
import { useDispatch } from "react-redux";
import { actionCreators as userActions } from "../redux/modules/user";
import { history } from "../redux/configureStore";
import { Permit } from "../shared/Permit";

export const Header = () => {
  const dispatch = useDispatch();
  return (
    <Grid is_flex padding="4px 16px">
      <Grid>
        <Text margin="0px" size="24px" bold>
          Hello
        </Text>
      </Grid>
      <Permit>
        <Grid is_flex>
          <Button text="내 정보" bg="#2f4f4f"></Button>
          <Button text="알림" bg="#2f4f4f"></Button>
          <Button
            text="로그아웃"
            bg="#2f4f4f"
            _onClick={() => {
              dispatch(userActions.logoutFB());
            }}
          ></Button>
        </Grid>
        <Grid is_flex>
          <Button
            text="로그인"
            bg="#2f4f4f"
            _onClick={() => {
              history.push("/login");
            }}
          ></Button>
          <Button
            text="회원가입"
            bg="#2f4f4f"
            _onClick={() => {
              history.push("/signup");
            }}
          ></Button>
        </Grid>
      </Permit>
    </Grid>
  );
};

Header.defaultProps = {};
Post Button
글쓰기 버튼을 만들어 보자.
elements>Button컴포넌트의 내부에FloatButton을 추가한다.
import React from "react";
import styled from "styled-components";

export const Button = (props) => {
  const { text, _onClick, bg, is_float } = props;

  if (is_float) {
    return (
      <React.Fragment>
        <FloatButton bg={bg} onClick={_onClick}>
          {text}
        </FloatButton>
      </React.Fragment>
    );
  }

  return (
    <React.Fragment>
      <ElButton bg={bg} onClick={_onClick}>
        {text}
      </ElButton>
    </React.Fragment>
  );
};

Button.defaultProps = {
  text: "텍스트",
  is_float: false,
  _onClick: () => {},
};

const ElButton = styled.button`
  width: 100%;
  background-color: ${(props) => (props.bg ? `${props.bg};` : "#212121")};
  color: #ffffff;
  padding: 12px 0px;
  box-sizing: border-box;
  border: none;
`;

const FloatButton = styled.button`
  width: 60px;
  height: 60px;
  background-color: #225232;
  color: aliceblue;
  box-sizing: border-box;
  font-size: 36px;
  font-weight: 800;
  position: fixed;
  bottom: 70px;
  right: 10px;
  text-align: center;
  vertical-align: middle;
  border: none;
  border-radius: 50px;
`;
App.js파일에서 새로운 버튼을Permit으로 감싸 불러오자.
...
return (
    <React.Fragment>
      <Grid>
        <Header></Header>
        <ConnectedRouter history={history}>
          <Route path="/" exact component={PostList} />
          <Route path="/login" exact component={Login} />
          <Route path="/signup" exact component={Signup} />
        </ConnectedRouter>
      </Grid>
      <Permit>
        <Button is_float text="+" />
        <React.Fragment />
      </Permit>
    </React.Fragment>
  );
...
Email check
common.js파일을 만들어 이메일 형식을 체크하는 정규식을 작성해보자.
export const emailCheck = (email) => {
  let _reg =
    /^[0-9a-zA-Z]([-_.]?[0-9a-zA-Z])*@[0-9a-zA-Z]([-_.]?[0-9a-zA-Z])*.[a-zA-Z]{2,3}$/i;

  return _reg.test(email);
};
pages>Login.js와Signup.js파일에서emailCheck함수를 적용해보자.
...
const login = () => {
    if (id === "" || pwd === "") {
      window.alert("아이디 혹은 비밀번호가 공란입니다.");
      return;
    }
    if (!emailCheck(id)) {
      window.alert("이메일 형식이 맞지 않습니다.");
    }
    dispatch(userActions.logInFB(id, pwd));
  };
...
PostWrite
게시글 작성 페이지의 UI를 만들어 보자.
pages>Postwrite.js와PostDetail.js파일을 만들어 다음과 같이 작성한다.
// Postwrite.js
import React from "react";
import { Grid, Text, Button, Image, Input } from "../elements";
import { Upload } from "../shared/Upload";

export const PostWrite = () => {
  return (
    <React.Fragment>
      <Grid padding="16px">
        <Text margin="0px" size="36px" bold>
          게시글 작성
        </Text>
        <Upload />
      </Grid>
      <Grid>
        <Grid padding="16px">
          <Text margin="0px" size="24px" bold>
            미리보기
          </Text>
          <Image shape="rectangle"></Image>
        </Grid>
      </Grid>
      <Grid>
        <Grid padding="16px">
          <Input label="게시글 내용" placeholder="게시글 작성" multiLine />
        </Grid>
        <Grid padding="16px">
          <Button text="게시글 작성" />
        </Grid>
      </Grid>
    </React.Fragment>
  );
};
// PostDetail.js
import React from "react";
import { Post } from "../components/Post";
import { CommentWrite } from "../components/CommentWrite";
import { CommentList } from "../components/CommentList";
export const PostDetail = () => {
return (
<React.Fragment>
<Post />
<CommentWrite />
<CommentList />
</React.Fragment>
);
};
elements>Input.js에ElTextArea를 추가하고multiLine속성에 따라 선택 할 수 있도록 한다.
import React from "react";
import styled from "styled-components";
import { Grid } from "./Grid";
import { Text } from "./index";

export const Input = (props) => {
  const { label, placeholder, _onChange, type, multiLine } = props;

  if (multiLine) {
    return (
      <Grid>
        <Text margin="0px"></Text>
        <ElTextArea rows={10} placeholder={placeholder} onChange={_onChange} />
      </Grid>
    );
  }
  return (
    <React.Fragment>
      <Text margin="0px">{label}</Text>
      <ElInput type={type} placeholder={placeholder} onChange={_onChange} />
    </React.Fragment>
  );
};

Input.defaultProps = {
  multiLine: false,
  label: "텍스트",
  placeholder: "텍스트를 입력해주세요.",
  type: "text",
  _onChange: () => {},
};

const ElTextArea = styled.textarea`
  border: 1px solid #212121;
  width: 100%;
  padding: 12px 4px;
  box-sizing: border-box;
`;

const ElInput = styled.input`
  border: 1px solid #212121;
  width: 100%;
  padding: 12px 4px;
  box-sizing: border-box;
`;
shared>Upload.js파일을 만들고 UI를 작성한다.
import React from "react";

export const Upload = () => {
  return (
    <React.Fragment>
      <input type="file" />
    </React.Fragment>
  );
};
App.js파일을 수정해 라우터에 추가해준다.
...
return (
    <React.Fragment>
      <Grid>
        <Header></Header>
        <ConnectedRouter history={history}>
          <Route path="/" exact component={PostList} />
          <Route path="/login" exact component={Login} />
          <Route path="/signup" exact component={Signup} />
          <Route path="/write" exact component={PostWrite} />
        </ConnectedRouter>
      </Grid>
      <Permit>
        <Button is_float text="+" />
        <React.Fragment />
      </Permit>
    </React.Fragment>
  );
...
Comments
댓글 UI도 만들어 보자.
components경로에commentWrite.js와commentList.js파일을 추가하고 다음과 같이 작성한다.
// commentWrite.js
import React from "react";
import { Grid, Button, Input } from "../elements";

export const CommentWrite = () => {
  return (
    <div>
      <Grid padding="16px" is_flex>
        <Input placeholder="댓글 내용을 입력해주세요." />
        <Button width="50px" margin="0 2 0 2">
          작성
        </Button>
      </Grid>
    </div>
  );
};
// commentList.js
import React from "react";
import { Grid, Image, Text } from "../elements";

export const CommentList = () => {
  return (
    <div>
      <Grid padding="16px">
        <CommentItem />
        <CommentItem />
        <CommentItem />
      </Grid>
    </div>
  );
};

export const CommentItem = (props) => {
  const { user_profile, user_name, user_id, post_id, contents, insert_dt } =
    props;
  return (
    <Grid is_flex>
      <Grid is_flex width="auto">
        <Image shape="circle" />
        <Text bold>{user_name}</Text>
      </Grid>
      <Grid is_flex margin="0px 4px">
        <Text margin="0px">{contents}</Text>
        <Text margin="0px">{insert_dt}</Text>
      </Grid>
    </Grid>
  );
};

CommentItem.defaultProps = {
  user_profile: "",
  user_name: "likerdo",
  user_id: "",
  post_id: "",
  contents: "contents contents contents",
  insert_dt: "2021-01-01 19:00:00",
};