https://blog.ml6.eu/a-practical-guide-to-anomaly-detection-using-anomalib-b2af78147934
https://openvinotoolkit.github.io/anomalib/how_to_guides/train_custom_data.html
위 글들을 참고해 Anomalib에서 제공하는 여러 모델들 중 calssification task 기반 모델인 PaDiM 모델을 돌려봤다.
아직 논문을 안읽어봐서 학습 과정에 대해서는 잘 모르겠지만..
23.08.14
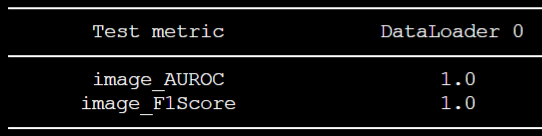
튜토리얼 상의 config.yaml 세팅 사용 결과
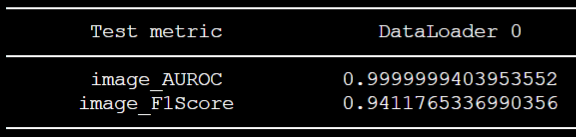
위와 같은 결과를 얻어둔 상태다.
아직 config 파일을 만지는 법을 잘 몰라서, 논문 읽고 이해한 뒤 이후 작업을 진행할 예정이다.
23.08.18
https://velog.io/@ljwljy51/PaDiM
논문을 읽고, 작동 매커니즘은 파악을 했다. 그러나, 여전히 config 파일을 어떻게 만져야 할지 감이 안온다.

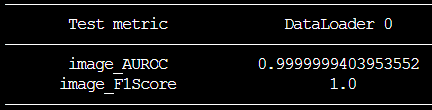
기본 튜토리얼을 보고 수정한 세팅에서 image_size 부분만 수정해주었다. 본 논문에서는 256x256으로 이미지를 resize해 사용하는데, 내가 사용할 데이터셋의 원본 이미지 사이즈는 64x128정도여서 사이즈를 이에 맞게 수정해주었다.
기존 세팅에서 image_size를 변경해준 뒤 결과
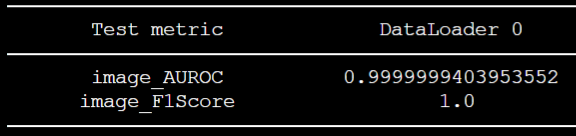
그 뒤, 위와 같은 성능을 얻었다. 수치는 좋게 나왔는데 여전히 왜 이렇게 잘 나오는지 잘 모르겠다.
- 아마, 본 논문이 분포 기반 anomaly detection 모델이다 보니, 해상도가 분포 정보에 영향을 끼쳐 그런 것 같다.
- 위 config.yaml 파일에서 split_ratio를 크게 잡으면 그에 따라 F1 Score도 높아진다. (당연한거긴 함)
- split_ratio 부분은 건들지 말자
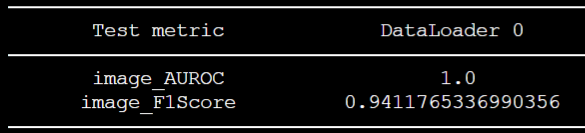
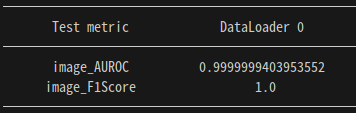
n_features 변경 후 결과
직관적으로 생각해봤을 때, n_features값을 기존 값인 100에서 증가시켜줬을 때 성능이 좋아질 것이라고 예상했으나, 200으로 변경했음에도 불구하고 성능이 향상되지는 않았다.
model:
  name: padim
  backbone: resnet18
  pre_trained: true
  layers:
    - layer1
    - layer2
    - layer3
  normalization_method: min_max # options: [none, min_max, cdf]
n_features: 200- 기존 config 파일에는 n_features 옵션이 없었으나, github issue를 보니 해당 파라미터를 추가할 수 있었다. issue창을 잘 보자.
- 현재 테스팅하는 데이터셋 규모 상의 문제인 것 같다. 큰 규모, 그리고 고해상도의 데이터셋 상에서 테스팅하면 의미 있는 결과가 있을지도!
이미지 사이즈가 256일 때 기준으로 측정한 거여서 F1Score가 약 0.94정도가 나왔다.
훈련 세팅 변경
튜토리얼에서 제공하는 config 파일 옵션들이 기존에 제공하는 config 파일이랑 다른 부분이 많아서 처음에도 의아했는데, issue를 보다 보니 훈련 세팅을 또 다르게 줄 수 있었다.
https://github.com/openvinotoolkit/anomalib/issues/1238
https://github.com/openvinotoolkit/anomalib/issues/1067
위 링크는 normal dataset만으로 PaDiM 모델을 돌리고 싶을 때에 대한 세팅에 대해 나와있다. (근데 원래 normal image만 훈련때 사용하도록 된 거 아닌가?)
어쨌거나 위 세팅에 따라서도 해보자.
난 바보였당..! 옵션을 차근차근..하나하나 봤어야 했다. 안그래도 지금 사용하는 데이터셋 규모가 너무 작아서 최대한 활용해야 하는데, 자꾸 결과 이미지 개수가 의도했던 개수대로 안나와서 의아해 했었다.
dataset:
    name: module_anomalib
    format: folder
    root: ./datasets/module_anomalib/module_anomalib
    normal_dir: normal # name of the folder containing normal images.
    abnormal_dir: leaf # name of the folder containing abnormal images.
    task: classification # classification or segmentation
    mask_dir: null #optional
    normal_test_dir: normal # optional
    extensions: null
    split_ratio: 0.2  # normal images ratio to create a test split
    seed: 0
    image_size: 256
    train_batch_size: 32
    eval_batch_size: 32
    num_workers: 8
    normalization: imagenet # data distribution to which the images will be normalized
    test_split_mode: from_dir # options [from_dir, synthetic]
    val_split_ratio: 0.5 # fraction of train/test images held out for validation (usage depends on val_split_mode)
    transform_config:
        train: null
        eval: null
    val_split_mode: same_as_test # determines how the validation set is created, options [same_as_test, from_test]
    tiling:
        apply: false
        tile_size: null
        stride: null
        remove_border_count: 0
        use_random_tiling: False
        random_tile_count: 16


model:
  name: padim
  backbone: resnet18
  pre_trained: true
  layers:
    - layer1
    - layer2
    - layer3
  normalization_method: min_max # options: [none, min_max, cdf]

metrics:
  image:
    - F1Score
    - AUROC
  pixel:
    - F1Score
    - AUROC
  threshold:
    method: adaptive #options: [adaptive, manual]
    manual_image: null
    manual_pixel: null
위 내용 중, val_split_mode부분을 고쳐주니 성능이 훨씬 좋아졌다. 즉, 이전 세팅들에서는 저 부분이 from_test였는데, 그러면 val_split_ratio에 따라 훈련데이터 중 절반을 validation set으로 쓰고, 제공된 train set 중 절반의 데이터만 실질적으로 훈련 데이터로 사용된다.
- val_split_mode부분을 same_as_test로 고쳐주면 trainset에서 validation split을 안하게 되고, 전체 train set을 사용할 수 있게 되는 것이다.
- 그러나, validation set이 test set과 같아지는 문제가 발생한다.
- 사실, validation set과 test set은 완전히 별개로 두어야 한다. 그래야 일반화 성능이 보장되기 때문에..
- 지금은 데이터셋이 너무 작아서 이렇게 세팅해두었으나, 추후 데이터셋이 더 확보되면, validation set과 test set을 별개로 구축해 다시 테스팅해야 할 것 같다.
23.08.21
Backbone model 변경
- 역시 GPU 메모리가 허용하는 한, backbone 모델은 큰 게 최고인 것 같다.
- validation set과 test set을 별개로 두고, train set 규모가 매우 작아졌음에도 불구하고 성능이 좋았다.
- backbone을 바꿔줬더니, weight 용량이 매우매우.. 커졌다. resnet18을 썼을 때는 650MB정도 됐었는데, wide resnet50_2로 바꾼 뒤, 5G가 넘는 용량이 나왔다. 아무래도 각 이미지 당 패치 별 가우시안 분포 파라미터를 저장해야 하다보니 그렇게 된 듯 하다.
model:
  name: padim
  backbone: wide_resnet50_2
  pre_trained: true
  layers:
    - layer1
    - layer2
    - layer3
  normalization_method: min_max # options: [none, min_max, cdf]
#  n_features: 200
여전히 config파일을 어떻게 수정해야할지 옵션 사항들을 잘 몰랐지만, github issue들을 보면서 백본 옵션 중 하나인 wide resnet에 대한 글을 찾아 변경해주었다. 훈련 데이터셋에서 절반만 사용하고, 기본 튜토리얼의 옵션에서 백본만 바꿔줬는데도 F1score 1.0을 찍었다.
23.08.22
PatchCore 시도
- 라이브러리화가 잘 되어있어 config 파일만 조금 바꾸면, 구동해볼 수 있었다.
- 아직 논문을 안읽어봐서 작동 매커니즘은 잘 파악하지 못했다.
- 같은 backbone 모델을 사용함에도 불구하고, pretrained weight 용량이 약 500MB정도로, PaDiM의 가중치 용량과 크기 차이가 매우 컸다.
- PaDiM의 데이터셋과 똑같이 하고, 시드 고정해서 테스팅해본 결과, 두 모델의 성능이 같게 나왔다. 아무래도 데이터셋 규모가 작아서인듯
논문 읽어본 뒤 config 파일 만져서 성능을 높여볼 예정이다.
23.08.31
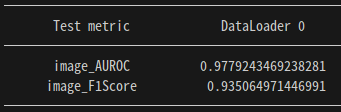
새로운 데이터셋을 추가해본 후 성능 상태다. 그다지 좋지 않다
결과 이미지들을 보니, 중간에 centercrop이 적용되어 가장자리부분의 anomaly detection이 잘 되지 않고 있었다. 그러나, Center crop을 아예 적용하지 않으면 더 성능이 떨어졌었다..
23.09.04
Centercrop 옵션 변경
가장자리 anomaly detection 문제를 해결했다! 본 모델이 테스팅됐던 데이터셋인 MVTecAD 데이터셋 자체가 object가 중앙에 있는 형식이었기에, centercrop이 적용돼서 처리되어 현재 내 Task에서는 가장자리 anomaly에 대한 detection이 안됐었는데, config 파일을 다음과 같이 수정해줌으로써 성능을 높힐 수 있었다.
dataset:
  name: module_anomalib
  format: folder
  #root: ./rgb_non_module_anomalib/module_anomalib
  root: ./RGBmodule_anomalib/module_anomalib/module_anomalib
  normal_dir: normal # name of the folder containing normal images.
  abnormal_dir: leaf # name of the folder containing abnormal images.
  task: classification # classification or segmentation
  train_batch_size: 32
  normal_test_dir: null
  mask_dir: null
  extensions: null
  eval_batch_size: 32
  num_workers: 8
  image_size: 224 # dimensions to which images are resized (mandatory)
  center_crop: 224 # dimensions to which images are center-cropped after resizing (optional)
  normalization: imagenet # data distribution to which the images will be normalized: [none, imagenet]
  transform_config:
    train: null
    eval: null
  test_split_mode: from_dir # options: [from_dir, synthetic]
  test_split_ratio: 0.2 # fraction of train images held out testing (usage depends on test_split_mode)
  val_split_mode: same_as_test # options: [same_as_test, from_test, synthetic]
  val_split_ratio: 0.5 # fraction of train/test images held out for validation (usage depends on val_split_mode)
  tiling:
    apply: false
    tile_size: null
    stride: null
    remove_border_count: 0
    use_random_tiling: False
    random_tile_count: 16
위 내용에서 집중해서 봐야 하는 부분은 image_resize와 center_crop 부분이다. 원래 default setting은 이미지를 256x256 사이즈로 resize해준 뒤, 224x224 사이즈로 크롭을 적용해 input으로 넣어 학습한다. 그러나, 애초에 center crop이 적용되지 않도록 resize를 224 사이즈로 해주면 됐었다.
대체 이 간단한 문제를 왜 지금까지 해결을 못하고 있었는가..^^,,,,,,,
역시 논문을 잘 읽고 세팅을 "잘.." 해줘야 한다.
그렇게 달성한 최종 성능!

새로운 데이터셋 추가 후 성능
- 메모리 부족으로 인해 이미지 사이즈를 조금 작게 해서 처리해주었다.
- train data
- normal image 1649장
- test data
- normal image 412장, abnormal image 79장

최종 config
dataset:
  name: module_anomalib
  format: folder
  root: ./RGBmodule_anomalib_mod
  normal_dir: normal # name of the folder containing normal images.
  abnormal_dir: leaf # name of the folder containing abnormal images.
  task: classification # classification or segmentation
  train_batch_size: 32
  normal_test_dir: null
  mask_dir: null
  extensions: null
  eval_batch_size: 32
  num_workers: 8
  image_size: 210 # dimensions to which images are resized (mandatory)
  center_crop: 210 # dimensions to which images are center-cropped after resizing (optional)
  normalization: imagenet # data distribution to which the images will be normalized: [none, imagenet]
  transform_config:
    train: null
    eval: null
  test_split_mode: from_dir # options: [from_dir, synthetic]
  test_split_ratio: 0.2 # fraction of train images held out testing (usage depends on test_split_mode)
  val_split_mode: same_as_test # options: [same_as_test, from_test, synthetic]
  val_split_ratio: 0.5 # fraction of train/test images held out for validation (usage depends on val_split_mode)
  tiling:
    apply: false
    tile_size: null
    stride: null
    remove_border_count: 0
    use_random_tiling: False
    random_tile_count: 16

model:
  name: patchcore
  backbone: wide_resnet50_2
  pre_trained: true
  layers:
    - layer2
    - layer3
  coreset_sampling_ratio: 0.1
  num_neighbors: 9
  normalization_method: min_max # options: [null, min_max, cdf]

metrics:
  image:
    - F1Score
    - AUROC
  pixel:
    - F1Score
    - AUROC
  threshold:
    method: adaptive #options: [adaptive, manual]
    manual_image: null
    manual_pixel: null

visualization:
  show_images: False # show images on the screen
  save_images: True # save images to the file system
  log_images: True # log images to the available loggers (if any)
  image_save_path: null # path to which images will be saved
  mode: full # options: ["full", "simple"]

project:
  seed: 0
  path: ./results

logging:
  logger: [] # options: [comet, tensorboard, wandb, csv] or combinations.
  log_graph: false # Logs the model graph to respective logger.

optimization:
  export_mode: null # options: onnx, openvino

# PL Trainer Args. Don't add extra parameter here.
trainer:
  enable_checkpointing: true
  default_root_dir: null
  gradient_clip_val: 0
  gradient_clip_algorithm: norm
  num_nodes: 1
  devices: [0]
  enable_progress_bar: true
  overfit_batches: 0.0
  track_grad_norm: -1
  check_val_every_n_epoch: 1 # Don't validate before extracting features.
  fast_dev_run: false
  accumulate_grad_batches: 1
  max_epochs: 1
  min_epochs: null
  max_steps: -1
  min_steps: null
  max_time: null
  limit_train_batches: 1.0
  limit_val_batches: 1.0
  limit_test_batches: 1.0
  limit_predict_batches: 1.0
  val_check_interval: 1.0 # Don't validate before extracting features.
  log_every_n_steps: 50
  accelerator: auto # <"cpu", "gpu", "tpu", "ipu", "hpu", "auto">
  strategy: null
  sync_batchnorm: false
  precision: 32
  enable_model_summary: true
  num_sanity_val_steps: 0
  profiler: null
  benchmark: false
  deterministic: false
  reload_dataloaders_every_n_epochs: 0
  auto_lr_find: false
  replace_sampler_ddp: true
  detect_anomaly: false
  auto_scale_batch_size: false
  plugins: null
  move_metrics_to_cpu: false
  multiple_trainloader_mode: max_size_cycle