
✒️ 테라폼으로 ALB Controller 설치 & 트러블슈팅 과정 기록
ALB Controller를 설치하고 트러블 슈팅하면서 배운 것들에 대해 기록해보려 한다.
설치 과정
Helm을 사용해서 설치할 것이기 때문에, Helm 프로바이더를 먼저 설치해야 한다.
쿠버네티스 프로바이더와 비슷하게 EKS 정보를 받아 연결해주면 된다.
provider "helm" {
  alias = "eks"
  kubernetes {
    host                   = module.eks.cluster_endpoint
    cluster_ca_certificate = base64decode(module.eks.cluster_ca)
    token                  = data.aws_eks_cluster_auth.token.token
  }
}

data "aws_eks_cluster_auth" "token" {
  name = module.eks.cluster_name
}
이후의 ALB Controller의 설치 흐름은 이러하다.
IAM 정책 생성 ->
IAM Role 생성 후 정책 연결 ->
IRSA 적용한 SA 생성 ->
Helm으로 ALB Controller 설치
좀 더 자세히 살펴보겠다.
1. IAM 정책 생성
data "http" "alb_policy" {
  url = "https://raw.githubusercontent.com/kubernetes-sigs/aws-load-balancer-controller/v2.7.0/docs/install/iam_policy.json"
}

resource "aws_iam_policy" "alb_controller" {
  name        = "AWSLoadBalancerControllerIAMPolicy"
  description = "IAM policy for AWS Load Balancer Controller"
  policy      = data.http.alb_policy.response_body
}
AWS Load Balancer Controller Github에서 제공하는 IAM Policy json을 다운로드하고 이를 바탕으로 직접 정책을 생성한다.
나는 이전에 만들어둔 정책이 있어서 아래처럼 그냥 조회해서 갖고왔다.
data "aws_iam_policy" "existing_alb_policy" {
  name = "AWSLoadBalancerControllerIAMPolicy"
}
2. IAM Role 생성 후 정책 연결
resource "aws_iam_role" "alb_sa_role" {
  name = "eks-alb-controller-role"

  assume_role_policy = jsonencode({
    Version = "2012-10-17"
    Statement = [{
      Effect = "Allow"
      Principal = {
        Federated = var.oidc_provider_arn
      }
      Action = "sts:AssumeRoleWithWebIdentity"
      Condition = {
        StringEquals = {
          "${replace(var.oidc_issuer_url, "https://", "")}:sub" = "system:serviceaccount:kube-system:aws-load-balancer-controller"
        }
      }
    }]
  })
}


resource "aws_iam_role_policy_attachment" "alb_controller_attach" {
  policy_arn = data.aws_iam_policy.existing_alb_policy.arn
  role       = aws_iam_role.alb_sa_role.name
}
이건 전에 했던 EBS CSI Driver 애드온 설치할 때 작성했던 코드랑 거의 비슷하다.
3. IRSA 적용한 SA 생성
resource "kubernetes_service_account" "alb_sa" {
  metadata {
    name      = "aws-load-balancer-controller"
    namespace = "kube-system"
    annotations = {
      "eks.amazonaws.com/role-arn" = aws_iam_role.alb_sa_role.arn
    }
  }

  automount_service_account_token = true
}
위에서 생성한 Role과 연결해서 ALB Controller Pod가 사용할 ServiceAccount를 직접 생성한다.
4. Helm으로 ALB Controller 설치
명령어는 Helm을 사용하여 AWS Load Balancer Controller 설치 공식문서 참고해서 작성하면 된다. (나는 챗지피티의 힘을 빌렸다)
resource "helm_release" "aws_load_balancer_controller" {
  name       = "aws-load-balancer-controller"
  repository = "https://aws.github.io/eks-charts"
  chart      = "aws-load-balancer-controller"
  namespace  = "kube-system"
  version    = "1.7.1"

  set {
    name  = "clusterName"
    value = var.cluster_name
  }

  set {
    name  = "serviceAccount.create"
    value = "false"
  }

  set {
    name  = "serviceAccount.name"
    value = "aws-load-balancer-controller"
  }

  set {
    name  = "region"
    value = var.aws_region
  }

  set {
    name  = "vpcId"
    value = var.vpc_id
  }

  set {
    name  = "webhookPort"
    value = "9443"
  }

  depends_on = [ kubernetes_service_account.alb_sa ]
}
serviceAccount.create=false & serviceAccount.name=... 설정을 통해 위에서 생성한 SA를 사용하도록 한다.
이제 대략적인 코드 작성은 끝났으니 terraform apply를 해보았다.
🔥 트러블 슈팅
1. K8s 내부 리소스 접근 권한 에러 발생
설치 도중 아래와 같은 에러 메시지가 떴다.
│ Error: Unauthorized
│
│   with module.eks_addons_alb.kubernetes_service_account.alb_sa,
│   on modules\eks-alb-controller\main.tf line 96, in resource "kubernetes_service_account" "alb_sa":
│   96: resource "kubernetes_service_account" "alb_sa" {
│
╵
╷
│ Error: Unauthorized
│
│   with module.eks_auth.kubernetes_config_map.aws_auth,
│   on modules\eks-auth\main.tf line 10, in resource "kubernetes_config_map" "aws_auth":
│   10: resource "kubernetes_config_map" "aws_auth" {
│
원인
원인은 K8s 클러스터 내부 접근에 대한 권한 부족이었다.
이는 설치 방식 때문인데, EBS CSI Controller 같은 경우는 AWS가 제공하는 애드온 리소스이므로 AWS API로 설치가 된다.
하지만, ALB Controller는 K8s 내부에서 리소스를 직접 설치하는 방식이다. (내부에서 SA를 생성하고 Helm으로 설치)
따라서, 클러스터 API에 접근해야 하므로 테라폼을 실행하는 주체에 대한 kubectl 수준의 권한이 필요하다.
해결책
내가 테라폼을 실행할 때 사용하고 있는 IAM 사용자를 aws-auth에 등록해주었다.
resource "kubernetes_config_map" "aws_auth" {
  metadata {
    name      = "aws-auth"
    namespace = "kube-system"
  }

  data = {
    mapRoles = yamlencode([
		.
        .
        .
    ])

    mapUsers = yamlencode([
    {
      userarn  = var.user_arn
      username = "terraform-user"
      groups   = ["system:masters"]
    }
  ])
  }
}
띄우기 성공~
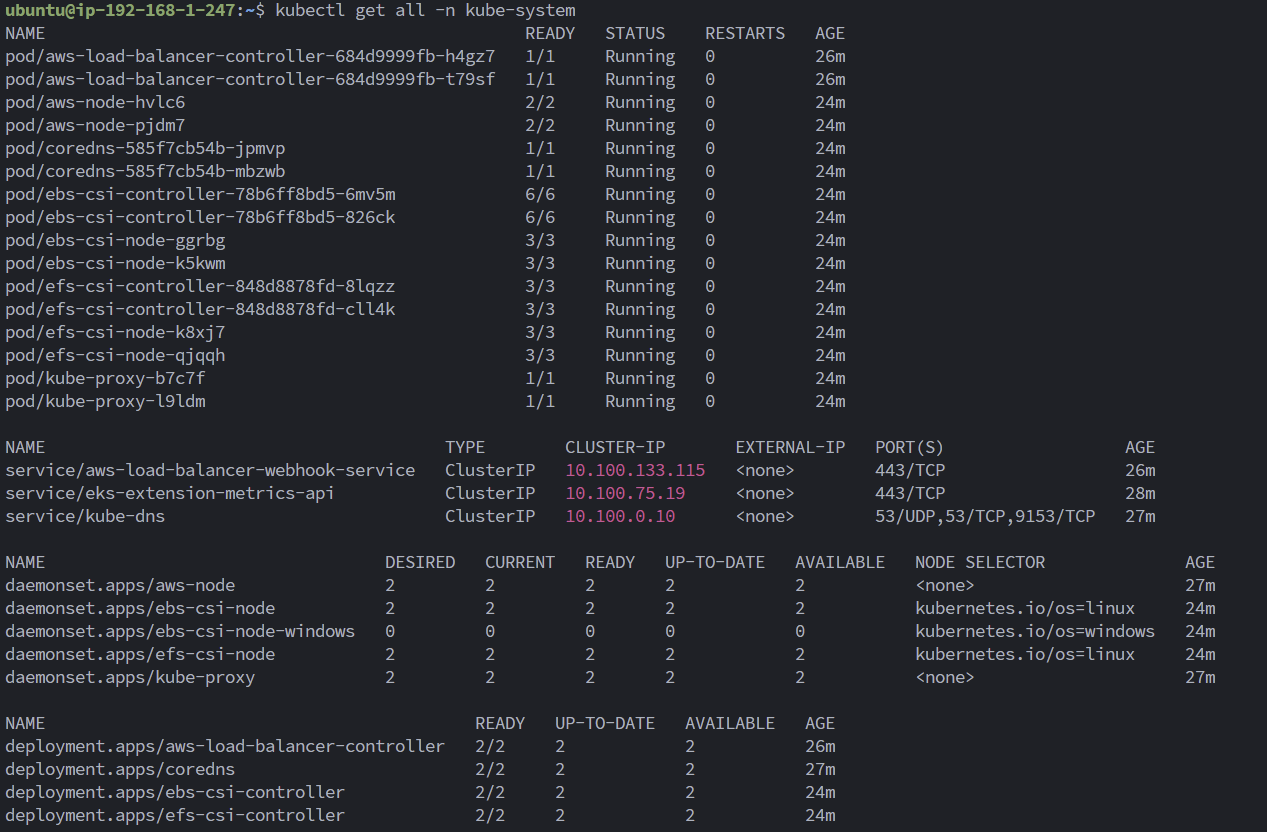 ALB Controller 관련 리소스가 정상적으로 설치가 된 것을 확인하고 검증을 시작했다.
테스트
지피티를 시켜서 만든 yaml 스크립트이다.
apiVersion: v1
kind: Namespace
metadata:
  name: alb-test
---
apiVersion: apps/v1
kind: Deployment
metadata:
  name: nginx
  namespace: alb-test
spec:
  replicas: 2
  selector:
    matchLabels:
      app: nginx
  template:
    metadata:
      labels:
        app: nginx
    spec:
      containers:
      - name: nginx
        image: nginx:latest
        ports:
        - containerPort: 80
---
apiVersion: v1
kind: Service
metadata:
  name: nginx
  namespace: alb-test
spec:
  selector:
    app: nginx
  ports:
  - port: 80
    targetPort: 80
  type: ClusterIP
---
apiVersion: networking.k8s.io/v1
kind: Ingress
metadata:
  name: nginx-ingress
  namespace: alb-test
  annotations:
    alb.ingress.kubernetes.io/scheme: internet-facing
    alb.ingress.kubernetes.io/target-type: ip
spec:
  ingressClassName: alb
  rules:
  - http:
      paths:
      - path: /
        pathType: Prefix
        backend:
          service:
            name: nginx
            port:
              number: 80
🔥🔥 트러블 슈팅 1. 웹훅 에러
kubectl apply 를 하는데 service와 ingress 리소스를 생성하지 못하고 webhook 어쩌구 에러를 뱉어냈다.

원인과 해결책은 https://cloudwithbass.tistory.com/50 이 글을 통해서 알 수 있었다. 원인은 ALB Controller가 동작하면서 클러스터 <-> 노드 그룹이 웹훅으로 통신하는데, 이때 사용하는 웹훅 포트인 9443 포트를 노드 그룹의 sg와 클러스터의 sg에서 열어주지 않아서 그런 것이었다.
# 노드 그룹의 SG (Cluster -> NodeGroup)
# modules/eks-node-group-sg/main.tf
resource "aws_security_group" "eks_node_sg" {
  name        = "${var.cluster_name}-node-sg"
  description = "Security group for EKS worker nodes"
  vpc_id      = var.vpc_id

	.
    .
    .

  # 추가: 클러스터 보안 그룹에서 오는 9443 포트 허용 (웹훅 HTTPS)
  ingress {
    description                = "Allow webhook HTTPS from EKS Control Plane"
    from_port                  = 9443
    to_port                    = 9443
    protocol                   = "tcp"
    security_groups            = [var.cluster_sg_id]
  }
}

# 클러스터의 SG (NodeGroup -> Cluster)
# main.tf
resource "aws_security_group_rule" "eks_cluster_ingress_webhook" {
  type                     = "ingress"
  from_port                = 9443
  to_port                  = 9443
  protocol                 = "tcp"
  source_security_group_id = module.eks_node_group_sg.eks_node_sg_id
  security_group_id        = module.eks.cluster_sg_id
  description              = "Allow webhook (9443) from worker nodes"
}
노드 그룹의 sg에서는 클러스터의 sg에서 오는 9443 포트를,
클러스터 sg에서는 노드 그룹의 sg에서 오는 9443 포트를 열어주었다.
🔥🔥트러블 슈팅 2. VPC 태깅 에러
노드 그룹 규칙을 추가하니 리소스는 잘 배포가 되었다. 하지만 Ingress를 조회하면 ALB 주소가 확인되지 않았고, ALB도 프로비저닝이 되지 않았다.
kubectl describe ingress nginx-ingress -n alb-test 를 통해 확인해보니
Warning  FailedBuildModel  6s (x14 over 50s)  ingress  Failed build model due to couldn't auto-discover subnets:
unable to resolve at least one subnet (0 match VPC and tags: [kubernetes.io/role/elb])
위와 같은 메시지를 확인할 수 있었다.
Application Load Balancer를 사용하여 애플리케이션 및 HTTP 트래픽 라우팅 공식 문서에 따르면, ALB가 프로비저닝될 서브넷을 태깅을 통해 명시를 해주어야 했다.
그래서 퍼블릭 서브넷 리소스에 두 개의 태그를 추가했다.
# Public Subnet
resource "aws_subnet" "public_subnet" {

	.
    .
    .
  tags                    = {
    Name                                 		 = "${var.name}-public-subnet-${count.index + 1}"
    "kubernetes.io/role/elb"             		 = "1"
    "kubernetes.io/cluster/${var.cluster_name}"  = "shared"
  }
}
마침내, 테스트 성공 ~~
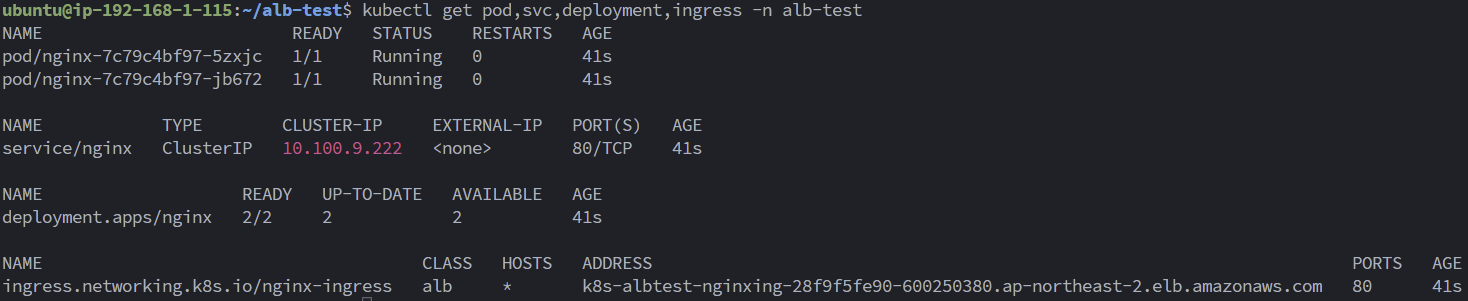

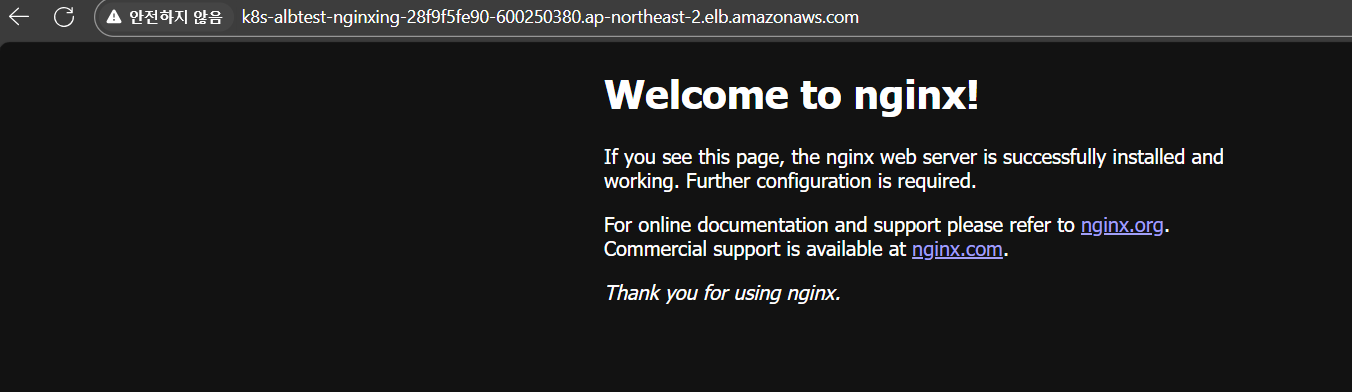 로드밸런서 프로비저닝이 돼서, Ingress에 ALB 도메인 주소도 잘 붙었고,
nginx에 접근도 잘 되었다!