생성일: 2022년 1월 1일 오후 9:21
1단계
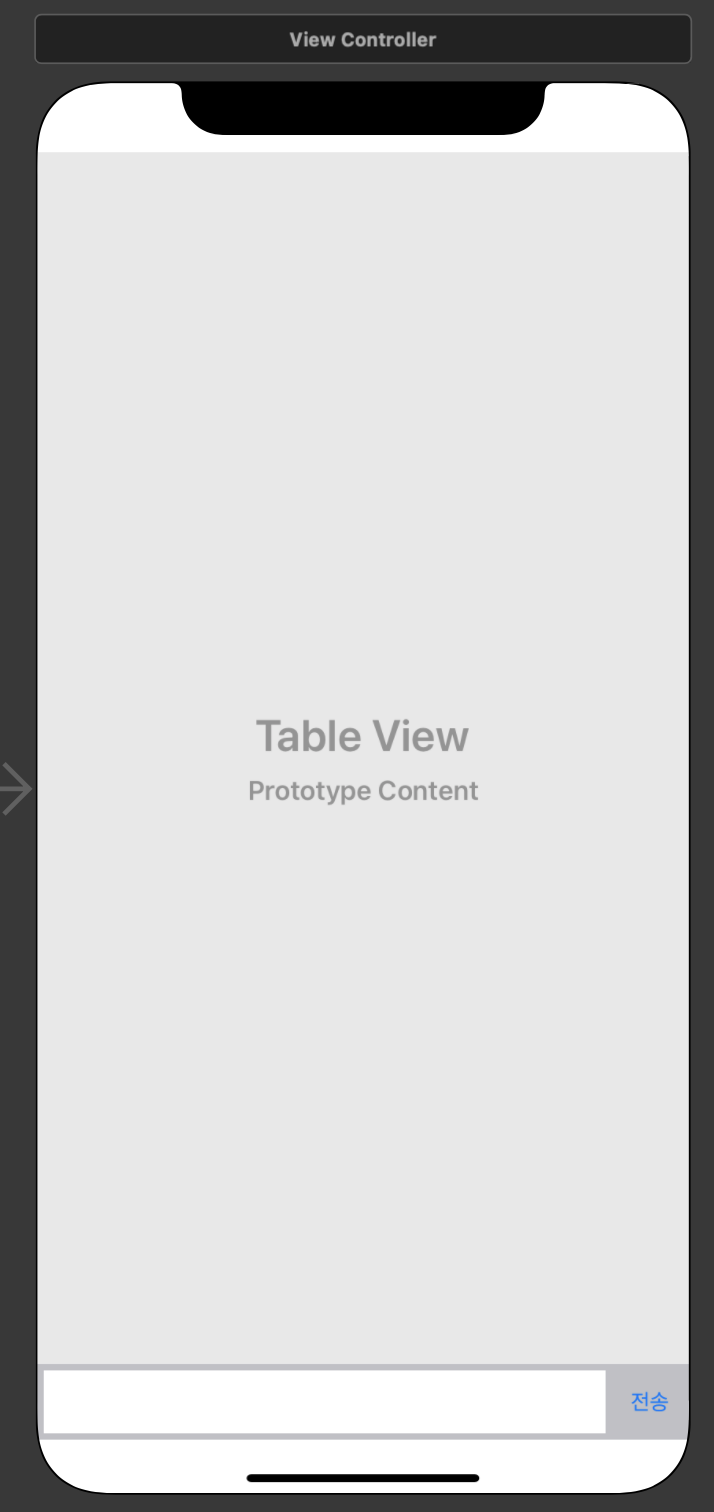
Main.storyboard에 위와 같이 테이블 뷰, 텍스트 뷰, 버튼을 정렬시켜 채팅 앱의 기본 구조를 만든다.
2단계
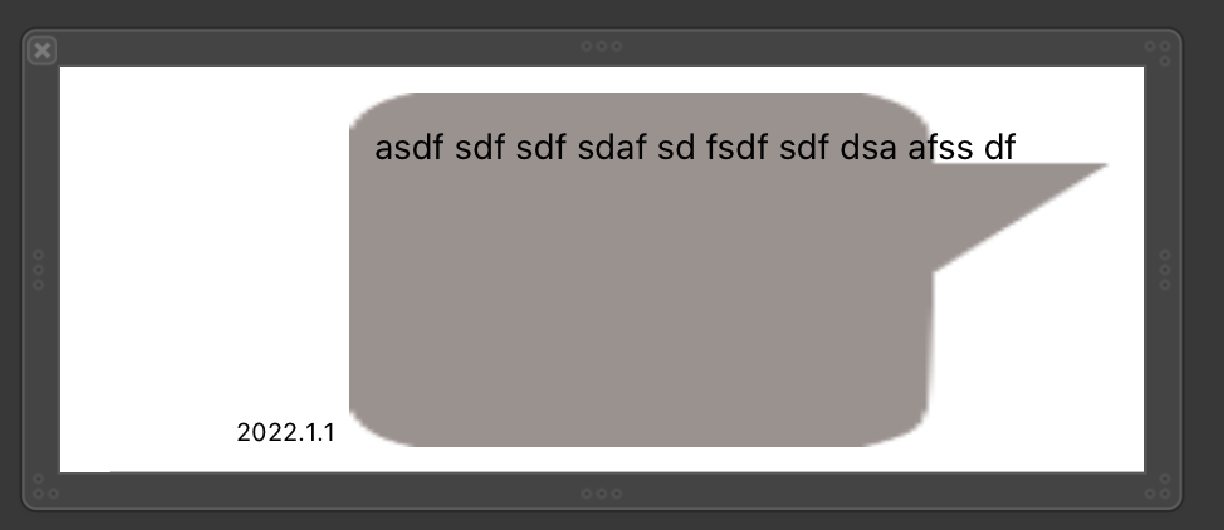
.xib 파일을 생성하여 말풍선 이미지와 텍스트 뷰를 만들고 정렬시킨다.
- 문제점
- 텍스트 뷰가 커질수록 (글자 수가 많아 질수록) 말풍선 이미지도 커지도록 말풍선 이미지 뷰와 텍스트 뷰를 전방향 edges 정렬 시켜놓았다.
- 이러면 글자 수가 늘어나서 말풍선이 커질때 말풍선 우측의 꼬리부분도 커져서 보기 이상해진다.
- 해결방법

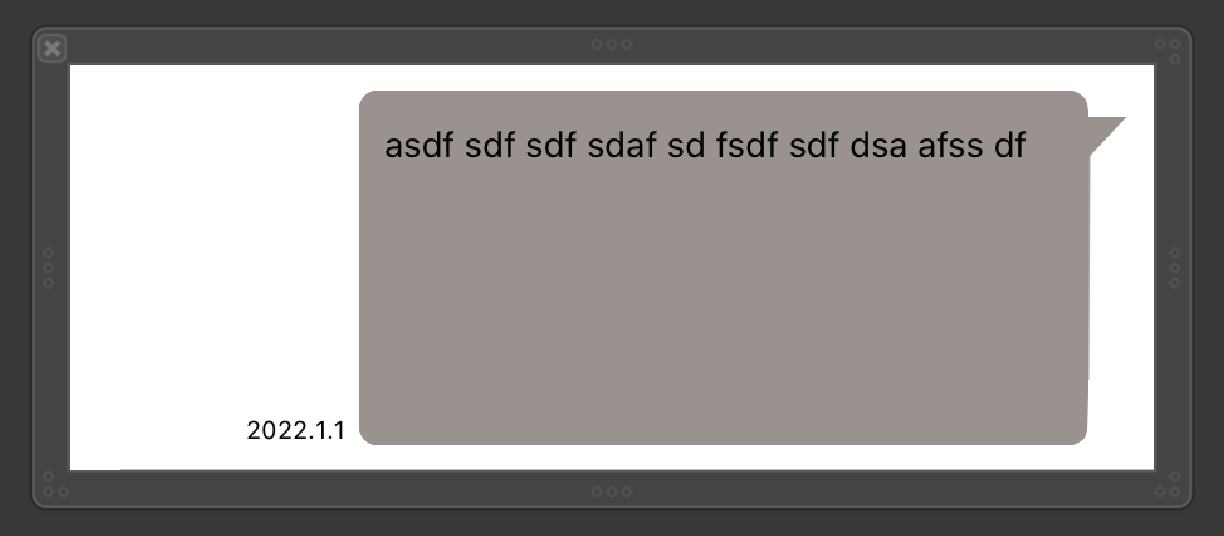
- 말풍선 이미지 뷰의 Stretching을 위와 같이 수정하면 말풍선의 꼬리부분은 커지지 않는다.
- 왜냐하면 Stretching을 활용하여 위와 같이 값을 주면 이미지를 전체적으로 확대시키는 것이 아니라 중앙 부분을 확대시키기 때문이다.
날짜 라벨에 superview와 ≥ 40 constraint를 주어 말풍선이 너무 커져서 넘치는 현상을 방지한다.
위와 같은 방식으로 채팅을 받는 방향의 xib파일도 추가로 생성한다.
3단계
import UIKit

class ViewController: UIViewController {

    @IBOutlet weak var chatTabbleView: UITableView!
    @IBOutlet weak var inputTextView: UITextView!
    @IBOutlet weak var inputViewBottomMargin: NSLayoutConstraint!

    override func viewDidLoad() {
        super.viewDidLoad()

        // 테이블 뷰에 커스터마이징한 xib 셀 등록
        chatTabbleView.register(UINib(nibName: "MyCell", bundle: nil), forCellReuseIdentifier: "myCell")

        chatTabbleView.register(UINib(nibName: "YourCell", bundle: nil), forCellReuseIdentifier: "yourCell")

        // 키보드 관련 옵저버 (상태를 알려주는 것) 설정
        // 키보드 올라올 때
        NotificationCenter.default.addObserver(self, selector: #selector(keyboardWillShow), name: UIResponder.keyboardWillShowNotification, object: nil)

        // 키보드 내려올 때
        NotificationCenter.default.addObserver(self, selector: #selector(keyboardWillHide), name: UIResponder.keyboardWillHideNotification, object: nil)
    }

    @objc func keyboardWillShow(noti: Notification) {
        let notifiInfo = noti.userInfo!
        let keyboardFrame = notifiInfo[UIResponder.keyboardFrameEndUserInfoKey] as! CGRect
        let height = keyboardFrame.size.height

        // 키보드가 올라오는 시간(애니매이션 시간)
        let animationDuration = notifiInfo[UIResponder.keyboardAnimationDurationUserInfoKey] as! TimeInterval

        UIView.animate(withDuration: animationDuration) {
            // 아이폰의 safe area 영역을 더해주어야 빈공간 없이 키보드와 inputView가 붙어진다.
            self.inputViewBottomMargin.constant = -height + self.view.safeAreaInsets.bottom
            self.view.layoutIfNeeded()
        }
    }

    @objc func keyboardWillHide(noti: Notification) {
        let notifiInfo = noti.userInfo!

        let animationDuration = notifiInfo[UIResponder.keyboardAnimationDurationUserInfoKey] as! TimeInterval

        UIView.animate(withDuration: animationDuration) {
            self.inputViewBottomMargin.constant = 0
            self.view.layoutIfNeeded()
        }
    }

    @IBAction func SendString(_ sender: Any) {
    }

}- 2단계에서 만든 테이블 뷰 셀(xib)를 viewDidLoad에서 register
- 키보드가 올라오거나 내려오는 것을 트래킹(옵저빙)하기 위해 addObserver 함수 사용
- 키보드가 올라올 때는 inputView가 키보드가 올라온 높이 만큼 위로 올라가야 함. 주의할 점은 아아폰x 이상의 기기에 있는 safe area 때문에 safe area의 하단 높이 만큼 더해준 값을 constant로 설정해야 함
- 반대로 키보드가 내려갈 때에는 constant를 0으로 바꿔 줌
- 키보드가 올라가거나 내려갈때 inputView가 자연스럽게 위치를 바꾸도록 animation을 추가 함
- 키보드 밖 (여기선 테이블뷰)를 터치 했을 때 키보드가 내려가도록 설정하는 법

- 테이블 뷰의 인스펙터에서 Keyboard 항목을 Dismiss on drag로 바꾸어 주면 키보드 밖을 유저가 드래그 했을 때 키보드가 사라지게 됨4단계
class ViewController: UIViewController{
    @IBOutlet weak var chatTabbleView: UITableView!{
        didSet{
            chatTabbleView.delegate = self
            chatTabbleView.dataSource = self
						chatTabbleView.separatorStyle = .none
        }
    }
    var chatData = [String]()
tableViewDelegate를 이용하기 위해 위와 같이 didSet에서 delegate를 self로 설정한다.
사용자에게 입력받은 텍스트를 저장하기 위해 chatData 어레이를 선언한다.
// 사용자가 텍스트를 입려갛고 전송 버튼을 눌렀을 때 => chatData 어레이 안에 해당 텍스트가 들어가야 함
    @IBAction func SendString(_ sender: Any) {

        chatData.append(inputTextView.text)
        inputTextView.text = ""
        // 테이블 뷰 갱신
        chatTabbleView.reloadData()

        // 사용자가 새로운 메시지를 전송했을 때 화면을 테이블 뷰에 새로운 메시지가 생긴 부분으로 내려주게 함
        let lastIndexPath = IndexPath(row: chatData.count - 1, section: 0)

        chatTabbleView.scrollToRow(at: lastIndexPath, at: UITableView.ScrollPosition.bottom, animated: true)
    }
전송 버튼과 IBAction을 연결하여 사용자가 전송 버튼을 누르면 테이블 뷰를 갱신하고 새 메시지가 생긴 부분으로 화면을 옮기도록 구현했다.
UITableViewDelegate
//MARK: - TableViewDelegate

extension ViewController: UITableViewDelegate, UITableViewDataSource{

    func tableView(_ tableView: UITableView, numberOfRowsInSection section: Int) -> Int {
        return chatData.count
    }

    func tableView(_ tableView: UITableView, cellForRowAt indexPath: IndexPath) -> UITableViewCell {

        if indexPath.row % 2 == 0 {
            let myCell = tableView.dequeueReusableCell(withIdentifier: "myCell", for: indexPath) as! MyCell
            myCell.myTextView.text = chatData[indexPath.row]

            return myCell

        }else{
            let yourCell = tableView.dequeueReusableCell(withIdentifier: "yourCell", for: indexPath) as! YourCell
            yourCell.yourTextView.text = chatData[indexPath.row]

            return yourCell
        }

    }
}
extension을 사용하여 UITableViewDelegate와 DataSource를 불러왔다.
두 프로토콜은 위의 두 함수를 필수적으로 필요로 한다.
현재 구현하고자 하는 채팅 앱에서는 타인과 채팅을 치는 것이 아닌 본인만 채팅을 하도록 구성했기 때문에 위와 같이 chatData 어레이의 짝수 인덱스 텍스트는 myCell을, 홀수 인덱스 텍스트는 yourCell을 사용하도록 했다.
5단계
사용자가 많은 글자를 Input Text View에 입력하고 있다면 해당 Text View의 높이를 키워서 사용자가 해당 시기까지 입력한 텍스트들을 한눈에 확인할 수 있도록 구현해보자
class ViewController: UIViewController{
    @IBOutlet weak var chatTabbleView: UITableView!{
        didSet{
            chatTabbleView.delegate = self
            chatTabbleView.dataSource = self
            chatTabbleView.separatorStyle = .none
        }
    }
    var chatData = [String]()

    @IBOutlet weak var inputTextView: UITextView!{
        didSet{
            inputTextView.delegate = self
        }
    }
		@IBOutlet weak var inputTextViewHeight: NSLayoutConstraint!
UITextViewDelegate를 사용하기 위해 위와 같이 inputTextView.delegate를 self로 선언한다.
inputTextView의 높이를 변경해야 하기 때문에 해당 constraint를 IBOutlet으로 가져온다.
//MARK: - UITexViewDelegate
extension ViewController: UITextViewDelegate {

    func textViewDidChange(_ textView: UITextView) {
        if textView.contentSize.height <= 40{
            inputTextViewHeight.constant = 40
        }else if textView.contentSize.height >= 100 {
            inputTextViewHeight.constant = 100
        }else {
            inputTextViewHeight.constant = textView.contentSize.height
        }
    }

}
100 px 까지는 사용자가 많이 입력하면 그만큼 inputTextView의 높이를 키우도록 구현했다.
최종 구현