Chapter 04. Implementing a GPT model from Scratch To Generate Text
https://github.com/rasbt/LLMs-from-scratch/blob/main/ch04
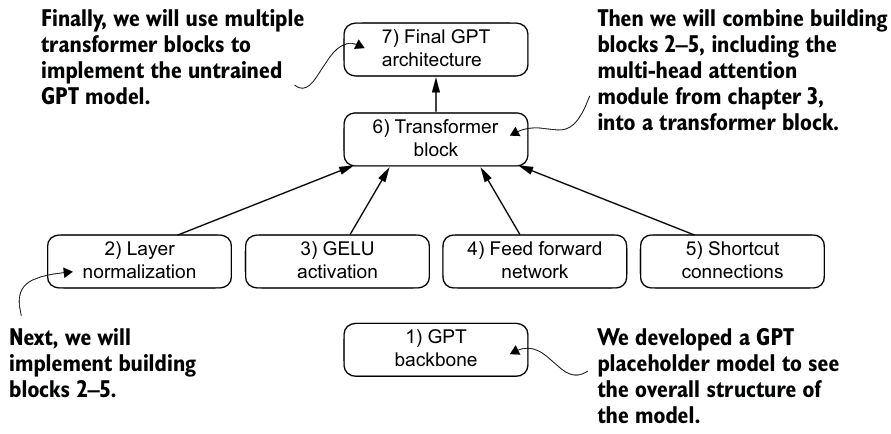
1. Coding an LLM architecture
먼저, GPT backbone(placeholder)을 구현해보자.
GPT_CONFIG_124M = {
    "vocab_size": 50257,    # Vocabulary size
    "context_length": 1024, # Context length
    "emb_dim": 768,         # Embedding dimension
    "n_heads": 12,          # Number of attention heads
    "n_layers": 12,         # Number of layers
    "drop_rate": 0.1,       # Dropout rate
    "qkv_bias": False       # Query-Key-Value bias
}

class DummyGPTModel(nn.Module):
    def __init__(self, cfg):
        super().__init__()
        self.tok_emb = nn.Embedding(cfg["vocab_size"], cfg["emb_dim"])
        self.pos_emb = nn.Embedding(cfg["context_length"], cfg["emb_dim"])
        self.drop_emb = nn.Dropout(cfg["drop_rate"])

        # Use a placeholder for TransformerBlock
        self.trf_blocks = nn.Sequential(
            *[DummyTransformerBlock(cfg) for _ in range(cfg["n_layers"])])

        # Use a placeholder for LayerNorm
        self.final_norm = DummyLayerNorm(cfg["emb_dim"])
        self.out_head = nn.Linear(
            cfg["emb_dim"], cfg["vocab_size"], bias=False
        )

    def forward(self, in_idx):
        batch_size, seq_len = in_idx.shape
        tok_embeds = self.tok_emb(in_idx)
        pos_embeds = self.pos_emb(torch.arange(seq_len, device=in_idx.device))
        x = tok_embeds + pos_embeds
        x = self.drop_emb(x)
        x = self.trf_blocks(x)
        x = self.final_norm(x)
        logits = self.out_head(x)
        return logits


class DummyTransformerBlock(nn.Module):
    def __init__(self, cfg):
        super().__init__()
        # A simple placeholder

    def forward(self, x):
        # This block does nothing and just returns its input.
        return x


class DummyLayerNorm(nn.Module):
    def __init__(self, normalized_shape, eps=1e-5):
        super().__init__()
        # The parameters here are just to mimic the LayerNorm interface.

    def forward(self, x):
        # This layer does nothing and just returns its input.
        return x

batch = []
batch.append(torch.tensor(tokenizer.encode(txt1)))
batch.append(torch.tensor(tokenizer.encode(txt2)))
batch = torch.stack(batch, dim=0)

model = DummyGPTModel(GPT_CONFIG_124M)

logits = model(batch)
2. Normalizing activations with layer normalization
Layer normalization(LayerNorm)은 신경망 레이어의 activations를 평균 0과 분산 1로 정규화한다.
- 훈련을 안정화시키고 가중치가 더 빠르게 수렴할 수 있도록 한다.
- multi-head attention module의 전후와 마지막 output layer에도 적용된다.
- 정규화는 각 행(inputs)에 독립적으로 적용된다.
dim=-1을 사용하여 행 차원 대신 마지막 차원에 걸쳐 계산을 적용한다.dim=0이면, 열 별 평균을 내서 행을 만든다. 이 경우에는 사용하지 않는다.
class LayerNorm(nn.Module):
    def __init__(self, emb_dim):
        super().__init__()
        self.eps = 1e-5
        self.scale = nn.Parameter(torch.ones(emb_dim))
        self.shift = nn.Parameter(torch.zeros(emb_dim))

    def forward(self, x):
        mean = x.mean(dim=-1, keepdim=True)
        var = x.var(dim=-1, keepdim=True, unbiased=False)
        norm_x = (x - mean) / torch.sqrt(var + self.eps)
return self.scale * norm_x + self.shift- trainable
scale과shiftparameter를 추가한다.- 초기
scale은 1을 곱하는 것이고shift는 0을 더하는 것이지만, 훈련 동안 조정된다. - 추가적으로 분산의 제곱근을 계산하기 전에
eps를 더해서 division-by-zero를 방지한다.
- 초기
unbiased=False는 분산 계산 시 을 사용한다는 것으로, 분모에 을 사용하는 베셀 보정을 포함하지 않아서 분산의 편향된 추정치를 제공한다.- LLM은 이 매우 크기 때문에 과 동일하다.
- GPT-2도 편향된 분산으로 훈련된다.
3. Implementing a feed forward network with GELU activations
LLM에서 트랜스포머 block의 일부로 사용되는 작은 신경망 submodule을 구현하자.
- 딥러닝에서는 ReLU(Rectified Linear Unit) 활성화 함수가 흔히 사용되지만, LLM에서는 GELU(Gaussian Error Linear Unit)와 SwiGLU(Swish-Gated Linear Unit) 등 다양한 활성화 함수가 사용된다.
- ReLU보다 복잡하고 부드러운 활성화 함수이다.
- , 는 표준 가우시안 분포의 누적 분포 함수이다.
- 로 사용된다.
- ReLU와 유사한 매끄럽고 비선형적인 함수이지만, 음수 값의 경우 기울기가 0이 아닌 함수이다.
FeedForward도 임베딩 차원에 맞게 구현한다.- Linear Layer 두 개 사이에 GELU를 넣고 Bottle Neck 방식으로 차원을 구성한다.
4. Adding shortcut connections
트랜스포머 block에 사용되는 shortcut connections(skip connections, residual connections)에 대해서 알아보자.
- vanishing gradient을 해결하기 위해 제시되었다.
- gradient가 네트워크를 통해 흐를 수 있는 path를 만든다.
- 일반적으로 output을 중간에 하나 이상의 레이어를 건너뛰고 나중 layer의 output에 더하는 방식으로 구현된다.
def forward(self, x):
	for layer in self.layers:
		# Compute the output of the current layer
		layer_output = layer(x)
		# Check if shortcut can be applied
		if self.use_shortcut and x.shape == layer_output.shape:
			x = x + layer_output
		else:
			x = layer_output
return x- 이를 통해 신경망을 지날수록 gradients가 사라지는 문제를 방지할 수 있다.
5. Connecting attention and linear layers in a transformer block
선형 layer인 feed forward 신경망과 dropout, shortcut connections, causal multi-head attention module을 결합하여 트랜스포머 block을 만들어보자.

class TransformerBlock(nn.Module):
    def __init__(self, cfg):
        super().__init__()
        self.att = MultiHeadAttention(
            d_in=cfg["emb_dim"],
            d_out=cfg["emb_dim"],
            context_length=cfg["context_length"],
            num_heads=cfg["n_heads"],
            dropout=cfg["drop_rate"],
            qkv_bias=cfg["qkv_bias"])
        self.ff = FeedForward(cfg)
        self.norm1 = LayerNorm(cfg["emb_dim"])
        self.norm2 = LayerNorm(cfg["emb_dim"])
        self.drop_shortcut = nn.Dropout(cfg["drop_rate"])

    def forward(self, x):
        # Shortcut connection for attention block
        shortcut = x
        x = self.norm1(x)
        x = self.att(x)  # Shape [batch_size, num_tokens, emb_size]
        x = self.drop_shortcut(x)
        x = x + shortcut  # Add the original input back

        # Shortcut connection for feed forward block
        shortcut = x
        x = self.norm2(x)
        x = self.ff(x)
        x = self.drop_shortcut(x)
        x = x + shortcut  # Add the original input back

return x- output은 context vectors의 확장된 버전으로 볼 수 있다.
6. Coding the GPT model
구현한 트랜스포머 block을 아키텍처에 결합하여 모델을 완성해보자.
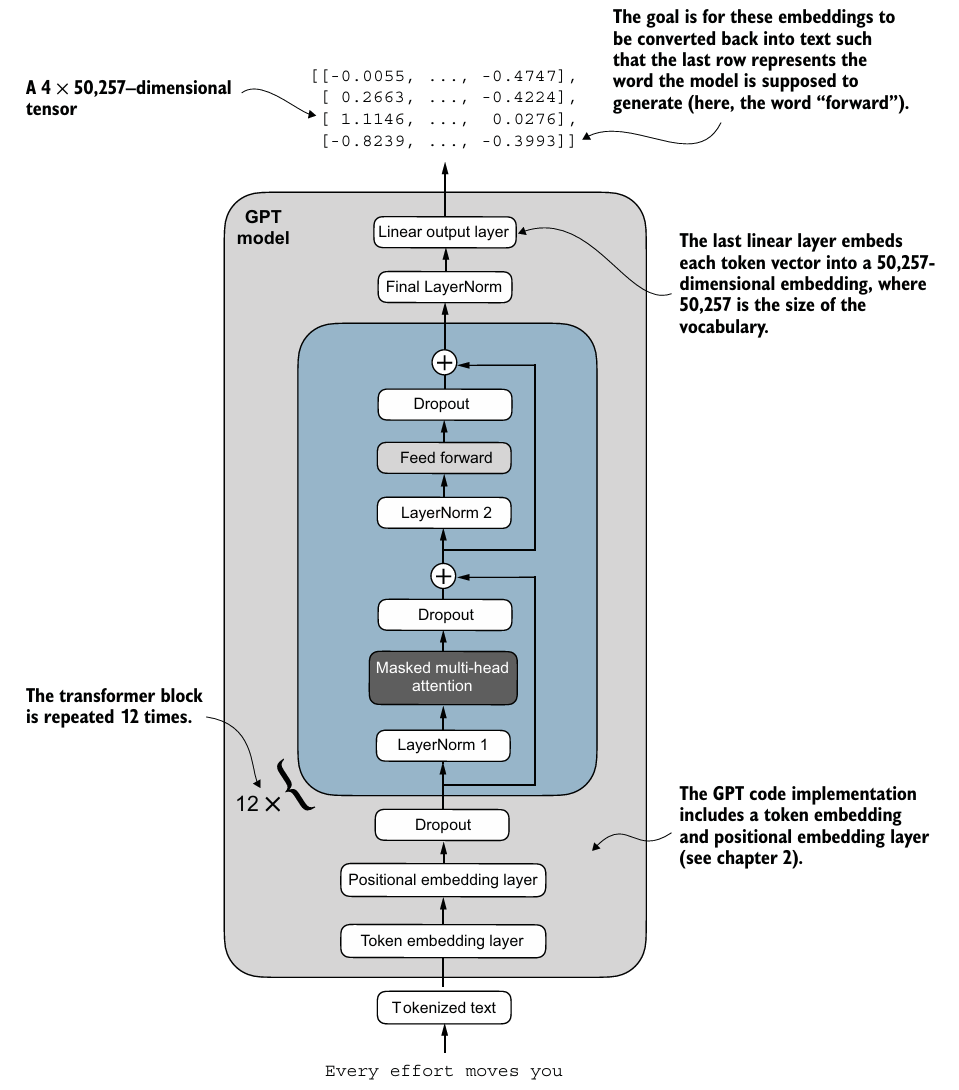
class GPTModel(nn.Module):
    def __init__(self, cfg):
        super().__init__()
        self.tok_emb = nn.Embedding(cfg["vocab_size"], cfg["emb_dim"])
        self.pos_emb = nn.Embedding(cfg["context_length"], cfg["emb_dim"])
        self.drop_emb = nn.Dropout(cfg["drop_rate"])

        self.trf_blocks = nn.Sequential(
            *[TransformerBlock(cfg) for _ in range(cfg["n_layers"])])

        self.final_norm = LayerNorm(cfg["emb_dim"])
        self.out_head = nn.Linear(
            cfg["emb_dim"], cfg["vocab_size"], bias=False
        )

    def forward(self, in_idx):
        batch_size, seq_len = in_idx.shape
        tok_embeds = self.tok_emb(in_idx)
        pos_embeds = self.pos_emb(torch.arange(seq_len, device=in_idx.device))
        x = tok_embeds + pos_embeds  # Shape [batch_size, num_tokens, emb_size]
        x = self.drop_emb(x)
        x = self.trf_blocks(x)
        x = self.final_norm(x)
        logits = self.out_head(x)
        return logits

model = GPTModel(GPT_CONFIG_124M)
out = model(batch)

total_params = sum(p.numel() for p in model.parameters())total_params는 약 163M이며 이는 사전에 계획한 124M 모델보다 많다.- GPT-2 논문에서 연구자들은 weight tying을 적용하여,
self.out_head.weight = self.tok_emb.weight를 통해 토큰 임베딩 layer(tok_emb)를 output layer로 재사용했다. - 토큰 임베딩 layer는 50,257 차원을 768차원의 임베딩 표현에 투영하고, output layer는 768차원의 임베딩을 다시 50,257 차원으로 투영하기 때문에, 같은 가중치를 가질 수 있다.
- GPT-2 논문에서 연구자들은 weight tying을 적용하여,
- weight tying 없이 모델을 훈련하는 것이 더 쉽다.
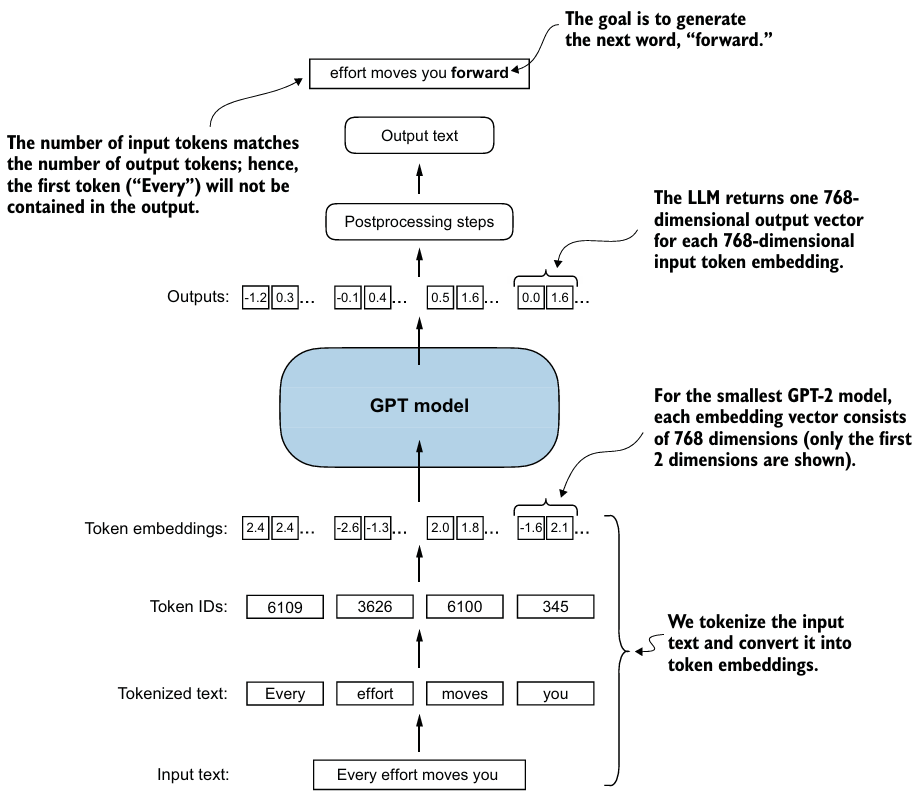
7. Generating text
만든 model로 text를 생성할 때, greedy decoding을 사용하면 간단하게 text를 생성할 수 있다.
- 각 단계에서 모델이 다음 출력으로 가장 높은 확률을 가진 단어(또는 토큰)를 선택한다.
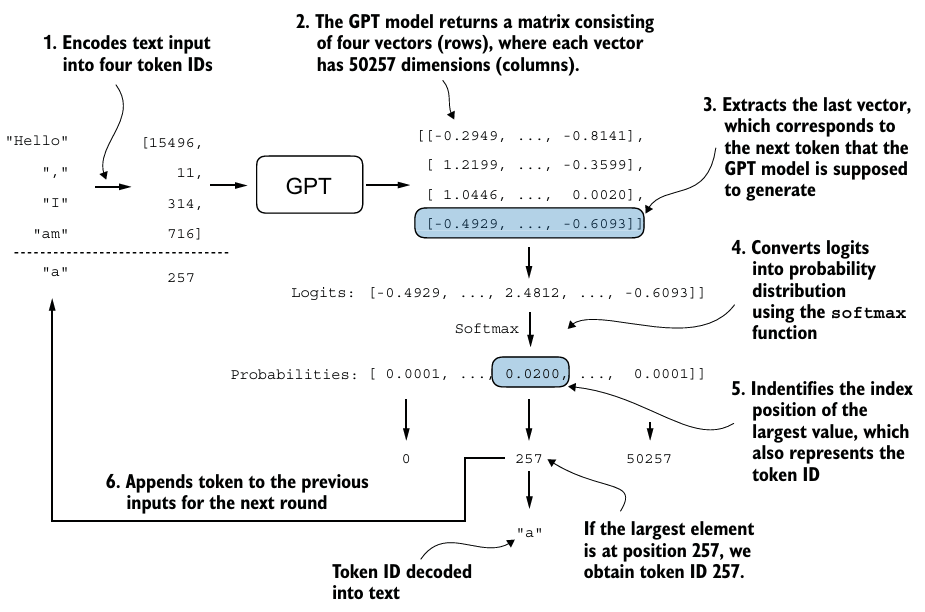
def generate_text_simple(model, idx, max_new_tokens, context_size):
    # idx is (batch, n_tokens) array of indices in the current context
    for _ in range(max_new_tokens):

        # Crop current context if it exceeds the supported context size
        # E.g., if LLM supports only 5 tokens, and the context size is 10
        # then only the last 5 tokens are used as context
        idx_cond = idx[:, -context_size:]

        # Get the predictions
        with torch.no_grad():
            logits = model(idx_cond)

        # Focus only on the last time step
        # (batch, n_tokens, vocab_size) becomes (batch, vocab_size)
        logits = logits[:, -1, :]

        # Apply softmax to get probabilities
        probas = torch.softmax(logits, dim=-1)  # (batch, vocab_size)

        # Get the idx of the vocab entry with the highest probability value
        idx_next = torch.argmax(probas, dim=-1, keepdim=True)  # (batch, 1)

        # Append sampled index to the running sequence
        idx = torch.cat((idx, idx_next), dim=1)  # (batch, n_tokens+1)

    return idx

out = generate_text_simple(
    model=model,
    idx=encoded_tensor,
    max_new_tokens=6,
    context_size=GPT_CONFIG_124M["context_length"]
)
※ FLOPS Analysis
FLOPs(Floating Point Operations Per Second)는 실행되는 부동 소수점 연산의 수를 세어 신경망 모델의 계산 복잡성을 측정한다.
- FLOPs가 클수록 더 많은 계산 및 에너지 소비 나타낸다.
- PyTorch 모델의 FLOPs 및 파라미터 개수를 분석하는 라이브러리인
thop(Torch-OpCounter)를 사용한다.profile(model, inputs)로 모델의 FLOPs 및 파라미터 개수를 계산한다.
macs, params = profile(model, inputs=(input_tensor,), verbose=False)
flops = 2 * macs
print(f"{flops:.1e} FLOPS") # 6.5e+13 FLOPS- MFU(Model FLOP Utilization)를 사용하여 성능을 측정할 수 있다.
- peak FLOPs에서 작동하는 시스템의 이론적 최대 처리량에 대한 관찰된 처리량(초당 토큰 수)의 비율을 이용한다.
memo
- 전체적인 구조를 코드를 통째로 두고 다시 한 번 살펴보기.

It’s always white night here.