최근 업데이트일 2024-11-25
따라하며 배우는 쿠버네티스: Custom Resource
쿠버네티스: Custom Resources
쿠버네티스에서 기본적으로 정의된 리소스 외에 Custom Resource를 활용하여 관리자가 원하는 리소스를 정의하고 사용할 수 있다.
Custom Resource
쿠버네티스에서 기본으로 제공되지 않는 리소스, 쿠버네티스 API의 Extension
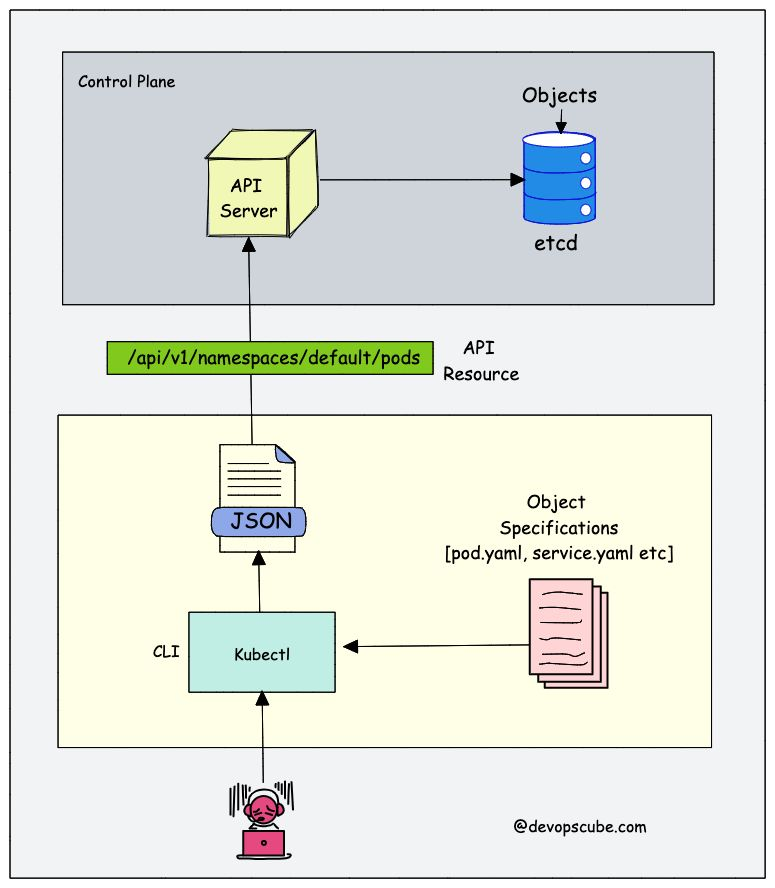
- 쿠버네티스에서의 리소스는 쿠버네티스 API에서 특정 종류의 API 오브젝트 모음을 저장하는 엔드포인트이다.
- 쿠버네티스는 CRD를 등록함으로써 etcd에 새로운 리소스를 저장할 수 있는 엔드포인트를 자동으로 생성한다.
- 일반적으로는 CRD(CustomResourceDefinition)를 통해 등록하며, 고급 사용자는 AA(API Aggregation Layer)를 통해 새로운 API 그룹을 직접 구현할 수도 있다.
- AA는 Go를 통해 개발하며 바이너리와 이미지를 따로 만들어줘야 한다.
- CRD로 쿠버네티스에 CR을 배포할 수 있는 yaml파일을 등록해놓으면 Custom resource를 등록할 수 있다.
- 일반적으로는 CRD(CustomResourceDefinition)를 통해 등록하며, 고급 사용자는 AA(API Aggregation Layer)를 통해 새로운 API 그룹을 직접 구현할 수도 있다.
- 등록 과정
kubectl apply -f mycrd.yaml실행- API 서버는 이 YAML을 파싱하고, CRD라는 내장 리소스 타입으로 처리
- API 서버가 etcd에 저장 in
/registry/apiextensions.k8s.io/customresourcedefinitions/... - API 서버가 새로운 리소스 경로를 동적으로 등록
- API 서버는 CRD를 통해 새로운 API 엔드포인트를 생성 like
apis/example.com/v1/mycrName
- API 서버는 CRD를 통해 새로운 API 엔드포인트를 생성 like
- yaml로 해당 리소스를 생성할 수 있게 되고, 이 객체는 API 서버를 거쳐 etcd에 저장되며, 필요하다면 컨트롤러가 이를 watch해서 자동화된 처리를 할 수 있게 된다.
Custom Resource 사용 예시
cert-manager는 쿠버네티스에서 SSL 인증서를 자동으로 발급하고 갱신하는 컨트롤러로, 이를 위해 Issuer, Certificate 같은 Custom Resource를 사용한다.
- cert-manager 사용 목적
- Ingress에 TLS 설정을 통한 HTTPS 트래픽 보호
- Mutual TLS 통신 (mTLS)을 구현하여 마이크로서비스 간의 보안 통신
- Webhook이나 API 서버 간의 TLS 보안 통신
1. cert-manager 설치
kubectl apply -f https://github.com/cert-manager/cert-manager/releases/latest/download/cert-manager.yaml

# 다음 CRDs를 자동 등록
# issuers.cert-manager.io
# certificates.cert-manager.io
# clusterissuers.cert-manager.io
# issuers.cert-manager.io 중 일부
apiVersion: apiextensions.k8s.io/v1
kind: CustomResourceDefinition
metadata:
name: issuers.cert-manager.io
spec:
group: cert-manager.io
names:
kind: Issuer
plural: issuers # 복수형, kubectl 명령어나 REST API 요청 시 사용될 이름
singular: issuer # 단수형
scope: Namespaced # 해당 CR이 특정 네임스페이스에 귀속된다는 뜻이며
# ClusterIssuer 같은 리소스는 scope: Cluster로 정의한다.
...- 특정 namespace에 종속된 리소스는 namespace를 명시해야 사용 및 조회가 가능하다.
- cluster-scoped인 리소스는 클러스터 전역에서 공유되며, namespace에 속하지 않는다.
2. Issuer & Certificate 리소스 정의 (자체 서명 CA 사용)
# issuer.yaml
apiVersion: cert-manager.io/v1
kind: Issuer
metadata:
  name: example-issuer
  namespace: default
spec:
  selfSigned: {}  # 자체 서명 방식
  # Let's Encrypt를 이용하려면 ClusterIssuer 리소스를 생성하고
  # ACME 프로토콜을 통한 도메인 검증 설정 필요

# certificate.yaml
apiVersion: cert-manager.io/v1
kind: Certificate
metadata:
  name: example-cert
  namespace: default
spec:
  secretName: example-tls
  duration: 2160h # 90일
  renewBefore: 360h # 15일 전 자동 갱신
  subject:
    organizations:
      - example.org
  dnsNames:
    - example.com
  issuerRef:
    name: example-issuer
    kind: Issuer
3. Issuer & Certificate 리소스 등록
kubectl apply -f issuer.yaml
kubectl apply -f certificate.yaml
4. 확인
# 인증서 발급 상태 확인
kubectl describe certificate example-cert

# 생성된 Secret 확인 (TLS 키/인증서 포함)
kubectl get secret example-tls -o yaml
ConfigMap ↔ Custom Resource
ConfigMap은 단순한 설정 데이터를 저장하고 전달하는 데 사용되며,
Custom Resource는 구조화된 선언형 리소스로서 설정뿐 아니라 해당 설정에 따라 동작하는 자동화 로직의 입력으로 사용된다.
- ConfigMap은 저장할 수 있는 데이터 형식이 정해져 있지 않지만, Custom Resource는 특정 App에 대한 설정 데이터를 저장하고 그 App에 대한 지식 없이도 손쉽게 설정할 수 있도록 한다.
- ConfigMap 사용 상황
mysql.cnf또는pom.xml과 같이 잘 문서화된 기존 구성 파일 형식이 있다.- 전체 구성 파일을 컨피그맵의 하나의 키에 넣고 싶다. - 구성 파일의 주요 용도는 클러스터의 파드에서 실행 중인 프로그램이 파일을 사용하여 자체 구성하는 것이다.
- 파일 사용자는 쿠버네티스 API가 아닌 파드의 환경 변수 또는 파드의 파일을 통해 사용하는 것을 선호한다.
- Custom Resource 사용 상황
- kubectl의 최상위 지원을 원한다. e.g.
kubectl get [Resource_NAME] - 새 오브젝트에 대한 업데이트를 감시한 다음 다른 오브젝트를 CRUD하거나 그 반대로 하는 새로운 자동화를 구축하려고 한다.
- 오브젝트의 업데이트를 처리하는 자동화를 작성하려고 한다.
.spec,.status및.metadata와 같은 쿠버네티스 API 규칙을 사용하려고 한다.- 제어된 리소스의 콜렉션 또는 다른 리소스의 요약에 대한 오브젝트가 되기를 원한다.
- kubectl의 최상위 지원을 원한다. e.g.
Custom Controller
CR은 단지 구조만 정의된 YAML 객체일 뿐 자체적인 동작은 없지만, Custom Controller가 이를 감시하면서 사용자가 선언한 상태(spec)를 실제 상태(status)와 동기화(Reconcile)하는 로직을 수행한다.
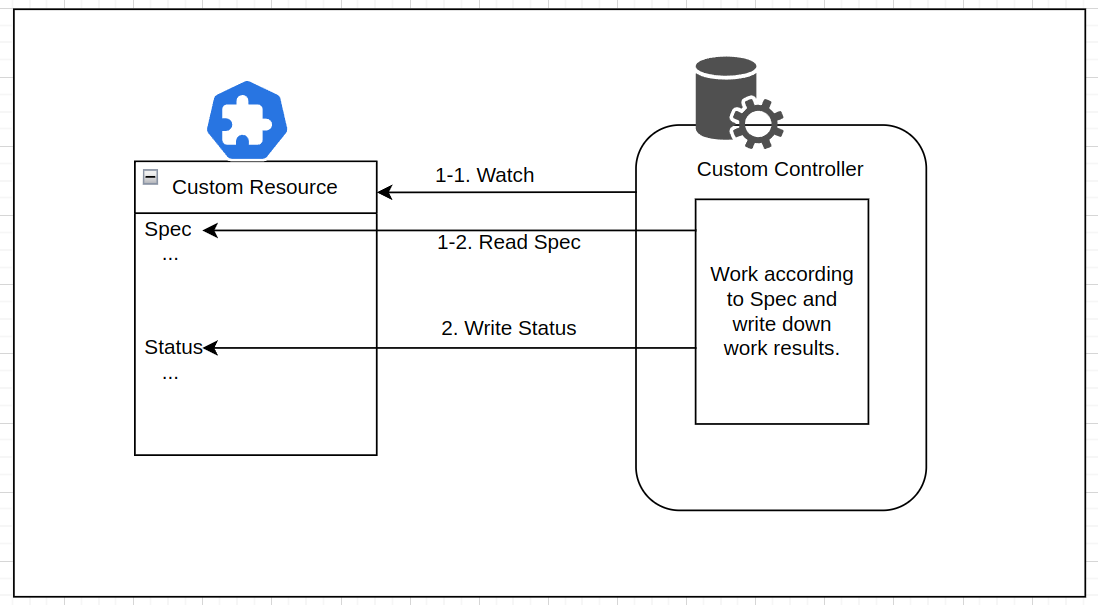
- CR과 Custom Contolelr가 결합해야 선언형 API가 된다.
- CR을 이용해서 사용자가 원하는 상태를 선언해두면 Custom Controller가 그 상태를 맞추기위해 필요한 처리를 한다.
- e.g. CoreOS’s Operator Pattern, Knative
Custom Controller 사용 예시
1. Controller 코드 작성
// HelloReconciler: Hello 리소스를 감시하고 반응하는 Reconciler 구조체
// ctx: Context 객체 (타임아웃, 취소 등 처리 가능)
// req: 어떤 네임스페이스의 어떤 이름의 리소스가 변경되었는지 정보가 담긴 요청 객체
func (r *HelloReconciler) Reconcile(ctx context.Context, req ctrl.Request) (ctrl.Result, error) {
  // example.com/v1 API 그룹에서 정의된 Hello 리소스
  var hello examplev1.Hello
  // req.NamespacedName으로 지정된 Hello 리소스를 클러스터에서 읽어옴
  // 리소스가 이미 삭제된 경우, 에러가 아니라 무시하고 종료
  if err := r.Get(ctx, req.NamespacedName, &hello); err != nil {
    return ctrl.Result{}, client.IgnoreNotFound(err)
  }

  // 사용자가 정의한 Custom Resource(Hello)의 spec.message 필드를 로그에 출력
  log.Info("Reconciling", "Message", hello.Spec.Message)
  // 원하는 상태를 클러스터에 반영
  return ctrl.Result{}, nil
}
2. Docker 이미지로 빌드
docker build -t myrepo/my-controller:v1 .
docker push myrepo/my-controller:v1
3. Deployment로 배포
apiVersion: apps/v1
kind: Deployment
metadata:
  name: hello-controller
spec:
  replicas: 1
  selector:
    matchLabels:
      app: hello-controller
  template:
    metadata:
      labels:
        app: hello-controller
    spec:
      containers:
        - name: controller
          image: myrepo/hello-controller:v1
kubectl apply -f hello-deployment.yaml이 조합은 도메인 지식을 포함한 고급 자동화가 가능한 Operator Pattern으로 이어진다.
조금 더 퀄리티 있는 Custom Resource 예제는 이 포스트를 참고하자. 쿠버네티스 커스텀 리소스 정의하고 관리하기 (feat. 컨트롤러)