HTTP
- HTTP: 클라이언트와 서버 사이에 이루어지는 요청/응답 프로토콜
- HTML 문서를 주고 받는데 쓰인다.
- 웹서버는 모두 HTTP 대몬을 가지고 있는데, 이 프로그램은 HTTP 요청을 기다리고 있다가 요청이 들어오면 그 것을 처리하도록 설계되어 있다.
- 대표적인 웹서버는 윈도우즈의
IIS, 리눅스의Apache - 보통 웹서버는 독자적으로 동작하지 않고 데이터베이스와 PHP가 묶여서 같이 사용된다.
부르기 쉽게 APM이라고 부른다.
요즘은 LAMP(Linux + Apache + Mysql/mariadb +phpper,python) 환경이라고 부르기도한다. - 아파치(apache)는 웹서버 자체로서 일반적인 프로토콜인 http 프로토콜을 사용한다. 또한 http ,ftp 등도 지원한다. mysql, maridb는 데이터베이스 엔진으로 각족 게시판이나 데이터 베이스를 사용해야할때 많이 사용되는 프로그램
- php는 스크립트 언어. 웹 페이지를 구성할수 있는 언어 중 하나. 많은 웹프로그램들이 php로 쓰인다.
apache2
apache 설치
$ sudo apt update
$ sudo apt install apache2
apache 확인
- apache 대몬 확인
$ sudo systemctl status apache2
- apache2 버전 확인

apache 제어
- 시작
$ sudo systemctl start apache2- 종료
$ sudo systemctl stop apache2- 부팅 시 자동 시작
$ sudo systemctl enable apache2port 확인
$ sudo netstat -ntlp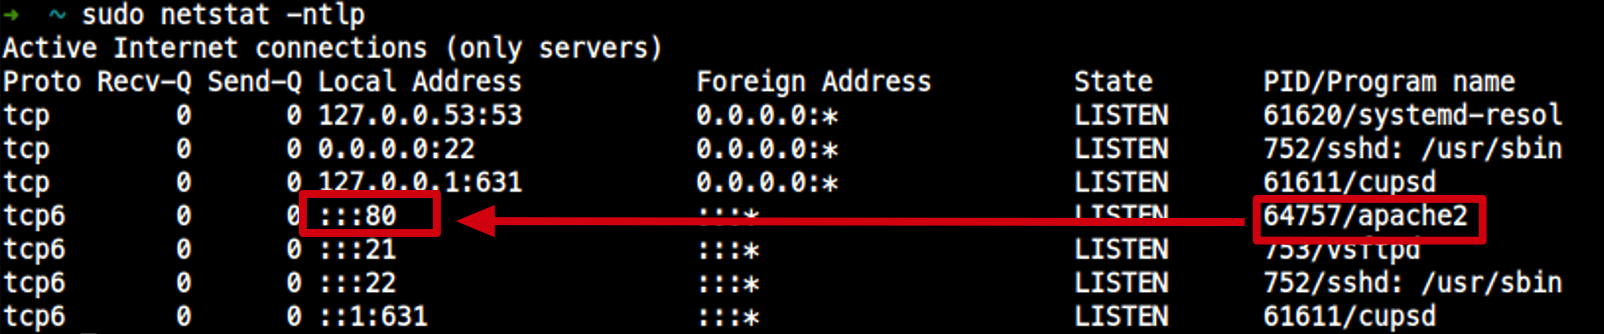 apache2는 port 80 사용
- 아파치는 내부에서
:::80이므로 어떠한 IP:80으로 들어가기만 하면된다.
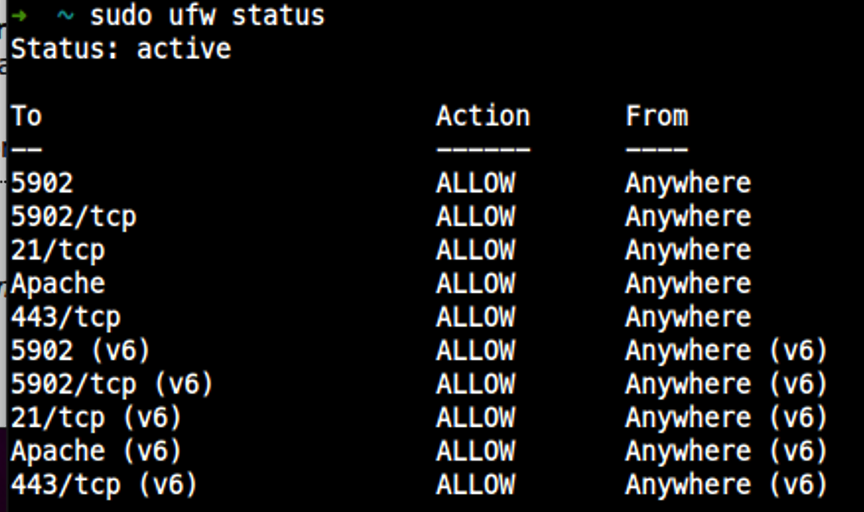
ufw 허용
- ufw 방화벽에 'apache' 허용하자
$ sudo ufw allow apache
- ufw 방화벽에 'https'도 허용하자.

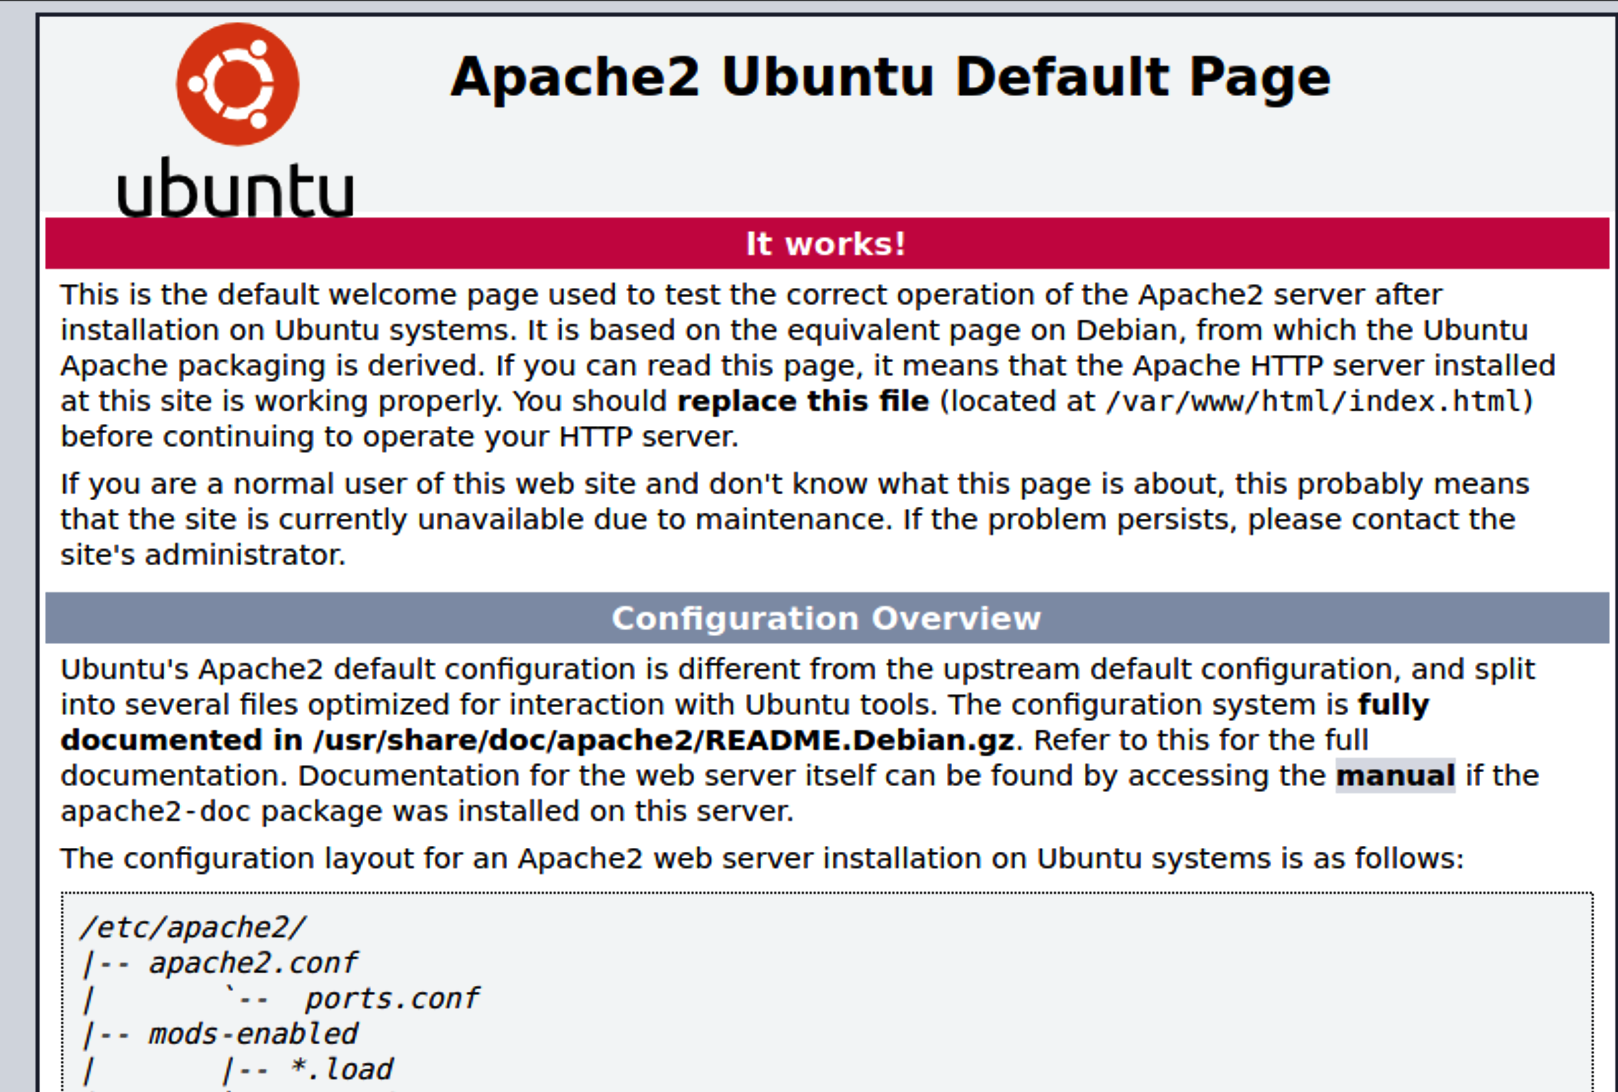
Apache2 Ubuntu Default Page
본인 컴퓨터 IP의 경우는 아래와 같음
1. 10.211.55.15:80 (NAT)
2. 10.37.129.6:80 (Host-only)
3. localhost:80
Apache 설정 파일들
| Configure File | Description |
|---|---|
/etc/apache2 | 설정파일 디렉토리로서 모든 설정 파일들 저장 |
/etc/apache2/apache2.conf | 기본 설정 파일 |
/etc/apache2/conf.d | 문자 셋, 보안 등에 관련된 기본 설정 파일들 |
/etc/apache2/envvars | apache2ctl의 기본 환경 변수 지정Apache의 실행 유저 및 그룹들 지정 |
/etc/apache2/magic | 파일의 시작 값 (magic number) 데이터 베이스 이 값을 기반으로 전송하는 파일의 MIME Type을 결정 |
/etc/apache2/mods-available | Apache에서 사용가능한 모듈들이 저장되어 있음 |
/etc/apache2/mods-available/userdir.conf | 유저 관련 설정 |
/etc/apache2/mods-enabled | 위의 사용 가능한 모듈 중에서 실제로 사용할 모듈을 심볼릭 링크로 연결하는 파일을 저장하는 디렉토리 즉, 사용가능한 모듈이라고 하더라도 이 디렉토리에서 링크로 연결해 주어야 실제로 사용 가능 |
/etc/apache2/ports.conf | Apache 서버의 서비스 포트 (http, https) 설정과 가상 호스트의 포트들 설정 |
/etc/apache2/sites-available | 서버에서 운영할 가상호스트들의 설정파일들이 있는 디렉토리 |
/etc/apache2/sites-enabled | 서버에서 운영할 가상 호스트들 중에 실제 운영할 사이트들을 심볼릭 링크로 연결하는 파일을 저장하는 디렉토리 |
apache2.conf
/etc/apache2/apache2.conf
# ==== /etc/apache2/apache2.conf ==== #
# This is the main Apache server configuration file...(중략)
ServerRoot "/etc/apache2"
Timeout 300 # 1)
User ${APACHE_RUN_USER}   # 2)
Group ${APACHE_RUN_GROUP} # 3)
1) Timeout 300: 클라이언트에서 서버로 접속할 때, 클라이언트나 서버의 통신 장애로 인해 300 sec 동안 클라이언트에서 완벽한 처리를 못하면, 클라이언트와의 연결을 해제시킬 수 있도록, 타임아웃을 수신하고 보내기까지 시간 sec로 설정
2) User, Group: 보안을 위해 메인 아파치 웹 서버는 root가 되지만, 이 root가 생성하는 서버들은 여기에서 지정한 사용자의 권한을 갖게 된다.
웹 서버 디렉토리
- 기본:
/var/www/html- 여기서 테스트 HTML을 만들어본다.
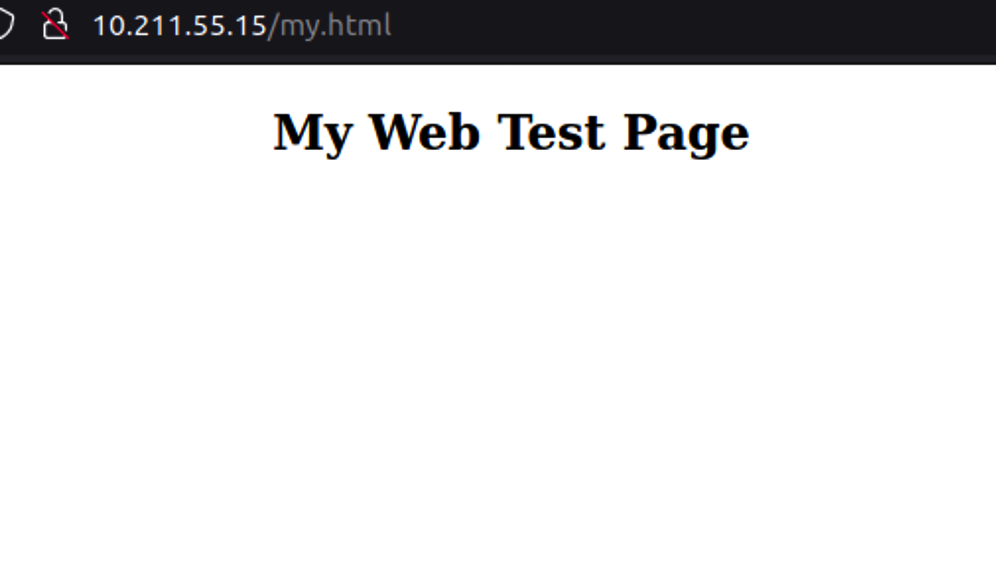
$ sudo vim /var/www/html/my.html
===== /var/www/html/my.html =====
<html>
  <head>
    <title> My Web Test Page </title>
  </head>
  <body>
    <center>
      <h2>My Web Test Page</h2>
    </center>
  </body>
</html>10.211.55.15/my.html로 접속하면 테스트 html 페이지 출력
사용자 디렉토리 허용
1. 관련 설정 파일 수정
- 유저 관련 설정은
/etc/apache2/mods-available/userdir.conf파일- 사용자 디렉토리 허용 하려면, userdir.conf 파일을 열어서 수정해야한다.
# ===== /etc/apache2/mods-available/userdir.conf ===== #
...중략...
<IfModule mod_userdir.c>
    UserDir public_html
    #UserDir disabled root <-- 이 부분 주석처리 하면, 사용자 디렉토리 허용
    ...중략...
</IfModule>
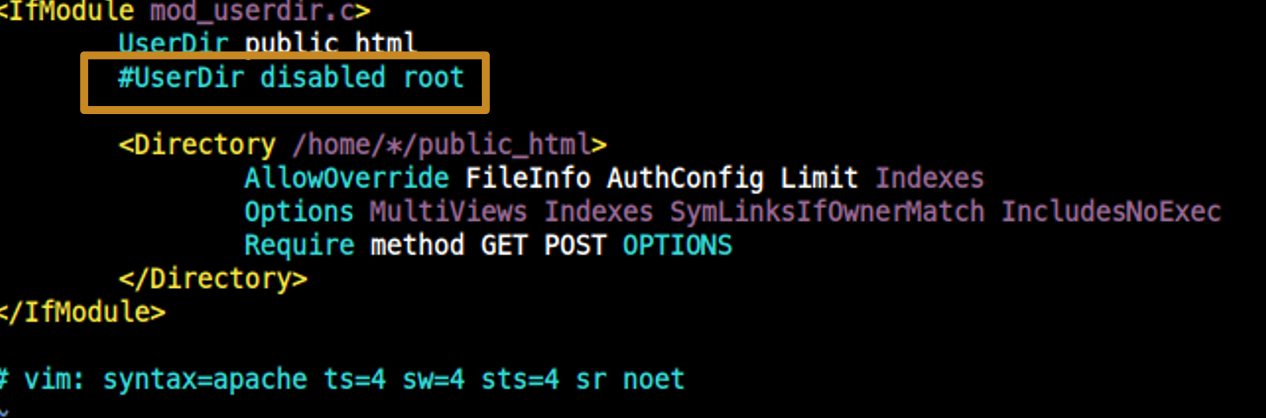
- 아래에
<Directory /home/*/public_html>설정이 있어, 사용자home에서public_html이란 디렉토리에서 사용자 디렉토리 및 html 관리할 수 있다.
2. mods-enabled에 symlink 적용
mods-available에서 관련 모듈을 수정해도mods-enabled에 symlink로 연결되어야 실제 적용된다.
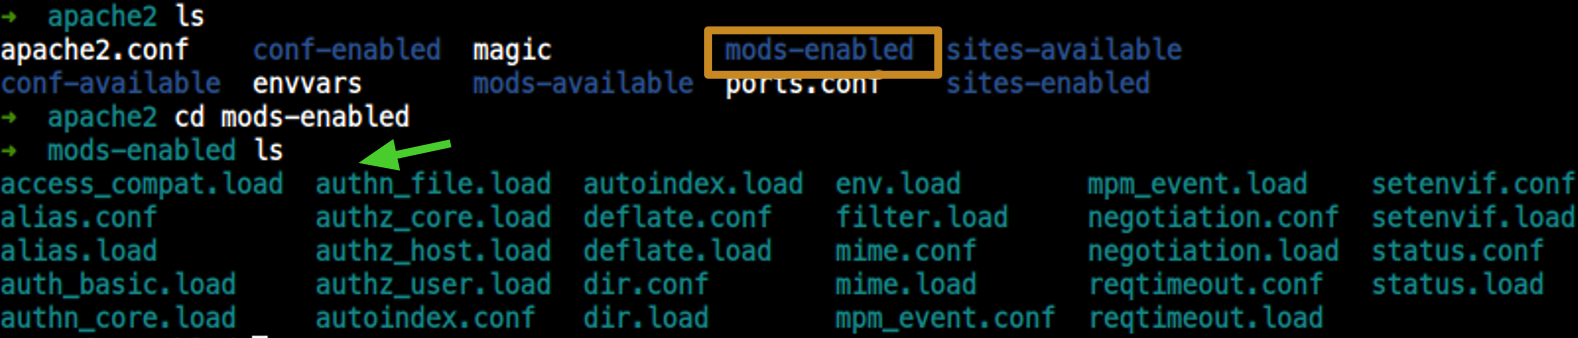
여기서 심볼릭 링크 만들어야함
-
1)
$ sudo ln -s ../mods-available/userdir.conf userdir.conf

-
2)
$ sudo ln -s ../mods-available/userdir.load userdir.load.conf,.load둘다 있어야함
-
3) apache 대몬 restart
$ sudo systemctl restart apache2사용자 디렉토리 이용하기
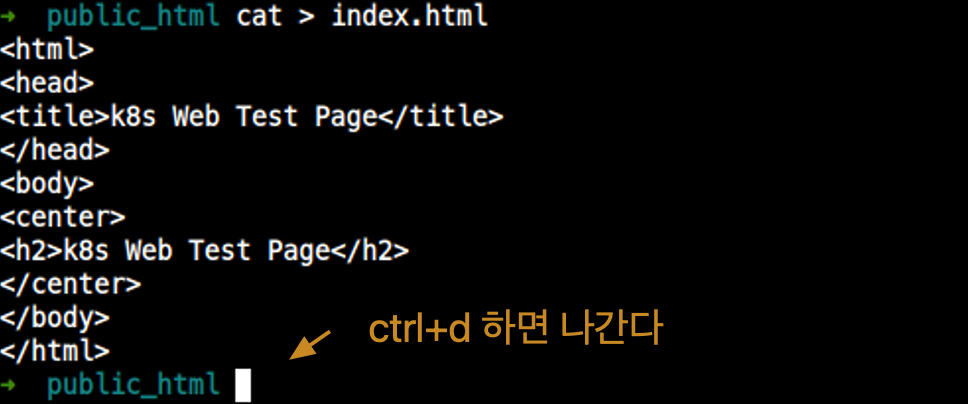
/etc/apache2/mods-available/userdir.conf에서<Directory /home/*/public_html>내용 대로
$HOME에 Apache용 디렉토리 생성한다.
$ mkdir ~/public_html- 여기에 연습용 html을 하나 만들어본다.
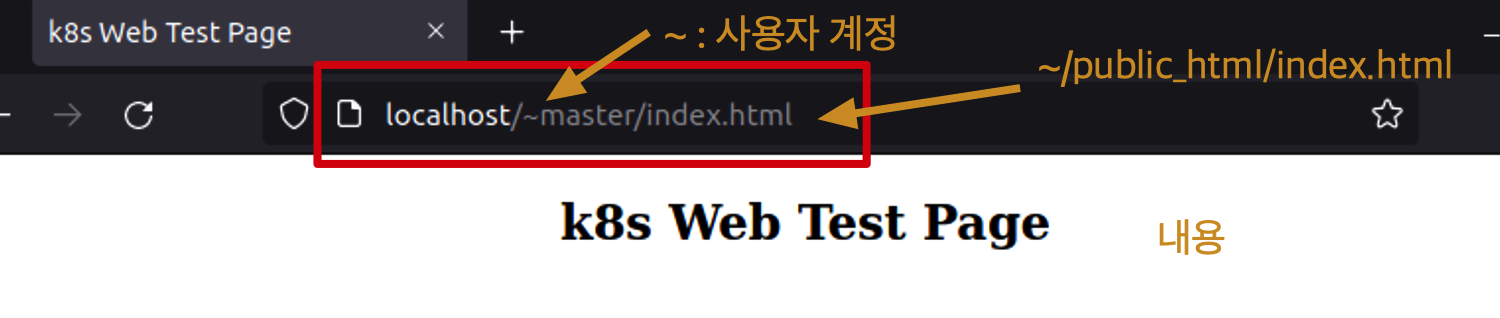
사용자 디렉토리 HTML 접근
IP/~<사용자계정>/<'HTML File name' in /home/$USER/public_html>로 접속한다.
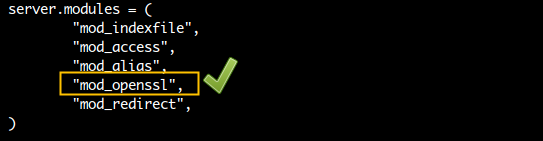
lighttpd
- 간단한 web server
lighttpd 설치
$ sudo apt install lighttpdconf 파일
/etc/lighttpd/lighttpd.confwebserver 대상 디렉토리 생성
$ sudo chmod 777 /var/www$ ln -s <ipk_dir> /var/www/myipkserverVirtual Hosting
- Virtual Hosting is an implementation ofo hosting multiple domains on single server
- 아래의 패키지들을 설치한다.
$ sudo apt update
$ sudo apt install lighttpd lighttpd-mod-vhostdb-pgsql lighttpd-modules-mysql lighttpd-modules-ldap- 디렉토리 생성
2.1./sites/vhosts/www.jksonar.net
2.2./sites/vhosts/www.jksonar.com
$ mkdir -p /sites/vhosts/www.jksonar.net
$ mkdir -p /sites/vhosts/www.jksonar.com/sites이하의 user:group 소유권을www-data:www-data로 변경$ chown -R www-data:www-data /sites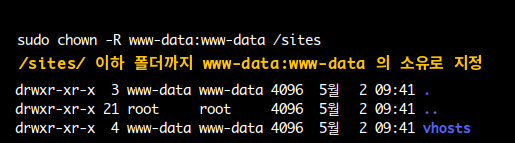
- 간단
html작성
- 일반 유저는 현재 소유권이 없기 때문에
root권한으로 작성한다.
1. root 로그인
$ sudo su
root# vi /sites/vhosts/www.jksonar.comindex.html작성
<h1> hello </h1>root# lighttpd -t -f /etc/lighttpd/lighttpd.conf
Syntax OK
root# systemctl restart lighttpdssl
/etc/lighttpd디렉토리로 간다.ssl디렉토리 생성
root# mkdir /etc/lighttpd/sslssl명령어 입력
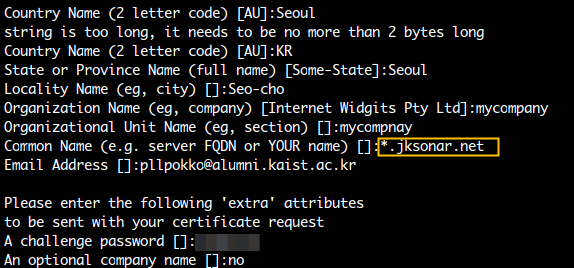
root:/etc/lighttpd/ssl # openssl req -new -newkey rsa:4096 -nodes -keyout jksonar.com.key \
-out jksonar.com.csr
jksonar.com.key,jksonar.com.scr생성확인

- 키에 대해 설정
root:/etc/lighttpd/ssl # openssl x509 -req -days 365 -in jksonar.com.csr -signkey jksonar.com.key -out jksonar.com.crt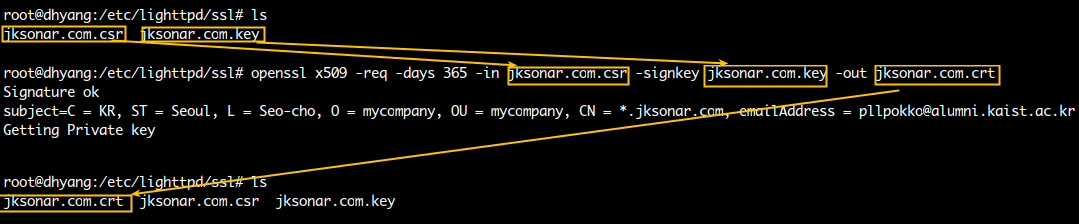
jksonar.com.crt 생성 확인
jksonar.com.csr내용 (Certificate Request)
jksonar.com.key내용 (Private key)
jksonar.com.crt내용 (Certificate)
cat jksonar.com.key jksonar.com.crt > jksonar.com.pem
root:/etc/lighttpd/ssl # cat jksonar.com.key jksonar.com.crt > jksonar.com.pemjksonar.com.pem내용:key(private) +crt(cert)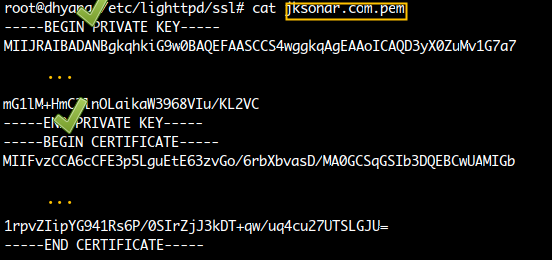
.net에 대한 openssl
ssl명령어 입력
root:/etc/lighttpd/ssl # openssl req -new -newkey rsa:4096 -nodes -keyout jksonar.net.key -out jksonar.net.csr
root:/etc/lighttpd/ssl # openssl x509 -req -days 365 -in jksonar.net.csr -signkey jksonar.net.key -out jksonar.net.crt
root:/etc/lighttpd/ssl # cat jksonar.net.key jksonar.net.crt > jksonar.net.pem

lighttpd 설정
/etc/lighttpd/lighttpd.conf
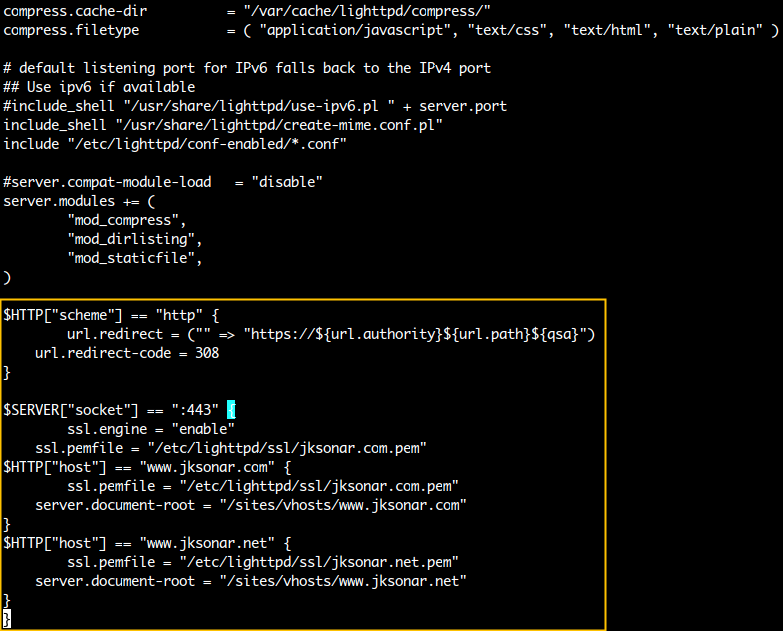
$HTTP["scheme"] == "http" {
	url.redirect = ("" => "https://${url.authority}${url.path}${qsa}")
    url.redirect-code = 308
}

$SERVER["socket"] == ":443" {
	ssl.engine = "enable"
    ssl.pemfile = "/etc/lighttpd/ssl/jksonar.com.pem"
$HTTP["host"] == "www.jksonar.com" {
	ssl.pemfile = "/etc/lighttpd/ssl/jksonar.com.pem"
    server.document-root = "/sites/vhosts/www.jksonar.com"
}
$HTTP["host"] == "www.jksonar.net" {
	ssl.pemfile = "/etc/lighttpd/ssl/jksonar.net.pem"
    server.document-root = "/sites/vhosts/www.jksonar.net"
}
} lighttpdSyntax Check
root # lighttpd -t -f /etc/lighttpd/lighttpd.conf
Syntax OKrestartlighttpddaemon
root # systemctl restart lighttpd/etc/hosts
127.0.0.1 localhost
192.168.0.60 www.jksonar.net
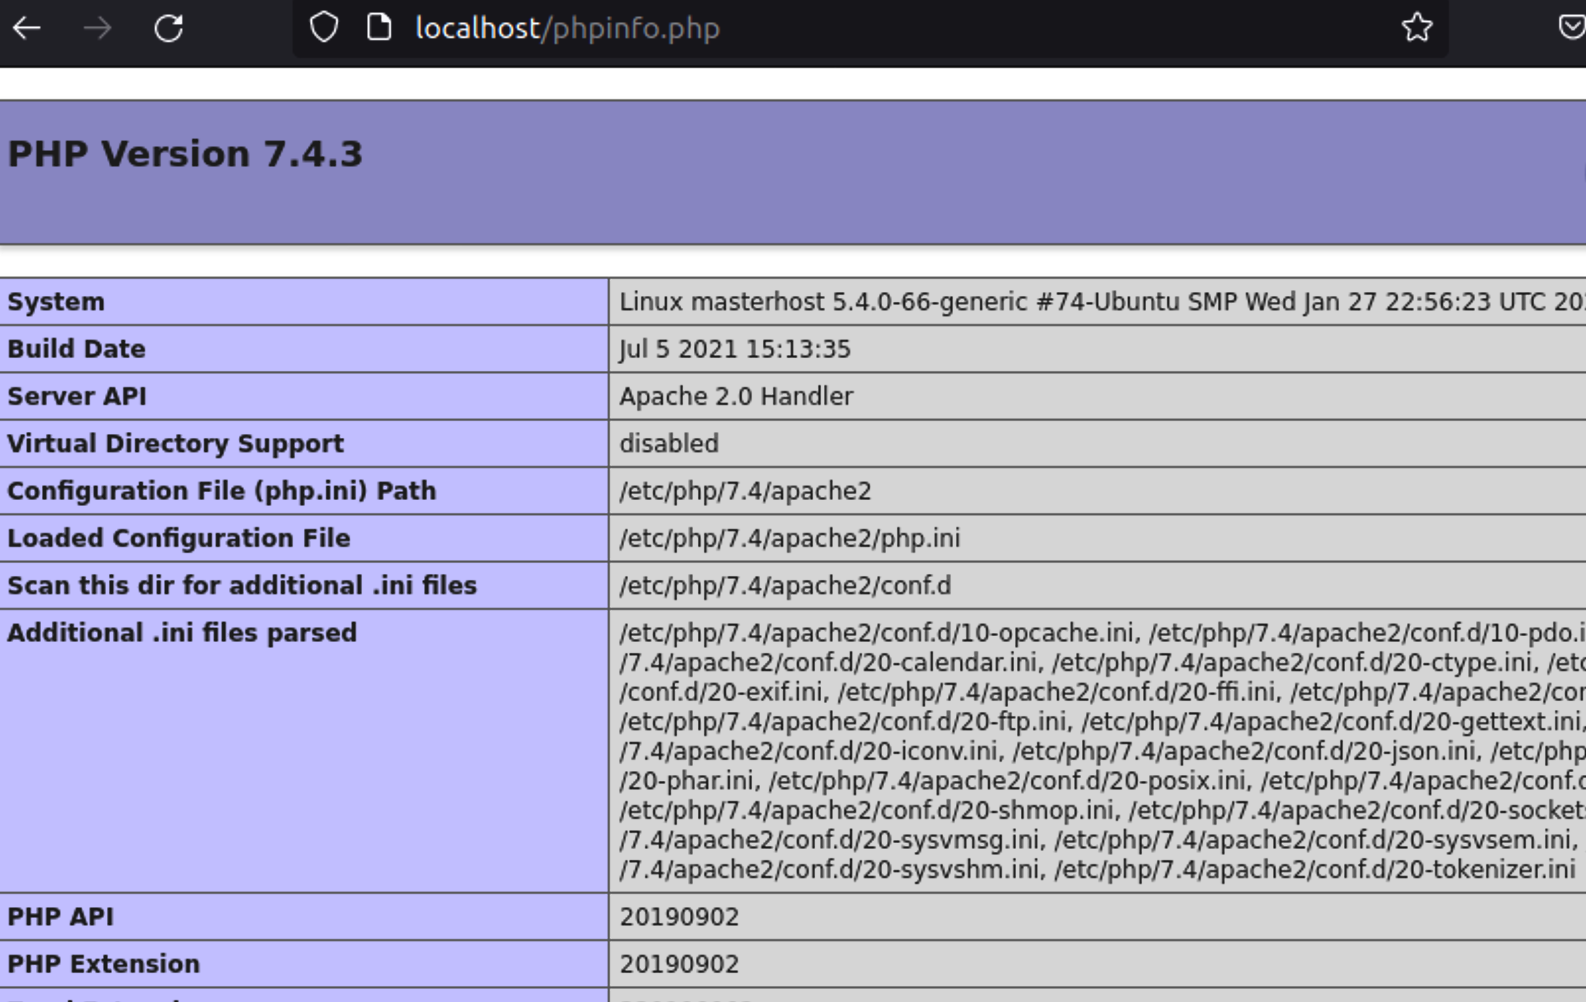
192.168.0.60 www.jksonar.comPHP
- php 설치
$ sudo apt install php- 위 Apache에서 사용자 디렉터리에서 php 파일 하나를 만들어 본다.
$ vim ~/public_html/phpinfo.php- 간단한 php 파일을 작성한다.
# ==== ~/public_html/phpinfo.php ==== #
<?php
phpinfo();
?>
IP/<'php name' in /home/$USER/public_html>로 접속한다.
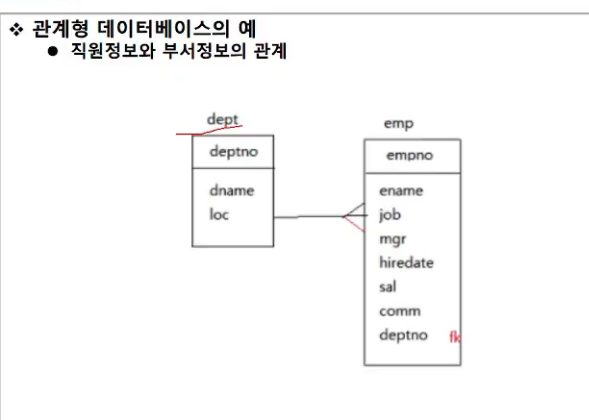
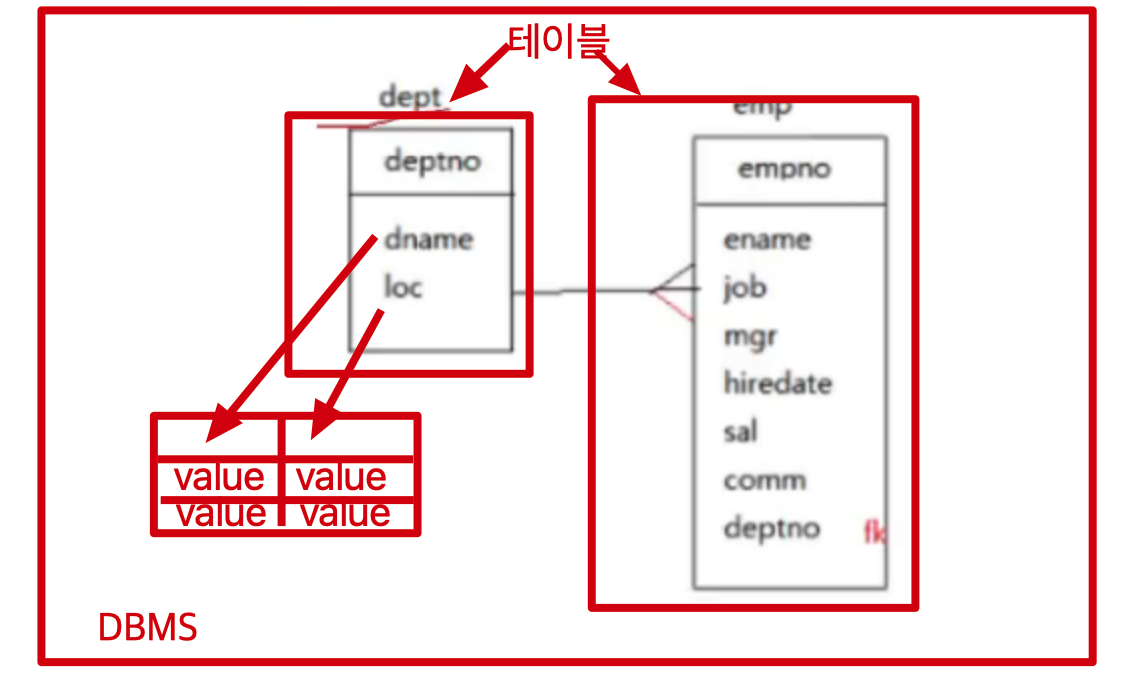
RDBMS
- 관계형 데이터베이스의 기본 개념
- DB: 서로 관련성을 가진 데이터들을 데이터 간의 중복성을 최소화해서 체계적으로 모아 놓은 것
- 관계형 DB는 데이터를 테이블로 표현
- 관계형 DB관련 용어
- 데이터: 각 항목에 저장되는 값
- 테이블: 데이터를 체계화하여 행과 열의 형태로 구성한 것. 테이블 이름을 붙인다.
- DB: 관련 있는 데이터를 체계적으로 저장한 것
- 데이터 -> 테이블 형태로 저장
- DB엔 여러 테이블 존재 가능
- 필드: Column
- 레코드: 한 Low의 정보. tuple이라고도 한다. 한 레코드에는 여러 필드 값이 저장된다.
- 키: 레코드를 구성하는 필드에서 각 레코드를 구분할 수 있는 필드 값
- 키로 선택된 필드의 값은 중복될 수 없다.
- Primary key, other keys로 나뉜다.
- 그냥 value로 알자.
- DB의 예
sql 언어로 다룸
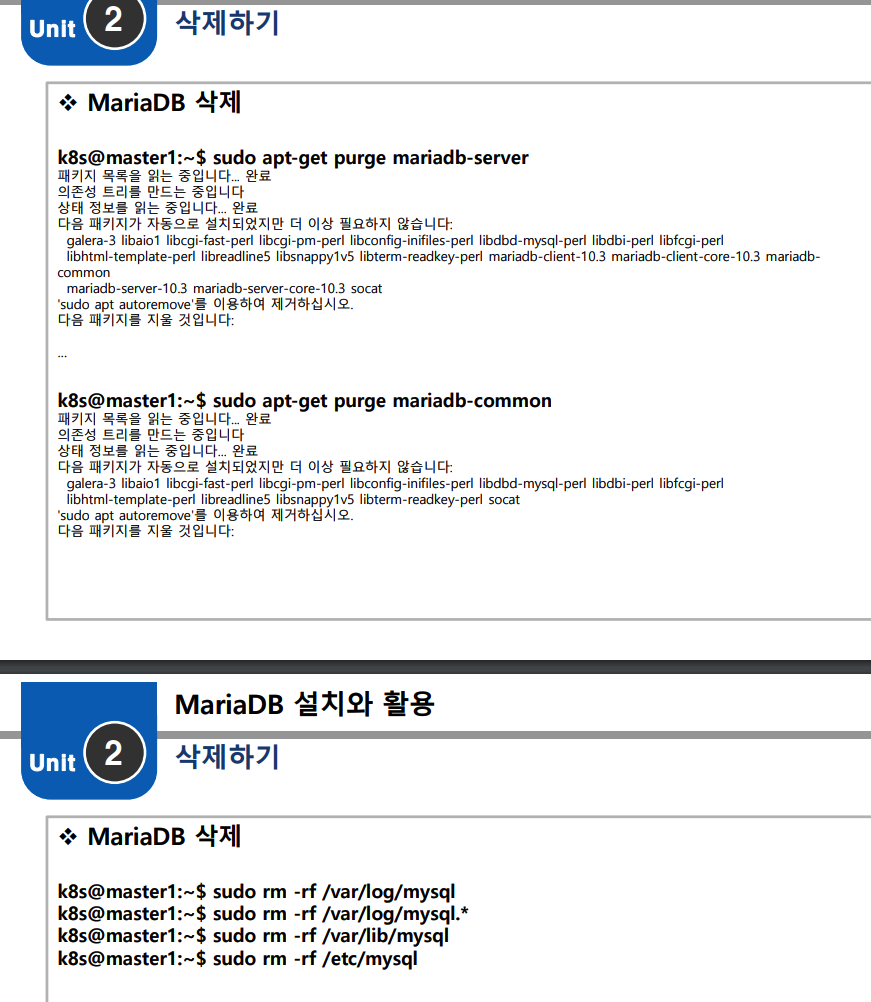
MariaDB 설치
https://mariadb.org/download/ 에서 맞는 버전 받기
sudo apt-get install software-properties-common dirmngr apt-transport-https
sudo apt-key adv --fetch-keys 'https://mariadb.org/mariadb_release_signing_key.asc'
sudo add-apt-repository 'deb [arch=amd64,arm64,ppc64el] https://mirror.yongbok.net/mariadb/repo/10.5/ubuntu focal main'
$ sudo apt update
$ sudo apt install mariadb-server

# client도 설치하려면,
$ sudo apt install mariadb-client
방화벽 오픈
reboot 시에도 되게 daemon enable
$ sudo systemctl enable mysql-> mariaDB server 구동 중!
MariaDB 유저 설정
초기 root user 설정
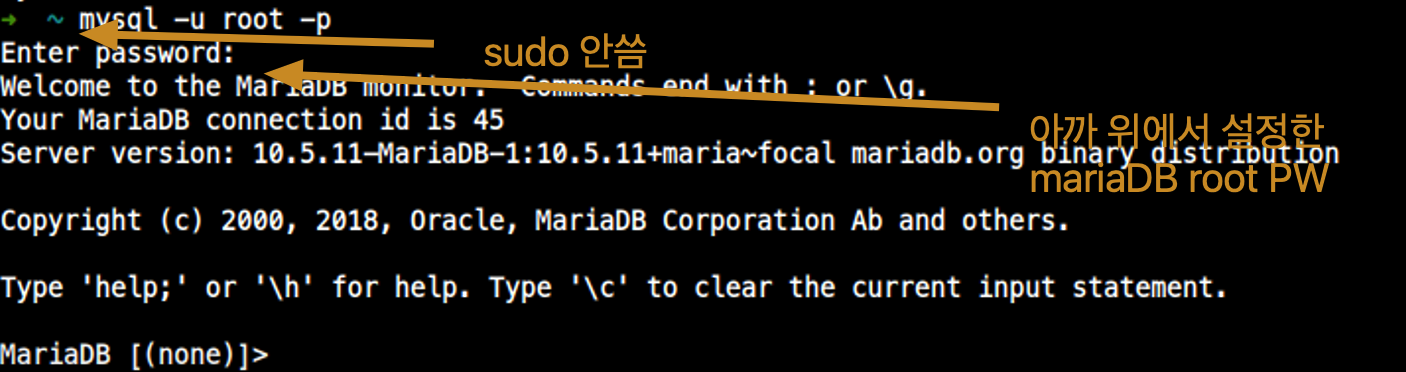
sudo mysql -u root -p: 처음에 우선 sudo 로 mysql 명령어를 이용해 mariadb를 사용한다.
1-1.-u root: root 유저로 로그인한다.
1-2.-p: password를 사용한다.
 접속
접속
- 아래
root유저의password설정을 마치면,sudo를 쓰지 않아도 된다.
2-1.password설정 후,sudo없이 MariaDB를 사용하는 모습
password 설정
- >
set password for 'user'@'hostname'=PASSWORD('set your password');

본인의 경우 MariaDBrootuser의localhost에서의 접근에서 password를mariadb로 set
- >
flush privileges;

user 생성
- >
create user 'username'@'hostname' identified by 'new-pass-word';

hostname에서%는 그 IP class에서 anynum-okidentified by에서 새로 만들 Password 적용
user 삭제
- >
drop user 'user'@'hostname';
권한 부여
-
>
grant all privileges on *.* to 'user'@'hostname';

-
>
flush privileges;
권한 제거
- >
revoke all on *.* from 'user'@'hostname';
현재 데이터 베이스 보기
- >
show databases;
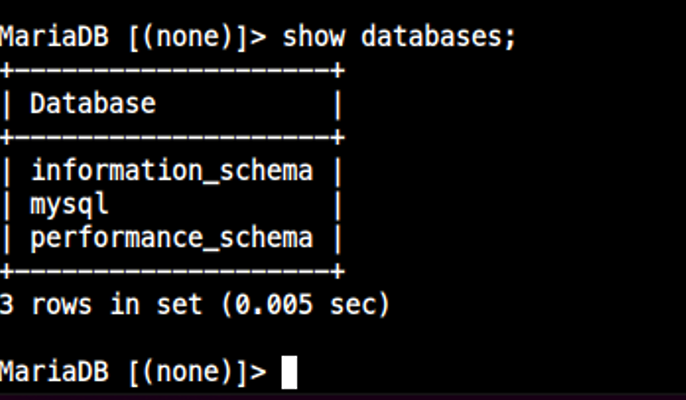
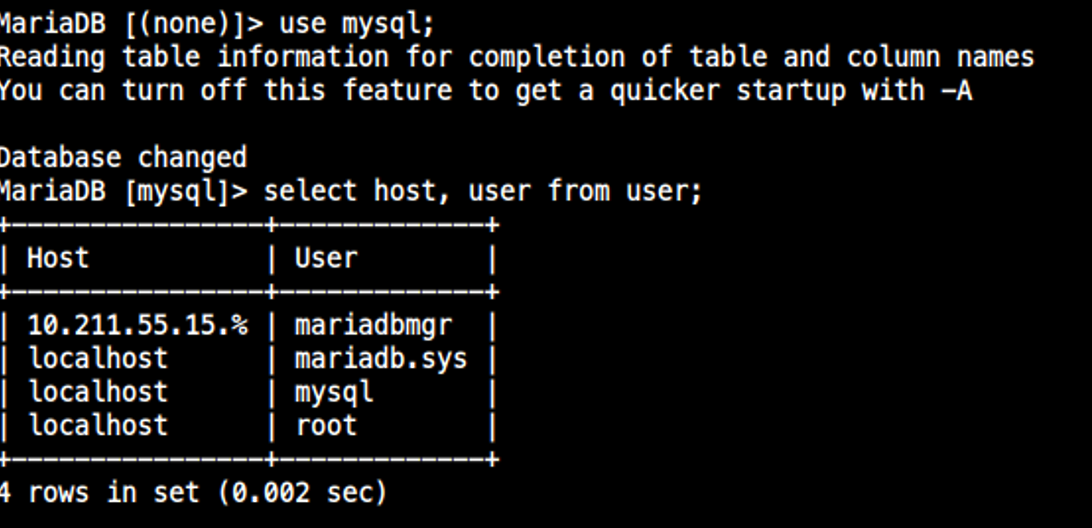
User, Host 보기
- >
use mysql; - >
select host, user from user;
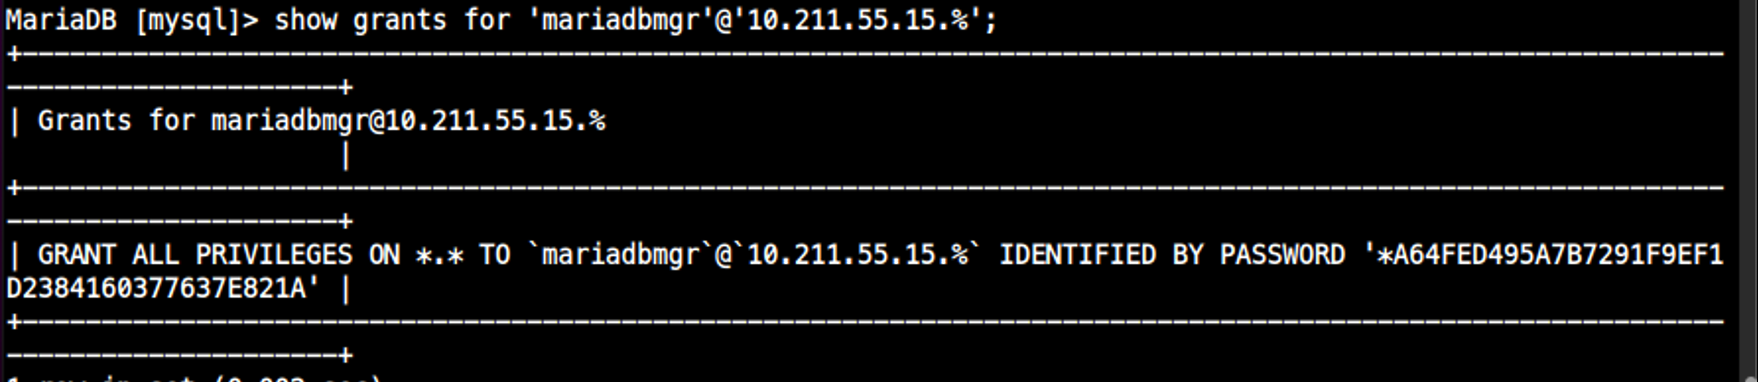
User 권한 보기
- >
use mysql; - >
show grants for 'user'@'hostname';
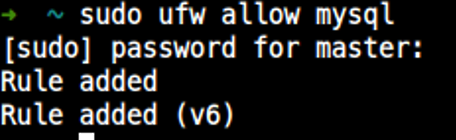
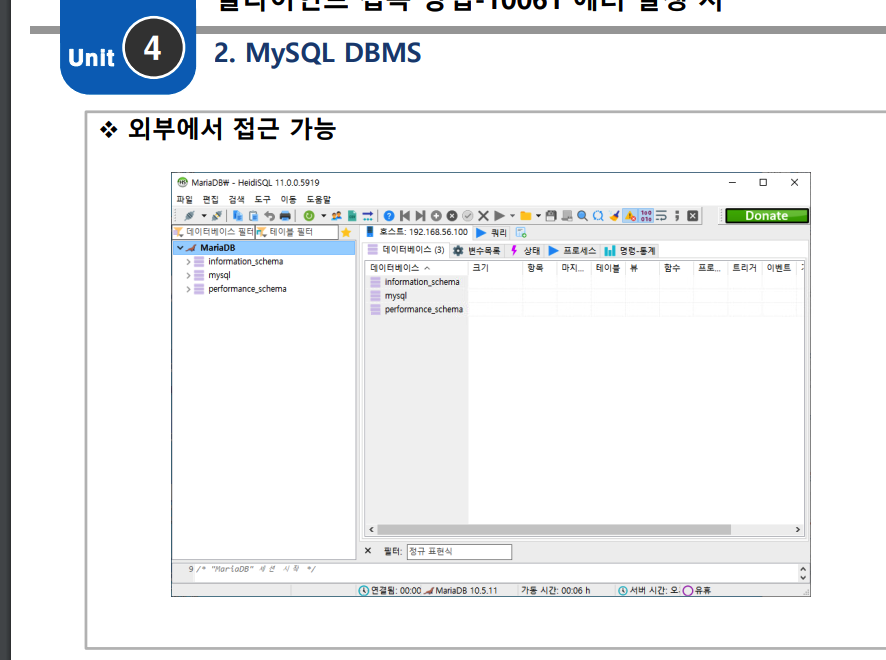
원격 접속 허용
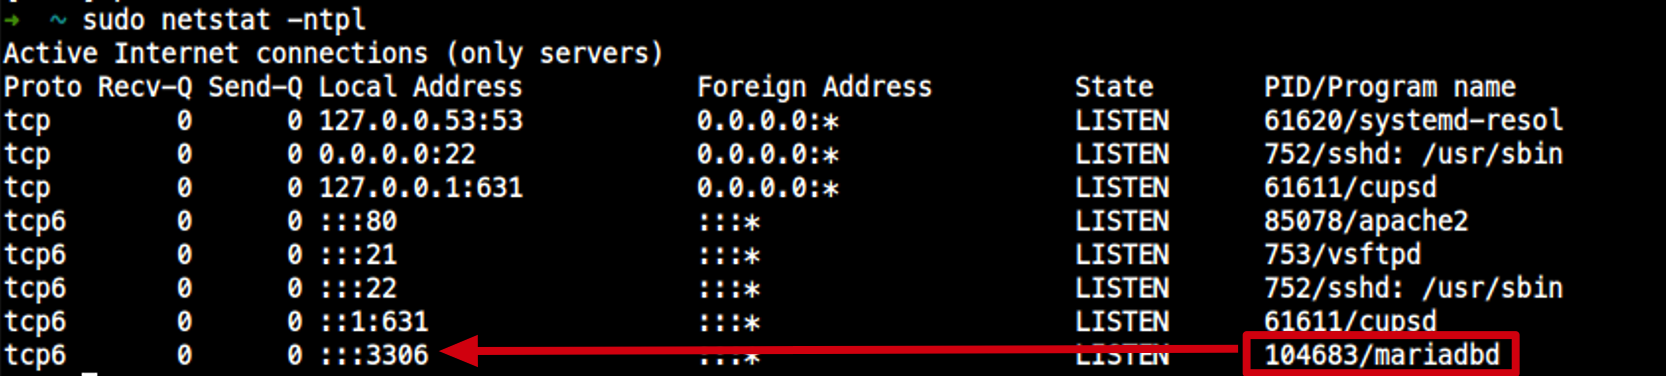
MariaDB(mysql)는 port 3306을 사용한다.
1. 우선 방화벽 체크에서 3306 port가 허용인지 확인

$ sudo netstat -ntlp
$ sudo netstat -ntlp
Active Internet connections (only servers)
Proto Recv-Q Send-Q Local Address           Foreign Address         State       PID/Program name
tcp        0      0 127.0.0.53:53           0.0.0.0:*               LISTEN      557/systemd-resolve
tcp        0      0 0.0.0.0:22              0.0.0.0:*               LISTEN      706/sshd: /usr/sbin
tcp        0      0 127.0.0.1:631           0.0.0.0:*               LISTEN      614/cupsd
tcp        0      0 127.0.0.1:3306          0.0.0.0:*               LISTEN      6821/mariadbd
tcp6       0      0 :::80                   :::*                    LISTEN      861/apache2
tcp6       0      0 :::21                   :::*                    LISTEN      700/vsftpd
tcp6       0      0 :::22                   :::*                    LISTEN      706/sshd: /usr/sbin
tcp6 0 0 ::1:631 :::* LISTEN 614/cupsd mariadb의 내부 개방 port가 127.0.0.1:3306 이라면, 외부에서 0.0.0.0:*이라도
내부 localhost:3306만 허용해서 외부 원격 접속을 할 수 없다.
현재 127.0.0.1:3306 이므로, 설정파일을 고쳐야한다.
2-1. mysql 설정은 /etc/mysql/my.cnf에서 담당한다.
- 최근에는 내부에
!include dir에 있는 경로에서 뽑아 쓴다.
- 그렇다면
/etc/mysql/mariadb.conf.d/50-server.cnf에서 설정파일을 변경해야한다.- 이 파일에서
skip-networking이 활성화 되어 있으면 오직sock파일로만 통신한다. - 이 파일에서
bind-address는 대몬에 접근할 수 있는 IP 대역을 지시한다.- 공식 문서에는 원격 접속을 허용하려면,
bind-address를 주석처리 하라고 되있는데, 테스트 결과bind-address가 해제되어 있으면, 원격 접근을 거부한다.#skip-networkingbind-address는 아래와 같이0.0.0.0으로 설정한다.
- 공식 문서에는 원격 접속을 허용하려면,
- 이 파일에서
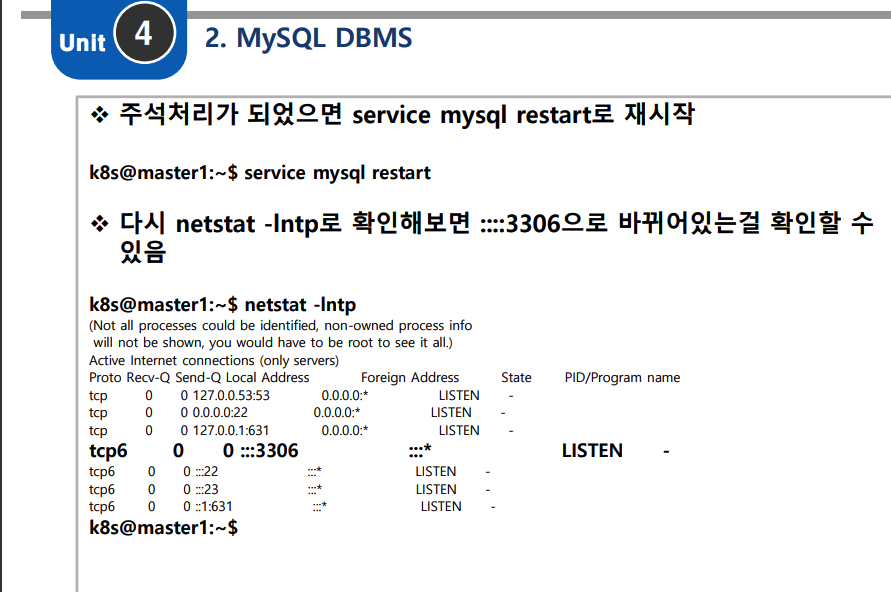
2-2. mysql 대몬을 restart!
$ sudo systemctl restart mysql2-3. sudo netstat -ntlp를 해보니 내부포트가 개방되어 있다.

MariaDB Client
'$ sudo mysql -u root -p' , Enter system root password
'> set password for root@'localhost'=PASSWORD('set your password to use mariadb as root');'
'> flush privileges;'
Then, You can access mariadb without 'sudo'
-
Create client-user and hostname
'$ mysql -u root -p', Enter root password as mariadb 'root'user
'>create user 'master02'@'10.%.%.%' identified by 'password for master02';
'>grant all privileges on . to 'master02'@'10.%.%.%';
'>flush privileges;' -
Check your databases and host&user
'> show databases;'
'> use mysql;'
'> select host, user from user;'
그냥 똑같이 설치하고 아래 명령실행
$ mysql --host=10.37.129.6 --user=master02'@'10.37.129.7' -p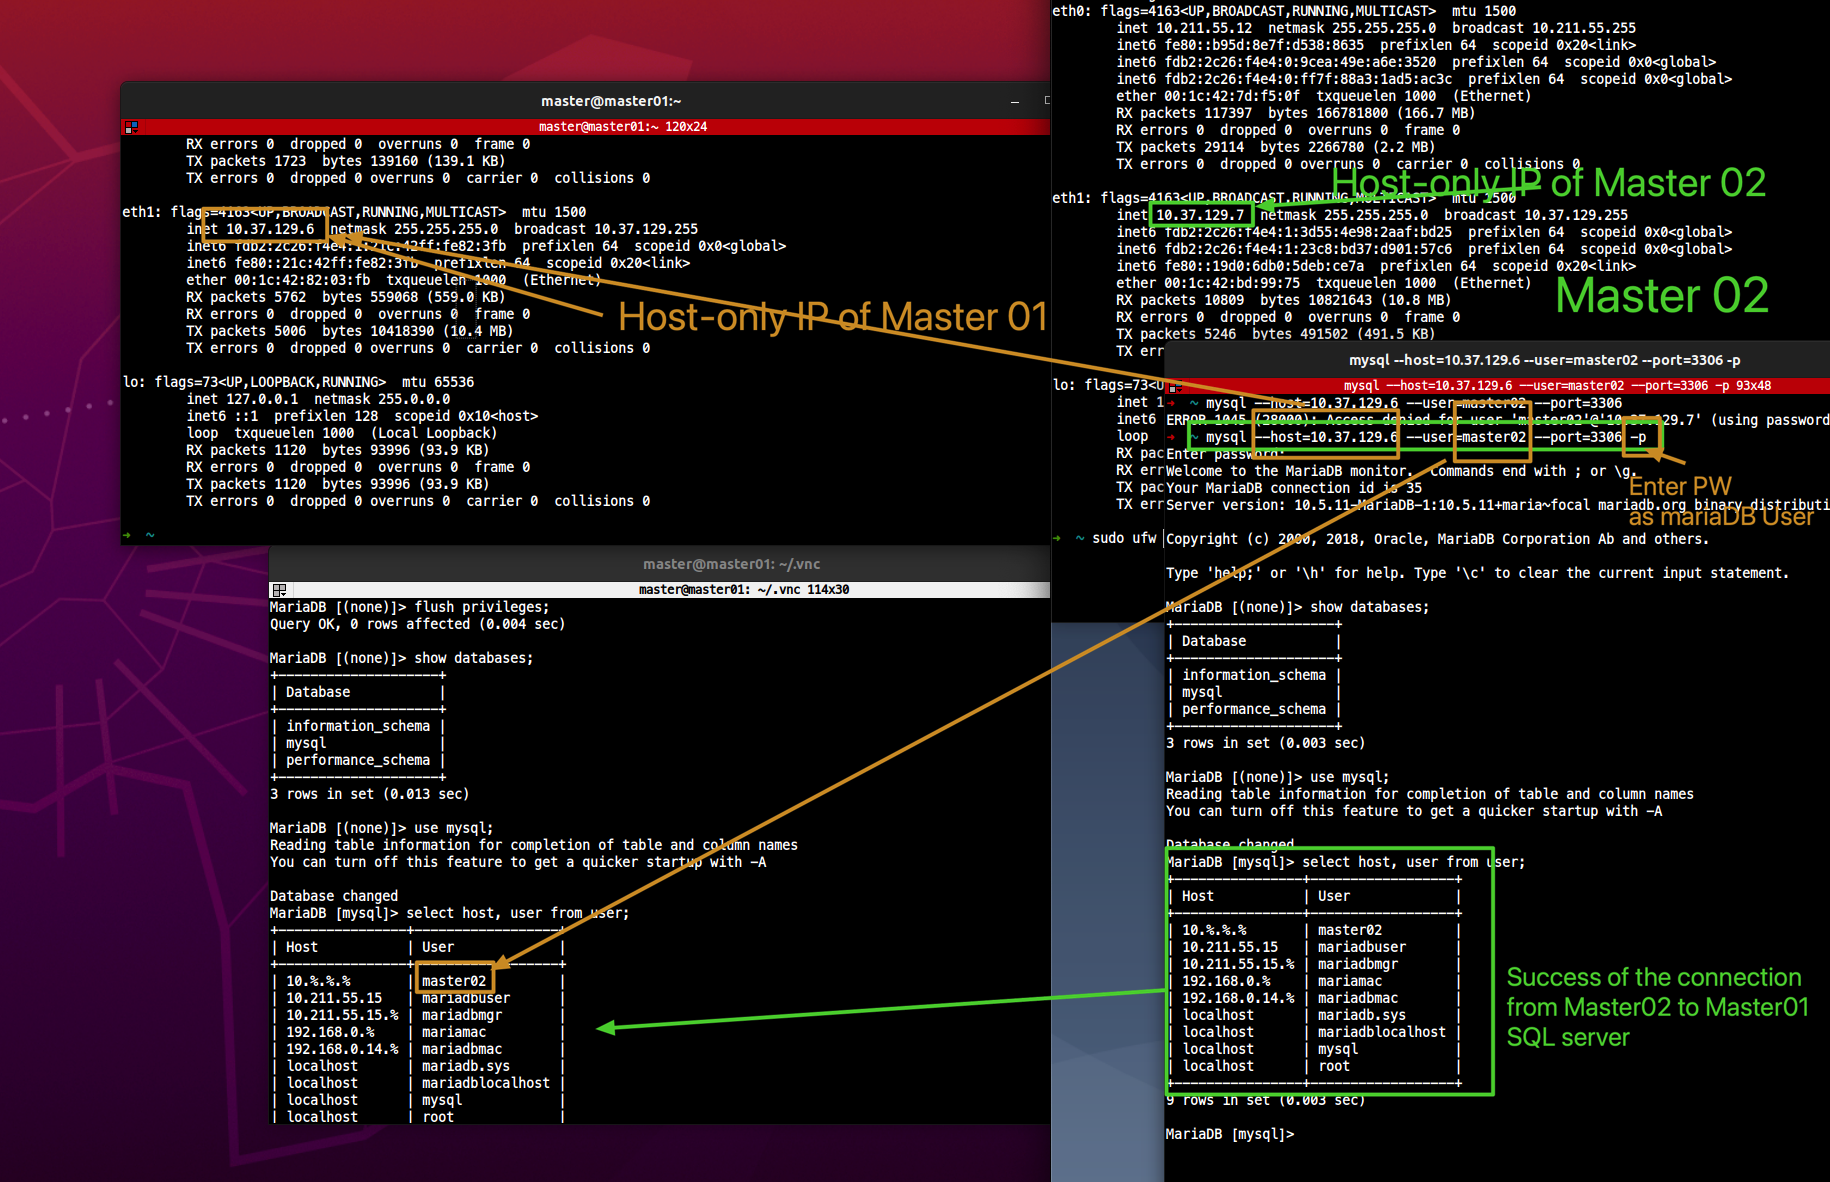
설치
$ sudo apt install mariadb-client
skip-networking 이 지시가 활성화 되면, 오로지 sock 파일로만 통신을 합니다.
bind-address 는 데몬에 접근을 할 수 있는 IP 대역대를 지시합니다.
설정 파일 찾기
데몬의 설정 파일을 찾아 위에 언급했던 두가지 요소 중, skip-networking 을 해제하고 bind-address 에 전체 IP에서 접근하도록 허용하도록 해야합니다.
공식 문서에서는 bind-address 를 주석 처리하라고 하였는데, 제가 테스트 해본 결과는 bind-address 가 해제되어 있으면, 원격 접근을 거부합니다.
-
출처: https://gafani.tistory.com/entry/MariaDBMySQL-원격에서-접근이-가능하도록-설정하기 [Sanctuary]

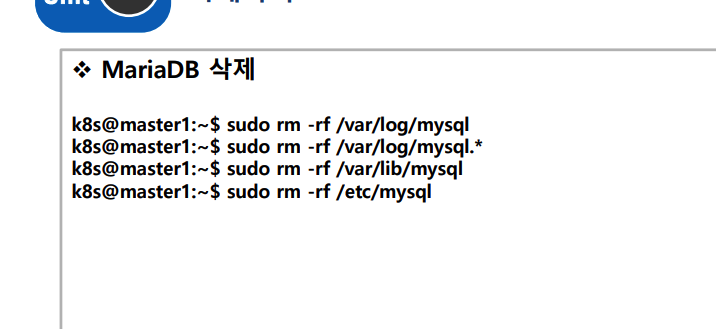


/etc/mysql/conf.d/
/etc/mysql/mariadb.conf.d/ 에 있다!

sudo vim /etc/mysql/mariadb.conf.d/50-server.conf