
서버 정보
- 서버 사양
CPU Mem Disk OS 4Core 8GB 50GB Rocky Linux 8
- Network
Node Name Host Name Private IP OS Ansible-Server Ans-SRV 10.101.0.3 Rocky Linux 8 Ansible-Node1 Ans-N01 10.101.0.4 Rocky Linux 8 Ansible-Node2 Ans-N02 10.101.0.8 Rocky Linux 8
사전 설정
- 호스트명 설정
각 서버에 접속하여 올바른 호스트 명으로 입력하여 설정한다.
터미널을 재접속해야 적용된 호스트 명으로 출력된다.
hostnamectl set-hostname --static Ans-SRV | Ans-N01 | Ans-N02- 패키지 업데이트
최신 라이브러리로 업데이트를 진행한다.
dnf update -y- 방화벽 설정 (본 설정은 기본 방화벽인 firewalld로 대체하여 사용하여도 무관)
기본 방화벽 서비스 데몬 비활성화
systemctl stop firewalld && systemctl disable firewalldiptables 설정
dnf install -y iptables-services iptables-utils- 계정 일치화
설치 단계에서는 root 계정 비밀번호를 모두 동일하게 설정해둔다.
Ansible Core
- Ansible Core란?
Ansible Core란 Ansible 동작에 필요한 최소한의 유틸이 포함된 패키지를 의미하며, Ansible 설치는 대체로 Ansible Core 설치를 뜻합니다.
- Ansible Config Files
ansible.cfg: /etc/ansible/ansible.cfg 에 설치되며, 앤서블 실행 관련 옵션을 기재합니다.
hosts: /etc/ansible/hosts 에 설치되며, 앤서블 서버에 연결되는 노드들의 정보를 기재합니다.
Ansible Server 설치 및 설정
- Ansible Core 설치
dnf install -y ansible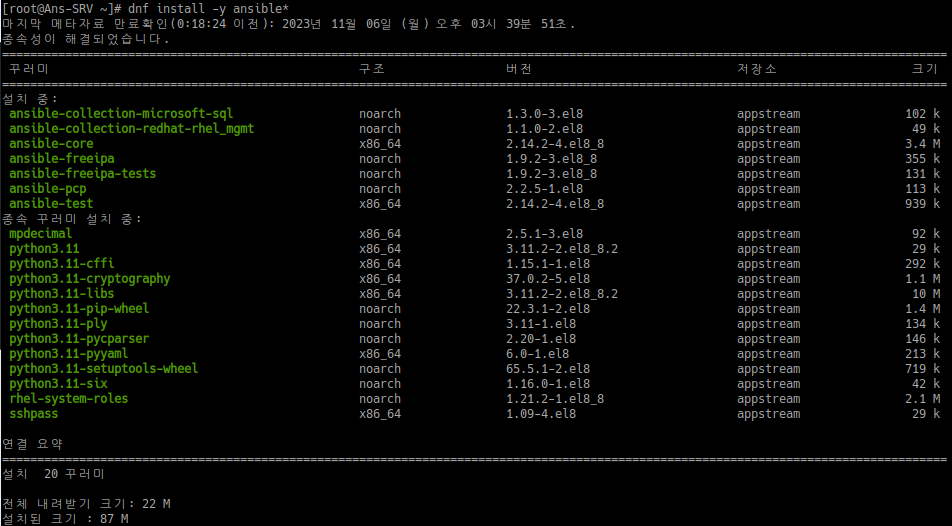
설치가 정상적으로 완료되었다면 /usr/bin 하단에 ansible 관련 실행 명령어가 설치되어 있습니다.
ls -al /usr/bin/ansible*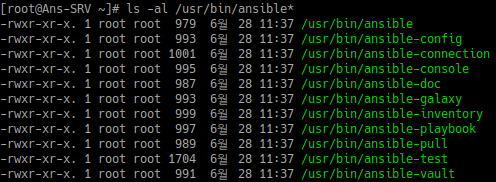
- /etc/ansible/hosts에 Node Server 추가
vi /etc/ansible/hosts
## db-[99:101]-node.example.com // 해당 구문 밑에 추가
# 추가할 Node Server IP 한 개 당 한 줄씩 기재
10.101.0.4
10.101.0.8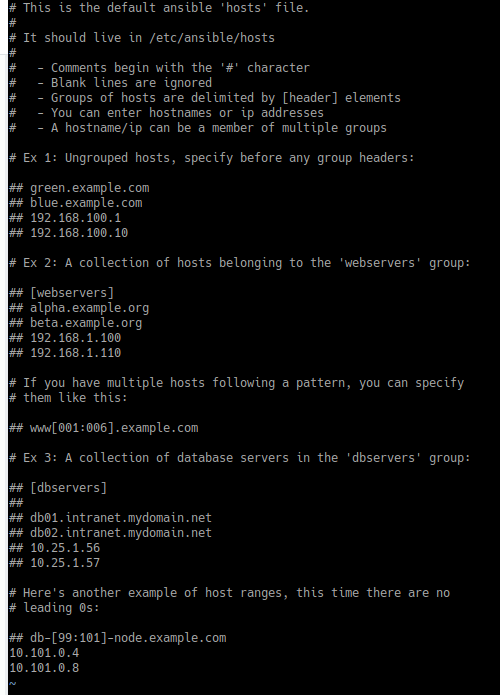
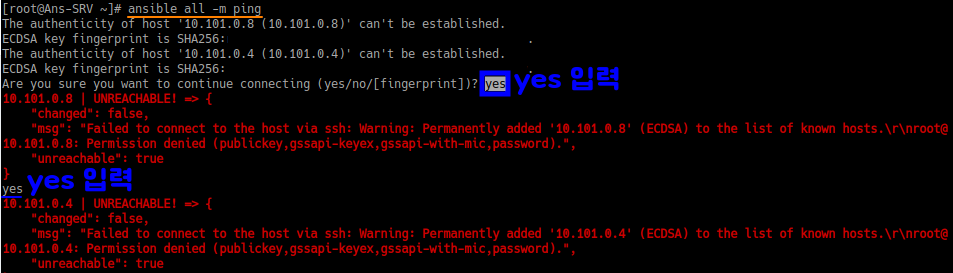
- Node Server known_hosts_key 값 받아오기
ansible all -m ping
The authenticity of host '10.101.0.8 (10.101.0.8)' can't be established.
ECDSA key fingerprint is SHA256:key_value.
The authenticity of host '10.101.0.4 (10.101.0.4)' can't be established.
ECDSA key fingerprint is SHA256:key_value.
Are you sure you want to continue connecting (yes/no/[fingerprint])? yes # yes 입력

10.101.0.8 | UNREACHABLE! => {
    "changed": false,
    "msg": "Failed to connect to the host via ssh: Warning: Permanently added '10.101.0.8' (ECDSA) to the list of known hosts.\r\nroot@10.101.0.8: Permission denied (publickey,gssapi-keyex,gssapi-with-mic,password).",
    "unreachable": true
}
# hosts 파일에 등록한 host 수 만큼 yes 입력
yes # yes 입력
10.101.0.4 | UNREACHABLE! => {
    "changed": false,
    "msg": "Failed to connect to the host via ssh: Warning: Permanently added '10.101.0.4' (ECDSA) to the list of known hosts.\r\nroot@10.101.0.4: Permission denied (publickey,gssapi-keyex,gssapi-with-mic,password).",
    "unreachable": true
}
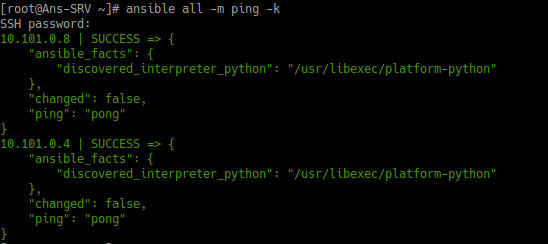
- Ansible Server - Node Server 간 통신 테스트
ansible all -m ping -k
SSH password: # 비밀번호 입력
10.101.0.8 | SUCCESS => {
    "ansible_facts": {
        "discovered_interpreter_python": "/usr/libexec/platform-python"
    },
    "changed": false,
    "ping": "pong"
}
10.101.0.4 | SUCCESS => {
    "ansible_facts": {
        "discovered_interpreter_python": "/usr/libexec/platform-python"
    },
    "changed": false,
    "ping": "pong"
}
아래 이미지처럼 출력된다면 ping 연결 테스트 성공입니다.
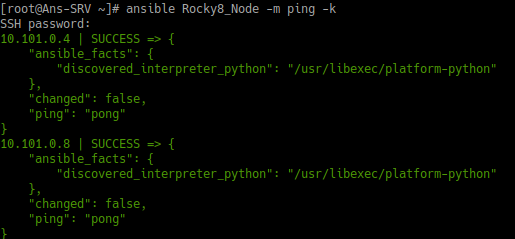
- Ansible hosts 파일에서 그룹으로 설정
all을 입력한다면 /etc/ansible/hosts에 등록된 모든 Node를 목적지로 설정합니다.
만일 구분을 짓고 싶다면 그룹으로 묶어서 설정할 수 있습니다.vi /etc/ansible/hosts [Rocky8_Node] # 단 그룹 명은 띄어쓰기 불가 10.101.0.4 10.101.0.8
ansible Rocky8_Node -m ping -k

- hosts 파일을 별도의 파일로 생성
그룹을 설정하지 않고 별도의 파일로 관리하는 방법도 있습니다. 단, ansible은 실행 시 자동으로 /etc/ansible/hosts 파일을 읽어들여 실행하기 때문에 별도의 파일을 작성했다면 해당 파일을 커맨드 상에
-i옵션과 함께 매번 기재하여 실행해야 합니다.echo "10.101.0.4" > /etc/ansible/custom_hosts.lst echo "10.101.0.8" >> /etc/ansible/custom_hosts.lst# 파일 내 모든 노드를 목적지로 설정 시 (all과 동일) ansible -i /etc/ansible/custom_hosts.lst -m ping -k # 파일 내 특정 노드를 목적지로 설정 시 ansible -i /etc/ansible/custom_hosts.lst 특정_NODE_IP -m ping -k
- Ansible 옵션 알아보기
- 자주 사용되는 옵션
help option 모두 보기
-i: (--inventory-file) 명령 커맨드 적용 노드 선택
-m: (--module-name) 사용 모듈 선택
-k: (--ask-pass) 암호 묻기 설정
-ㅣ: (--list-hosts) 적용 노드 확인 // 소문자 L
ansible --help
usage: ansible [-h] [--version] [-v] [-b] [--become-method BECOME_METHOD] [--become-user BECOME_USER]
             [-K | --become-password-file BECOME_PASSWORD_FILE] [-i INVENTORY] [--list-hosts] [-l SUBSET] [-P POLL_INTERVAL]
             [-B SECONDS] [-o] [-t TREE] [--private-key PRIVATE_KEY_FILE] [-u REMOTE_USER] [-c CONNECTION] [-T TIMEOUT]
             [--ssh-common-args SSH_COMMON_ARGS] [--sftp-extra-args SFTP_EXTRA_ARGS] [--scp-extra-args SCP_EXTRA_ARGS]
             [--ssh-extra-args SSH_EXTRA_ARGS] [-k | --connection-password-file CONNECTION_PASSWORD_FILE] [-C] [--syntax-check]
             [-D] [-e EXTRA_VARS] [--vault-id VAULT_IDS] [--ask-vault-password | --vault-password-file VAULT_PASSWORD_FILES]
             [-f FORKS] [-M MODULE_PATH] [--playbook-dir BASEDIR] [--task-timeout TASK_TIMEOUT] [-a MODULE_ARGS] [-m MODULE_NAME]
             pattern

Define and run a single task 'playbook' against a set of hosts

positional arguments:
pattern               host pattern

options:
--ask-vault-password, --ask-vault-pass
                      ask for vault password
--become-password-file BECOME_PASSWORD_FILE, --become-pass-file BECOME_PASSWORD_FILE
                      Become password file
--connection-password-file CONNECTION_PASSWORD_FILE, --conn-pass-file CONNECTION_PASSWORD_FILE
                      Connection password file
--list-hosts          outputs a list of matching hosts; does not execute anything else
--playbook-dir BASEDIR
                      Since this tool does not use playbooks, use this as a substitute playbook directory. This sets the relative
                      path for many features including roles/ group_vars/ etc.
--syntax-check        perform a syntax check on the playbook, but do not execute it
--task-timeout TASK_TIMEOUT
                      set task timeout limit in seconds, must be positive integer.
--vault-id VAULT_IDS  the vault identity to use
--vault-password-file VAULT_PASSWORD_FILES, --vault-pass-file VAULT_PASSWORD_FILES
                      vault password file
--version             show program's version number, config file location, configured module search path, module location,
                      executable location and exit
-B SECONDS, --background SECONDS
                      run asynchronously, failing after X seconds (default=N/A)
-C, --check           don't make any changes; instead, try to predict some of the changes that may occur
-D, --diff            when changing (small) files and templates, show the differences in those files; works great with --check
-K, --ask-become-pass
                      ask for privilege escalation password
-M MODULE_PATH, --module-path MODULE_PATH
                      prepend colon-separated path(s) to module library (default={{ ANSIBLE_HOME ~
                      "/plugins/modules:/usr/share/ansible/plugins/modules" }})
-P POLL_INTERVAL, --poll POLL_INTERVAL
                      set the poll interval if using -B (default=15)
-a MODULE_ARGS, --args MODULE_ARGS
                      The action's options in space separated k=v format: -a 'opt1=val1 opt2=val2' or a json string: -a '{"opt1":
                      "val1", "opt2": "val2"}'
-e EXTRA_VARS, --extra-vars EXTRA_VARS
                      set additional variables as key=value or YAML/JSON, if filename prepend with @
-f FORKS, --forks FORKS
                      specify number of parallel processes to use (default=5)
-h, --help            show this help message and exit
-i INVENTORY, --inventory INVENTORY, --inventory-file INVENTORY
                      specify inventory host path or comma separated host list. --inventory-file is deprecated
-k, --ask-pass        ask for connection password
-l SUBSET, --limit SUBSET
                      further limit selected hosts to an additional pattern
-m MODULE_NAME, --module-name MODULE_NAME
                      Name of the action to execute (default=command)
-o, --one-line        condense output
-t TREE, --tree TREE  log output to this directory
-v, --verbose         Causes Ansible to print more debug messages. Adding multiple -v will increase the verbosity, the builtin
                      plugins currently evaluate up to -vvvvvv. A reasonable level to start is -vvv, connection debugging might
                      require -vvvv.

Privilege Escalation Options:
control how and which user you become as on target hosts

--become-method BECOME_METHOD
                      privilege escalation method to use (default=sudo), use `ansible-doc -t become -l` to list valid choices.
--become-user BECOME_USER
                      run operations as this user (default=root)
-b, --become          run operations with become (does not imply password prompting)

Connection Options:
control as whom and how to connect to hosts

--private-key PRIVATE_KEY_FILE, --key-file PRIVATE_KEY_FILE
                      use this file to authenticate the connection
--scp-extra-args SCP_EXTRA_ARGS
                      specify extra arguments to pass to scp only (e.g. -l)
--sftp-extra-args SFTP_EXTRA_ARGS
                      specify extra arguments to pass to sftp only (e.g. -f, -l)
--ssh-common-args SSH_COMMON_ARGS
                      specify common arguments to pass to sftp/scp/ssh (e.g. ProxyCommand)
--ssh-extra-args SSH_EXTRA_ARGS
                      specify extra arguments to pass to ssh only (e.g. -R)
-T TIMEOUT, --timeout TIMEOUT
                      override the connection timeout in seconds (default=10)
-c CONNECTION, --connection CONNECTION
                      connection type to use (default=smart)
-u REMOTE_USER, --user REMOTE_USER
                      connect as this user (default=None)

Some actions do not make sense in Ad-Hoc (include, meta, etc)
- [ -i ] 옵션 활용
① 별도의 호스트 등록 파일을 생성하여 사용하는 경우
② 별도의 호스트 등록 파일에서 특정 노드를 지정하는 경우
ansible -i /etc/ansible/custom_hosts.lst 10.101.0.4 -m ping -k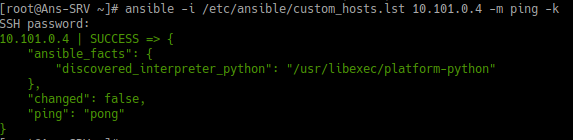
- [ -k ] 옵션 활용
비밀번호 인증을 사용하겠다는 의미로 Permission Denied 에러 발생을 막기 위해 붙여서 사용하는 것이 좋습니다.
- [ -m ] 옵션 활용
모듈의 종류에는 많은 것들이 있지만 주로 ping, shell, user, yum 등 자주 사용되는 것들이 정해져 있습니다.
ansible 모듈 종류 참고 URL
https://docs.ansible.com/ansible/2.9/modules/list_of_all_modules.html
ping
앤서블 서버와 노드 간 통신 상태 확인
ansible all -m ping -kshell
노드에 실행할 명령 커맨드를 적용하고 결과 값을 반환
단순 명령어는 " " 로 묶음 처리하지 않아도 실행 가능하지만 옵션을 포함하는 커맨드 적용 시에는 필수로 묶음처리를 해야 하기 때문에 명령 커맨드를 " "로 묶음 처리하는 습관을 들이는 편이 좋습니다.
ansible all -m shell -a "date" -k
-a: shell 모듈을 이용하여 커맨드 입력 시 인자 값을 의미하는 옵션으로 -a 다음 " 명령 커맨드 " 를 입력
user
: 사용자 관리 모듈로 사용자 추가‧삭제‧관리 가능
# 안 좋은 예시
ansible all -m user -a "name=mimic1995 password=mimic1995 state=present" -k
-name: 유저 명 선언
-password: 계정 비밀번호 설정
-state: 생성과 삭제 등 계정 상태를 설정하며 옵션은 아래와 같음
present: 생성을 의미하는 디폴트 옵션
absent: 삭제
옵션 참고 URL
https://docs.ansible.com/ansible/latest/collections/ansible/builtin/user_module.html
위 명령어가 안좋은 예시인 이유는 입력 시 password를 평문으로 전달하고 암호화하지 않기 때문에 보안적 측면에서도 좋지 않으며, 입력 결과로 warning log가 발생하기 때문입니다.
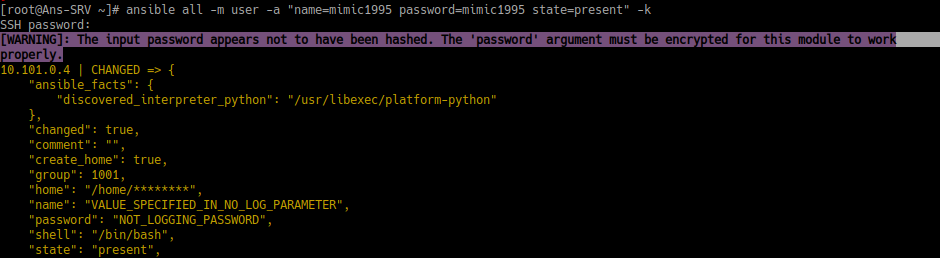
하지만 생성은 됩니다.
ansible all -m shell -a "cat /etc/passwd | tail -n 1" -k
계정 정보를 관리하려면 보통은 yaml 파일로 제작하여 사용하거나 미리 문자열을 암호화하고 해당 문자열을 전달하는 방식으로 사용합니다.
yum | dnf | apt 등 패키지 관리
ansible all -m dnf -a "name=vsftpd state=present" -k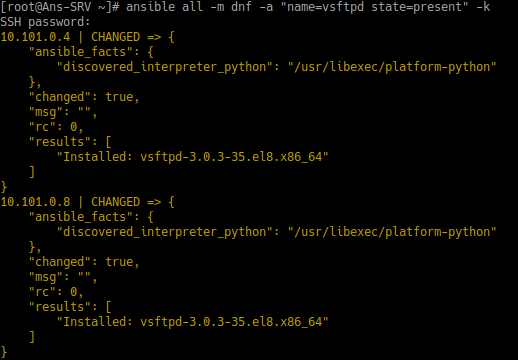
ansible all -m shell -a "dnf list vsftpd" -k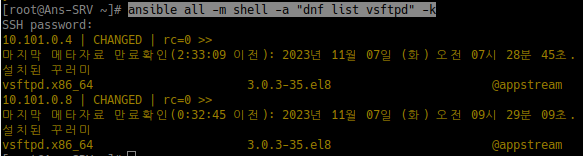
name: 설치할 패키지명
-state: 설치와 삭제 등을 설정하며 옵션은 아래와 같음
present: 생성을 의미하는 디폴트 옵션
absent: 삭제yum 관련 옵션 참고 URL
https://docs.ansible.com/ansible/2.9/modules/yum_module.html#yum-module
dnf 관련 옵션 참고 URL
https://docs.ansible.com/ansible/2.9/modules/dnf_module.html#dnf-module
apt 관련 옵션 참고 URL
https://docs.ansible.com/ansible/2.9/modules/apt_module.html#apt-module
copy
앤서블 서버에서 노드로 파일 전송
# 테스트에 사용할 파일 생성
echo $(date) > /etc/ansible/copy_test.txt
cat /etc/ansible/copy_test.txt
2023. 11. 07. (화) 10:08:30 KST
# 실제 전송
ansible all -m copy -a "src=/etc/ansible/copy_test.txt dest=/home/mimic1995/" -k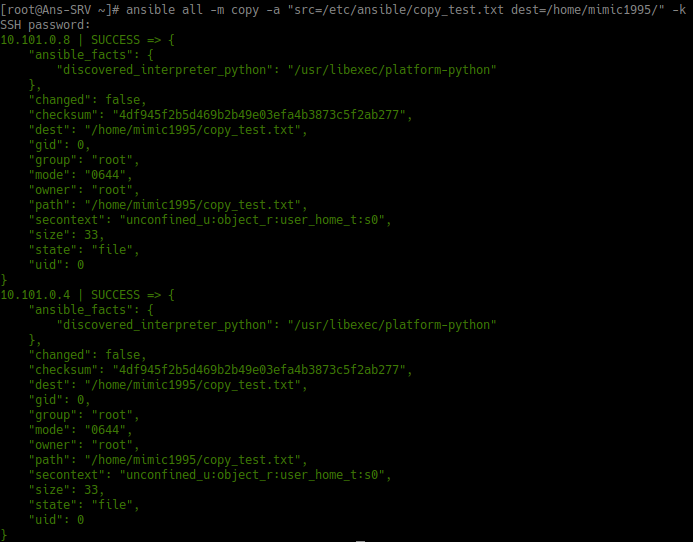
ansible all -m shell -a "cat /home/mimic1995/copy_test.txt" -k
src: 전송할 원본 파일 경로
dest: 수신받을 노드의 경로
force: 같은 파일이 수신 받을 노드 경로에 있는 경우 덮어쓰기 여부를yes또는no로 입력copy 관련 옵션 참고 URL
https://docs.ansible.com/ansible/2.9/modules/copy_module.html#copy-module
service
서비스 데몬 관리
ansible all -m service -a "name=vsftpd state=started" -k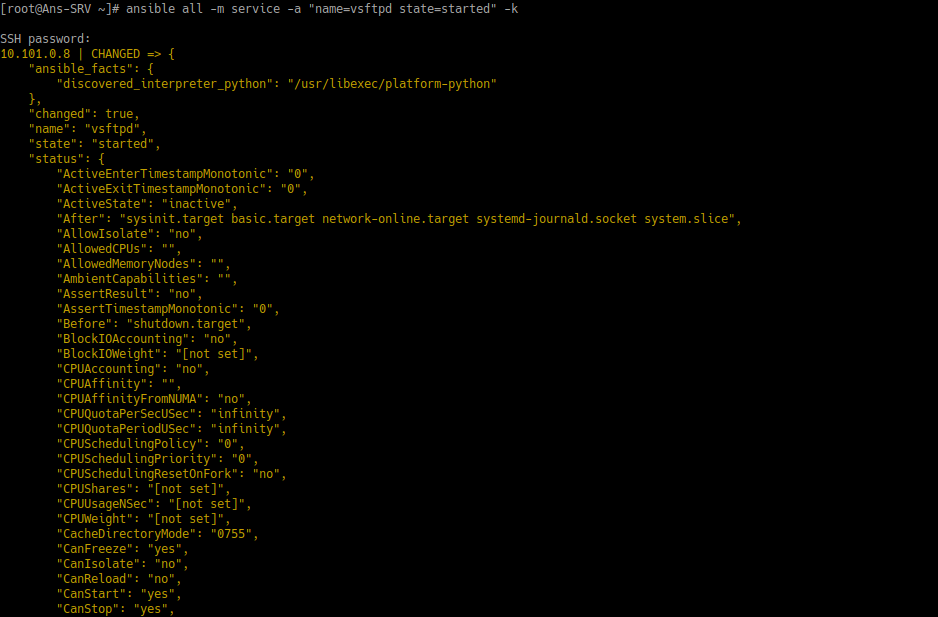
ansible all -m shell -a "netstat -nltp | egrep 'State|vsftpd'" -k
지금까지 기재한 내용 외에도 firewalld 방화벽을 대체할 모듈, curl 명령어를 활용한 모듈 등 다양한 모듈이 있으니 필요에 따라 Docu 사이트에서 찾아보고 활용하면 됩니다.