📢
- 개, 고양이 이미지(사진)를 분류하는 CNN 신경망 실습을 진행해보자
- 개, 고양이 이미지를 numpy 배열로 변환하는 작업 진행 (이미지 데이터 전처리)
- 압축된 형식의 배열로 저장 (npz 파일)
개념
이미지 데이터 처리
npz- numpy 에서 제공하는 파일 형식
- 여러개의 numpy array 를 하나의 압축된 파일로 저장할 수 있도록 해줌
- 대용량의 데이터를 압축 형태로 정리하여 저장공간의 효율이 생기고, 빠른 공유 가능
코드
데이터 불러오기 & 전처리
<전처리 전략>
- 압축파일 불러오기
- 압축해제
- 이미지 접근
- 이미지 크기 조정 (모든 파일 크기 맞춰줘야 함)
- numpy arrray 로 변환
-
import library
# 라이브러리 불러오기 import numpy as np import matplotlib.pyplot as plt import os from zipfile import ZipFile from PIL import Image -
압축파일 불러오기 및 압축 해제
# 압축파일 불러오기 및 압축 해제 zip_path = './data/cats_and_dogs_filtered.zip' with ZipFile(zip_path, 'r') as f: f.extractall(path = './data/') # 압축파일 해제 후 저장할 위치 # 이미지 접근 # train - cats, dogs # test - cats, dogs # 4개의 폴더 경로를 변수에 저장 (더 내의 사진 한 장씩 접근하기 위함) train_cats_dir = './data/cats_and_dogs_filtered/train/cats' train_dogs_dir = './data/cats_and_dogs_filtered/train/dogs' test_cats_dir = './data/cats_and_dogs_filtered/test/cats' test_dogs_dir = './data/cats_and_dogs_filtered/test/dogs' # 해당 경로에 있는 파일명 리스트로 저장 train_cats_fnames = os.listdir(train_cats_dir) train_dogs_fnames = os.listdir(train_dogs_dir) test_cats_fnames = os.listdir(test_cats_dir) test_dogs_fnames = os.listdir(test_dogs_dir) print(len(train_cats_fnames), len(train_dogs_fnames), len(test_cats_fnames),len(test_dogs_fnames)) # 1000 1000 500 500 -
이미지 크기 조정 및 numpy array 변환
# 이미지 불러오기, 사이즈 조정, 배열로 변경하기 def prepro_img(dir_path, filenames, img_size=(224,224)): img_list = [] # 변경 후 데이터를 담아줄 비어있는 리스트 생성 for i in filenames: # 경로 합치기 img_path = os.path.join(dir_path, i) # 이미지 크기 조정 img = Image.open(img_path).resize(img_size) # numpy array 변환 img = np.array(img) img_list.append(img) # 이것도 리스트를 numpy array 로 다시 묶어줘야 함! 전체가 np array 여야 하기 때문에 return np.array(img_list) # 함수 적용 X_train_cats = prepro_img(train_cats_dir, train_cats_fnames) X_train_dogs = prepro_img(train_dogs_dir, train_dogs_fnames) X_test_cats = prepro_img(test_cats_dir, test_cats_fnames) X_test_dogs = prepro_img(test_dogs_dir, test_dogs_fnames) print("훈련데이터:", X_train_cats.shape, X_train_dogs.shape) print("테스트데이터:", X_test_cats.shape, X_test_dogs.shape) # 훈련데이터: (1000, 224, 224, 3) (1000, 224, 224, 3) # 테스트데이터: (500, 224, 224, 3) (500, 224, 224, 3) -
고양이, 개 데이터 병합
# train -> cats, dogs 병합 X_train = np.concatenate((X_train_cats, X_train_dogs), axis=0) X_test = np.concatenate((X_test_cats, X_test_dogs), axis=0) print(X_train.shape, X_test.shape) # (2000, 224, 224, 3) (1000, 224, 224, 3) -
정답 데이터 생성
# 정답 데이터 생성 # 1차원의 numpy array 생성 # cat : 0, dog : 1 y_train = np.array([0]*1000 + [1]*1000) y_test = np.array([0]*500 + [1]*500) print(y_train.shape, y_test.shape) # (2000,) (1000,) -
npz변환# npz 파일로 저장 np.savez_compressed('./data/np_cats_dogs.npz', X_train = X_train, # 앞: 지정할 이름, 뒤: 현재 저장된 이름 X_test = X_test, y_train = y_train, y_test = y_test) -
npz불러오기data = np.load('./data/np_cats_dogs.npz') data # NpzFile './data/np_cats_dogs.npz' with keys: X_train, X_test, y_train, y_test # 저장되어 있는 데이터 변수에 저장 X_train = data['X_train'] X_test = data['X_test'] y_train = data['y_train'] y_test = data['y_test']우리가 저장한 이름대로 변수 이름 지정됨
MLP v.s. CNN 비교
MLP modeling
from tensorflow.keras import Sequential
from tensorflow.keras.layers import Input, Dense, Flatten
from tensorflow.keras.optimizers import SGD, Adam
from tensorflow.keras.callbacks import EarlyStopping

mlp_model = Sequential()

mlp_model.add(Input(shape=(224,224,3)))
mlp_model.add(Flatten())
mlp_model.add(Dense(units=256, activation='relu'))
mlp_model.add(Dense(units=128, activation='relu'))
mlp_model.add(Dense(units=64, activation='relu'))
mlp_model.add(Dense(units=1, activation='sigmoid'))

mlp_model.compile(loss='binary_crossentropy',
                  optimizer='Adam',
                  metrics=['accuracy'])

es = EarlyStopping(monitor='val_accuracy',
                   verbose=1,
                   patience=5)

m = mlp_model.fit(X_train, y_train,
                  validation_split=0.2,
                  epochs=50,
                  callbacks=[es])
성능 나쁨 ! 완전 들쭉 날쭉 !
CNN modeling
from tensorflow.keras import Sequential
from tensorflow.keras.layers import Conv2D, MaxPooling2D, Flatten, Dense
from tensorflow.keras.optimizers import SGD, Adam
from tensorflow.keras.callbacks import EarlyStopping

cnn_model = Sequential()

# feature extractors
cnn_model.add(Conv2D(input_shape=(224,224,3),
                     filters = 32,
                     kernel_size=(3,3),
                     padding='same',
                     strides=(2,2),
                     activation='relu'))

cnn_model.add(MaxPooling2D())

cnn_model.add(Conv2D(filters = 64,       # 여기에는 input_shape 적지 않음!
                     kernel_size=(3,3),
                     padding='same',
                     strides=(2,2),
                     activation='relu'))

cnn_model.add(MaxPooling2D())

# classifier
cnn_model.add(Flatten())
cnn_model.add(Dense(units=512, activation='relu'))  # hidden layer
cnn_model.add(Dense(units=1, activation='sigmoid')) # output layer

# 학습방법, 평가방법 설계
cnn_model.compile(loss='binary_crossentropy',
                  optimizer=Adam(),
                  metrics=['accuracy'])

# callback
es = EarlyStopping(monitor='val_accuracy',
                   verbose=1,
                   patience=5)

# train
c = cnn_model.fit(X_train, y_train,
                  validation_split=0.2,
                  epochs=50,
                  callbacks=[es])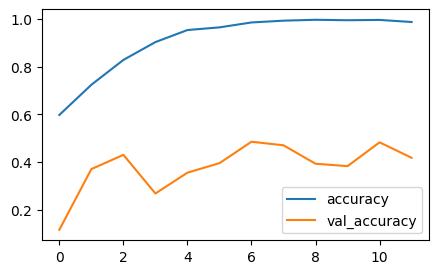
과적합 .. train 만 잘하고 validation 개 망 함 !
결과 비교
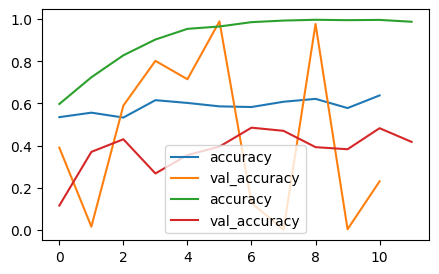
- 손글씨보다 개/고양이 데이터는 위치가 더 제각이라서 MLP 로는 성능 많이 좋지 않음
- CNN 도 과적합 때문에 모델 성능 개선 필요함 → 성능 개선 시, 가장 효과적인 것은 데이터를 추가하는 것. → 하지만 데이터 추가 쉽지 않을 수 있음. 그럴땐, 이미지 증식!