오늘은 OpenCV를 이용해 실시간 얼굴 인식 및 이목구비를 오렌지 사진에 복사해 어노잉 오렌지를 만들어 보겠습니다.
웹캠으로 본인의 얼굴을 실시간으로 어노잉 오렌지화 시킬 수 있지만 저는 아이브 원영양의 얼빡 동영상으로 프로젝트를 진행해 보겠습니다. (원영아 아줌마 영상처리 되게 잘한다? 잘 봐봐 데헷 😉)
라이브러리 불러오기
import cv2
import dlib
from imutils import face_utils, resize
import numpy as np
제가 본 프로젝트에서 사용한 라이브러리 중에서 집중해야 할 것은 바로 cv2와 dlib입니다.
OpenCV 설치하기
pip install opencv-python
아주 간단하쥬? 저는 파이참 환경에서 진행했기 때문에 파이참 터미널에 위 명령어를 적어주었습니당.
OpenCV는 실시간 이미지 프로세싱에 중점을 둔 라이브러리로, 이미지나 동영상 영상처리에 매우 많이 쓰이는 라이브러리입니다.
dlib 설치하기
사실 제가 가장 애먹은,,,부분이랄까요??
파이참 환경에서 3분만에 dlib 설치하는 방법을 알려드리겠습니다.
pip install cmake
pip install dlib
dlib을 무작정 먼저 pip으로 설치할려고 하면 어마무시한 빨간색 에러문자들과 함께 설치가 fail 됩니다. 그러나 고마운 친구 stack overflow가 cmake를 먼저 설치하면 잘 설치가 된다는 꿀팁을 알려주었고 그대로 실행해보니 무사히 설치가 되었습니다!
dlib은 얼굴과 관련한 알고리즘들을 편하게 사용할 수 있는 라이브러리입니다. dlib로 face detection, face landmark detection 등을 수행할 수 있는데 저는 둘 다 사용해 볼것입니다.
shape_predictor_68_face_landmarks
학습된 랜드마크 모델 데이터를 가져오기 위해서는 shape_predictor_68_face_landmarks라는 모델 데이터를 다운받아야 합니다.
설치링크: http://dlib.net/files/shape_predictor_68_face_landmarks.dat.bz2
위의 모델 데이터를 다운 받았다면 압축을 풀어야 하는데 저는 윈도우 사용자이기 때문에 7z 압축 프로그램을 따로 설치해서 압축을 풀어주었습니다.
설치링크: https://www.7-zip.org/

압축을 푼 학습 데이터는 파이참 프로젝트 창에 드래그엔 드롭으로 Lib안에 넣어주었습니다. (가장 단순하지만 확실한 방법이랄까요,,ㅎㅎ)

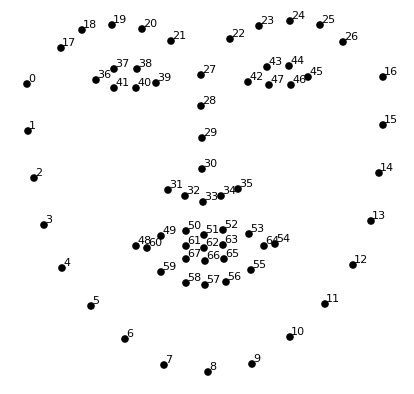
Facial Landmarks란 사람의 얼굴에 특징점을 찍어내는 방법입니다.
위의 사진은 68개의 특징점을 추출한 포인트를 보여줍니다.
코드 구현
전체코드
import cv2
import dlib
from imutils import face_utils, resize
import numpy as np

orange_img = cv2.imread('orange.jpg')
orange_img = cv2.resize(orange_img, dsize=(512, 512))

detector = dlib.get_frontal_face_detector()
predictor = dlib.shape_predictor('venv/Lib/shape_predictor_68_face_landmarks (1).dat')

cap = cv2.VideoCapture('장원영.mp4')

while cap.isOpened():
    ret, img = cap.read()

    if not ret:
        break

    faces = detector(img)

    result = orange_img.copy()

    if len(faces) > 0:
        face = faces[0]

        x1, y1, x2, y2 = face.left(), face.top(), face.right(), face.bottom()
        face_img = img[y1:y2, x1:x2].copy()

        shape = predictor(img, face)
        shape = face_utils.shape_to_np(shape)

        for p in shape:
            cv2.circle(face_img, center=(p[0] - x1, p[1] - y1), radius=2, color=255, thickness=-1)

        # eyes
        le_x1 = shape[36, 0]
        le_y1 = shape[37, 1]
        le_x2 = shape[39, 0]
        le_y2 = shape[41, 1]
        le_margin = int((le_x2 - le_x1) * 0.18)

        re_x1 = shape[42, 0]
        re_y1 = shape[43, 1]
        re_x2 = shape[45, 0]
        re_y2 = shape[47, 1]
        re_margin = int((re_x2 - re_x1) * 0.18)

        left_eye_img = img[le_y1 - le_margin:le_y2 + le_margin, le_x1 - le_margin:le_x2 + le_margin].copy()
        right_eye_img = img[re_y1 - re_margin:re_y2 + re_margin, re_x1 - re_margin:re_x2 + re_margin].copy()

        left_eye_img = resize(left_eye_img, width=100)
        right_eye_img = resize(right_eye_img, width=100)

        result = cv2.seamlessClone(
            left_eye_img,
            result,
            np.full(left_eye_img.shape[:2], 255, left_eye_img.dtype),
            (100, 200),
            cv2.MIXED_CLONE
        )

        result = cv2.seamlessClone(
            right_eye_img,
            result,
            np.full(right_eye_img.shape[:2], 255, right_eye_img.dtype),
            (250, 200),
            cv2.MIXED_CLONE
        )

        # mouth
        mouth_x1 = shape[48, 0]
        mouth_y1 = shape[50, 1]
        mouth_x2 = shape[54, 0]
        mouth_y2 = shape[57, 1]
        mouth_margin = int((mouth_x2 - mouth_x1) * 0.1)

        mouth_img = img[mouth_y1 - mouth_margin:mouth_y2 + mouth_margin,
                    mouth_x1 - mouth_margin:mouth_x2 + mouth_margin].copy()

        mouth_img = resize(mouth_img, width=250)

        result = cv2.seamlessClone(
            mouth_img,
            result,
            np.full(mouth_img.shape[:2], 255, mouth_img.dtype),
            (180, 320),
            cv2.MIXED_CLONE
        )

        cv2.imshow('left', left_eye_img)
        cv2.imshow('right', right_eye_img)
        cv2.imshow('mouth', mouth_img)
        cv2.imshow('face', face_img)

        cv2.imshow('result', result)

    if cv2.waitKey(1) == ord('q'):
        break
이미지 및 영상 불러오기
orange_img = cv2.imread('orange.jpg')
orange_img = cv2.resize(orange_img, dsize=(512, 512))

detector = dlib.get_frontal_face_detector() #얼굴 정면 detector 불러오기
predictor = dlib.shape_predictor('venv/Lib/shape_predictor_68_face_landmarks (1).dat') #학습된 랜드마크 모델 데이터 불러오기

cap = cv2.VideoCapture('장원영.mp4')
위의 코드를 통해 오렌지 이미지를 불러오고 얼굴 정면이 나오는 영상을 불러왔습니다.
cv2.VideoCapture()를 사용해 비디오 캡쳐 객체를 생성할 수 있습니다. 안의 숫자는 장치 인덱스(어떤 카메라를 사용할 것인가)입니다. 1개만 부착되어 있으면 0, 2개 이상이면 첫 웹캠은 0, 두번째 웹캠은 1으로 지정합니다
얼굴에 점 찍기
while cap.isOpened():
ret, img = cap.read()
if not ret:
break
faces = detector(img)
result = orange_img.copy() #결과는 오렌지 이미지에 복사
if len(faces) > 0:
face = faces[0]
x1, y1, x2, y2 = face.left(), face.top(), face.right(), face.bottom() #얼굴의 위치를 좌표로 찍음
face_img = img[y1:y2, x1:x2].copy() #얼굴의 이미지를 따로 복사해 놓기
shape = predictor(img, face)
shape = face_utils.shape_to_np(shape)
for p in shape:
cv2.circle(face_img, center=(p[0] - x1, p[1] - y1), radius=2, color=255, thickness=-1)
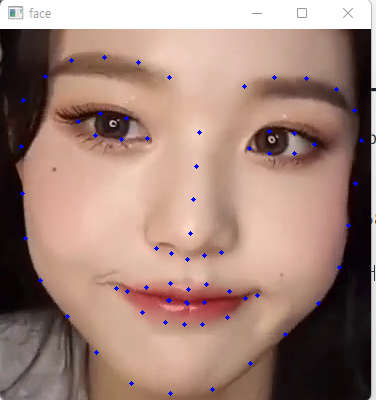
# 화면에 랜드마크 좌표 68개를 표시한 프레임 출력ret, img = cap.read(): 비디오의 한 프레임씩 읽습니다. 제대로 프레임을 읽으면 ret값이 True, 실패하면 False가 나타납니다. img에 읽은 프레임이 나옵니다.
만약 dlib이 영상에서 얼굴의 정면을 detect했다면 얼굴의 위치를 좌표로 찍고 따로 복사 해 놓습니다.
그리고 predictor를 호출하여 얼굴에 68개의 랜드마크 위치 좌표를 찍습니다.
맨 마지막 for문을 통해 랜드마크 좌표 68개를 표시한 프레임 출력합니다.
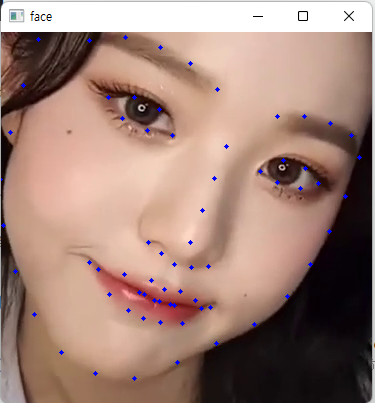
결과는 이렇게 뜨게 됩니다. 얼굴에서 눈과 입만 따오기
# eyes
        le_x1 = shape[36, 0]
        le_y1 = shape[37, 1]
        le_x2 = shape[39, 0]
        le_y2 = shape[41, 1]
        le_margin = int((le_x2 - le_x1) * 0.18)

        re_x1 = shape[42, 0]
        re_y1 = shape[43, 1]
        re_x2 = shape[45, 0]
        re_y2 = shape[47, 1]
        re_margin = int((re_x2 - re_x1) * 0.18)

        left_eye_img = img[le_y1 - le_margin:le_y2 + le_margin, le_x1 - le_margin:le_x2 + le_margin].copy()
        right_eye_img = img[re_y1 - re_margin:re_y2 + re_margin, re_x1 - re_margin:re_x2 + re_margin].copy()

        left_eye_img = resize(left_eye_img, width=100)
        right_eye_img = resize(right_eye_img, width=100)

        result = cv2.seamlessClone(
            left_eye_img,
            result,
            np.full(left_eye_img.shape[:2], 255, left_eye_img.dtype),
            (100, 200),
            cv2.MIXED_CLONE
        )

        result = cv2.seamlessClone(
            right_eye_img,
            result,
            np.full(right_eye_img.shape[:2], 255, right_eye_img.dtype),
            (250, 200),
            cv2.MIXED_CLONE
        )

        # mouth
        mouth_x1 = shape[48, 0]
        mouth_y1 = shape[50, 1]
        mouth_x2 = shape[54, 0]
        mouth_y2 = shape[57, 1]
        mouth_margin = int((mouth_x2 - mouth_x1) * 0.1)

        mouth_img = img[mouth_y1 - mouth_margin:mouth_y2 + mouth_margin,
                    mouth_x1 - mouth_margin:mouth_x2 + mouth_margin].copy()

        mouth_img = resize(mouth_img, width=250)

        result = cv2.seamlessClone(
            mouth_img,
            result,
            np.full(mouth_img.shape[:2], 255, mouth_img.dtype),
            (180, 320),
            cv2.MIXED_CLONE
        )

        cv2.imshow('left', left_eye_img)
        cv2.imshow('right', right_eye_img)
        cv2.imshow('mouth', mouth_img)
        cv2.imshow('face', face_img)
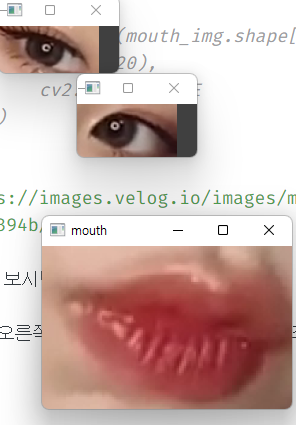
위 사진을 보시면 왼쪽 눈, 오른쪽 눈, 그리고 입에 할당된 숫자를 보실 수 있습니다.
왼쪽 눈, 오른쪽 눈 그리고 입에 각각 4개의 좌표를 부여해 눈, 코, 입만을 따로 따오겠습니다.
양쪽 눈과 입을 추출해 내셨다면 result인 오렌지 사진에 부착을 시켜줍니다.
더욱 더 자연스러운 어노잉 오렌지를 생서하기 위해 이미지 합성 및 블랜딩을 진행해보았습니다.
OpenCV에서는 cv2.seamlessClone()이라는 함수가 있는데 이는 두 이미지의 특징을 살려 알아서 합성하는 기능을 합니다.
dst = cv2.seamlessClone(src, dst, mask, coords, flags, output)
src: 입력 이미지, 일반적으로 전경
dst: 대상 이미지, 일반적으로 배경
mask: 마스크, src에서 합성하고자 하는 영역은 255, 나머지는 0
coords: src가 놓이기 원하는 dst의 좌표 (중앙)
flags: 합성 방식
output(optional): 합성 결과
이렇게 눈코입과 오렌지 배경을 자연스럽게 합성하여 눈코입만 둥둥 뜨지 않은 자연스러운 어노잉 오렌지를 만들어 볼 수 있습니다.
화면에 출력
cv2.imshow('result', result)간단하게 위의 코드로 결과물을 출력할 수 있습니다.
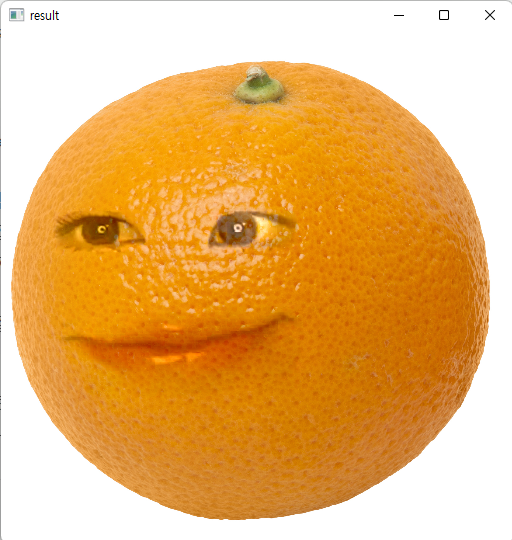
요롷게 말이죠. 원영양은 얼굴형이 오렌지가 되어도 이쁘군요
   if cv2.waitKey(1) == ord('q'):
        break
창을 끄고 싶다면 위의 코드를 if문 밖에 선언 해 주어 'q'를 입력했을 때 창이 모두 꺼지도록 해줍니다.
소감
유튜브에서 영상을 보고 구현하기 간단한 코드이기도 하고 너무 귀여운 토이 프로젝트인 것 같아 1시간만에 후루룩 코드도 쳐보고 다양한 영상으로 코드를 돌려보기도 하였습니다.
실시간 얼굴인식을 하고 싶을 때 dlib 라이브러리를 사용할 수 있다는 점도 배웠고 미리 학습된 데이터 모델을 사용해 볼 수 있어서 재밌었습니다.
독자님들도 귀여운 영상처리 프로젝트를 해보고 싶을 때 따라하는 것을 추천드립니당