Docker로 SpringBoot + MySQL DB 서버 연결을 실습해보겠습니다.
springBoot 프로젝트 - 로컬
MySQL - Docker 컨테이너
연동 성공
Dockerfile로 구현
구현 소스
Dockerfile
FROM openjdk:11-jdk
ARG JAR_FILE=build/libs/*.jar
COPY ${JAR_FILE} app.jar
ENTRYPOINT ["java","-jar","/app.jar"]
Dockferfile(+gradlew build 포함)
# 최신 17-jdk-alpine 이미지로부터 시작
FROM openjdk:17-jdk-alpine

# 작업 디렉토리를 /app으로 설정
WORKDIR /app

# 현재 디렉토리의 모든 파일을 컨테이너의 /app 디렉토리로 복사
COPY . .

# gradlew에 실행 권한 부여
RUN chmod +x ./gradlew
# 프로젝트 빌드
RUN ./gradlew clean build

#ENV SPRING_PROFILES_ACTIVE=prod
# 빌드된 JAR 파일을 컨테이너로 복사
ARG JAR_FILE=build/libs/*SNAPSHOT.jar
RUN mv ${JAR_FILE} app.jar

# 컨테이너가 실행될 때 실행될 명령어 지정
# 오류남! 왜냐하면, spring.profiles.active=prod를 사용하려면, application.properties에 spring.profiles.active=prod를 추가해야함
ENTRYPOINT ["java", "-jar", "app.jar"]
#ENTRYPOINT ["java", "-Dspring.profiles.active=prod", "-jar","app.jar"]
application.yml
spring:
  datasource:
    driver-class-name: com.mysql.cj.jdbc.Driver
    url: jdbc:mysql://localhost:3306/memo?useSSL=false&allowPublicKeyRetrieval=true&serverTimezone=Asia/Seoul&characterEncoding=UTF-8
    username: root
    password: 1234


  jpa:
    open-in-view: true
    hibernate:
      ddl-auto: update
      naming:
        physical-strategy: org.hibernate.boot.model.naming.PhysicalNamingStrategyStandardImpl
      use-new-id-generator-mappings: false
    show-sql: true
    properties:
      hibernate.format_sql: true
      dialect: org.hibernate.dialect.MySQL8Dialect


logging:
  level:
    org.hibernate.SQL: debug
1) network로 묶기

2차 시도 docker 같은 network로 설정?
--network springboot-mysql-net실패 (2023-12-09)
하지만 aws ec2 인스턴스 에서 docker 컨테이너 실행시, 잘 실행됨 성공!(23-01-12)
✳️ datasoruce 내 localhost -> docker mysql name으로 변경!
  datasource:
    driver-class-name: com.mysql.cj.jdbc.Driver
    url: jdbc:mysql://mysql_8.0:3306/memo?useSSL=false&allowPublicKeyRetrieval=true&serverTimezone=Asia/Seoul&characterEncoding=UTF-8
    username: root
    password: 1234
🌟 해결은 network 연결 시도!
docker create network springboot-mysql-net각 Docker run 명령어시, 다음 network 옵션을 붙입니다!
--network springboot-mysql-netApplication Docker 컨테이너 실행
docker run \
  --name=memo-test \
  -p 8080:8080 \
  -e TZ=Asia/Seoul \
  -d \
  mooh2jj/memo-test \
  --restart unless-stopped \
  --network springboot-mysql-net
MySQL Docker 컨테이너 실행
docker run \
  --name mysql_8.0 \
  -d \
  --restart unless-stopped \
  --network springboot-mysql-net
  -e MYSQL_ROOT_PASSWORD=1234 \
  -e MYSQL_DATABASE=memo \
  -e TZ=Asia/Seoul \
  -p 3308:3306 \
  -v $(pwd)/mysql/conf.d:/etc/mysql/conf.d \
  mysql:latest \
  --character-set-server=utf8mb4 \
  --collation-server=utf8mb4_general_ci
2) --add-host=host.docker.internal:172.17.0.1
application.yml
localhost -> host.docker.internal 을 붙이기
  datasource:
    driver-class-name: com.mysql.cj.jdbc.Driver
    url: jdbc:mysql://host.docker.internal:3306/memo?serverTimezone=Asia/Seoul&characterEncoding=UTF-8
    username: root
    password: 1234
application 컨테이너 실행
--add-host=host.docker.internal:172.17.0.1 을 추가해줍니다.
# docker pull 받기
docker pull mooh2jj/memo-test

# docker 옵션 --add-host=host.docker.internal:172.17.0.1
docker run -d -p 8080:8080 --add-host=host.docker.internal:172.17.0.1 mooh2jj/memo-test
MySQL 컨테이너 실행
--network springboot-mysql-net 은 빼줍니다.
docker run \
  --name mysql_8.0 \
  -d \
  --restart unless-stopped \
  -e MYSQL_ROOT_PASSWORD=1234 \
  -e MYSQL_DATABASE=memo \
  -e TZ=Asia/Seoul \
  -p 3308:3306 \
  -v $(pwd)/mysql/conf.d:/etc/mysql/conf.d \
  mysql:latest \
  --character-set-server=utf8mb4 \
  --collation-server=utf8mb4_general_ci
❗ 만약 데이터베이스가 안만들어졌다?
docker exec -it {mysql_8.0 컨테이너 id} bash

mysql -u root -p
# 1234

# database memo 만들기
$ create database memo;

$ show databases; - 새로 계정 만들기
user : dsg
password : dsg1234
$ CREATE USER 'dsg'@'%' IDENTIFIED BY 'dsg1234';
$ GRANT ALL PRIVILEGES ON *.* TO 'dsg'@'%';
$ FLUSH PRIVILEGES;
💥 로컬내 docker 컨테이너로 돌리면 application, mysql 컨테이너 connection 문제로 실패
이유 불문...(23-01-10)
com.mysql.cj.jdbc.exceptions.CommunicationsException: Communications link failuredocker-compose 구현
docker-compose를 활용하여 한번에 컨테이너 정리가 가능합니다.
docker-compose 같은 경우는 실제 배포보단 로컬에서 테스트용으로 많이 사용됩니다.
docker-compose.yml
version: '3'

services:
  database:
    container_name: mysql_db
    image: mysql:8.0.22
    restart: unless-stopped
    environment:
      MYSQL_DATABASE: memo
#      MYSQL_ROOT_HOST: '%'
      MYSQL_ROOT_PASSWORD: 1234
      TZ: 'Asia/Seoul'
    ports:
      - "3306:3306"
    volumes:
      - ./mysql/conf.d:/etc/mysql/conf.d # MySQL 설정 파일 위치
      - ./mysql/initdb.d/:/docker-entrypoint-initdb.d/  # 데이터베이스 초기화 sql
    command:
      - "mysqld"
      - "--character-set-server=utf8mb4"
      - "--collation-server=utf8mb4_general_ci"
    networks:
      - test_network

  application:
    container_name: memo-test
    restart: on-failure
    build:
      context: ./
      dockerfile: Dockerfile
    ports:
      - "8080:8080"
    environment:
      SPRING_DATASOURCE_URL: jdbc:mysql://mysql_db:3306/memo?useSSL=false&allowPublicKeyRetrieval=true
      SPRING_DATASOURCE_USERNAME: "root"
      SPRING_DATASOURCE_PASSWORD: "1234"
    depends_on:
      - database
    networks:
      - test_network

networks:
  test_network:
./mysql/initdb.d/initdata.sql
DROP DATABASE IF EXISTS memo;
CREATE DATABASE memo;
USE memo;
application.yaml profile
application profile에 따라 정리
application.yml
spring:
  profiles:
    active: ${activeProfile:dev}
  datasource:
    driver-class-name: com.mysql.cj.jdbc.Driver
application-dev.yml
spring:
  datasource:
    driver-class-name: com.mysql.cj.jdbc.Driver
    url: jdbc:mysql://localhost:3306/memo?useSSL=false&allowPublicKeyRetrieval=true&serverTimezone=Asia/Seoul&characterEncoding=UTF-8
    username: root
    password: 1234


  jpa:
    open-in-view: true
    hibernate:
      ddl-auto: update
      naming:
        physical-strategy: org.hibernate.boot.model.naming.PhysicalNamingStrategyStandardImpl
      use-new-id-generator-mappings: false
    show-sql: true
    properties:
      hibernate.format_sql: true
      dialect: org.hibernate.dialect.MySQL8Dialect


logging:
  level:
    org.hibernate.SQL: debug
Dockerfile
FROM openjdk:11-jdk
ARG JAR_FILE=build/libs/*.jar
COPY ${JAR_FILE} app.jar
ENTRYPOINT ["java","-Dspring.profiles.active=dev","-jar","/app.jar"]
DevInitData
초기화시, CommandLineRunner 상속으로 처리할 수 있음.
@Configuration
public class InitData {
@Bean
public CommandLineRunner initDevData(BlogService blogService) {
return args -> {
if(blogService.getBlogs().size() > 0) {
return;
}
blogService.create(new BlogCreateRequest("title1", "content1"));
blogService.create(new BlogCreateRequest("title2", "content2"));
};
}
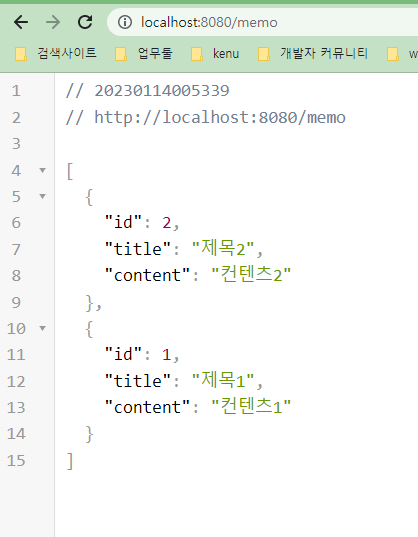
}결과
처음 데이타베이스 조정없이 확인가능한 것이 아주 좋다.
출처