본격적으로 개발환경을 세팅해보자
프로젝트의 이름은 'nsb' (next strapi blog) 로 통일하여 사용하도록 하겠다
Strapi로 백엔드 프로젝트 구성
Strapi 설치
공식 문서를 참고해 진행해보자
https://strapi.io/documentation/developer-docs/latest/installation/cli.html
yarn create strapi-app nsb --quickstart

// or

npx create-strapi-app nsb --quickstart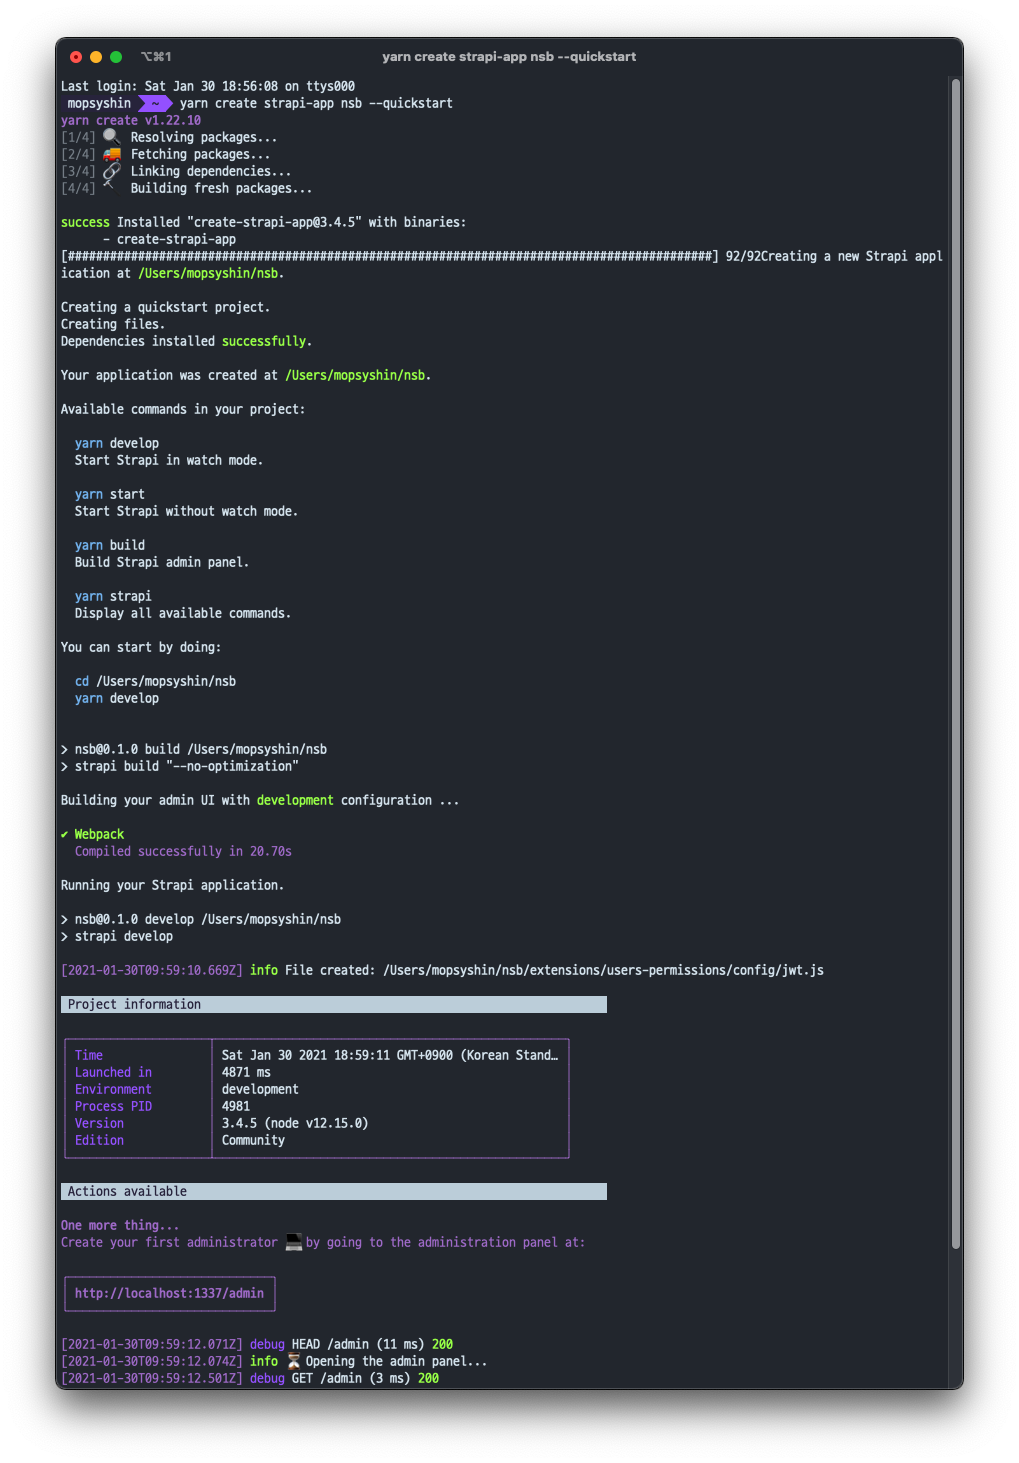
위 명령어를 실행하면, strapi 설치를 진행하고 설치가 완료되면 자동으로 실행시켜준다.
http://localhost:1337/ 에서 서버가 실행되고
다음과 같이 admin 클라이언트를 띄워준다.
만약 자동으로 실행되지 않는다면
npm run develop
// or
yarn develop
로 서버를 실행시켜주자
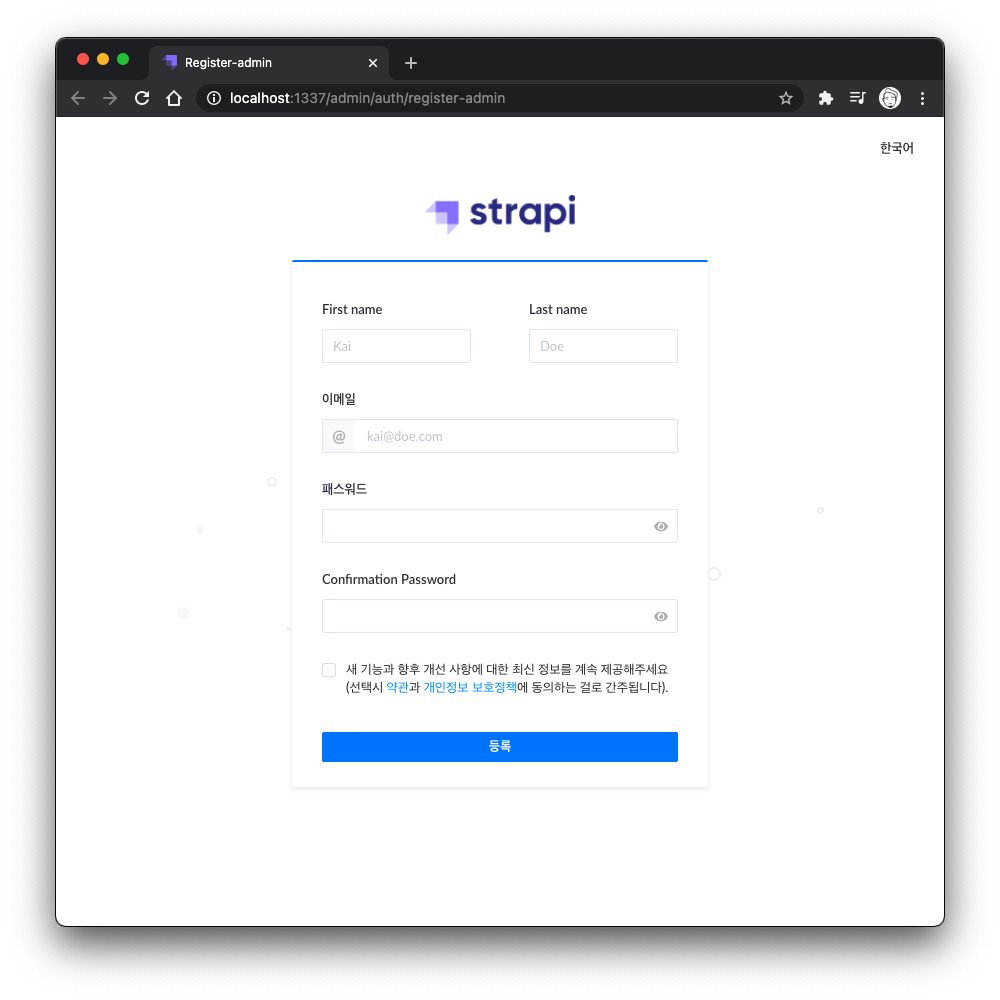
어드민 계정을 생성하여 strapi 대쉬보드에 접근할 수 있다.
많은 부분이 한글화되어있어 접근성이 좋은 편
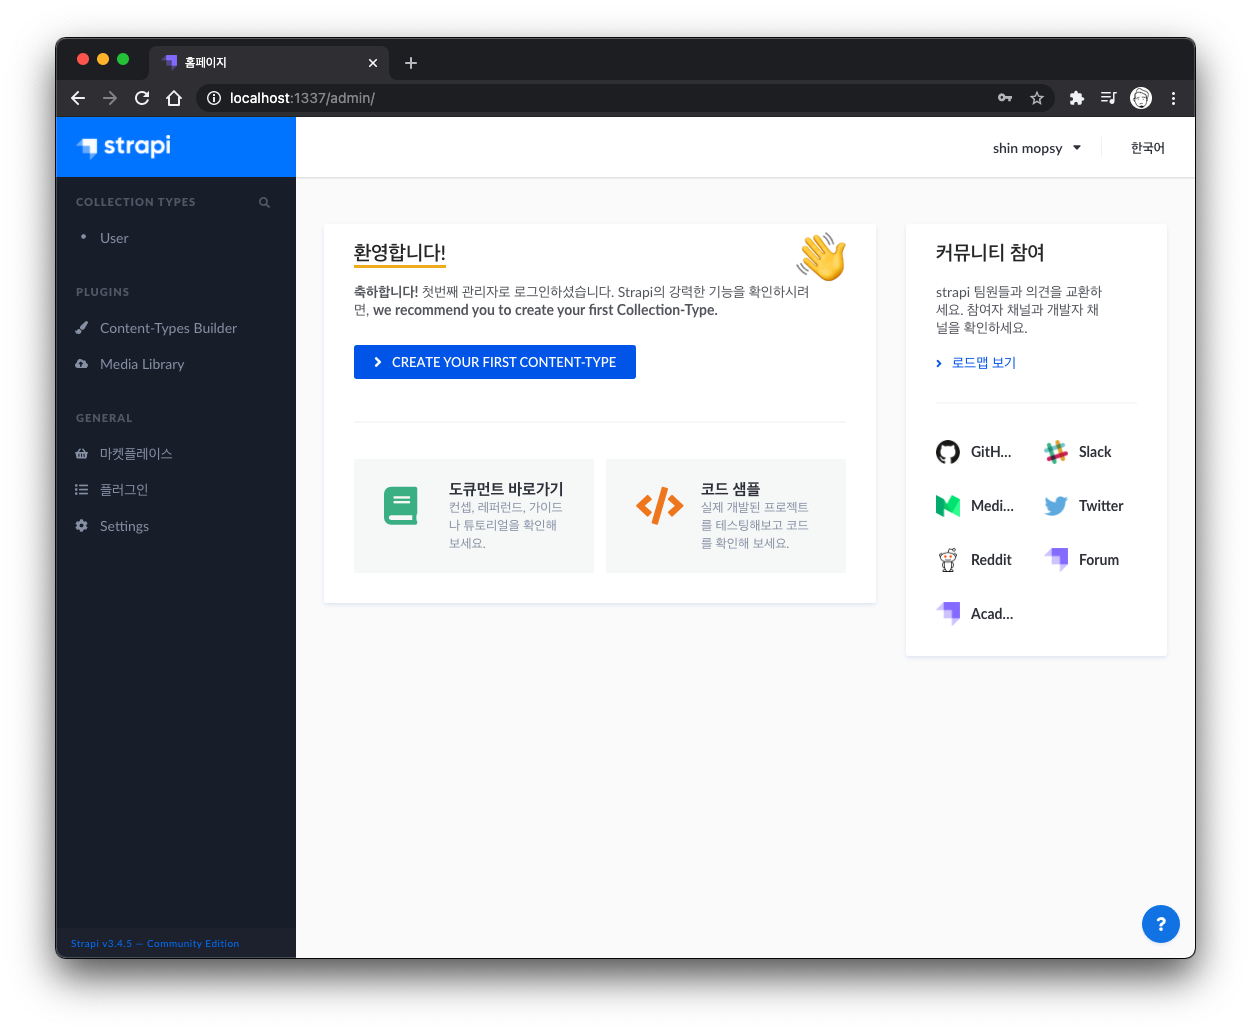
사이드바의 Collection Types이 Database의 Table들을 보여준다.
strapi를 --quickstart 옵션으로 시작하면 기본 Dababase가 sqlite 로 설정되어 있는데, 이를 postgreSQL로 변경하도록 하자.
공식 문서에서 가이드를 친절하게 제공해주고 있으니 참고하자.
https://strapi.io/documentation/developer-docs/latest/guides/databases.html#other-sql-databases-postgresql-mysql
nsb 프로젝트 폴더를 열어보면 /config 폴더 내에서 다음과 같은 database.js 파일을 찾을 수 있다.
// ./config/database.js
module.exports = ({ env }) => ({
  defaultConnection: 'default',
  connections: {
    default: {
      connector: 'bookshelf',
      settings: {
        client: 'sqlite',
        filename: env('DATABASE_FILENAME', '.tmp/data.db'),
      },
      options: {
        useNullAsDefault: true,
      },
    },
  },
});
이 부분을 다음과 같이 변경하자
// ./config/database.js
module.exports = ({ env }) => ({
  defaultConnection: 'default',
  connections: {
    default: {
      connector: 'bookshelf',
      settings: {
        client: 'postgres',
        host: env('DATABASE_HOST', 'localhost'),
        port: env.int('DATABASE_PORT', 5432),
        database: env('DATABASE_NAME', 'strapidb'),
        username: env('DATABASE_USERNAME', 'strapi'),
        password: env('DATABASE_PASSWORD', 'strapi'),
      },
      options: {
        ssl: env.bool('DATABASE_SSL', false),
      },
    },
  },
});
먼저 client의 값을 sqlite 에서 postgres 로 변경하고, 그 밑에 host, port, database, username, password 를 추가해주었다.
설정한 값들은 이후 postgreSQL database 의 설정값들이니 참고하자.
여기까지 진행하고 저장 후 터미널을 보면
[2021-01-30T10:18:50.152Z] info File changed: /Users/mopsyshin/projects/nsb/config/database.js
[2021-01-30T10:18:50.154Z] info The server is restarting

[2021-01-30T10:18:51.055Z] error The client `pg` is not installed.
[2021-01-30T10:18:51.056Z] error You can install it with `$ npm install pg --save`.
error Command failed with exit code 1.
위와 같은 에러와 함께 서버가 종료되었다.
posgreSQL사용하기 위한 pg 패키지가 설치되어 있지 않기 때문이다. 설치해주도록 하자.
npm install pg --save여기까지 진행했다면, 이제 postgreSQL를 설치하고 위에서 설정한 database 설정값대로 database를 설정해주자.
PostgreSQL 설치 및 설정
맥 환경에서 postgreSQL은 homebrew를 통해 간단하게 설치할 수 있다
psql 설치
brew install postgres서버 실행
brew를 통해 postrgres를 설치하면 자동으로 서버가 실행된다.
brew services list로 확인할 수 있다. 만약 리스트에 뜨지 않는다면,
brew services start postgresql로 서버를 시작할 수 있다

참고
brew services start postgresql
// postgresql 서버 실행

brew services stop postgresql
// postgresql 서버 중지

brew services restart postgresql
// postgresql 재시작
DB초기화
이미 설치 시 초기화가 되어있는 경우가 있는데
깔끔하게 시작하기 위해 삭제하고 새로 초기화해주자
rm -r /usr/local/var/postgres
//  기존 db파일 삭제

initdb /usr/local/var/postgres
//  db초기화

psql postgres
// db 접속
ROLE 생성
DB 접속 후 \du 명령어를 사용해보면 role(user) 리스트를 확인 할 수 있다.
로그인할 유저를 특정하지 않고 접속하게되면 맥 사용자 이름으로 생성된 user 로그인된다.
먼저 해당 user에 대한 비밀번호를 설정해 준다
postgres=# \du mopsyshin
                                   List of roles
 Role name |                         Attributes                         | Member of
-----------+------------------------------------------------------------+-----------
 mopsyshin | Superuser, Create role, Create DB, Replication, Bypass RLS | {}

postgres=# \password mopsyshin
// mopsyshin user 비밀번호 설정
Enter new password:
Enter it again:
postgres=#
strapi프로젝트에서 사용할 strapi user 를 생성하고, 비밀번호를 strapi로 설정한다
비밀번호는 알아서 잘 설정하도록 하자
postgres=# CREATE ROLE strapi WITH LOGIN PASSWORD 'strapi';
//  SQL문은 마지막에 세미콜론(;)을 붙여줘야 한다

postgres=# \du
                                   List of roles
 Role name |                         Attributes                         | Member of
-----------+------------------------------------------------------------+-----------
 mopsyshin | Superuser, Create role, Create DB, Replication, Bypass RLS | {}
 strapi    |                                                            | {}
 // strapi user 가 생성된 것을 확인
처음 만든 user엔 아무런 권한이 부여되지 않아 있다. CREATEDB 권한을 부여한다.
 postgres=# ALTER ROLE strapi CREATEDB;
 // strapi user 에 CREATEDB 권한 부여

                                    List of roles
 Role name |                         Attributes                         | Member of
-----------+------------------------------------------------------------+-----------
 mopsyshin | Superuser, Create role, Create DB, Replication, Bypass RLS | {}
 strapi    | Create DB                                                  | {}
이제 strapi user에 CREATEDB 권한을 부여했으니, strapi user로 다시 접속 해보자
postgres=# exit
혹은
postgres=# \q
// db 접속종료

psql postgres -U strapi
// strapi user로 postgres db에 접속

postgres=>
\list 명령어를 사용하면 현재 존재하는 db목록을 확인할 수 있다.
postgres=> \list

                              List of databases
   Name    |   Owner   | Encoding | Collate | Ctype |    Access privileges
-----------+-----------+----------+---------+-------+-------------------------
 postgres  | mopsyshin | UTF8     | C       | UTF-8 |
 template0 | mopsyshin | UTF8     | C       | UTF-8 | =c/mopsyshin           +
           |           |          |         |       | mopsyshin=CTc/mopsyshin
 template1 | mopsyshin | UTF8     | C       | UTF-8 | =c/mopsyshin           +
           |           |          |         |       | mopsyshin=CTc/mopsyshin
(3 rows)
초기화 시 기본적으로 생성되는 postgres db 와 template db 들이 만들어져 있는 것을 확인할 수 있다.
strapidb 라는 이름을 가진 db를 생성해준다.
postgres=> CREATE DATABASE strapidb;
CREATE DATABASE
postgres=> \list
                              List of databases
   Name    |   Owner   | Encoding | Collate | Ctype |    Access privileges
-----------+-----------+----------+---------+-------+-------------------------
 postgres  | mopsyshin | UTF8     | C       | UTF-8 |
 strapidb  | strapi    | UTF8     | C       | UTF-8 |
 template0 | mopsyshin | UTF8     | C       | UTF-8 | =c/mopsyshin           +
           |           |          |         |       | mopsyshin=CTc/mopsyshin
 template1 | mopsyshin | UTF8     | C       | UTF-8 | =c/mopsyshin           +
           |           |          |         |       | mopsyshin=CTc/mopsyshin
(4 rows)
strapidb database가 생성된 것을 확인했다.
이제 strapidb 에 접근 가능한 유저(strapi)를 추가해준다.
postgres=> GRANT ALL PRIVILEGES ON DATABASE strapidb TO strapi;
GRANT
postgres=> \list
                              List of databases
   Name    |   Owner   | Encoding | Collate | Ctype |    Access privileges
-----------+-----------+----------+---------+-------+-------------------------
 postgres  | mopsyshin | UTF8     | C       | UTF-8 |
 strapidb  | strapi    | UTF8     | C       | UTF-8 | =Tc/strapi             +
           |           |          |         |       | strapi=CTc/strapi
 template0 | mopsyshin | UTF8     | C       | UTF-8 | =c/mopsyshin           +
           |           |          |         |       | mopsyshin=CTc/mopsyshin
 template1 | mopsyshin | UTF8     | C       | UTF-8 | =c/mopsyshin           +
           |           |          |         |       | mopsyshin=CTc/mopsyshin
(4 rows)
이제 DB 생성과 유저 생성, 권한 설정이 마무리되었다.
다시 Strapi
이제 다시 strapi 서버를 실행시켜보자
npm run develop
// or
yarn develop
아까 관리자 계정을 만들었었지만, DB가 바뀌었기 때문에 다시 만들어줘야 한다.
만약 이 창이 안뜨고 바로 대쉬보드로 넘어간다면 DB변경이 되지 않은 것이다.
이제 백엔드 개발환경은 세팅이 마무리 되었다.
Nextj.js로 프론트엔드 프로젝트 구성
프론트엔드 프로젝트는 훨씬 간단하다.
마찬가지로 공식 문서를 참고해 진행한다.
https://nextjs.org/docs/getting-started
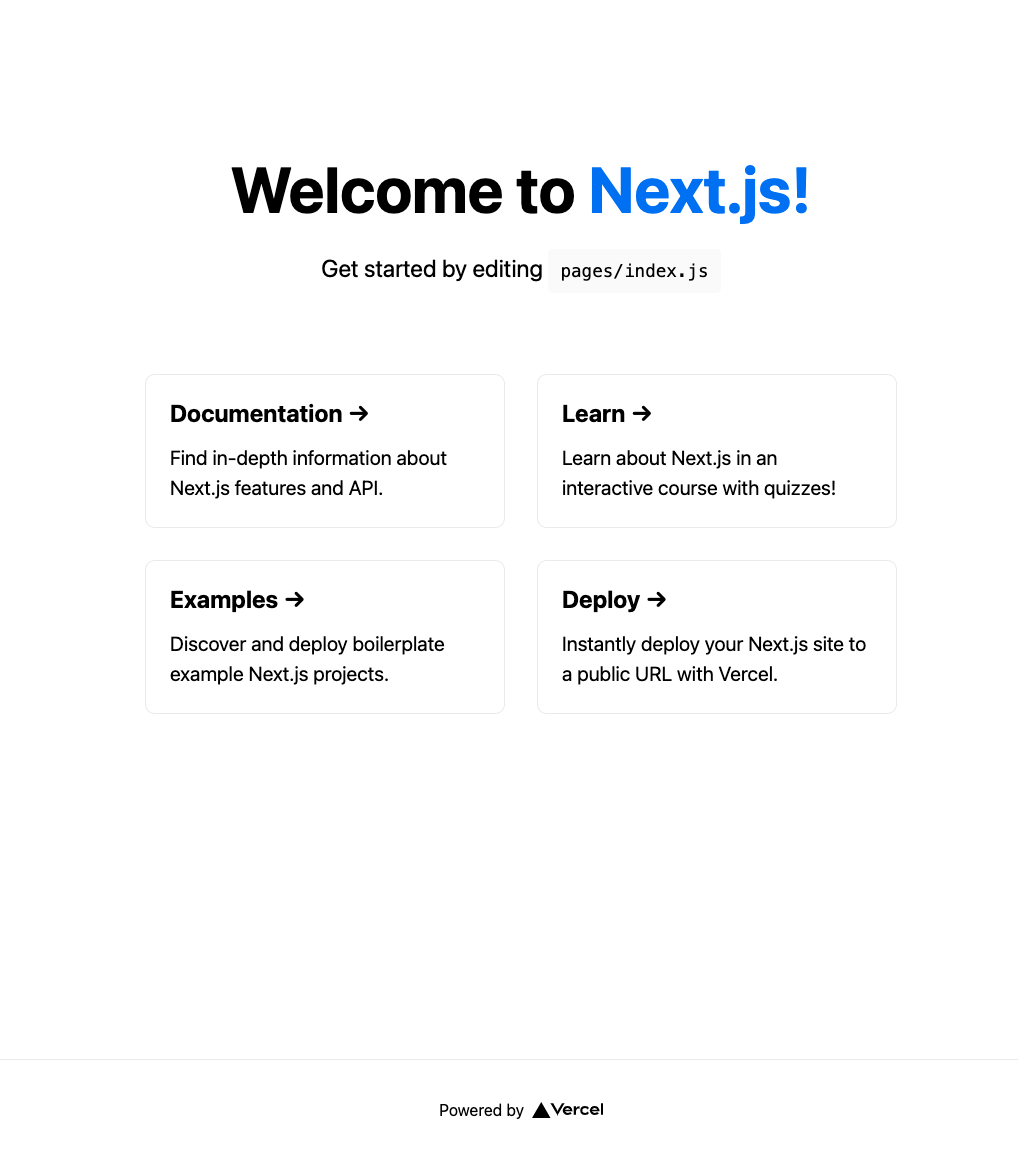
npx create-next-app
# or
yarn create next-app
위 명령어를 입력하면, 프로젝트 이름을 입력하라는 메세지가 나오고 설치가 시작된다.
나의 경우에는 프로젝트 이름을 nsb-client로 지정했다.
이제 nsb-client 폴더 안에 해당 프로젝트가 설치되었다.
cd nsb-client/
npm run dev
next 서버를 실행시키고 localhost:3000 으로 접속했을 때 다음과 같은 페이지가 뜬다면 성공적으로 설치된 것이다.
라이브러리 설치
next 프로젝트 설치가 완료되었으니, 주요 라이브러리들을 설치해보자.
Typescript
https://nextjs.org/docs/basic-features/typescript
next 프로젝트는 typescript에 대해 IDE수준의 통합된 경험을 제공한다.
프로젝트 경로에서
touch tsconfig.json를 통해 tsconfig.json 파일(typescript 설정 파일)을 만들어준 뒤
yarn dev를 다시 실행하면, next cli가 자동으로 타입스크립트 기본 설정을 잡아준다.
하지만 아직 타입스크립트가 설치되어 있지 않으므로 에러가 날텐데, 에러 메세지에 나온대로
yarn add --dev typescript @types/react @types/node타입스크립트를 dev-dependencies로 설치해 준 후 다시 yarn dev를 실행하자.
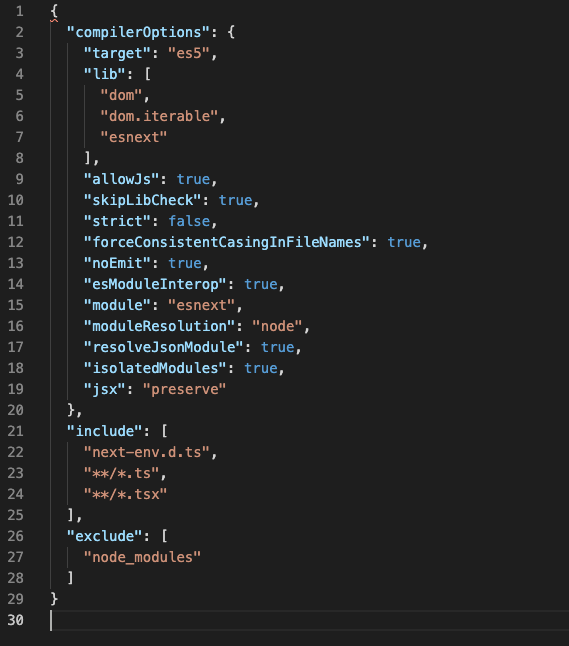
그럼 tsconfig.json에 위와 같이 기본 설정이 작성된다.
sass 설치
next.js는 기본적으로 module.css 를 지원하지만 module.scss를 사용하기 위해서는 sass를 설치해주어야 한다.
https://nextjs.org/docs/basic-features/built-in-css-support#sass-support
yarn add sassrecoil 설치
상태관리를 위해 recoil도 설치해준다.
https://recoiljs.org/docs/introduction/getting-started
yarn add recoil마무리
이로써 기본적인 프로젝트 세팅을 완료했다. 다음편부터는 본격적으로 어플리케이션 개발을 할 수 있게 됐다 (드디어). 혼자 진행할때는 금방금방 했었는데, 아무래도 기록하면서 진행하려니 생각보다 시간이 오래 걸렸다. 좀 더 효율적으로 정리할 방법을 찾아봐야 할 것 같다.