
Spring CRUD
ReadOne
데이터베이스에는 테이블이 있고, 테이블은 각각 로우를 가진다. 로우는 하나의 기록으로 사용된다. 이때 하나의 레코드를 식별하는 칼럼을 Primary Key라고 한다. 한 명의 Student를 읽어 오려면 먼저 PK로 어떤 Student를 읽어 올 것인지부터 결정해야 한다. Service에서 StudentDto를 주는 메소드를 만들 때, 따라서 Long id를 파라미터로 가져 와야 한다. 지금은 데이터베이스 연결이 없어서 그냥 JAVA 코드로 작성되지만, 데이터베이스가 연결된 이후로는 쿼리문까지 작성해야 한다. 이를 바탕으로 Service를 만들면 다음과 같다.
public StudentDto readStudent(Long id) {
        for (StudentDto student: studentDtoList) {
            if (student.getId().equals(id)) {
                return student;
            }
        }
        return null;
    }
이후 학생을 보여 주기 위해 read.html을 만든다.
<!DOCTYPE html>
<html lang="en">
<head>
    <meta charset="UTF-8">
    <title>Read Student</title>
</head>
<body>
<h1>student.id student.name</h1>
<p>이메일: student.email</p>
<a href="/home">back</a>
</body>
</html>
이후 Controller를 작성해 준다.
@GetMapping("/read")
    public String read(Long id, Model model) {
        model.addAttribute(
                "student",
                studentService.readStudent(id)
        );
        return "read";
    }
작성해 둔 html에 thymeleaf 문법을 넣어 준다.
<!DOCTYPE html>
<html lang="en">
<head>
    <meta charset="UTF-8">
    <title>Read Student</title>
</head>
<body>
<h1>[[${student.id}]] [[${student.name}]]</h1>
<p>이메일: [[${student.email}]]</p>
<a href="/home">back</a>
</body>
</html>
이를 실행하면 500 번대 에러가 뜬다. 서버가 요청을 제대로 수행할 수 없다는 것이다. 파라미터로 id를 보내 줘야 하는데, html을 해석하는 과정에서 데이터가 없기 때문에 html 작성이 불가능해진 것이다. 즉, springboot는 정상적으로 작동하지만 thymeleaf 문법이 적용된 html 문서 해석이 어려워진 것이다.
html이 에러가 난 것이지만 이는 spring에서 null 값을 보내 줬기 때문이다. 따라서 코드를 수정해야 할 부분은 html이 아니다. 그렇다면 어떻게 id를 전달할 수 있을까?
url의 경로는 폴더의 구조와 유사한 모습을 보인다. 코드를 @GetMapping("/{id}") 이렇게 수정하면 된다. 이때 중괄호 안에 있는 값은 사용자가 지정해 주는 변수라고 인식한다. 이후 이 url로 받은 파라미터를 @PathVariable로 받아온다.
@GetMapping("/{id}")
public String read(@PathVariable("id") Long id, Model model) {
model.addAttribute(
"student",
studentService.readStudent(id)
);
return "read";
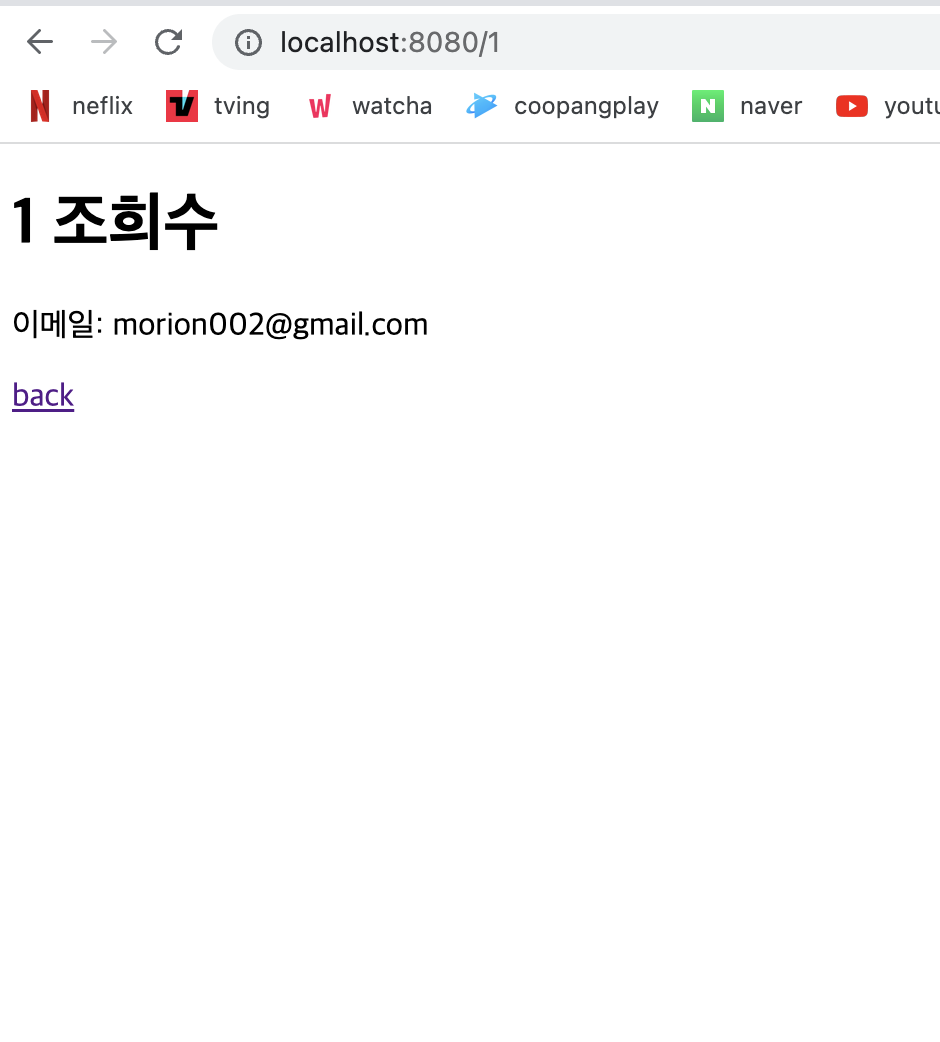
}url 뒤에 student id를 입력하면 다음과 같이 화면이 잘 출력된다.
Linking
Student List 페이지에서 이름을 누르면 해당 학생의 상세 보기 페이지로 이동하도록 수정해 보고자 한다. th: 속성은 thymeleaf 속성이지만 href는 원래 html의 속성이다. html의 속성도 동적으로 사용하고 싶을 때는 th:href 로 바꿔서 사용할 수 있다.
또한 Thymeleaf에서 url을 표현할 때 그냥 쓰는 것보다 @{/url} 로 사용하는 것을 권장한다.
<!DOCTYPE html>
<html lang="en">
<head>
    <meta charset="UTF-8">
    <title>Student List</title>
</head>
<body>
<h1>Student List</h1>
<!-- 등록된 학생이 없을 때 -->
<div th:if="${studentList.isEmpty()}">
  <p>No Student Here...</p>
</div>
<!-- 등록된 학생이 있을 때 -->
<div th:unless="${studentList.isEmpty()}" th:each="student: ${studentList}">
  <p>ID: [[${student.id}]]</p><br>
  <p>Name: **<a th:href="@{/{id} (id=${student.id})}">**[[${student.name}]]</a></p><br>
  <p>Email: [[${student.email}]]</p><br>
</div>
<a href="/create-view">Create</a>
</body>
</html>
Update
상세 보기 페이지에서 업데이트 페이지로 이동하는 버튼을 만들고, 업데이트 페이지에서 만든 form을 통해 데이터를 변경하는 작업을 해 보고자 한다. 전반적인 과정을 살피자면 다음과 같다.
- 먼저 상세 보기 페이지에 업데이트 기능을 추가한다.
- 업데이트 페이지를 만들어 from을 생성한다.
- Controller에서 PostMapping을 통해 데이터를 수정한다.
- 이후 Service를 갱신한다.
- Redirect를 이용해 상세 보기 페이지로 다시 이동하도록 한다.
먼저 상세 보기 페이지에 업데이트 기능을 추가하고 update 폼을 만든다.
<!DOCTYPE html>
<html lang="en">
<head>
    <meta charset="UTF-8">
    <title>Update</title>
</head>
<body>
<h1>Update Student</h1>
<form method="post">
  <label for="name-input">Name:
    <input id="name-input" name="name">
  </label>
  <br>
  <label for="email-input">Email:
    <input id="email-input" name="email">
  </label>
  <br>
  <!--  데이터 제출 버튼  -->
  <input type="submit">
</form>
<a th:href="@{/{id} (id=${student.id})}">back</a>
</body>
</html>
Controller에 update를 받아 오는 매핑을 추가한다.
@GetMapping("/{id}/update-view")
public String updateView(@PathVariable("id") Long id, Model model){
model.addAttribute(
"student",
studentService.readStudent(id));
return "update";
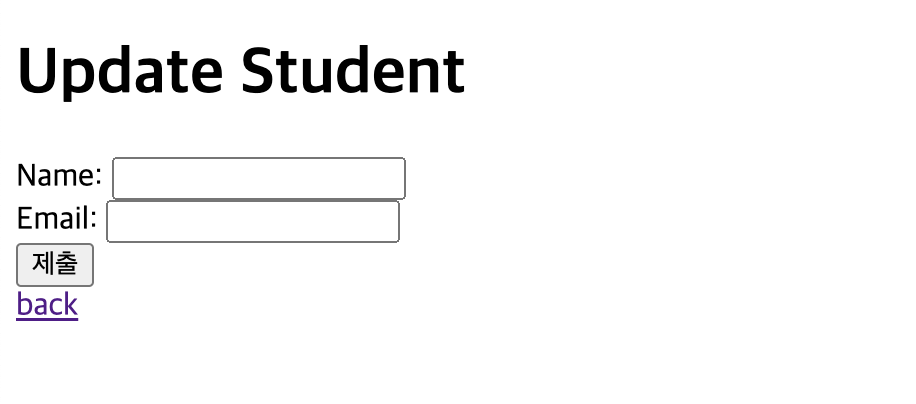
}이후 edit 버튼을 누르면 다음과 같은 화면이 뜬다.
하지만 원래의 값이 뭐였는지 알아야 수정이 더욱 용이하다. 따라서 value 속성을 통해 원래 데이터가 무엇인지 표시한 뒤 수정하도록 바꾸려고 한다.
<!DOCTYPE html>
<html lang="en">
<head>
    <meta charset="UTF-8">
    <title>Update</title>
</head>
<body>
<h1>Update Student</h1>
<form method="post">
  <label for="name-input">Name:
    <input id="name-input" name="name" **th:value="${student.name}"**>
  </label>
  <br>
  <label for="email-input">Email:
    <input id="email-input" name="email" **th:value="${student.email}**">
  </label>
  <br>
  <!--  데이터 제출 버튼  -->
  <input type="submit">
</form>
<a th:href="@{/{id} (id=${student.id})}">back</a>
</body>
</html>
이후 어떤 학생 데이터를 갱신할 것인지, 그 학생의 데이터를 어떤 값으로 받아올 것인지를 통해 값을 변경하는 로직을 작성한다.
public StudentDto updateStudent(Long id, String name, String email) {
        /*
        for (StudentDto student: studentDtoList) {
            if(student.getId().equals(id)){
                student.setName(name);
                student.setEmail(email);
                return student;
            }
        }
        return null;
        */
        int target = -1;
        for (int i = 0; i < studentDtoList.size(); i++) {
            if(studentDtoList.get(i).getId().equals(id)) {
                target = i;
                break;
            }
        }

        if(target != -1) {
            studentDtoList.get(target).setName(name);
            studentDtoList.get(target).setEmail(email);
            return studentDtoList.get(target);
        }
        else return null;
    }
Service를 구현했으니 Post HTTP 요청을 처리하는 Controller를 하나 만든다.
@PostMapping("/{id}/update")
    public String update(
            @PathVariable("id") Long id,
            @RequestParam("name") String name,
            @RequestParam("email") String email
    ) {
        studentService.updateStudent(id, name, email);
        return "redirect:/{id}";
    }
여기서 th:action 의 기능은 form이 있는 html 의 문서에서 input으로 오는 값들을 action 뒤에 있는 url로 전달하게 해 주겠다는 것이다.
Delete
상세 보기 페이지에서 삭제 확인 페이지로 넘어가 삭제 기능을 구현하고, 뒤로 가기 버튼을 통해 상세 보기 페이지로 이동하는 기능을 추가하고자 한다. 삭제가 성공했다면 home으로 이동하도록 한다.
먼저 delete.html 템플릿을 완성한다.
<!DOCTYPE html>
<html lang="en">
<head>
    <meta charset="UTF-8">
    <title>Delete</title>
</head>
<body>
<h1>Delete Student Name?</h1>
<form action="" method="post">
    <!-- create, update와는 다르게 -->
    <!-- delete는 추가적인 데이터를 필요로 하지 않는다 -->
    <!-- 그래서 추가적인 input 요소 없이 input type = "submit" 만 존재 -->
    <input type="submit" value="delete">
</form>
<a th:href="">back</a>
</body>
</html>
이후 삭제 확인 페이지를 반환하는 deleteView Controller를 반환한다.
@GetMapping("/{id}/delete-view")
public String deleteView(
@PathVariable("id") Long id, Model model
) {
StudentDto studentDto = studentService.readStudent(id);
model.addAttribute("student", studentDto);
return "delete";
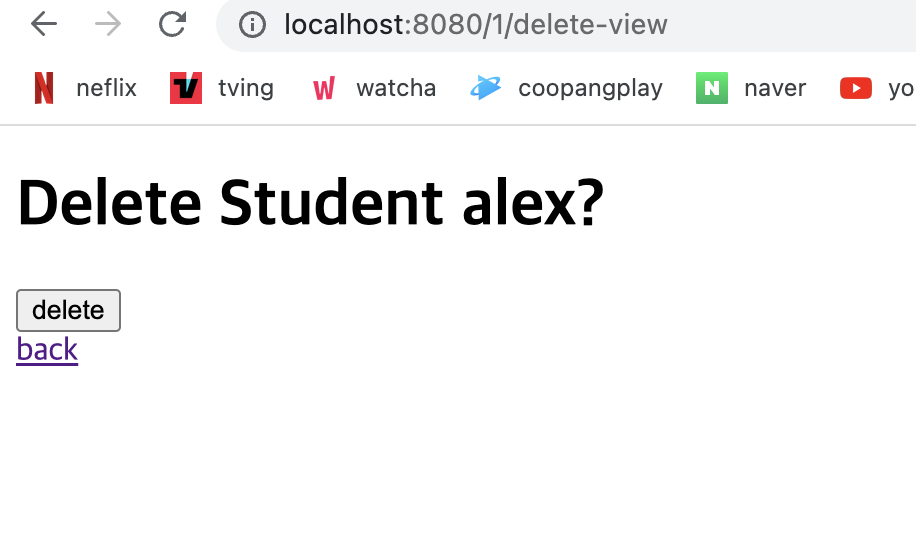
}이후 실행하면 다음과 같이 잘 뜨는 것을 볼 수 있다.
이후 Service에 해당 삭제 기능을 구현한다.
public boolean deleteStudent(Long id) {
        /*
        for (StudentDto student: studentDtoList
             ) {
            if(student.getId().equals(id)){
                studentDtoList.remove(student);
                return true;
            }
        }
        return false;
         */
        int target = -1;
        for (int i = 0; i < studentDtoList.size(); i++) {
            if(studentDtoList.get(i).getId().equals(id)) {
                target = i;
                break;
            }
        }
        if(target != -1) {
            studentDtoList.remove(target);
            return true;
        }
        else return false;
    }
이후 post HTTP 요청을 처리하는 Controller를 구현해 준다. update 때는 데이터가 남아 있지만 delete는 돌아갈 상세 보기가 없기 때문에 홈으로 돌아간다.
@PostMapping("/{id}/delete")
    public String delete(
         @PathVariable("id") Long id
    ) {
        studentService.deleteStudent(id);
        return "redirect:home";
    }