공개키
- 서로 다른 두개의 키를 이용하는 비대칭 방식
- 기밀성, 키 분배, 인증 굳
암호화 과정
1. 키 생성:
- 공개 키와 비공개 키 쌍을 생성
2. 공개 키를 사용한 암호화:
- 암호화된 메시지를 보내려는 사람은 수신자의 공개 키를 얻습니다.
이 공개 키를 사용하여 메시지를 암호화합니다.
일단 암호화되면 데이터는 수신자의 개인 키를 통해서만 해독될 수 있습니다.
암호화된 데이터(암호문)가 수신자에게 전송됩니다.
3. 개인 키를 사용한 암호 해독:
- 암호화된 메시지를 받으면 수신자는 개인 키를 사용하여 데이터를 해독합니다.
이 개인 키는 절대 공유되지 않으므로 의도한 수신자만 메시지를 해독하고 읽을 수 있습니다.
공개키 암호화

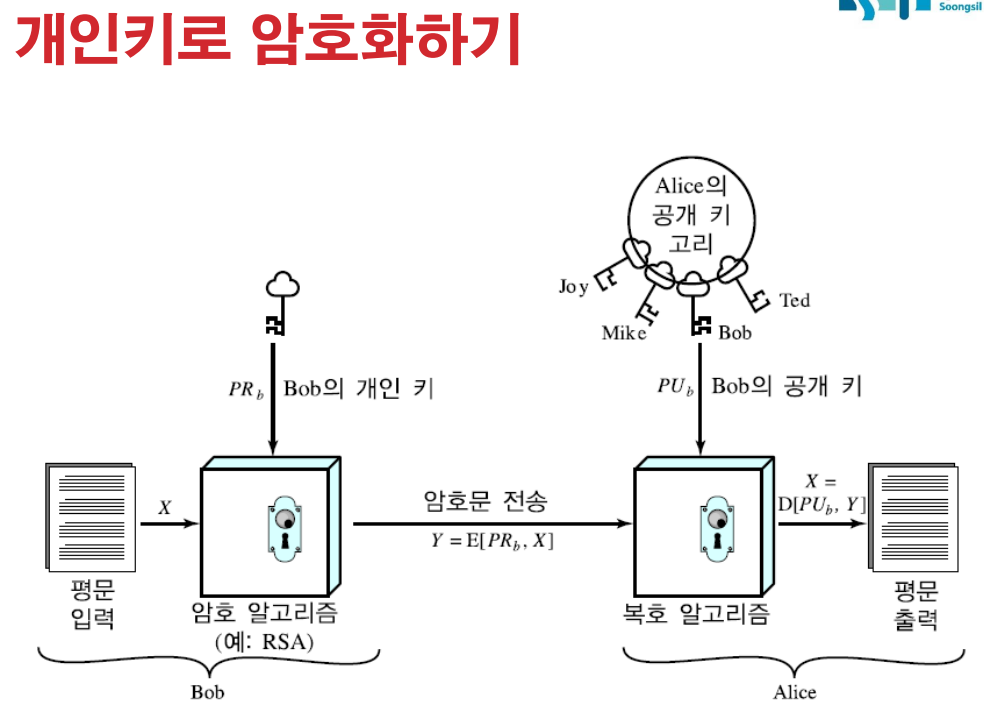
개인키 암호화
공개키 암호 요건
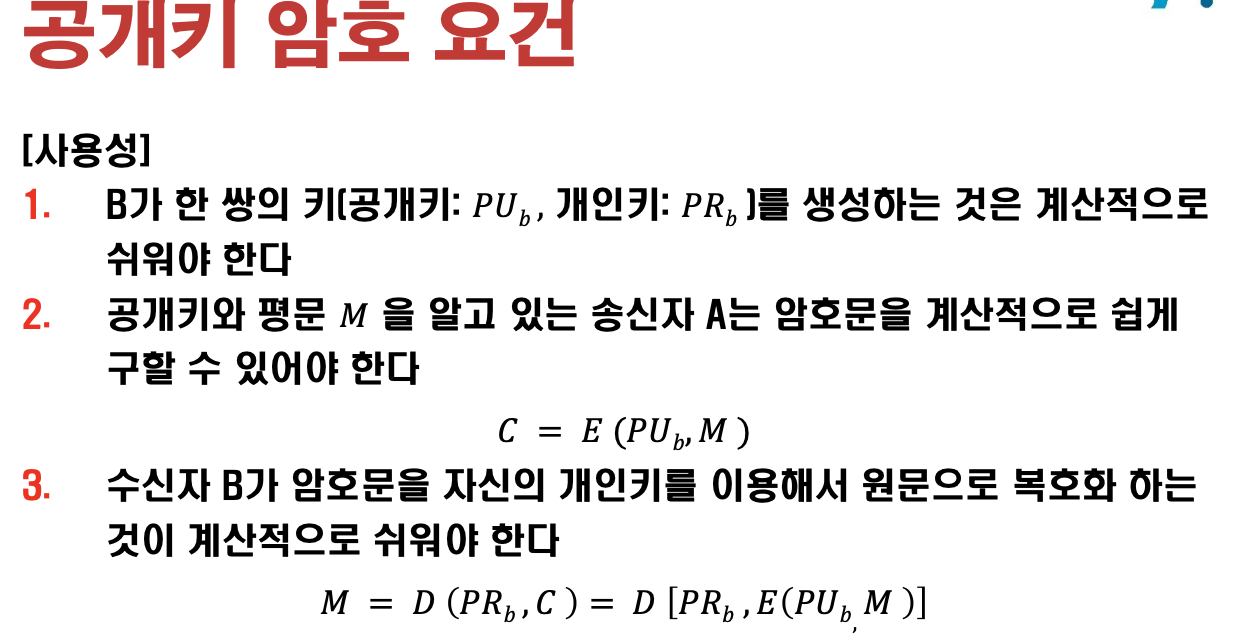
- C = E(PUb , M). 보낼때 수신자의 공개키를 넣어 암호화한다.
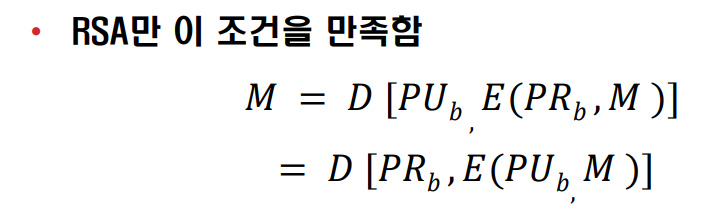
RSA만 이 조건을 만족함
𝑀 = 𝐷[𝑃𝑈𝑏,𝐸(𝑃𝑅𝑏,𝑀)]
= 𝐷 [𝑃𝑅𝑏 ,𝐸(𝑃𝑈𝑏, 𝑀 )]
공개키 암호기능
메세지 암호화
- 수신자 공개키로 암호화
- 암호문은 개인키로 복호화
- 개인키로 암호화하면, 공개키로 누구나 복호화 가능
Q1. 개인키로 암호화하면 아무나 볼 수 있는데 무슨의미가 있지?
A1. 디지털 서명의 목적(비밀유지가 목적이 아님!)
- 메시지는 주장된 발신자(인증)로부터 왔습니다.
- 메시지는 전송 중에 변조되지 않았습니다(무결성).
- 발신자는 메시지 전송을 거부할 수 없습니다(부인방지).
전자 서명
- 공개키로 복호화 된다면 개인키로 암호화했다는 것을 알 수 있음
키 교환
- 안전하게 온라인으로 키를 교환하는건 어려워.
- 키를 교환: 블록 암호에 사용할 대칭키를 공개키로 암호화해서 전송
RSA 만 개인키, 공개키 순서 상관없이 암호화,복호화 가능.
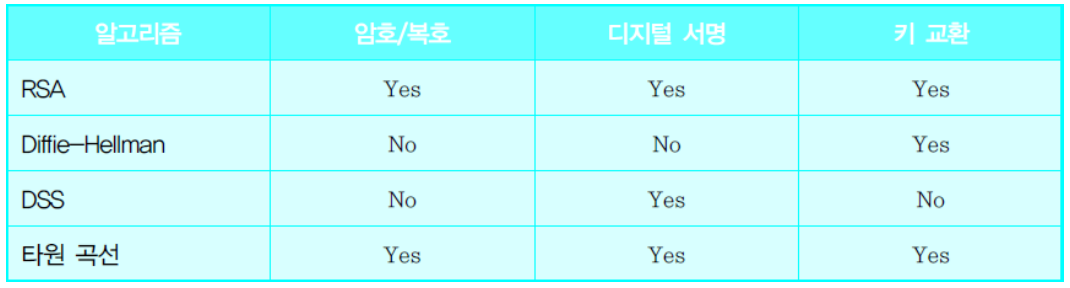
- DH : 키 일치만
- DSS : 디지털 서명만
- 타원곡선은 각각 따로 있어. RSA처럼 하나로 다 되는게 아님.
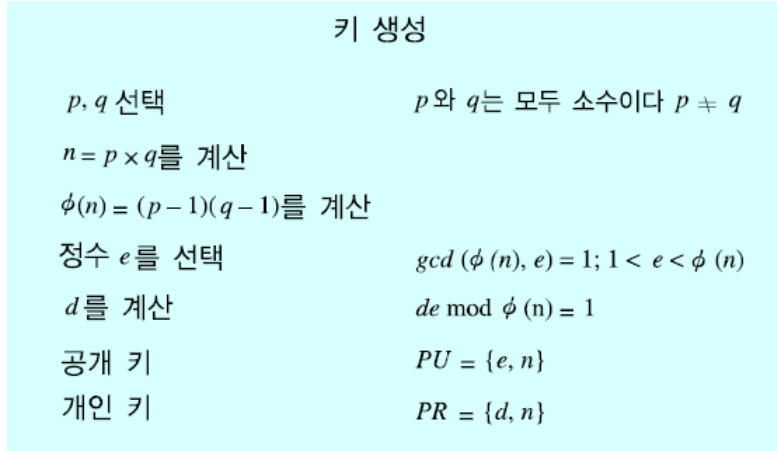
RSA 알고리즘
- 공개키 PU ={e,n}
- 개인키 PR = {d,n}
암호 복호 수식은 알아야해!! 원리는 몰라도 되지만. 시험 나옴
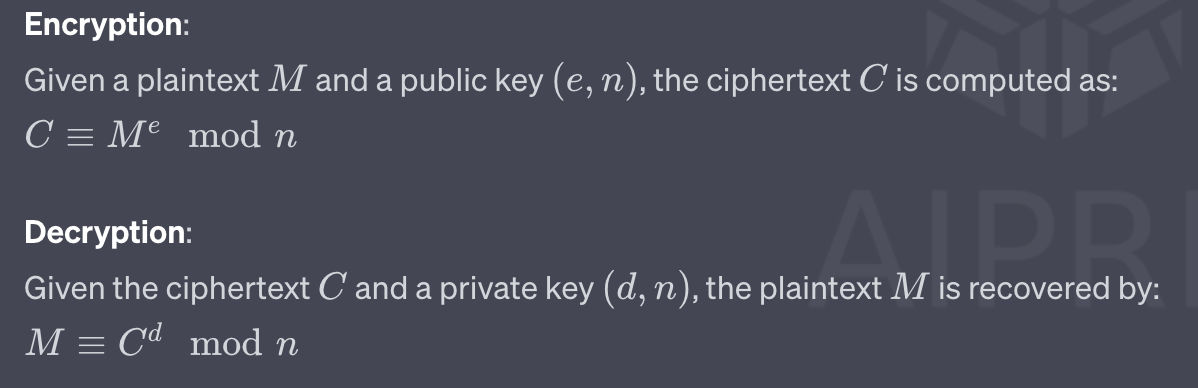
암호화, 복호화 수식
평문 : M
암호문 : C
키 생성 (대충만 알고있어. 시험 x)
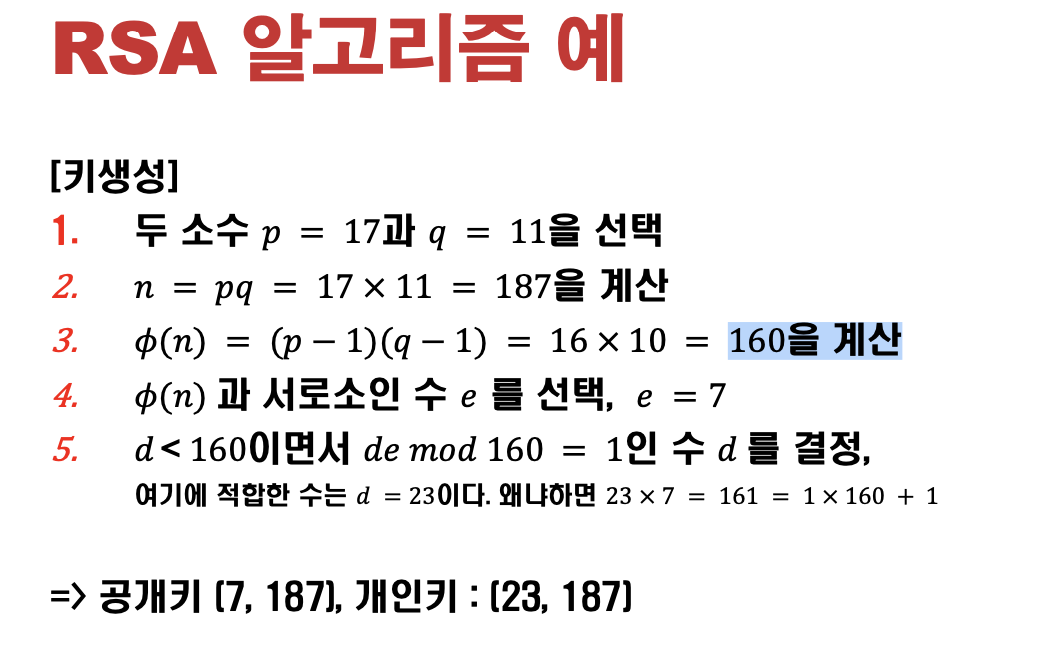
RSA 암호화 및 암호 해독의 예:
두 개의 소수를 선택하세요:
p=3
q=11
n과 ф(n)을 계산합니다:
n=p×q=3×11=33
ф(n)=(p−1)(q−1)=2×10=20
공개 키 선택:
e가 ψ(n) 및 1<e<ψ(n)과 서로소인 숫자 e가 필요합니다. e=3을 선택하겠습니다(3은 20보다 작고 서로소는 20이기 때문입니다).
컴퓨팅 개인 키:
(d×e)modф(n)=1이 되는 숫자 d가 필요합니다. 계산을 하면 d=7이라는 것을 알 수 있습니다.
그래서:
공개 키: (n,e)=(33,3)
개인키: d=7
메시지 암호화: 누군가가 당신에게 m=7이라는 메시지를 보내고 싶어한다고 가정해 보세요.
암호화된 메시지 c = memodn=73mod33=343mod33=13.
따라서 암호화된 메시지 c는 13입니다.
메시지 암호 해독: 개인 키 사용:
해독된 메시지 m = cdmodn=137mod33.
계산 후, 해독된 메시지 m은 다시 7로 돌아옵니다.
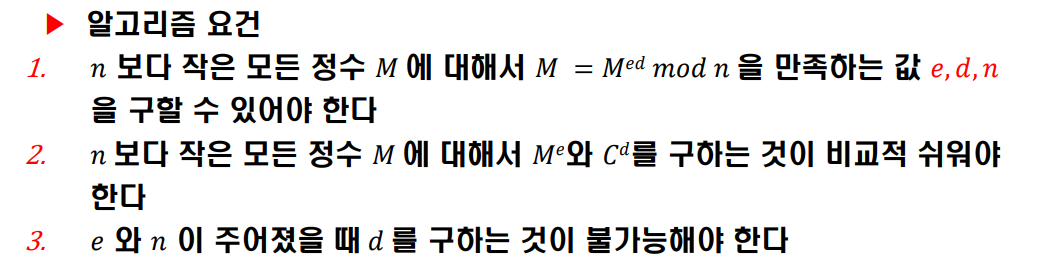
알고리즘 요건
깨기가 어려운 이유
- p와 q를 알면 이를 다 계산할 수 있는데,
공개된 n 값으로 부터 p와 q를 계산하는 소인수 분해가 어렵다. => p,q를 찾아내기 계산적으로 어려움. => 그래서 안전함
But 양자 컴퓨터가 소인수 분해를 빨리해버리기 때문에 새로운 암호화 방법이 필요해. => PQC 의 등장.
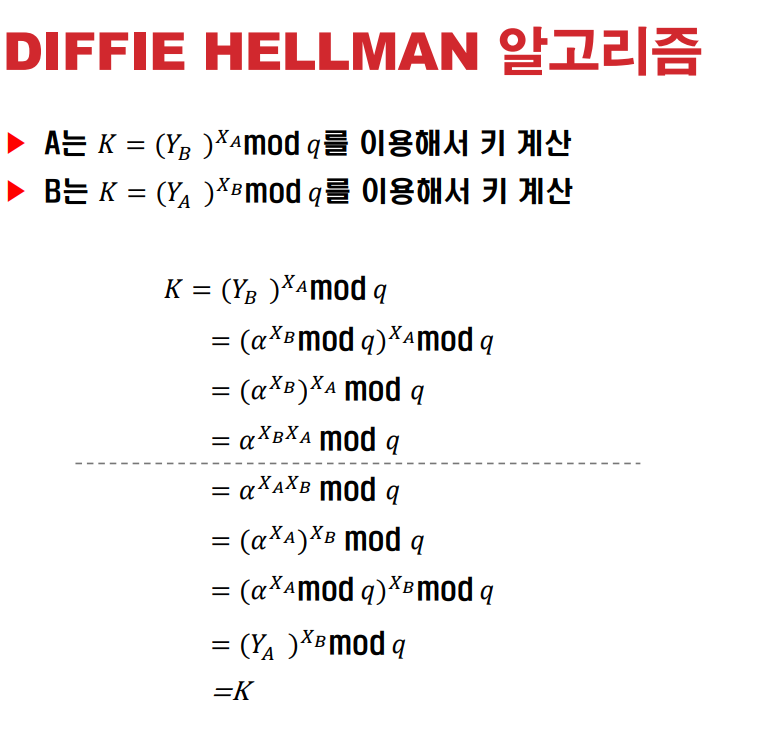
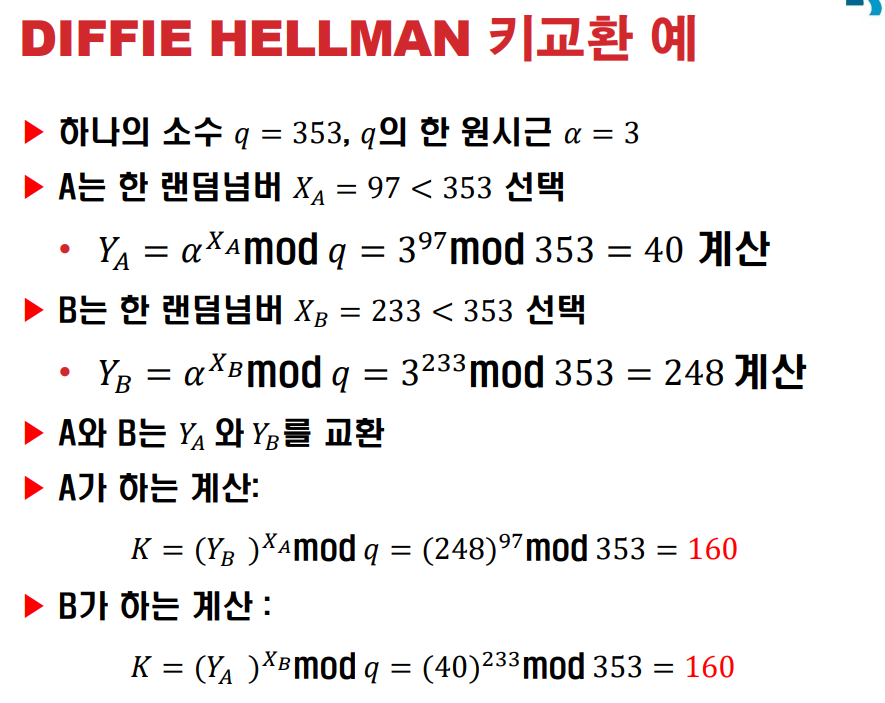
DIFFIE-HELLMAN 키 교환
- 수신자 발신자 모두 소수q 와 원시근 알파 a 를 공유.
키 교환 방식 비유
-
공공 기반 색상: 먼저 노란색. 누구나 볼 수 있습니다.
-
개인 비밀 색상:
앨리스는 파란색.
Bob은 다른 비밀 색상인 빨간색. -
공공 컬러와 혼합:
앨리스는 비밀 파란색과 공개 노란색을 혼합하여 청록색.
밥은 자신의 빨간색과 공개된 노란색을 혼합하여 주황색을 얻습니다. -
그런 다음 혼합된 색상을 교환합니다. 이제 Alice는 Bob의 오렌지를 갖고 있고 Bob은 Alice의 청록색을 갖고 있습니다.
-
공유 비밀 색상 생성:
앨리스는 밥의 오렌지색+ 원래의 파란색 = 갈색을 얻습니다.
밥은 앨리스의 청록색 + 원래의 빨간색 = 갈색도 얻습니다.
시험에 나와. 수식.
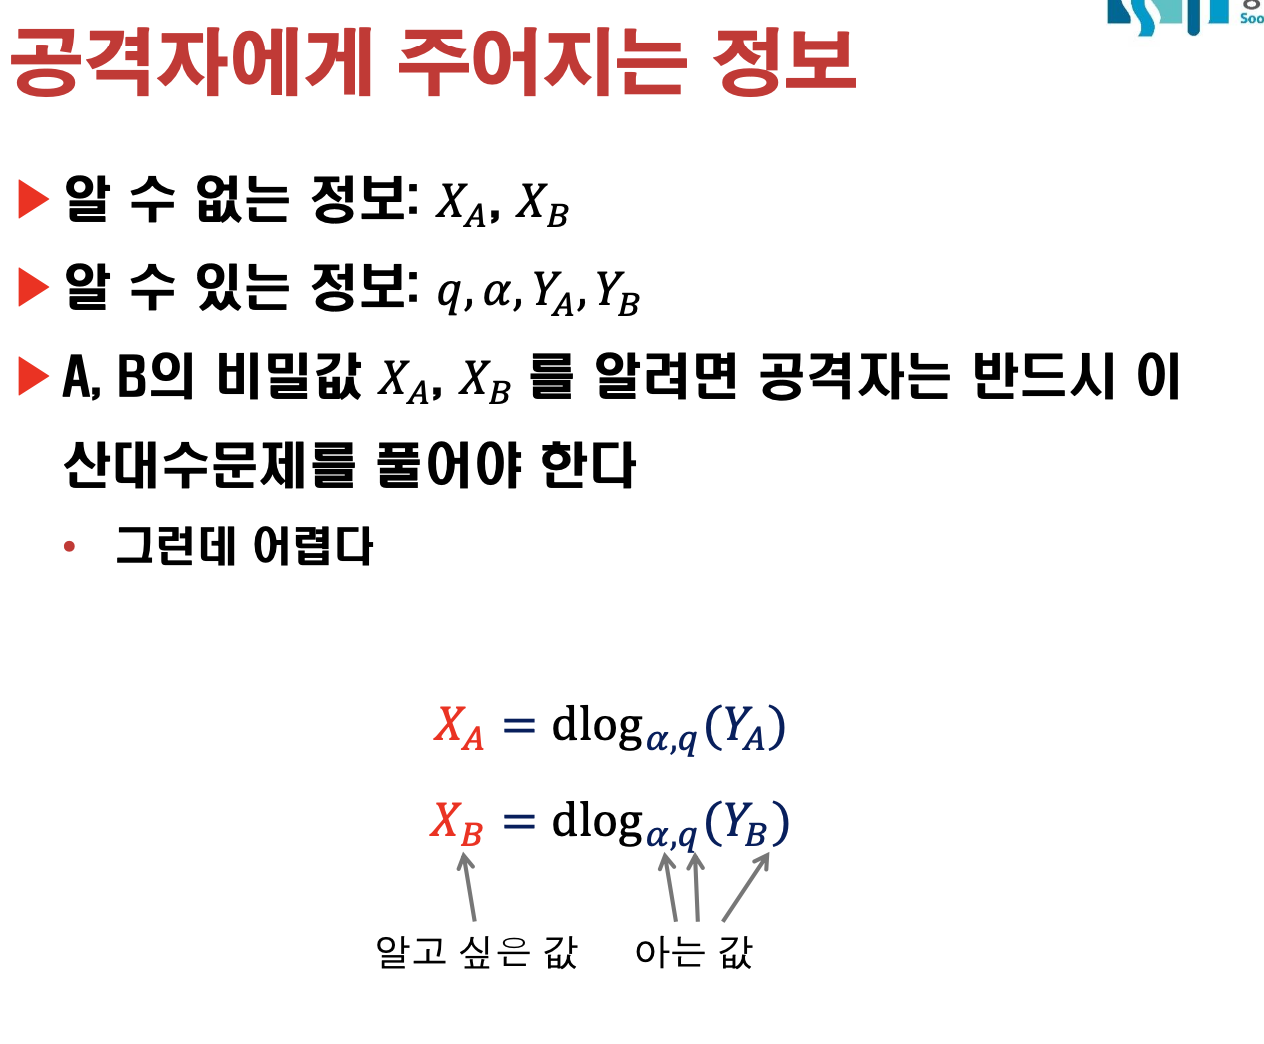
공격자에게 주어지는 정보
중간자 공격(MITM)
- 키 교환 과정에서 공격자가 중간에 개입하는 Active Attack
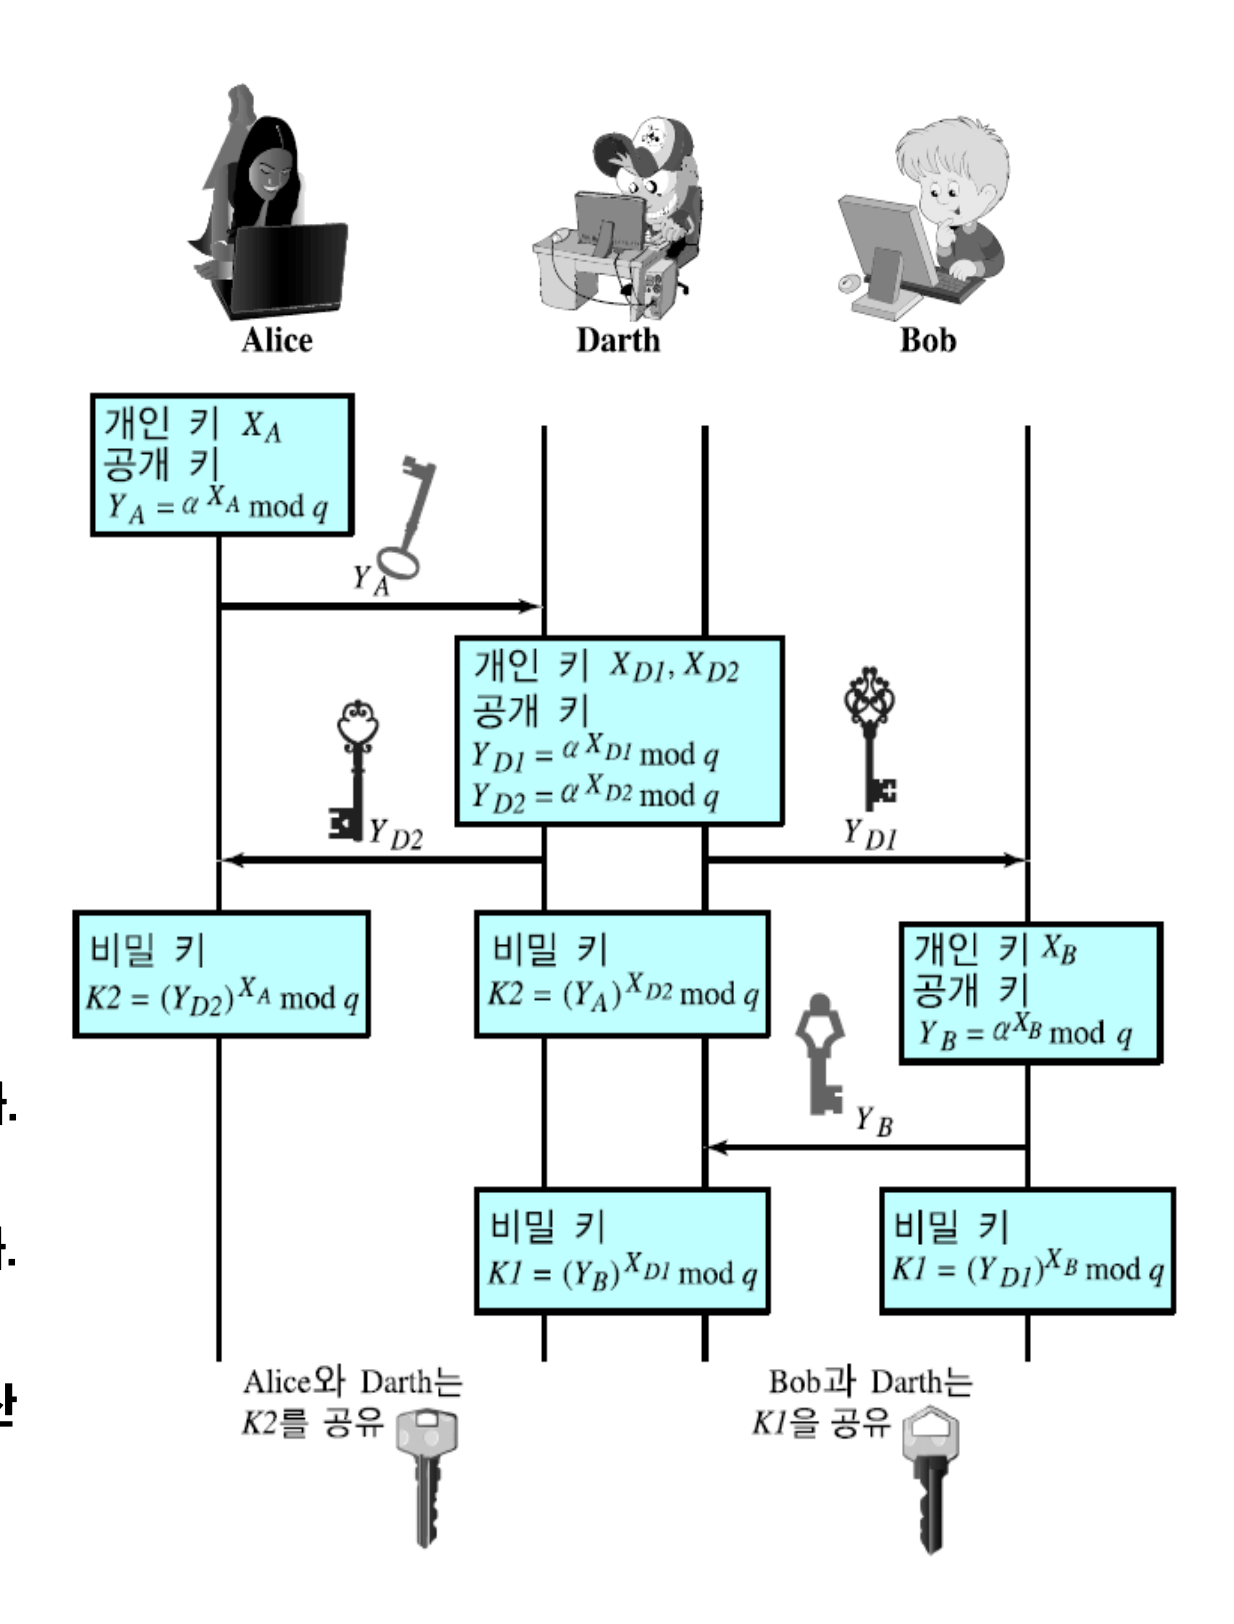
중간자 공격 대응 방안
- 키 교환시 상대방을 인증해야한다. => 전자서명
전자서명
MAC
-
MAC는 단일 공유 비밀 키를 사용합니다. 송신자와 수신자 모두 이 공유 키를 소유
-
부인방지 기능.
-
공유키-개인키는 수신자가 내가 보내지도 않은 메세지를 만든거 아니냐고 주장, 똑같은 키를 가지고 있으니. => 전자서명. 개인키 암호화로 방지가능 = 메세지 무결성
-
메시지의 무결성
-
소스 인증
-
부인방지
개인키로 서명하고 공개키로 검증.
RSA-PSS 부호화와 서명 생성
PEM 인코딩
- 암호화 키, 인증서 및 기타 데이터를 텍스트 형식으로 저장하고 전송하는 데 사용되는 인코딩 유형
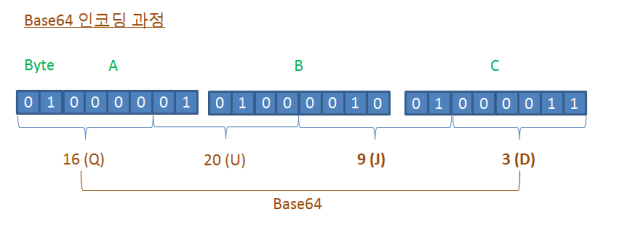
Base64 인코딩
- 이미지나 파일과 같은 바이너리 데이터를 ASCII 문자로 변환하는 데 사용되는 방법
- 바이너리 데이터를 텍스트 기반 형식으로 전송하거나 저장
- 64니까 6비트씩 끊어.
과제 1a-1.py
• 키쌍 생성
• 개인키를 Alice_private.pem으로 저장
• 공개키를 Alice_public.pem으로 저장
from Crypto.PublicKey import RSA
from Crypto.Cipher import PKCS1_OAEP
import binascii

# Generate a key pair
keyPair = RSA.generate(2048)
pubkey = keyPair.publickey()  # Separate public key

# Export the private key to PEM format
private_pem = keyPair.export_key(passphrase="1234")

# Save the private key to a file in binary mode
with open('Alice_private.pem', 'wb') as private_file:
    private_file.write(private_pem)

# Export the public key to PEM format
public_pem = pubkey.export_key()

# Save the public key to a file in binary mode
with open('Alice_public.pem', 'wb') as public_file:
    public_file.write(public_pem)
과제 1b.py
Alice_public.pem을 읽어 들여서
임의 파일 1.txt를 이 공개키로 암호화하여 enc.txt로 저장
- 1.txt 는 너무 길 필요 없음
- Enc.txt 파일 구조는 알아서..
from Crypto.PublicKey import RSA
from Crypto.Cipher import PKCS1_OAEP

# 1. Save content to 1.txt
with open("1.txt", "w", encoding="utf-8") as file:
    file.write('aaa111')

# 2. Read the public key
with open("Alice_public.pem", "r") as pub_file:
    public_key = RSA.import_key(pub_file.read())

# 3. Encrypt the content of 1.txt
cipher = PKCS1_OAEP.new(public_key)

with open("1.txt", "r", encoding="utf-8") as file:
    plaintext = file.read().encode("utf-8")
    ciphertext = cipher.encrypt(plaintext)

# 4. Save the encrypted data to enc.txt
with open("Enc.txt", "wb") as enc_file:
    enc_file.write(ciphertext)
과제 a-2.py
• Passphrase를 사용자에게 입력받은 후
• Alice_private.pem으로 부터 private key를 읽고
• Enc.txt를 읽어서 복호화 후 화면에 print
from Crypto.PublicKey import RSA
from Crypto.Cipher import PKCS1_OAEP

# 1. Prompt the user for the passphrase
passphrase = input("Enter the passphrase for the private key: ")

# 2. Read the private key
with open("Alice_private.pem", "r") as priv_file:
    private_key = RSA.import_key(priv_file.read(), passphrase=passphrase)

# 3. Read the encrypted data from enc.txt
with open("Enc.txt", "rb") as enc_file:
    ciphertext = enc_file.read()

# 4. Decrypt the encrypted data
cipher = PKCS1_OAEP.new(private_key)
plaintext = cipher.decrypt(ciphertext)

# 5. Print the decrypted content
print(plaintext.decode("utf-8"))
너무 길면 안돼.
파일 정보도 알아서 마들어.
1a-2.py
passphrase 를 넣었으니 사용자한테 입력을 받고
저장된 private 를 import 만 하면돼.
불러와서 Enc.txt.를 읽어서 복호화 후 화면에 print
RSA 전자서명
ASN1(추상 구문 표기법 1)
- 데이터를 표현, 인코딩, 전송 및 디코딩하기 위한 데이터 구조를 설명하는 데 사용되는 표준 표기법
- ex) 청사진
DER(고유 인코딩 규칙)
- ASN.1 데이터 구조를 바이너리 형식으로 인코딩하는 특정 방법
- ex) ASN1 이라는 청사진에서 무언가를 구축하는 방법
verifier = PKCS1_PSS.new(key.publickey())
sig = signer.sign(h)
verifier = PKCS2_PSS.new(key.publickey())
verifier.verify(h,sig)
DER 인코딩.
구조화 되어있는걸 DER 인코딩을 하고.
바이너리를 텍스트화 시키는게 있음.
asn 샘플을 보면
from Crypto.Util.ans1 import *
from binascii import hexlify
seq = DerSequence()
seq.append(9)
seq.append(5)
enc = seq.encode() #이때 타입 랭스 value 로 변환
hexlify(enc)
b'3006020...' # seq니까 30. 타입 02 길이가
RSA 키도 DER 인코딩해서 저장하는게 일반적.
DER or PEM 으로.
from Crypto.PublicKey import RSA
key = RSA.generate(2048)
pubkey = key.publickey()
pubkey.exprot_key(format"DER")
#DER로 시퀀스화 시켜서 저장.

hexlify(pubkey.export_key(format="DER"))
# 30 으로 시작해.

# 공인인증서도 로컬에서 저장할때 DER 임.
과제 2a.py
• 키쌍 생성
• 공개키를 public.der로 저장 (der 인코딩으로 저장)
• 1.txt 를 읽어서 서명 후 서명 값은 Base64 encoding하여 sig.txt에 저장
☞ 문서와 sign 을 저장하기 위해 표준화된 asn.1 포맷 (PKCS#7) 이 따로 있음
from Crypto.PublicKey import RSA
from Crypto.Signature import PKCS1_PSS
from Crypto.Hash import SHA
from Crypto.Util.asn1 import *
from binascii import hexlify
from base64 import b64encode

def create_key():
    key=RSA.generate(2048)
    public_key = key.publickey().export_key("DER")
    with open("public.der", "wb") as f:
        f.write(public_key)
    return key

def sign(private_key, filename="1.txt"):
    with open(filename, "rb") as f:
        msg = f.read()
    h = SHA.new()
    h.update(msg)
    signer = PKCS1_PSS.new(private_key)
    sig = signer.sign(h)

    # base 64
    signature_b64 = b64encode(sig)
    with open("sig.txt", "wb") as f:
        f.write(signature_b64)
if __name__ == "__main__":
    private_key = create_key()
    sign(private_key)
과제2 2b.py
• Public.der와 sig.txt, 1.txt을 읽어서
• 1.txt에 대한 서명을 검증하는 코드를 작성 , 맞으면 "verified" 틀리면 "not
verified"를 출력
- 1.txt의 한글자만 바꿔도 not verified가 되어야
from Crypto.PublicKey import RSA
from Crypto.Signature import PKCS1_PSS
from Crypto.Hash import SHA
from base64 import b64decode

with open("public.der", "rb") as f:
    pubKey= RSA.import_key(f.read())

with open("sig.txt", "rb") as f:
    sig = b64decode(f.read())

with open("1.txt", "rb") as f:
    msg = f.read()

def verify_signature(pubKey, msg, sig):
    h = SHA.new()
    h.update(msg)
    verifier = PKCS1_PSS.new(pubKey)

    try:
        verifier.verify(h, sig)
        print("verified")
    except ValueError:
        print("not verified")

if __name__ == "__main__":
    verify_signature(pubKey, msg, sig)
과제 2.
텍스트는 길어도 상관없어.
서명값은 sig.txt로 저장
2b는 검증단계.
두개를 읽어서 퍼블릭 키로 검증.
이번에는 DER 로 저장해봐라.
값이 맞으면 verified, not verified.
바꿔서 틀리게나오는거 까지는 안해도되고.