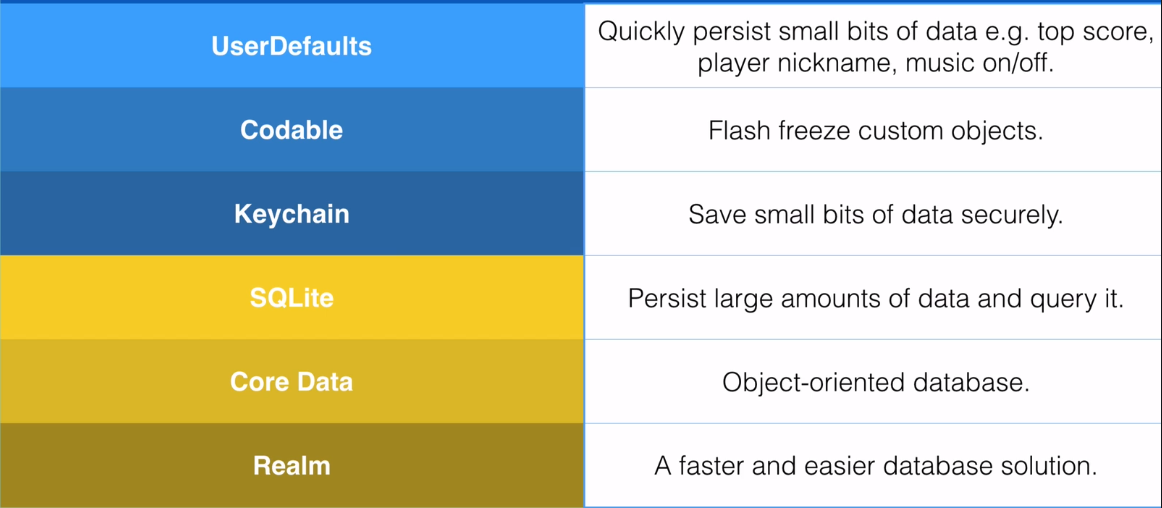
Database
파란색: table
노란색: database
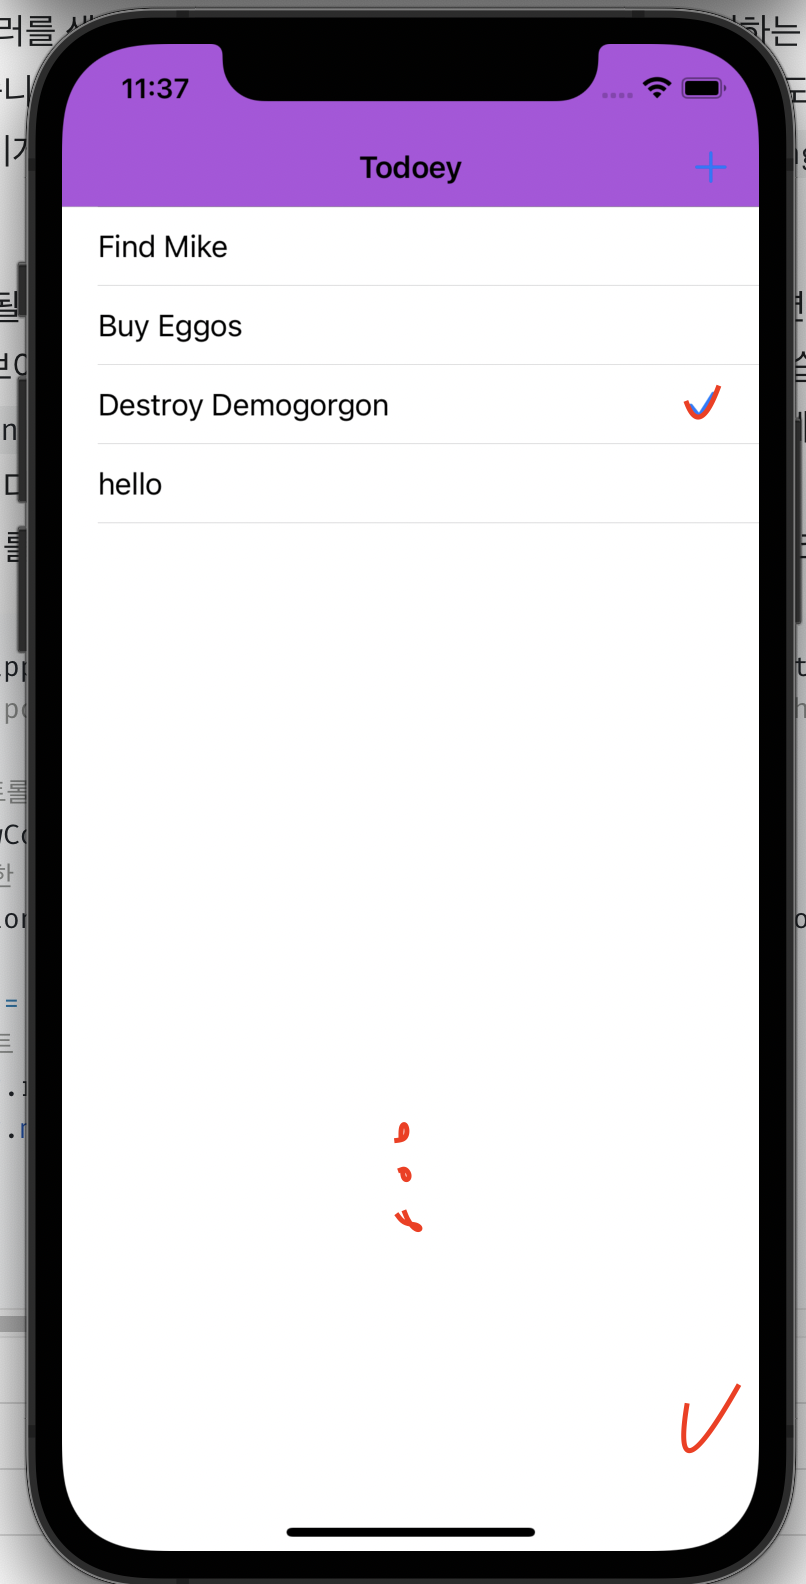
Todoey 만들기
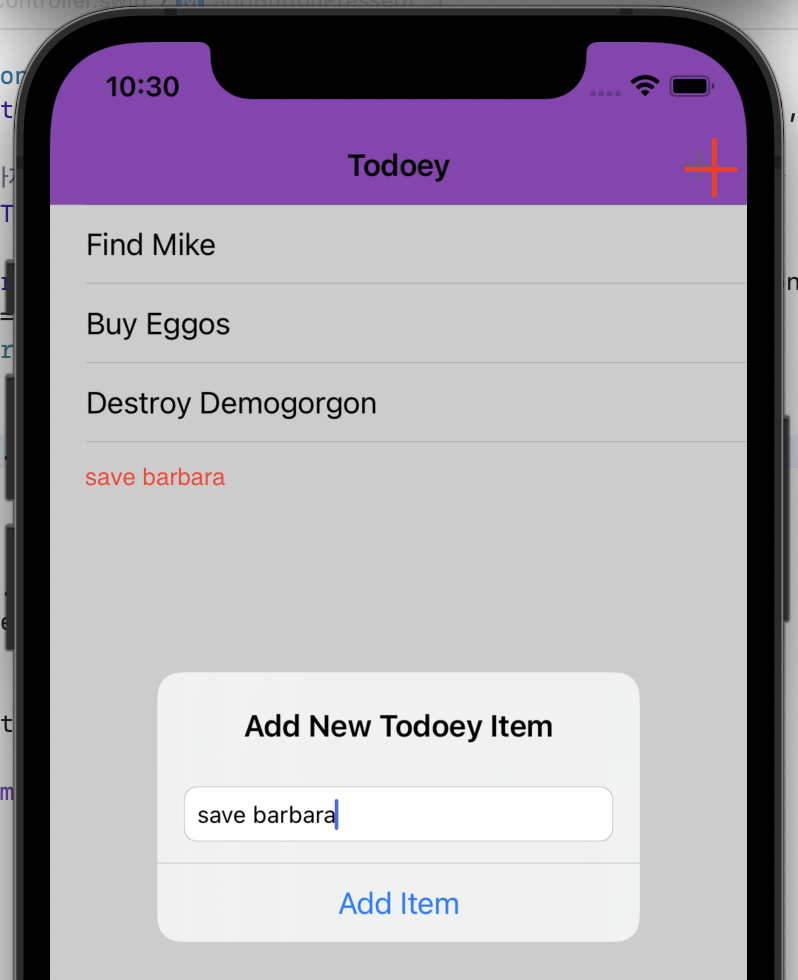
바 버튼 아이템을 클릭하면
텍스트필드에서 값을 입력받아 배열에 추가한 후 테이블뷰를 다시 불러온다
    @IBAction func addButtonPressed(_ sender: UIBarButtonItem) {
        let alert = UIAlertController(title: "Add New Todoey Item", message: "", preferredStyle: .alert)

        // 텍스트 필드의 값을 가져오기 위해 텍스트필드 객체 생성해주기
        var textField = UITextField()

        let action = UIAlertAction(title: "Add Item", style: .default) { (action) in
            if let tfText = textField.text {
                self.itemArray.append(tfText)
            }

            self.tableView.reloadData()
        }

        alert.addTextField { (alertTextField) in
            alertTextField.placeholder = "Create new item"
            textField = alertTextField
        }

        alert.addAction(action)

        present(alert, animated: true, completion: nil)
    }
디버깅

(lldb) print itemArray
([String]) $R2 = 3 values {
  [0] = "Find Mike"
  [1] = "Buy Eggos"
  [2] = "Destroy Demogorgon"
}
step over 버튼 클릭 후
(lldb) print itemArray
([String]) $R3 = 4 values {
  [0] = "Find Mike"
  [1] = "Buy Eggos"
  [2] = "Destroy Demogorgon"
  [3] = "sdf"
}
코드작성을 통해 내비게이션 인터페이스 구성하기
코드로 내비게이션 컨트롤러를 생성할 경우, 내비게이션 컨트롤러가 생성되기 원하는 적절한 지점에 내비게이션 컨트롤러를 생성할 수 있습니다. 예를 들어 내비게이션 컨트롤러가 애플리케이션 윈도우(window)의 루트 뷰로서 역할을 한다면, 내비게이션 컨트롤러를 applicationDidFinishLaunching: 메서드에 구현할 수 있습니다.
- 루트 뷰 컨트롤러가 될 뷰 컨트롤러를 생성합니다. 이 객체는 처음에 내비게이션 스택의 최상위 뷰 컨트롤러가 화면에 보이게 되고 내비게이션 바에 뒤로가기 버튼이 생성되지 않습니다.
init(rootViewController: UIViewController)메서드를 통해 내비게이션 컨트롤러를 초기화하고 생성합니다.- 내비게이션 컨트롤러를 윈도우의 루트 뷰 컨트롤러로 설정합니다. 아래의 예시 코드를 살펴봅시다.
func application(_ application: UIApplication, didFinishLaunchingWithOptions launchOptions: [UIApplicationLaunchOptionsKey: Any]?) -> Bool {
        // Override point for customization after application launch.

        // 루트 뷰 컨트롤러가 될 뷰 컨트롤러를 생성합니다.
        let rootViewController = UIViewController()
        // 위에서 생성한 뷰 컨트롤러로 내비게이션 컨트롤러를 생성합니다.
        let navigationController = UINavigationController(rootViewController: rootViewController)

        self.window = UIWindow(frame: UIScreen.main.bounds)
        // 윈도우의 루트 뷰 컨트롤러로 내비게이션 컨트롤러를 설정합니다.
        self.window?.rootViewController = navigationController
        self.window?.makeKeyAndVisible()

        return true
    }
Local Data Persistance가 필요한 이유는?
앱 생명주기에서 알 수 있듯이
앱이 terminated 되면
데이터가 유지되지 않기 때문이다
- 첫번째 해결방법: NSUserDefaults, 프로퍼티리스트
- 두번째 해결방법: CoreData, Realm, SQLite
- 세번째 해결방법: 아카이빙
라이프사이클

- didFinishLaunchingWithOptions: viewDidLoad 전, 앱 시작 후
iOS13 이후 AppDelegate.swift가 SceneDelegate.swift으로 분리
- sceneWillResignActive: 전화같은거 왔을 때 active -> inactive, 게임 중이었으면 게임이 종료된다
- sceneDidEnterBackground: 홈버튼 눌렀을 때, 다른 앱을 켰을 때 (앱이 보이지 않는 상태)
- sceneWillTerminate: 강제 종료(아래는 네 가지의 경우)
- OS reclaim resources (when using memory intensive app) 리소스를 많이 차지할 때- force quit app 앱 강제종료
- install update to app 앱 업데이트 할 때
- update OS
1. NSUserDefaults [프로퍼티리스트]
KB 정도의 크기 데이터만 저장해야 한다
Sigleton으로 구현되어 있다
custom data type을 저장할 수 없다
예를 들어) 볼륨 로우 하이 (환경설정)
key-value 타입으로 저장된다
앱을 로드하기 전에 UserDefaults 전체가 property를 읽기 전에 동시에 load 되어야 하기 때문에, 앱의 효율성 때문에 데이터베이스로 사용하기 바람직하지 않다
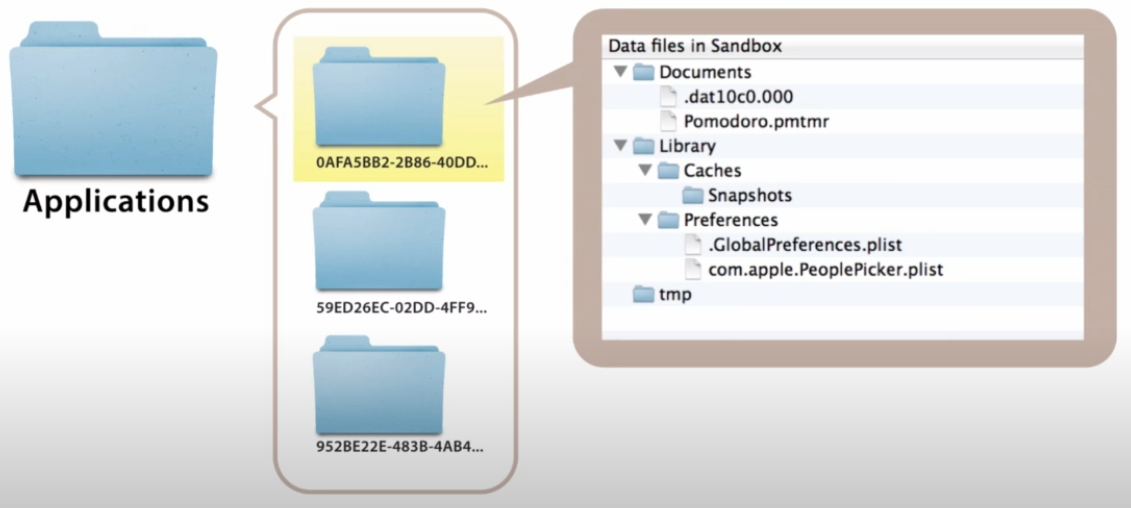
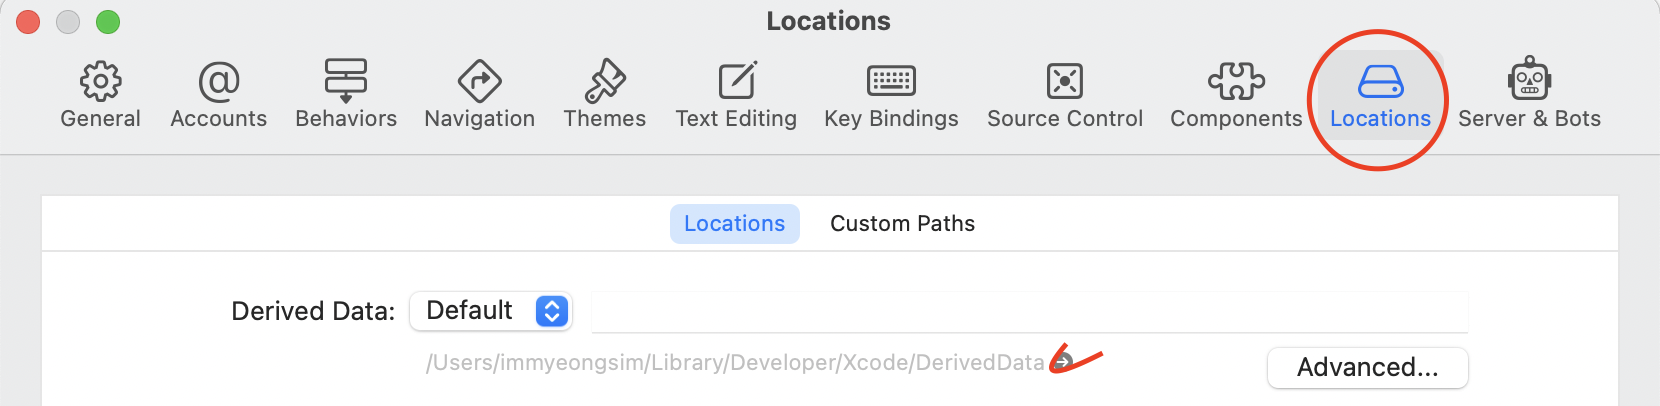
샌드박스에 존재하는 앱의 경로에서 plist를 찾아서 UserDefaults파일을 확인할 수 있다
경로 확인하는 방법
//AppDelegate.swift
func application(_ application: UIApplication, didFinishLaunchingWithOptions launchOptions: [UIApplication.LaunchOptionsKey: Any]?) -> Bool {
	print(NSSearchPathForDirectoriesInDomains(.documentDirectory, .userDomainMask, true).last! as String)
    return true
}UUID: device ID (could be simulator or physical device)
8FF0E5D5-E481-4AD6-822D-C0AC2D9ADA67
앱id: 즉 샌드박스
A8D4A05A-8A3A-458B-8365-8DDFC3CF26E9
/Users/유저아이디/Library/Developer/CoreSimulator/Devices/8FF0E5D5-E481-4AD6-822D-C0AC2D9ADA67/data/Containers/Data/Application/A8D4A05A-8A3A-458B-8365-8DDFC3CF26E9/Documents
세 번째 Library가 finder로는 안보여서
아래 방법을 통해 접근해서 확인했다
요기서 Library/preferences에 plist파일이 들어있다 (기본 경로)


기본 데이터 타입만 사용할 수 있다
UserDefaults 사용하기
let defaults = UserDefaults.standard

    override func viewDidLoad() {
        super.viewDidLoad()

        if let items = defaults.array(forKey: "TodoListArray") as? [String] {
            itemArray = items
        }
    }

self.defaults.set(self.itemArray, forKey: "TodoListArray")
sandbox

자기가 위치한 폴더를 root directory로 인식해 상위 디렉토리를 인식할 수 없다
연락처(addressbook), 사진(SNlibrary), 일정(EventKit), 음악, 비디오 등에 접근할 수 없어서, API를 통해 사용자가 허락 하면 샌드박스 외부의 사용자의 시스템(데이터)에 접근한다
백그라운드 프로세스 제한한다
앱 안의 Documents 폴더에 personal data가 안전하게 저장된다
Singleton
https://stackoverflow.com/questions/137975/what-is-so-bad-about-singletons
- 언제 써야하나
- 오직 한 개의 인스턴스를 가질 때
- 그 단일 인스턴스를 직접 조작해야 할 때 (예를 들어 환경변수 설정)
- 단점은 무엇인가
- 코드의 의존성(디펜던시)를 파악하기 어렵다.
- single-responsibility principel(SRP)를 위반한다. 싱글톤만의 라이프사이클을 가진다.
- 코드간 결합도를 높인다.
- 유닛테스트를 할 수 없다(유닛테스트는 서로 독립적일때만 실행할 수 있다)
- SRP: 모든 모듈, 클래스, 함수는 단일 기능에 책임져야하고 캡슐화해야한다.
어느 곳에서 호출하던지 같은 것이 호출된다. SOLID 중 하나SOLID: 객체지향 프로그래밍을 위한 다섯가지 원칙
- The Single-responsibility principle: every class should have only one responsibility. 모든 클래스는 하나만 책임진다.
- The Open–closed principle: "Software entities ... should be open for extension, but closed for modification. 확장에는 열림, 수정에는 닫힘
- The Liskov substitution principle: "Functions that use pointers or references to base classes must be able to use objects of derived classes without knowing it". 클래스에 상관없이 참조할 수 있다
- The Interface segregation principle: "Many client-specific interfaces are better than one general-purpose interface." 다양한 인터페이스가 다용도 인터페이스보다 낫다
- The Dependency inversion principle: "Depend upon abstractions, [not] concretions." 구체화 말고 추상화
import UIKit

class Car {
    var colour = "Red"

    static let singletonCar = Car()
}

let myCar = Car.singletonCar    //let defaults = UserDefaults.standard 스탠다드가 싱글톤

myCar.colour = "Blue"

let yourCar = Car.singletonCar
print(yourCar.colour)	//Blue

class A {
    init() {
        Car.singletonCar.colour = "Brown"
    }
}

class B {
    init() {
        print(Car.singletonCar.colour)	//Brown
    }
}

let a = A()
let b = B()
dequeueReusableCell의 문제점
셀이 화면 보다 많아 재사용될 경우
액세서리로 체크되어 있는 부분이 남아 재사용되는 문제가 발생했다
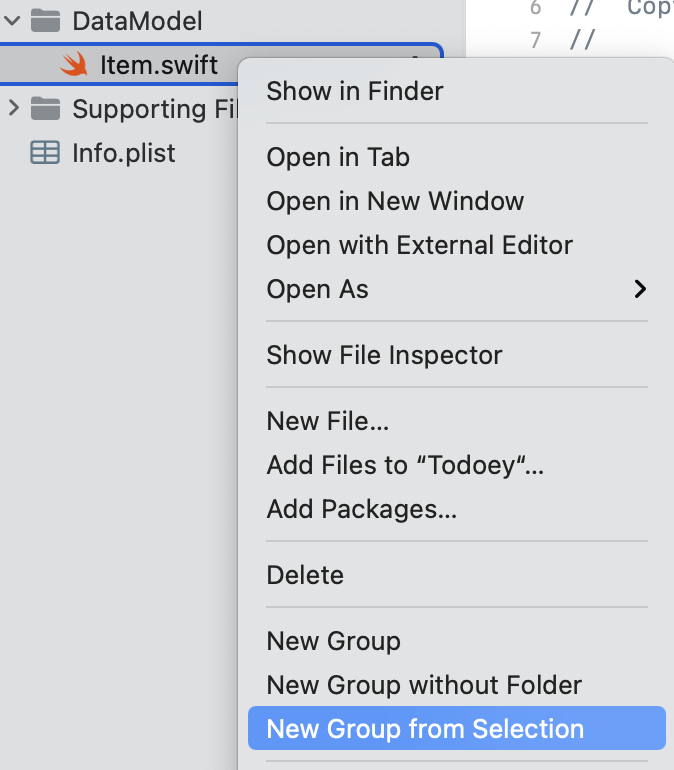
MVC 패턴으로 해결하기
Item이라는 파일을 생성하고
오른쪽 마우스로 New Group from Selection을 눌러 폴더를 나눠주자
class Item {
    var title: String = ""	// 타이틀
    var done: Bool = false	// 체크 여부
}
import UIKit
class TodoListViewController: UITableViewController {
var itemArray = [Item]()
override func viewDidLoad() {
super.viewDidLoad()
let newItem1 = Item()
newItem1.title = "xptmxm"
itemArray.append(newItem1)
let newItem2 = Item()
newItem2.title = "sdkfjoiwe"
itemArray.append(newItem2)
let newItem3 = Item()
newItem3.title = "qpowepq"
itemArray.append(newItem3)
}
//MARK: - TableView DataSource Methods
override func tableView(_ tableView: UITableView, numberOfRowsInSection section: Int) -> Int {
return itemArray.count
}
override func tableView(_ tableView: UITableView, cellForRowAt indexPath: IndexPath) -> UITableViewCell {
let cell = tableView.dequeueReusableCell(withIdentifier: "ToDoItemCell", for: indexPath)
let item = itemArray[indexPath.row]
if #available(iOS 14.0, *) {
var content = cell.defaultContentConfiguration()
content.text = item.title
cell.contentConfiguration = content
} else {
cell.textLabel?.text = item.title
}
// 삼항 연산자
cell.accessoryType = item.done ? .checkmark : .none
return cell
}
//MARK: - TableView Delegate Methods
override func tableView(_ tableView: UITableView, didSelectRowAt indexPath: IndexPath) {
itemArray[indexPath.row].done = !itemArray[indexPath.row].done
tableView.reloadData()
// 셀을 선택하면 회색으로 체크되는 것이 보여진 후, 해제됨
tableView.deselectRow(at: indexPath, animated: true)
}
}custom data type인 Item을 사용한 itemArray를 plist에 넣을 수 없게 되는 문제가 발생했다
해결 방법: NSCoder
NSCoder
plist로 encode하고 decode하는 데 사용한다
class Item: Codable {
    var title: String = ""	// 타이틀
    var done: Bool = false	// 체크 여부
}

var itemArray = [Item]()
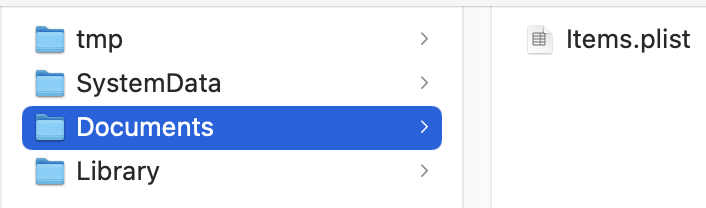
let defaults = UserDefaults.standard
let dataFilePath = FileManager.default.urls(for: .documentDirectory, in: .userDomainMask).first?.appendingPathComponent("Items.plist")
override func viewDidLoad() {
super.viewDidLoad()
loadItems()
}
//MARK: - TableView Delegate Methods
override func tableView(_ tableView: UITableView, didSelectRowAt indexPath: IndexPath) {
itemArray[indexPath.row].done = !itemArray[indexPath.row].done
saveItems()
// 셀을 선택하면 회색으로 체크되는 것이 보여진 후, 해제됨
tableView.deselectRow(at: indexPath, animated: true)
}
//MARK: - Add New Items
@IBAction func addButtonPressed(_ sender: UIBarButtonItem) {
let alert = UIAlertController(title: "Add New Todoey Item", message: "", preferredStyle: .alert)
// 텍스트 필드의 값을 가져오기 위해 텍스트필드 객체 생성해주기
var textField = UITextField()
let action = UIAlertAction(title: "Add Item", style: .default) { (action) in
// 객체 생성하기
let newItem = Item()
if let tfText = textField.text {
newItem.title = tfText
self.itemArray.append(newItem)
}
self.saveItems()
}
alert.addTextField { (alertTextField) in
alertTextField.placeholder = "Create new item"
textField = alertTextField
}
alert.addAction(action)
present(alert, animated: true, completion: nil)
}
// 프로퍼티 리스트에 저장하기
func saveItems() {
// 프로퍼티 리스트로 사용할 수 있도록 인코딩하기
let encoder = PropertyListEncoder()
do {
let data = try encoder.encode(itemArray)
try data.write(to: self.dataFilePath!)
} catch {
print("Error Encoding item array, \(error)")
}
tableView.reloadData()
}
// 프로퍼티 리스트에서 가져오기
func loadItems() {
if let data = try? Data(contentsOf: dataFilePath!) {
let decoder = PropertyListDecoder()
do {
itemArray = try decoder.decode([Item].self, from: data)
} catch {
print("Error decoding item array, \(error)")
}
}
}
}Ternary Operator 삼항 조건 연산자
value = condition ? valutIfTrue : valueIfFalse