집에 있는 내 노트북은 삼성이고 윈도우다.
리눅스가 아니다
터미널을 쓰고 싶은데 어떡하지
발동동
아래 두 링크를 따라하며 텍스트만 정리했다.
https://protocol.knu.ac.kr/tech/ISL-TR-20-03-WSL.pdf
https://velog.io/@njh7799/Windows-10-%EC%97%90%EC%84%9C-%ED%84%B0%EB%AF%B8%EB%84%90-%EA%BE%B8%EB%AF%B8%EA%B8%B0
1. WSL
WSL(Windows Subsystem for Linux)을 사용해야 한다.
Microsoft가 Linux를 WSL(Windows Subsystem for Linux)라는 방식으로 지원하고 있다.
시작 > Windows 기능 켜기/끄기
“Linux용 Windows 하위 시스템” 체크하여 활성화 후 재부팅
시작 > Microsoft store > 아래 두 개 앱 설치
1-1. ubuntu
실행 후, username, password 입력
Package 업데이트를 위해 root 권한으로 전환하는 “sudo -i”, password 입력
Root 권한에서 “apt-get update”를 입력해서 업데이트 진행
gcc/g++ 설치를 위해 “apt-get -y install gcc g++” 입력
vim 설치를 위해 “apt-get -y install vim” 입력(이미 설치되었을 수도 있음)
“su 사용자명”을 입력하여 root 권한 나가기(exit)
Terminal에서 “vim 파일명” 입력하여 파일 생성
“i”를 누르면 편집 모드, 내용 입력 후 esc 누르고 “:wq”를 입력하여 저장 후 종료
컴파일: gcc -o <실행파일 이름><소스코드 파일명>
apt-get(Advanced Packaging Tool)은 우분투(Ubuntu)를 포함안 데비안(Debian)계열의 리눅스에서 쓰이는 패키지 관리 명령어 도구
1-2. windows terminal
- 기본 터미널 설정 변경
설정 > .json파일 메모장으로 연결
defaultProfile을 ubuntu guid로 바꿔주기 - 깃 설치 https://git-scm.com/download/win
git --version으로 확인 - Oh My Zsh 설치( 터미널 꾸미기)
3-1. zsh 설치
sudo apt update
sudo apt install zsh -y
3-2. oh my zsh 설치
sh -c "$(curl -fsSL https://raw.githubusercontent.com/ohmyzsh/ohmyzsh/master/tools/install.sh)" - Oh my zsh 설정
vi ~/.zshrc
Esc, i
ZSH_THEME="agnoster"
Esc, :wq, Enter - D2Coding 글꼴 설치
https://github.com/naver/d2codingfont
5-1. 글꼴 적용
터미널 > 설정 > .json 메모장으로 열기
{
"fontFace": "D2Coding",
"fontSize": 12,
} - DesktopName 삭제
vi /.zshrc
prompt_context() {
if [[ "DEFAULT_USER" || -n "$SSH_CLIENT" ]]; then
prompt_segment black default "%(!.%{%F{yellow}%}.)$USER"
fi
} - git editor 변경
git config --global core.editor "vi"
주의사항
git clone, git init을 할 때 sudo 를 해주어야 한다.
2. 터미널 설치
맥북은 iTerm2
윈도우는 cmder (깃 포함되어 있음)
3. 연습
1. 환경설정
깃 환경설정 파일: .gitconfig
git config --list 환경설정
git config --global user.email "you@example.com"
git config --global user.name "Your Name"
2. 로컬
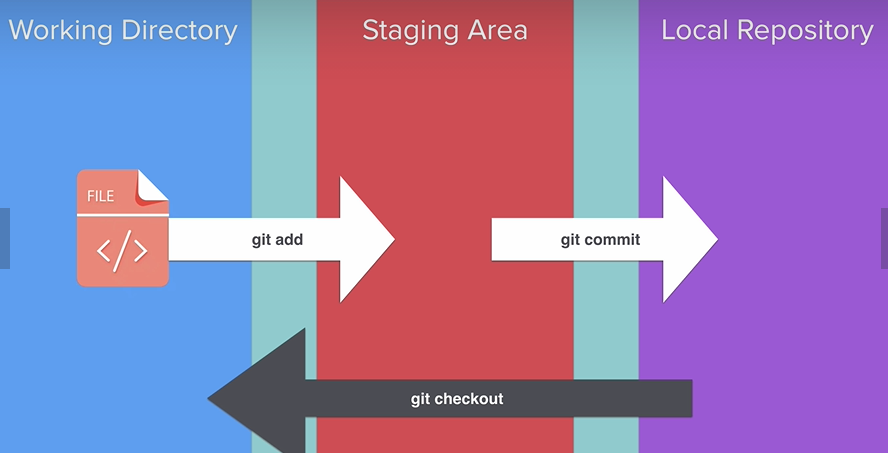
add 하면 스테이징(변화를 무시하거나 따라가거나)단계로
> cd Desktop/	바탕화면으로 이동
> mkdir Story
> cd Story
> touch chapter1.txt
> vim chapter1.txt	내용 수정
> git init
  Initialized empty Git repository in /mnt/c/Users/msi/Desktop/Story/.git/
> git status
On branch master

No commits yet

Untracked files:
  (use "git add <file>..." to include in what will be committed)
        chapter1.txt

nothing added to commit but untracked files present (use "git add" to track)
> git add chapter1.txt 스테이징
> git status
On branch master

No commits yet

Changes to be committed:
  (use "git rm --cached <file>..." to unstage)
        new file:   chapter1.txt
> git commit -m "Complete chapter1"  현재 시제로 작성
> touch chapter2.txt
> touch chapter3.txt
> git add .
> git status
On branch master
Changes to be committed:
  (use "git restore --staged <file>..." to unstage)
        new file:   chapter2.txt
        new file:   chapter3.txt
> git commit -m "complete chapter 2 and 3"
> git log
> vim chapter3.txt  내용 변경
> git diff chapter3.txt 커밋 이후 변경한 내용 확인 가능
> git checkout chapter3.txt 변경했던 내용이 커밋한 내용으로 돌아감
3. 깃허브와 연동
> git remote add origin https://github.com/msi753/Story.git	origin은 remote의 이름(변경가능하지만 잘 안함)
> git branch -M main	브랜치의 이름을 main으로 하고
> git push -u origin main	리모트(origin)에서 브랜치(main)으로 push한다.
4. GIT IGNORE
DS_STORE 파일: Desktop Services Store
Desktop Services Store의 약자로 애플에서 정의한 파일 포맷
애플의 맥 OS X 시스템이 폴더에 접근할 때 생기는 해당 폴더에 대한 메타데이터를 저장하는 파일이다.
윈도우의 thumb.db 파일과 비슷하다.
폴더 내에서 파일들의 정렬을 바꾸니 생성되었다.
프로젝트를 생성하고
터미널에서 해당 프로젝트 폴더로 들어간 후
> touch .gitignore
> open .gitignore
https://github.com/github/gitignore
swift.gitignore
# Project-wide 추가
.DS_Store

# Xcode
#
# gitignore contributors: remember to update Global/Xcode.gitignore, Objective-C.gitignore & Swift.gitignore

## User settings
xcuserdata/

## compatibility with Xcode 8 and earlier (ignoring not required starting Xcode 9)
*.xcscmblueprint
*.xccheckout

## compatibility with Xcode 3 and earlier (ignoring not required starting Xcode 4)
build/
DerivedData/
*.moved-aside
*.pbxuser
!default.pbxuser
*.mode1v3
!default.mode1v3
*.mode2v3
!default.mode2v3
*.perspectivev3
!default.perspectivev3

## Obj-C/Swift specific
*.hmap

## App packaging
*.ipa
*.dSYM.zip
*.dSYM

## Playgrounds
timeline.xctimeline
playground.xcworkspace

# Swift Package Manager
#
# Add this line if you want to avoid checking in source code from Swift Package Manager dependencies.
# Packages/
# Package.pins
# Package.resolved
# *.xcodeproj
#
# Xcode automatically generates this directory with a .xcworkspacedata file and xcuserdata
# hence it is not needed unless you have added a package configuration file to your project
# .swiftpm

.build/

# CocoaPods
#
# We recommend against adding the Pods directory to your .gitignore. However
# you should judge for yourself, the pros and cons are mentioned at:
# https://guides.cocoapods.org/using/using-cocoapods.html#should-i-check-the-pods-directory-into-source-control
#
# Pods/
#
# Add this line if you want to avoid checking in source code from the Xcode workspace
# *.xcworkspace

# Carthage
#
# Add this line if you want to avoid checking in source code from Carthage dependencies.
# Carthage/Checkouts

Carthage/Build/

# Accio dependency management
Dependencies/
.accio/

# fastlane
#
# It is recommended to not store the screenshots in the git repo.
# Instead, use fastlane to re-generate the screenshots whenever they are needed.
# For more information about the recommended setup visit:
# https://docs.fastlane.tools/best-practices/source-control/#source-control

fastlane/report.xml
fastlane/Preview.html
fastlane/screenshots/**/*.png
fastlane/test_output

# Code Injection
#
# After new code Injection tools there's a generated folder /iOSInjectionProject
# https://github.com/johnno1962/injectionforxcode

iOSInjectionProject/
> cd Desktop
> mkdir Project
> cd Project
> touch file1.txt
> touch file2.txt
> touch secret.txt
----파일 생성
> git init
> open .gitignore
> git add .
> git status
> git rm --cached -r . 스테이징한 것들을 되돌림(r: recursive)
> git status
> git commit -m "Initial Commit"5. clone
> git clone https://github.com/austinzheng/swift-2048
> cd swift-2048
> git log 커밋 목록 확인 가능
실제 기기에서 실행하려면 bundle identifier과 team을 바꿔야한다.
6. Branching and Merging
git init
git add .
git commit -m "Initial Commit"
> git branch alien-plot
> git branch (어느 브랜치에 있니)
alien-plot
*main (별표는 현재 위치한 브랜치를 나타냄)
> git checkout alien-plot (브랜치 이동) 그리고 파일 수정
> git checkout main
> touch chapter4.txt
> open chapter4.txt
> git add .
> git commit -m "add chapter4"
> git checkout alien-plot 파일 수정하고
> git commit -m "modify alien-plot"
> git checkout main
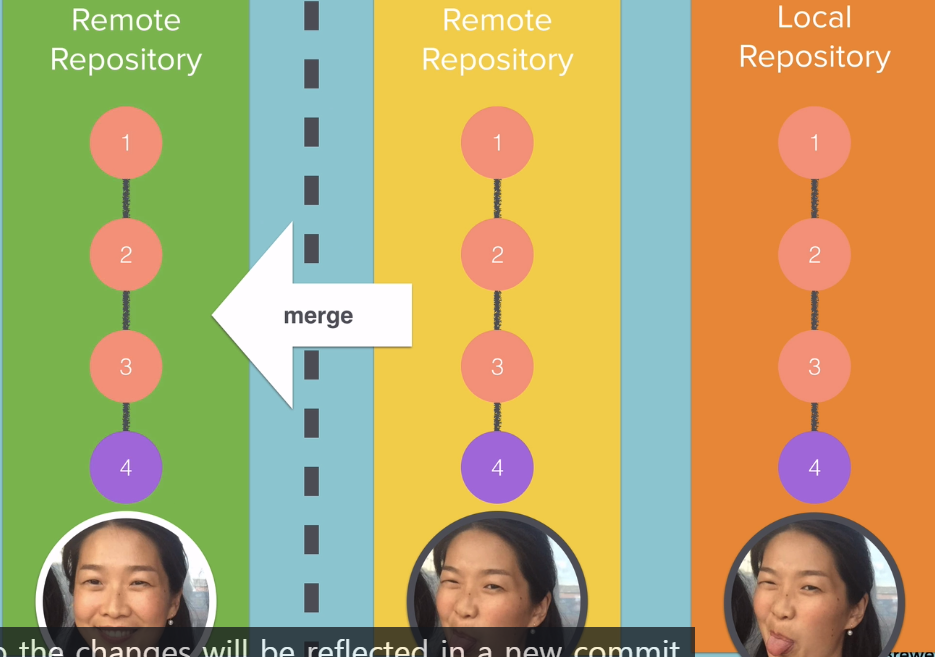
> git merge alien-plot 메인에서 alien-plot 머지하기
> git push origin main -uInsight > Network 에서 그래프 확인 가능
7. fork and pull request
clone하면 보통 읽기 쓰기 권한이 있지만
fork하면 쓰기 권한이 없어서 pull request를 하고(fork하면 내 깃 repo에 복사됨)
pull해서 코드리뷰한 후 이상이 없으면 merge한다
Xcode에서 사용하기
Source Control > commit
Source Control > Discard all changes
깃 컨트롤 하는 탭으로 이동 후 > 메인 브랜치 우클릭 Branch from...
영단어
- crux: 요점
-
Origin: 원격 저장소의 이름입니다.
원격저장소 시간때 원격저장소 추가 명령어는
git remote add <이름> 로 붙인다고 말씀드렸죠? :)
마찬가지로 git remote add origin 형식으로 원격저장소를 추가하거나
git clone을 통해 원격저장소를 복사한다면
자동으로 origin이라는 이름의 원격저장소가 등록되게 됩니다. -
master: 브랜치 중 가장 중심이 되는 기본적인 branch를 master 브랜치라고 부릅니다
-
HEAD: 현재 내가 어떤 작업공간에 있는지를 나타냅니다.
예를 들어 만약 제가 master 브랜치에서 작업을 하고 있다면
제 HEAD는 master 브랜치에 있게 되는 것이고,
다른 작업을 위해 feature 브랜치를 만들어줬다면
제 HEAD는 feature 브랜치에 있게 되는 겁니다 :)