Coroutine
코루틴은 일반적인 동기 동작이 아닌 중간 멈춤기능이 포함된 형태라고 볼 수 있다.
아래 그림을 보자.
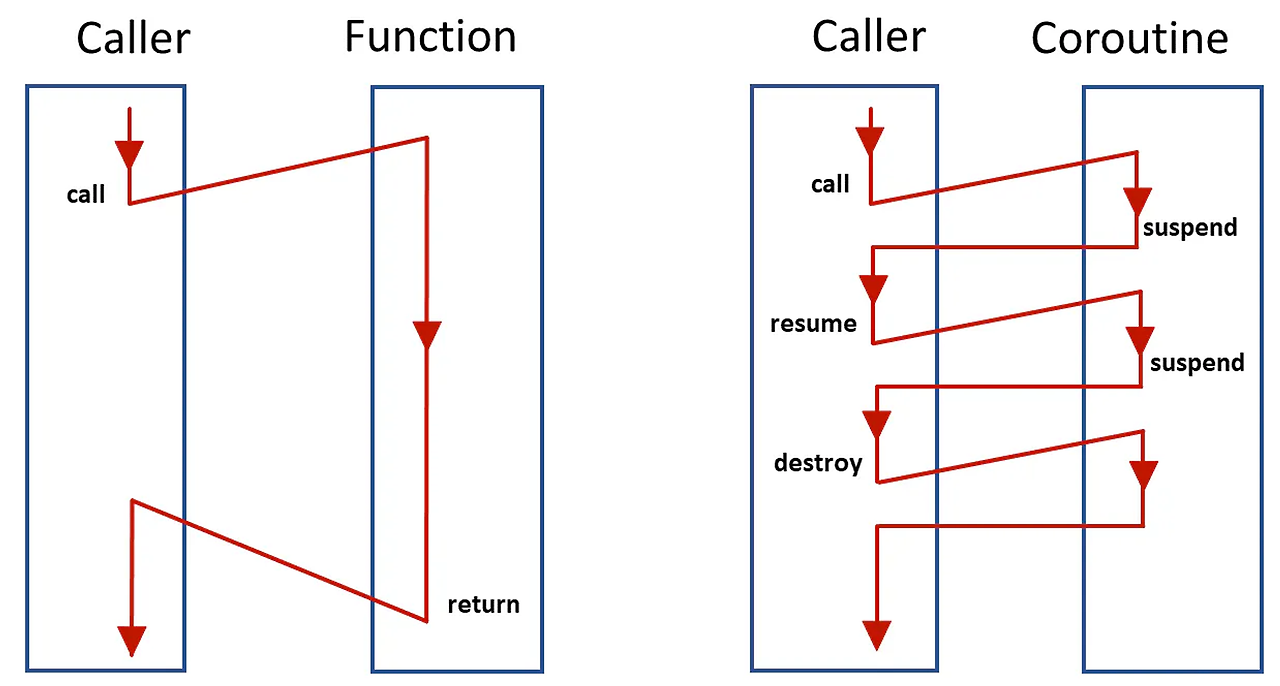
원래 우리가 아는 동기방식은 Call 한 함수의 동작이 완전히 끝나야면 본류의 함수를 진행할 수 있다.
반면에, Coroutine 은 잠시 중지하여 본류 함수를 진행하다 다시 Coroutine함수의 내용을 진행할 수 있다.
따라서 비동기처럼 보인다. 하지만 정확히는 비동기는 아니다.
많이 쓰는 동작
// 다음 프레임까지 대기
yield return null;
PrintMessage("after yield return null");

// 원하는 시간 만큼 대기
yield return new WaitForSeconds(1.5f);
PrintMessage("yield return new WaitForSeconds(1.5f)");

// FixedUpdate 까지 대기
yield return new WaitForFixedUpdate();
PrintMessage("yield return new WaitForFixedUpdate()");

// Frame 종료까지 대기
yield return new WaitForEndOfFrame();
PrintMessage("yield return new WaitForEndOfFrame()");

// WaitUntil; 특정 조건이 True 될때까지 대기.
// WaitWhile; 특정 조건이 False 될때까지 대기?
yield return new WaitUntil(() => _isBool);  // 파라메터: Func<bool>
PrintMessage("WaitUntil");
// yield return new WaitWhile();

// 코루틴 종료
yield break;- 단,
WaitForSeconds같은 함수를 매번 새로 생성하면 GC 가 발생될 수 있다. 따라서 별도로 생성해놓고 재활용하는 방법을 궁리하자.
다중 코루틴
아래 예제를 보자.
private IEnumerator TestCoroutine()
{
    PrintMessage("Start Coroutine");
    yield return StartCoroutine(OtherCoroutine());
    PrintMessage("Start Other Coroutine");
}

private IEnumerator OtherCoroutine()
{
    PrintMessage("Start Coroutine", "red");
    yield return new WaitForSeconds(1f);
    PrintMessage("WaitForSeconds", "red");
}

private void PrintMessage(string message, string color = "yellow")
{
    Debug.Log($"<color='{color}'>{message}</color>");
}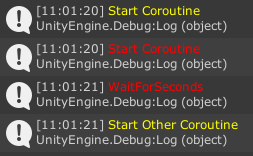
위 코드 및 결과를 보면 알다시피, 코루틴을 실행한 후 해당 코루틴 종료까지
외부 코루틴은 실행되지 않는다!
사용시 주의사항
코루틴이나 제어용 생성을 자주 하면 GC 등의 문제가 발생할 수 있다.
따라서 아래와 같은 가이드 방법으로 하는 것을 생각하자. (특히 중복 생성)
// 아래와 같이 미리 정의해서 재활용하는 것을 추천!
public static class YieldContainer
{
    public static readonly WaitForFixedUpdate WaitForFixedUpdate = new WaitForFixedUpdate();
    private static readonly Dictionary<float, WaitForSeconds> _waitForSecondsDict = new Dictionary<float, WaitForSeconds>();

    public static WaitForSeconds WaitForSeconds(float seconds)
    {
        if (!_waitForSecondsDict.ContainsKey(seconds))
        {
            _waitForSecondsDict.Add(seconds, new WaitForSeconds(seconds));
        }
        return _waitForSecondsDict[seconds];
    }
}

// 코루틴 생성, 시작, 정지, 삭제
private Coroutine m_Coroutine;
private void Update()
{
    if (Input.GetKeyDown(KeyCode.Alpha1))
    {
        if (m_Coroutine == null)
            m_Coroutine = StartCoroutine(TestCoroutine());
    }

    if (Input.GetKeyDown(KeyCode.Alpha2))
    {
        if (m_Coroutine != null)
        {
            StopCoroutine(m_Coroutine);
            m_Coroutine = null;
        }
    }
}
Coroutine vs Multithread
Thread는 단일 프로세서내 최소 작업 단위인Task를 실행하는 단위이다.MultiThread는 이Task를병렬로 실행하는 것을 뜻한다.Coroutine은 기본적으로Single Thread로 동작한다.- 즉,
Coroutine과MultiThread는 결 자체가 다르다. - 또한,
비동기처럼 동작하는 것으로 보이는Coroutine이지만, 사실 그렇게 보이는 것이지비동기와도 조금 다른 개념이다.
옵저버 패턴
이론에 대한 내용 및 C# 기본 코드에 대해서는 여기서 한번 다뤘다.
유니티 이벤트
- 유니티 이벤트는 옵저버 패턴에 대한 구현을 Unity 에서 조금 더 쉽게 구현할 수 있도록 돕는 기능이다.
Delegate로 직접 구현하든Unity Event를 사용하든 성능면에서는 미미한 차이 밖에 없다.
코드 예제
using UnityEngine.Events;

public class PlayerStats : MonoBehaviour
{
    public UnityEvent OnHpChanged;
    private int _hp;
    public int Hp
    {
        get => _hp;
        set
        {
            _hp = value;
            OnHpChanged?.Invoke();
        }
    }
}

public class HpUI : MonoBehaviour
{
    [SerializeField] private PlayerStats _playerStats;
    private TextMeshProUGUI _hpText;
    private void Awake()
    {
        _hpText = GetComponent<TextMeshProUGUI>();
    }

    private void OnEnable()
    {
        _playerStats.OnHpChanged.AddListener(RefreshHpUI);  // 구독하고
    }

    private void RefreshHpUI(int hp)
    {
        _hpText.text = $"HP: {_playerStats.Hp}";
    }

    private void OnDisable()
    {
        _playerStats.OnHpChanged.RemoveListener(RefreshHpUI);  // 구취하고
    }
}
Python Dev with Infra -> Game Programmer