Today What I Learned
Javascript를 배우고 있습니다. 매일 배운 것을 이해한만큼 정리해봅니다.
3. Data Structure - Linked List
1. Linked List는 어떻게 생겼나?
1) 그림으로 그려보자.
먼저 내가 그린 그림
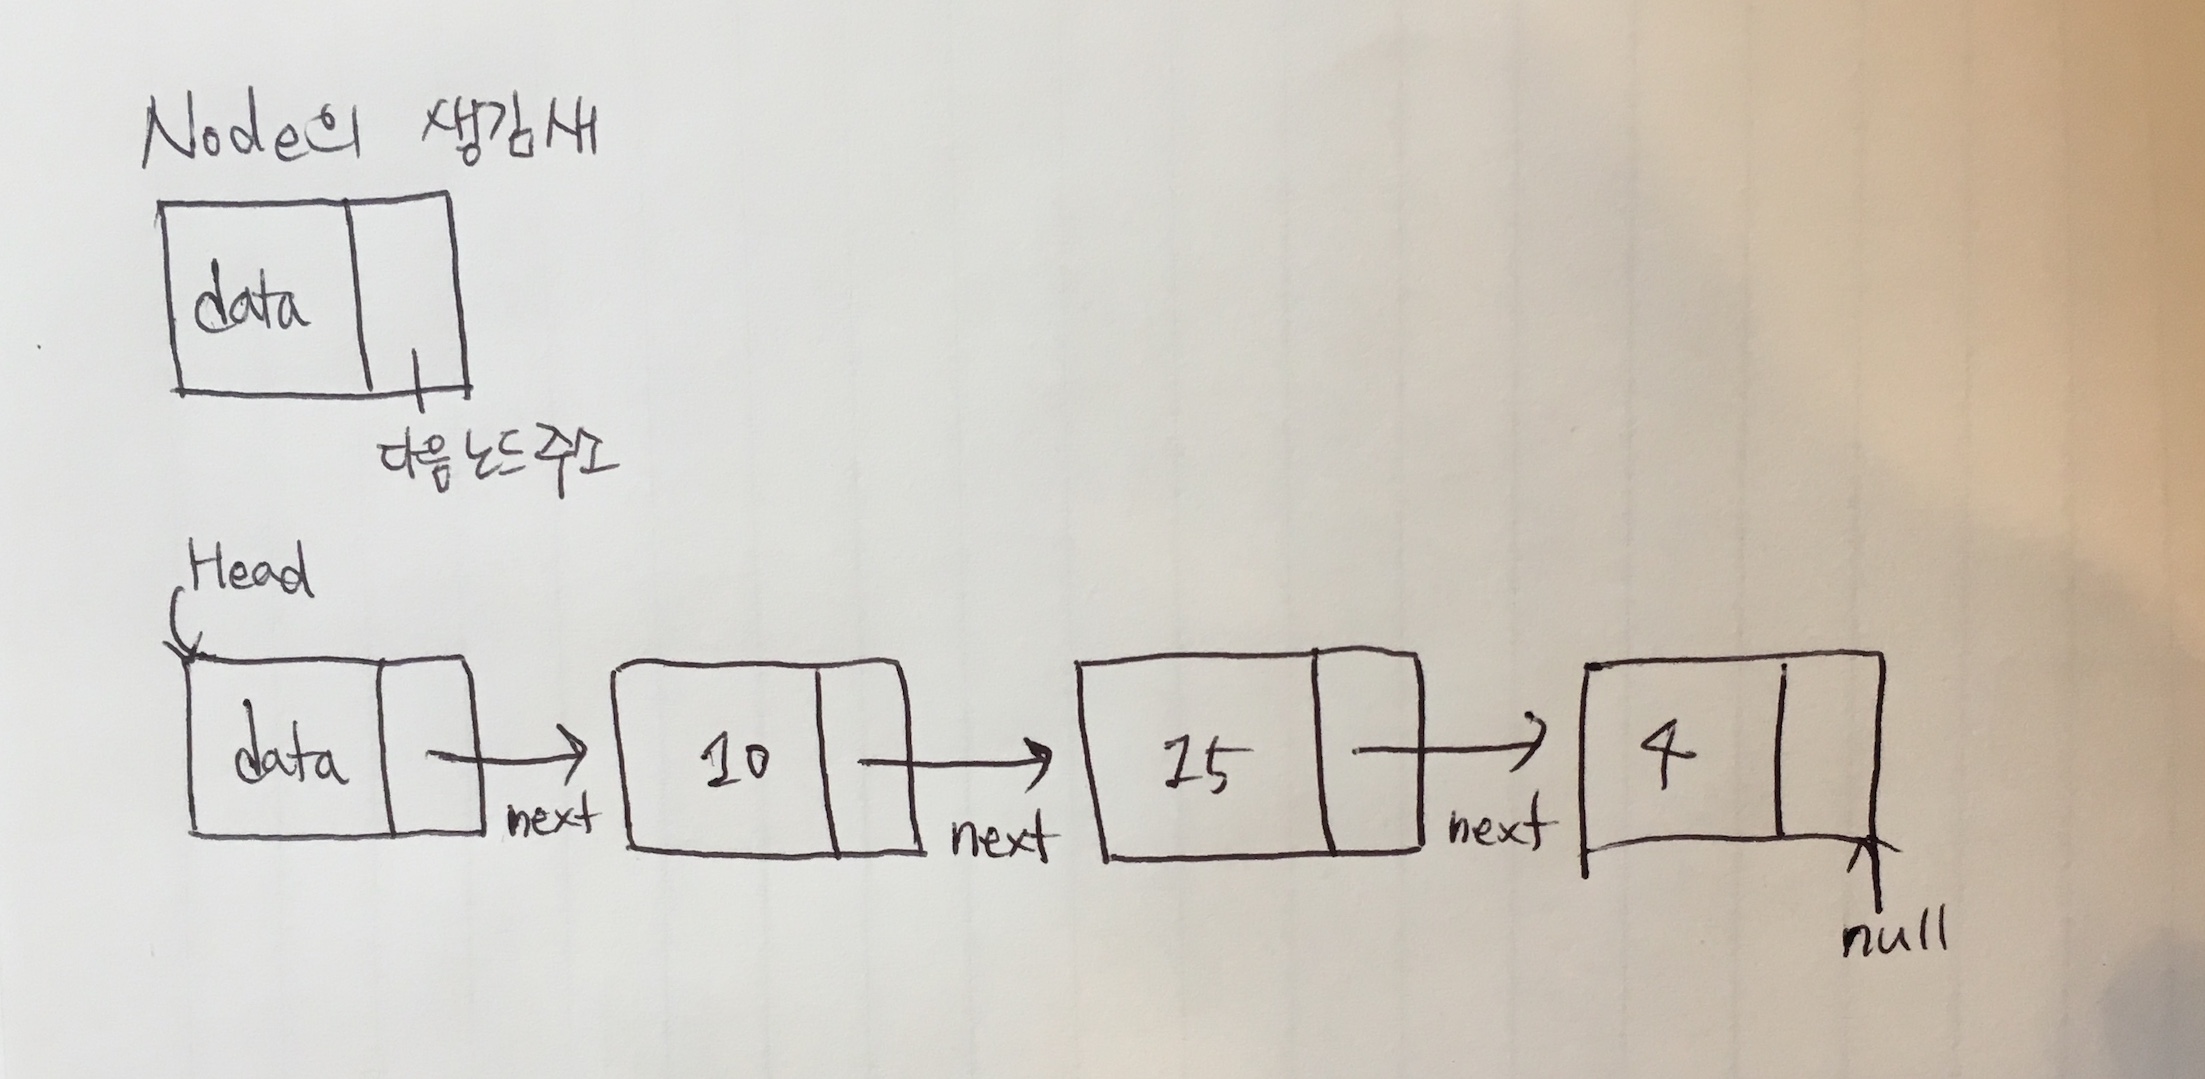
좀 더 나은 그림으로...
 [그림 출처: https://codeburst.io/linked-lists-in-javascript-es6-code-part-1-6dd349c3dcc3]
2) Linked List 구조
- Linked list는 연결된 노드로 구성되어 있다.
- 배열처럼 순서가 있고(ordered), 선형적(linear)인 자료 구조이다.
- 각 노드를 살펴보면 data와 다음 노드의 주소를 담고 있다.
여기서 다음 노드 주소를 참고하여 계속해서 노드가 연결되는 reference chain 형태이다. - 위의 그림에서 그린 것은 '단일 연결 리스트'이지만, 한 노드가 여러 노드와 연결되어 있는 '이중 연결 리스트' 또한 존재한다.
- 보통 단일 연결 리스트는 자신의 다음 노드만 알고 자신의 전에 있는 노드는 알 수가 없다. 이중 연결 리스트는 이러한 문제를 풀고자 자신의 전에 위치한 데이터가 무엇인지 알고자 하여 생성되었고, 이 경우 단일 연결 리스트에 비해 메모리가 더 증가한다.
- linked list는 stack, queue, hash table 등 다양한 자료구조를 구현하는데 사용된다.
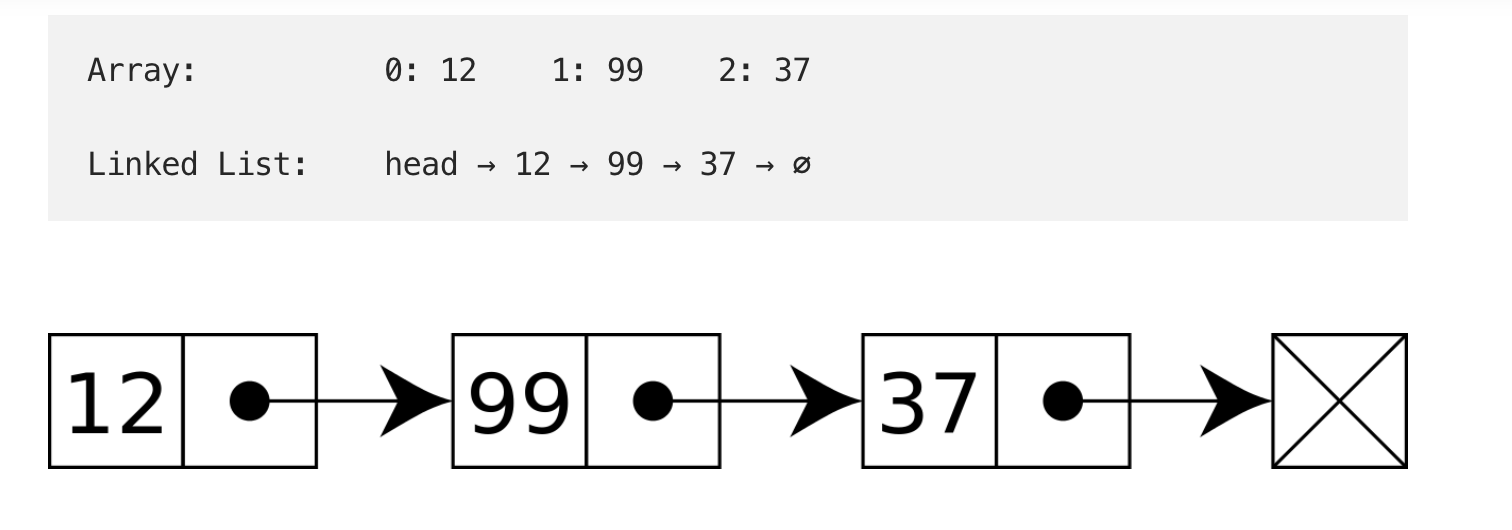
- 배열과 Linked List 비교
- Search 기준: linked list는 매 요소마다 계속 chaining을 하면서 검색을 하기 때문에 메모리를 연속적으로 배치해 index 기준으로 바로 값을 검색하는 배열보다 성능상 좋지 않다. 그러나 메모리 할당은 적다.
- 삽입/추가 기준: linked list는 중간에 데이터가 추가될 때 인덱스를 계속해서 변경해야 하는 배열에 비해 삽입/추가가 자유롭다.
2. Linked List의 property와 method
-
Property of Linked List
- head: 리스트가 시작되는 최상단 위치
- tail: 마지막에 붙어있는 노드
- length: 꼬리를 물고 연결되어 있는 노드의 개수
-
Method of Linked List
- add: 노드를 추가해준다.
- remove: 노드를 제거해 준다.
- search: value 값을 이용하여 해당 데이터를 지니고 있는 노드의 위치를 찾아준다.
-
Pesuedo Code 짜보기
-
list라는 객체를 선언한다. head와 tail은 null을, length는 0을 값으로 하는 속성값을 할당한다.
-
list에 들어갈 Node를 만들 생성자 함수가 필요하다.
- node는 value와 next(다음 노드의 주소)를 속성으로 하는 객체이다.
- Node 생성자 함수는 data를 받아 속성인 value에 넣고, next 속성값은 null로 할당한다.
-
addEnd: 노드는 위치와 상관없이 추가가 가능하지만 일단 수도코드는 끝에 추가하는 것만 짜본다.
- data를 전달 받아 Node 생성자 함수를 이용해 추가할 node 객체를 만든다(value는 data, next는 null)
- list의 length 값을 +1 한다.
- list의 head와 tail 값에 node를 넣는다.
-
removeEnd: 추가와 동일하게 끝 부분 삭제만 구현해본다.
1) list의 length가 0인 경우 제거는 불가능하다.
2) list의 legnth가 1인 경우 head와 tail의 값을 null로 재할당하고 length의 값도 0으로 재할당 한다.
3) list의 length가 2 이상인 경우,- list의 length -1 값만큼 list의 head에서 next를 순회한다.
- 순회 후 도착한 노드를 delete하고, null을 대신 채워 넣는다.
- list의 length에 -1를 해준다.
-
search:
1) list의 length가 1보다 작으면 null을 리턴한다.
2) list의 length가 1보다 같거나 크면,- current 라는 변수를 선언해 list의 head를 할당한다.
- location이라는 변수를 선언해 0으로 할당한다.
- current의 value가 찾고자 하는 data와 같다면 location을 리턴한다.
- 그렇지 않다면 head의 next가 null되지 않을 때까지 순회하며
(1) current의 next가 찾고자 하는 data와 동일한지 본다.
(2) 순회 때마다 location을 +1 한다.
(3) current의 next가 찾고자 하는 data와 동일하면 location을 리턴한다.
(4) 동일하지 않으면 current에 current의 next를 재할당한다.
3) 순회가 끝나도 동일 값을 찾지 못하면 null을 리턴한다.
-
-
Linked List 관련 읽어보기
- How to sole algorithms - adding linked list: https://www.youtube.com/watch?v=cEGx1zqD78Y
- Singly linked list : https://www.scriptonitejs.com/js-singly-linked-list/
- Functional Implementation
const LinkedList = function() {
    const list = {};
    list.head = null;
    list.tail = null;
};
//
list.addToTail = function(value) {
    const node = new Node(value);
    if (this.head === null) {
      this.head = node;
    } else {
      this.tail.next = node;
    }
    this.tail = node;
  };
  //
list.removeHead = function() {
    if(this.head === null) {
      return null;
    }
    list.head = list.head.next;
    if(this.head === null) {
      this.tail = null;
    }
    return this.head;
  };
  //
list.contains = function(target) {
    const originalHead = this.head;
    let node = this.head;
    while (node !== null) {
      if (node.value === target) {
        return true;
      }
      node = node.next;
    }
    this.head = originalHead;
    return false;
  };
//
const Node = function(value) {
    const node = {};
    node.value = value;
    node.next = null;
    return node;
};
4. Data Structure - Graph
1. Graph는 어떻게 생겼나?
1) 그림으로 그려보자.
먼저 내가 그린 그림
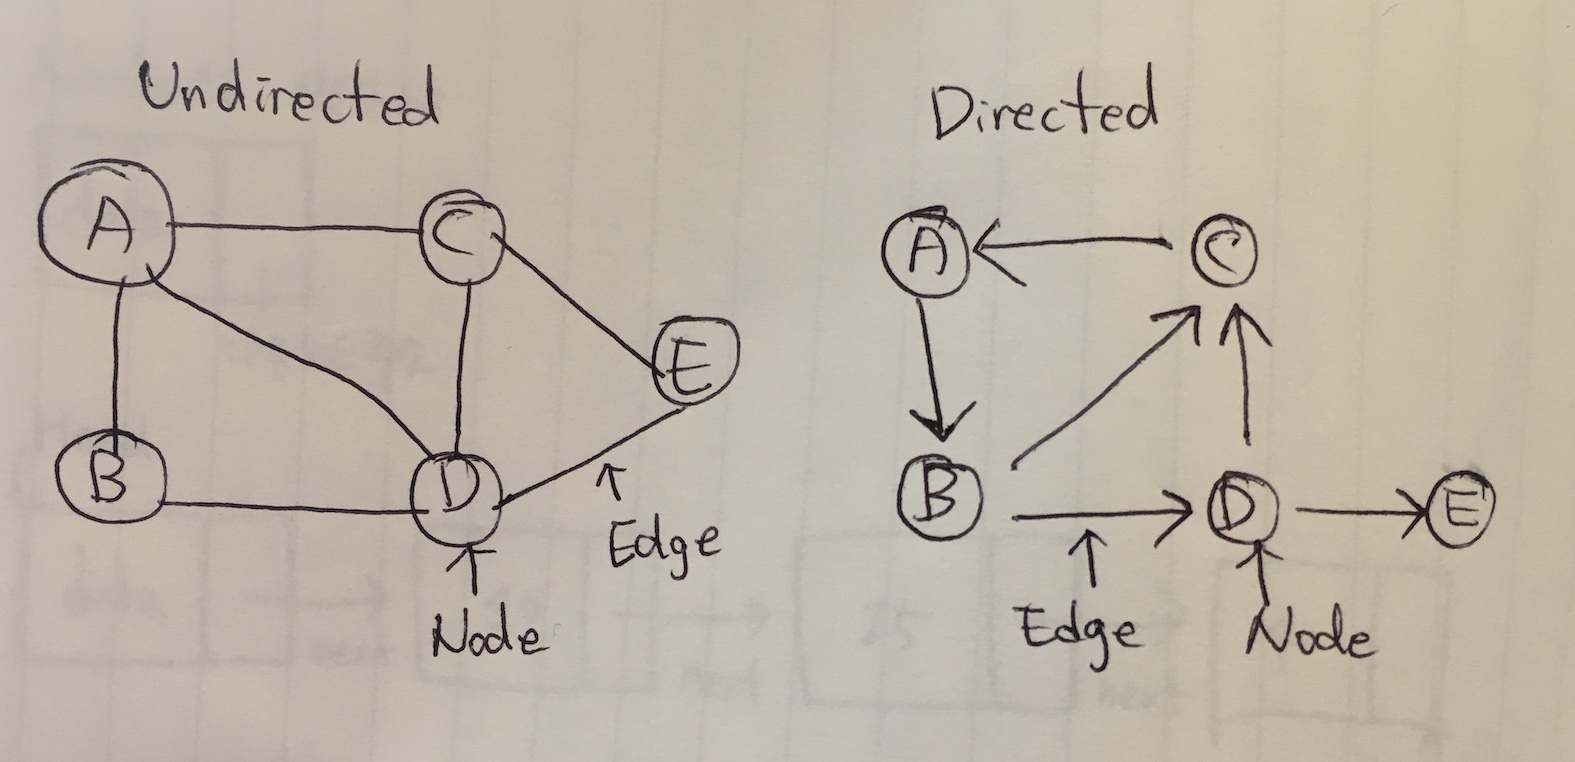
좀 더 나은 그림으로...
 [그림 출처: https://medium.com/@ziyoshams/graphs-in-javascript-cc0ed170b156]
2) Graph 구조
- Graph는 상하위 개념이 없는 노드(혹은 버텍스)와 노드들을 잇는 엣지(아크)로 구성되어 있는 자료구조이다.
- Graph에서는 모든 노드들이 관계를 가지고 있을 필요가 없어 비교적 자유로운 구조이다.
- node : 그래프 상의 정점
- edge : 정점과 정점 사이의 간선
- cycle : 노드가 엣지를 통해 다시 자기에게 돌아오는 것
- path : 정점에서 정점으로 이동하는 경로
- shortest path : 정점에서 정점으로 이동하는 최단 경로
- Graph는 비선형(non-linear)적이며, network model이라고도 불린다.
- 실생활에서는 지도, 지하철 노선도 등이 Graph 구조의 좋은 예시이다.
페이스북 친구 추천이나 e-commerce 추천 알고리듬에서도 사용된다. - 노드는 방향성이 있기도 하고 없기도 해 각각을 '무방향성 그래프', '방향성 그래프'라고 나뉘어 부른다.
- degree: 노드 간 방향이 없는 경우, 노드 하나에 연결된 엣지 수의 합을 가리킨다.
- in-degree: 노드 간 방향이 있는 경우, 외부에서 자신의 노드 쪽으로 향하는 엣지 수의 합을 가리킨다.
- out-degree: 노드 간 방향이 있는 경우, 자신 노드로부터 외부로 향하는 엣지 수의 합을 가리킨다.
- Graph를 표현하는 방법은 2가지가 있다: 2차원 배열로 표시, 연결리스트로 표시
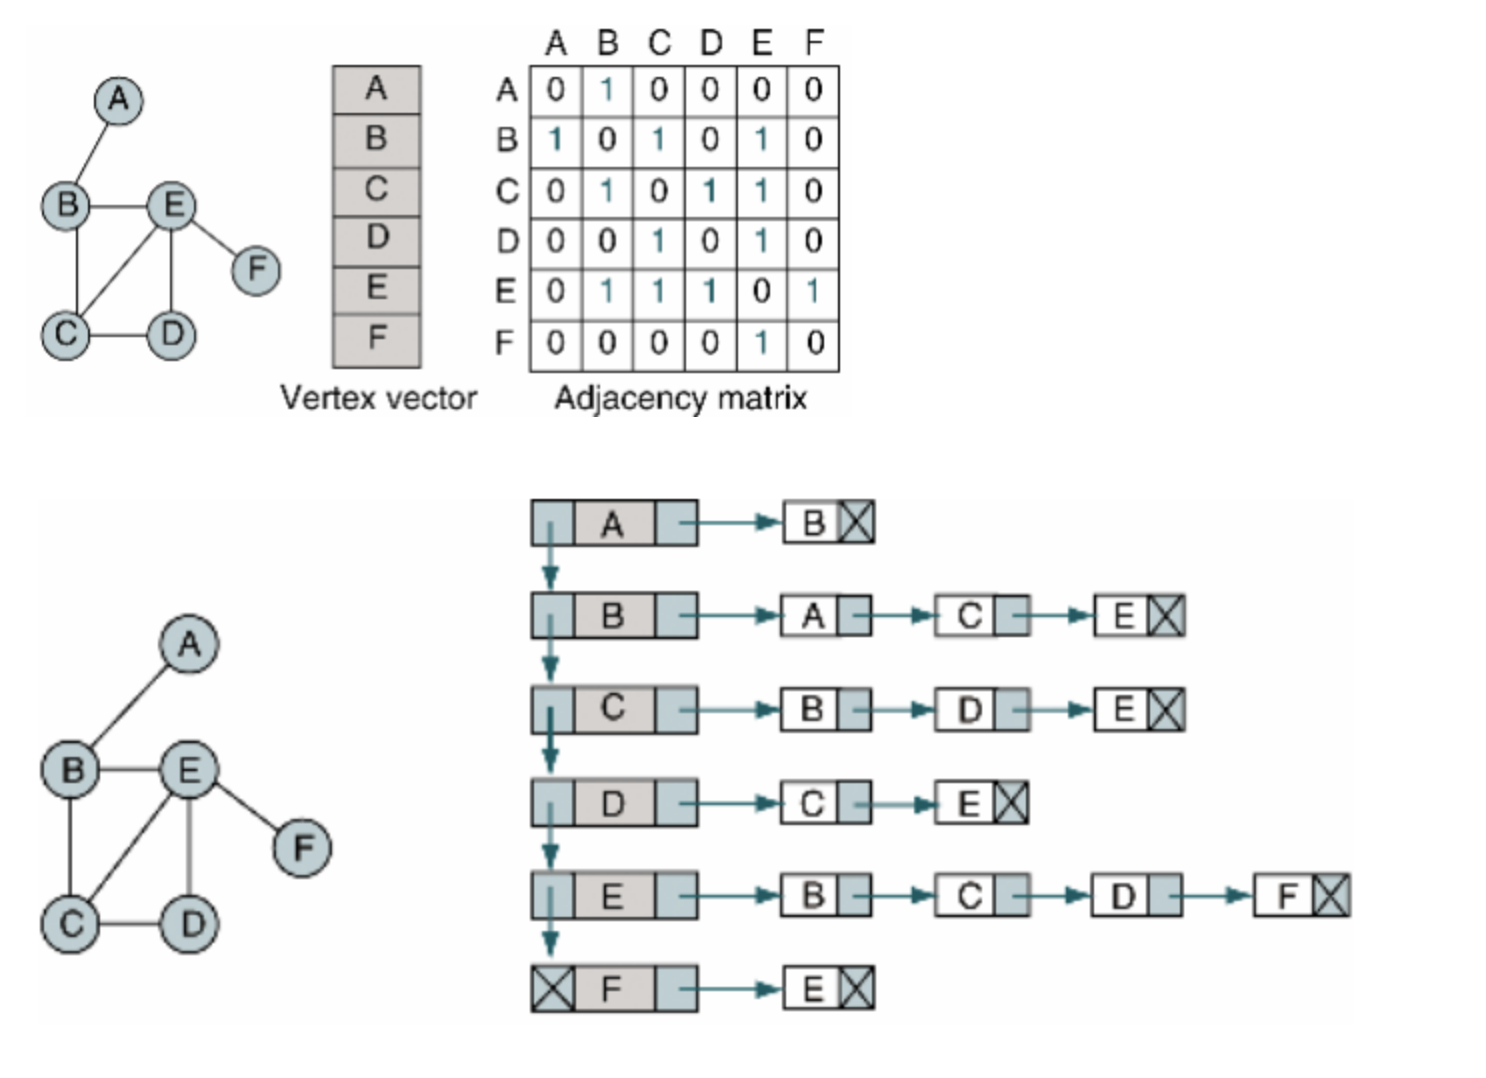
[자료 출처: https://www.zerocho.com/category/Algorithm/post/584b9033580277001862f16c]
2. Graph의 property와 method
-
Property of Graph
- node
- edge: node의 속성으로 넣을 수 있음(배열 혹은 객체 모양으로)
-
Method of Graph
- addNode
- removeNode
- addEdge
- removeEdge
- contains
- hasNode
- hasEdge
-
Pseudoclassical Implementation
const Graph = function() {
  this.nodes = {};
}

Graph.prototype.addNode = function(node) {
  this.nodes[node] = this.nodes[node] || {edges: {} };
};

Graph.prototype.cotains = function(node) {
  return !!this.nodes[node];
}

Graph.prototype.removeNode = function(node) {
  if(this.contains(node)) {
    const keys= Object.keys(this.nodes[node].edges);
    for(let i = 0; i < keys.length; i++;) {
      this.removeEdge(node, keys[i]);
    }
    delete this.nodes[node];
  }
};

Graph.prototype.hasEdge = function(fromNode, toNode) {
  if(!this.contains(fromNode)) {
    return false;
  }
  return !!this.nodes[fromNode].edges[toNode];
};

Graph.prototype.addEdge = function(fromNode, toNode) {
  if(!this.contains(fromNode) || !this.contains(toNode)) {
    return;
  }
  this.nodes[fromNode].edges[toNode] = toNode;
  this.nodes[toNode].edges[fromNode] = fromNode;
};

Graph.prototype.removeEdge = functino(fromNode, toNode) {
  if(!this.contains(fromNode) || !this.contains(toNode)) {
    return;
  }
  delete this.nodes[fromNode].edges[toNode];
  delete this.nodes[toNode].edges[fromNode];
};

Graph.prototype.forEachNode = function(callback) {
  const keys = Object.keys(this.nodes);
  for(let i = 0; i < keys.length; i++) {
    callback(keys[i]);
  }
};
- Graph 관련 읽어보기
- 칸 아카데미 그래프 설명하기 : https://ko.khanacademy.org/computing/computer-science/algorithms/graph-representation/a/describing-graphs
- Graph Data Structure in JavaScript: https://medium.com/@ziyoshams/graphs-in-javascript-cc0ed170b156
5. Data Structure - Tree
1. Tree는 어떻게 생겼나?
1) 그림으로 그려보자.
tree 구조는 익숙하다. 보통 이렇게 생김.
 [그림 출처: https://chercher.tech/kotlin/tree-kotlin]
2) Tree 구조
- 나무를 뒤집어 놓은 것처럼 하나의 시작 노드부터 시작되어 자식 노드들이 파생되는 자료 구조이다.
- tree 구조는 graph의 일종이나 양방향이나 원형 구조로 존재하지 않는다.
- HTML의 자료 구조가 가장 좋은 예시이다.
- 몇가지 용어들
- Root : 시작하는 노드, 1개 뿐이고 root 외에는 시작이 될 수 없다.
- Leaf : 가장 하단에 있는 마지막 노드, 자식 노드가 없다.
- Edge/Branch : 노드와 노드의 연결
- Path: 노드 간의 연결
- Parent & Child: 부모와 자식 노드, 자식 노드의 부모 노드는 1개 뿐이다.
- Children & Sibling: 부모 노드 아래로 파생된 모든 노드를 children에 담고 있다. 같은 부모 노드를 가지고 있는 자식 노드들은 서로를 sibling으로 본다.
- Height: 부모 노드와 자식 노드간 edge의 개수
- zerocho님의 자료구조(트리, tree) 블로그: https://www.zerocho.com/category/Algorithm/post/580ed6eb77023c0015ee9686
- 우유로 트리를 시작해 본다면? (자료 검색하다가 재미있어 보여서 가져와봤다🐼🐼🐼)
 [그림 출처: https://chercher.tech/kotlin/tree-kotlin]
2. Tree의 property와 method
- Property of Tree
- value
- children : 자식 트리
- Method of Tree
- insert : 자식 트리를 추가
- remove : 자식 트리를 삭제
- contains : 트리가 해당 노드 값을 가지고 있는가
- traverse : 모든 트리의 value를 callback 함수에 의해 변경
- map : callback 함수에 의해 변경된 새로운 트리 반환
- Pseudoclassical Implementation
const Tree = function(value) {
  this.value = value;
  this.children = [];
}

Tree.prototype.addChild = function(value) {
  const child = Tree(value);
  this.children.push(child);
}

Tree.prototype.contains = function(target) {
  if(this.value === target) {
    return true;
  }
  for(let i = 0; i < this.children.length; i++) {
    const child = this.children[i];
    if(child.contains(target)) {
      return true;
    }
  }
  return false;
}

Tree.prototype.traverse = functoin(callback) {
  callback(this.value);

  if(!this.children) {
    return;
  }
  for(let i = 0; i < this.children.length; i++) {
    const child = this.children[i];
    child.traverse(callback);
  }
});

Tree.prototype.map = funcion(callback) {
  const newTree = new Tree();
  newTree.value = callback(this.value);

  function recursion(children, tree) {
    if(children.length) {
      for(let i = 0; i < children.length; i++) {
        const child = chilren[i]
        const newChild = new Tree(callback(child.value));
        tree.addChild(newChild);
        recursion(child.children, newChild);
      }
    }
  }
  recursion(this.children, newTree);
  return newTree;
};