회원가입창
package controller;

import jakarta.servlet.ServletException;
import jakarta.servlet.annotation.WebServlet;
import jakarta.servlet.http.HttpServlet;
import jakarta.servlet.http.HttpServletRequest;
import jakarta.servlet.http.HttpServletResponse;
import java.io.IOException;

@WebServlet(urlPatterns = {"/member/join.do"})
public class JoinController extends HttpServlet {
	private static final long serialVersionUID = 1L;

    public JoinController() {
        super();
    }

	protected void doGet(HttpServletRequest request, HttpServletResponse response) throws ServletException, IOException {
		// main.jsp파일 랜더링
		request.getRequestDispatcher("/WEB-INF/member_join.jsp").forward(request, response);
	}


	protected void doPost(HttpServletRequest request, HttpServletResponse response) throws ServletException, IOException {


	}

}
JoinContorller.java를 생성하고
<%@ page language="java" contentType="text/html; charset=UTF-8"
    pageEncoding="UTF-8"%>
<!DOCTYPE html>
<html lang="ko">
<head>
    <meta charset='utf-8' />
    <meta http-equiv='X-UA-Compatible' content='IE=edge' />
    <title>회원가입</title>
    <meta name='viewport' content='width=device-width, initial-scale=1' />
	<link rel="stylesheet" href="${pageContext.request.contextPath}/resources/css/bootstrap.min.css" />
    <style>
    </style>
</head>

<body>
    <div class="container">
        <div style="width:600px; margin:0 auto; padding: 50px; border:1px solid #efefef;">
        	<h3>회원가입</h3>
        	<hr />
            <div class="row">
                <div class="col-sm">
	                <div class="form-floating mb-2">
	                    <input type="text" id="id" class="form-control">
	                    <label for="id" class="form-label">아이디</label>
	                </div>

                    <div class="form-floating mb-2">
                        <input type="password" id="pass" class="form-control">
                        <label for="pass" class="form-label">암호</label>
                    </div>

                    <div class="form-floating mb-2">
                        <input type="password" id="pass2" class="form-control">
                        <label for="pass2" class="form-label">암호 확인</label>
                    </div>

	                <div class="form-floating mb-2">
	                    <input type="text" id="name" class="form-control">
	                    <label for="name" class="form-label">이름</label>
	                </div>

	                <div>
                    	<input type="submit" value="회원가입" class="btn btn-primary" />
                    </div>
                </div>
            </div>
		</div>
	</div>

	<script>


	</script>
</body>
</html>
member_join.jsp 파일을 생성한다.
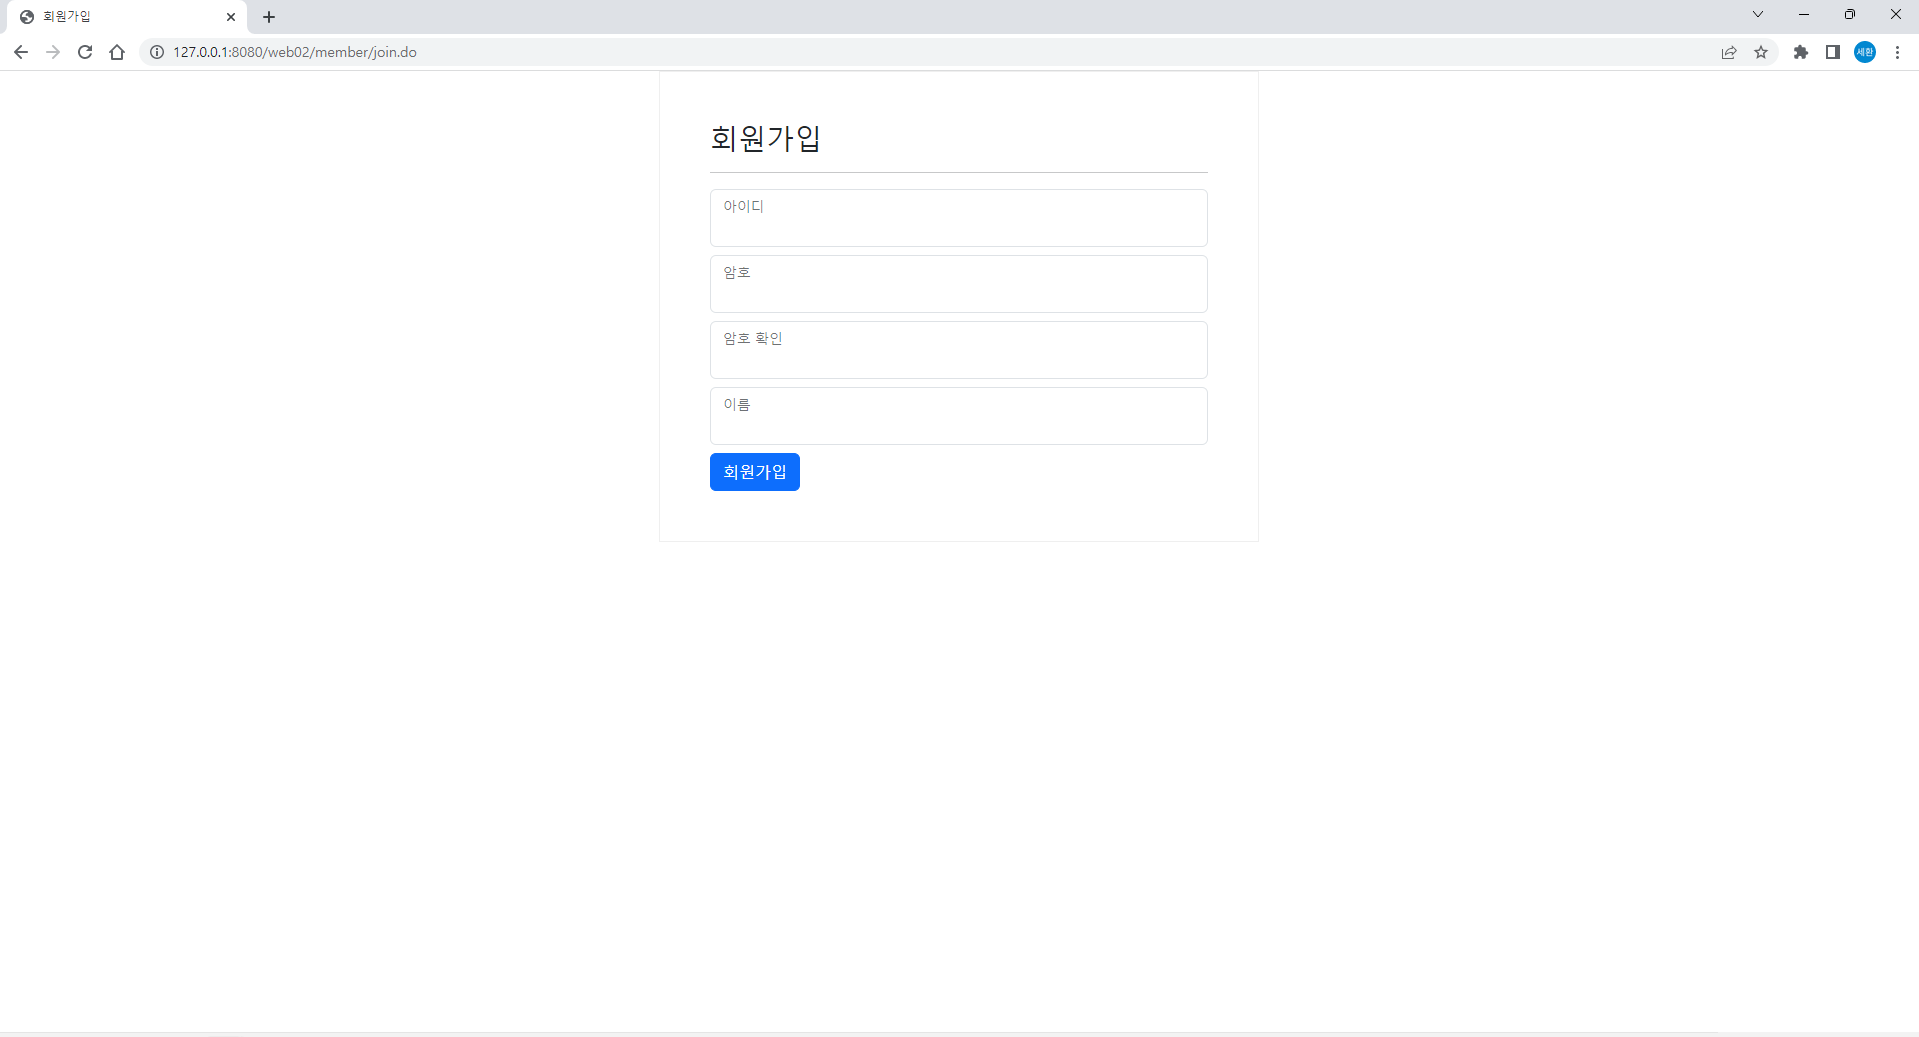
회원가입 창이 생성되었다.
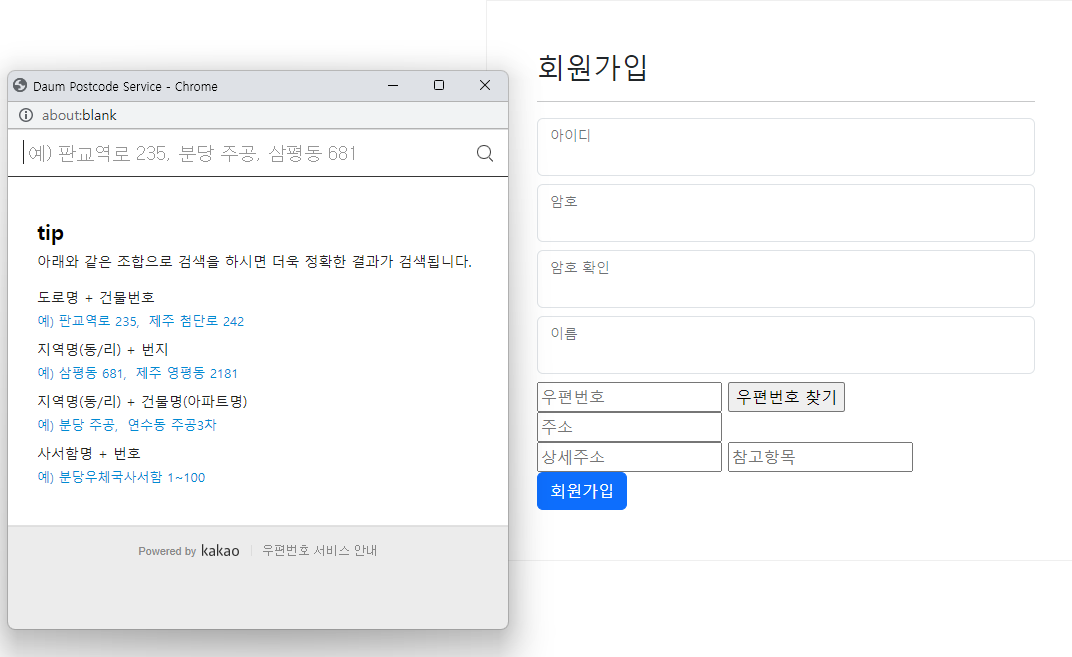
우편번호
<input type="text" id="sample6_postcode" placeholder="우편번호">
<input type="button" onclick="sample6_execDaumPostcode()" value="우편번호 찾기"><br>
<input type="text" id="sample6_address" placeholder="주소"><br>
<input type="text" id="sample6_detailAddress" placeholder="상세주소">
<input type="text" id="sample6_extraAddress" placeholder="참고항목">
이름 아래에 작성하면

이렇게 회원가입창이 나온다.
<script src="//t1.daumcdn.net/mapjsapi/bundle/postcode/prod/postcode.v2.js"></script>
	<script>
		function sample6_execDaumPostcode() {

			// Postcode() obj = new PostCode() obj.open(); = new PostCode().open();

			new daum.Postcode({
				oncomplete: function(data) {
					console.log(data);	// 전체 데이터
					console.log(data.address);	// 일부데이터 추출(키를 이용해서...)
					console.log(data['address']);

					// 변수 생성 => var, let
					// 상수 생성 => const
					var addr = ''; // 주소 변수
					var extraAddr = ''; // 참고항목 변수

					//사용자가 선택한 주소 타입에 따라 해당 주소 값을 가져온다.
	                if (data.userSelectedType === 'R') { // 사용자가 도로명 주소를 선택했을 경우
	                    addr = data.roadAddress;
	                } else { // 사용자가 지번 주소를 선택했을 경우(J)
	                    addr = data.jibunAddress;
	                }

	                // 사용자가 선택한 주소가 도로명 타입일때 참고항목을 조합한다.
	                if(data.userSelectedType === 'R'){
	                    // 법정동명이 있을 경우 추가한다. (법정리는 제외)
	                    // 법정동의 경우 마지막 문자가 "동/로/가"로 끝난다.
	                    if(data.bname !== '' && /[동|로|가]$/g.test(data.bname)){
	                        extraAddr += data.bname;
	                    }
	                    // 건물명이 있고, 공동주택일 경우 추가한다.
	                    if(data.buildingName !== '' && data.apartment === 'Y'){
	                        extraAddr += (extraAddr !== '' ? ', ' + data.buildingName : data.buildingName);
	                    }
	                    // 표시할 참고항목이 있을 경우, 괄호까지 추가한 최종 문자열을 만든다.
	                    if(extraAddr !== ''){
	                        extraAddr = ' (' + extraAddr + ')';
	                    }
	                    // 조합된 참고항목을 해당 필드에 넣는다.
	                    document.getElementById("sample6_extraAddress").value = extraAddr;

	                } else {
	                    document.getElementById("sample6_extraAddress").value = '';
	                }

	                // 우편번호와 주소 정보를 해당 필드에 넣는다.
	                document.getElementById('sample6_postcode').value = data.zonecode;
	                document.getElementById("sample6_address").value = addr;
	                // 커서를 상세주소 필드로 이동한다.
	                document.getElementById("sample6_detailAddress").focus();

				}

			}).open();
		}
daum지도 api를 가져왔다.

입력하고 선택한 주소가 들어오게 된다.
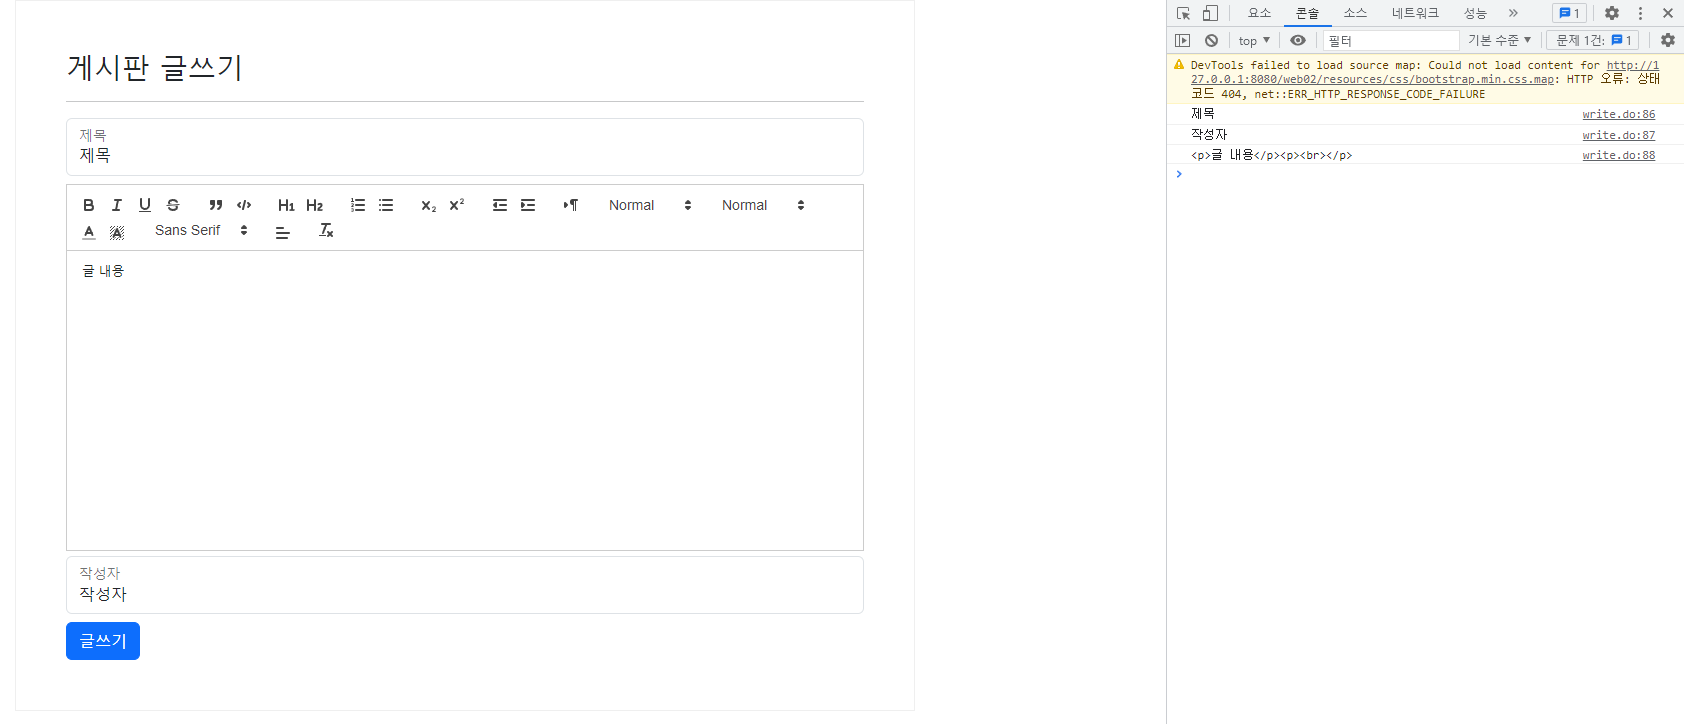
게시글 작성
<%@ page language="java" contentType="text/html; charset=UTF-8"
    pageEncoding="UTF-8"%>
<!DOCTYPE html>
<html lang="ko">
<head>
	<meta charset="UTF-8">
	<meta http-equiv='X-UA-Compatible' content='IE=edge' />
	<meta name='viewport' content='width=device-width, initial-scale=1' />
	<title>게시판 글쓰기</title>
	<link rel="stylesheet" href="${pageContext.request.contextPath}/resources/css/bootstrap.min.css" />
	<!-- Include stylesheet -->
	<link href="https://cdn.quilljs.com/1.3.6/quill.snow.css" rel="stylesheet">
</head>
<body>
    <div class="container">
        <div style="width:900px; margin:0 auto; padding: 50px; border:1px solid #efefef;">
        	<h3>게시판 글쓰기</h3>
        	<hr />
            <div class="row">
                <div class="col-sm">
	                <div class="form-floating mb-2">
	                    <input type="text" id="title" class="form-control" autofocus required />
	                    <label for="title" class="form-label">제목</label>
	                </div>

                    <div style="margin-bottom:5px;">
                        <!-- Create the editor container -->
						<div id="editor" style="height:300px;">
						  <p>Hello World!</p>
						  <p>Some initial <strong>bold</strong> text</p>
						  <p><br></p>
						</div>
                    </div>

                    <div class="form-floating mb-2">
                        <input type="text" id="writer" class="form-control" required />
                        <label for="writer" class="form-label">작성자</label>
                    </div>
	                <div>
                    	<input type="submit" value="글쓰기" class="btn btn-primary" onclick="getEditorContent()"/>
                    </div>
                </div>
            </div>
		</div>
	</div>


	<!-- Include the Quill library -->
	<script src="https://cdn.quilljs.com/1.3.6/quill.js"></script>

	<!-- Initialize Quill editor -->
	<script>

		const toolbarOptions = [
			  ['bold', 'italic', 'underline', 'strike'],        // toggled buttons
			  ['blockquote', 'code-block'],

			  [{ 'header': 1 }, { 'header': 2 }],               // custom button values
			  [{ 'list': 'ordered'}, { 'list': 'bullet' }],
			  [{ 'script': 'sub'}, { 'script': 'super' }],      // superscript/subscript
			  [{ 'indent': '-1'}, { 'indent': '+1' }],          // outdent/indent
			  [{ 'direction': 'rtl' }],                         // text direction

			  [{ 'size': ['small', false, 'large', 'huge'] }],  // custom dropdown
			  [{ 'header': [1, 2, 3, 4, 5, 6, false] }],

			  [{ 'color': [] }, { 'background': [] }],          // dropdown with defaults from theme
			  [{ 'font': [] }],
			  [{ 'align': [] }],

			  ['clean']                                         // remove formatting button
			];

		// 위쪽에 있는 태그 중에서 id가 editor인 것을 찾아서 toolbar는 toolbarOptions의 값으로 대체하고 테마를 snow로 해서 변경
		var quill = new Quill('#editor', {
			  modules: {
			    toolbar: toolbarOptions
			  },
			  theme: 'snow'
			});

		function getEditorContent(){
			const title 	= document.getElementById("title");
			const writer	= document.getElementById("writer");
			const content 	= quill.root.innerHTML; // 위쪽의 editor객체를 통해서 가져오기

			console.log(title.value);
			console.log(writer.value);
			console.log(content);
		}
	</script>
</body>
</html>
board_write.jsp이다.
quill_editor에서 툴바를 가져왔다.

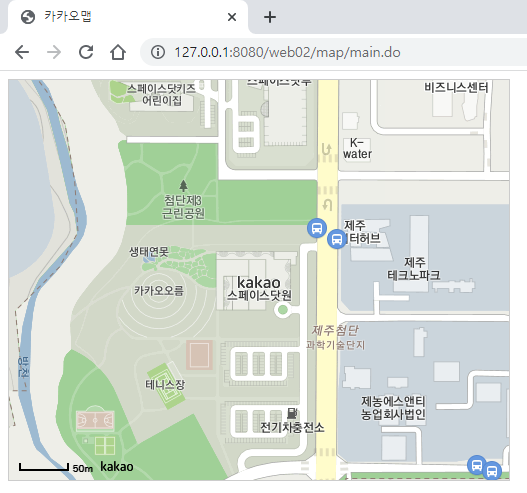
카카오맵
@WebServlet(urlPatterns = {"/map/main.do"})
public class MapController extends HttpServlet {
	private static final long serialVersionUID = 1L;


    public MapController() {
        super();
    }


	protected void doGet(HttpServletRequest request, HttpServletResponse response) throws ServletException, IOException {

		request.getRequestDispatcher("/WEB-INF/map/map.jsp").forward(request, response);
	}
MapController 서블렛을 생성하고
<%@ page language="java" contentType="text/html; charset=UTF-8"
pageEncoding="UTF-8"%>
<!DOCTYPE html>
<html>
<head>
<meta charset="UTF-8">
<title>카카오맵</title>
</head>
<body>
<div id="map" style="width:500px; height:400px; border:1px solid #cccccc;"></div>
<script type="text/javascript" src="//dapi.kakao.com/v2/maps/sdk.js?appkey=발급받은 APP KEY를 넣으시면 됩니다."></script>
<script>
var container = document.getElementById('map');
var options = {
center: new kakao.maps.LatLng(33.450701, 126.570667), // 지도의 중심위치 위도, 경도
level: 3 // 지도의 레벨
};
// 실제로 맵이 생성되는 시점
var map = new kakao.maps.Map(container, options);
</script>
</body>
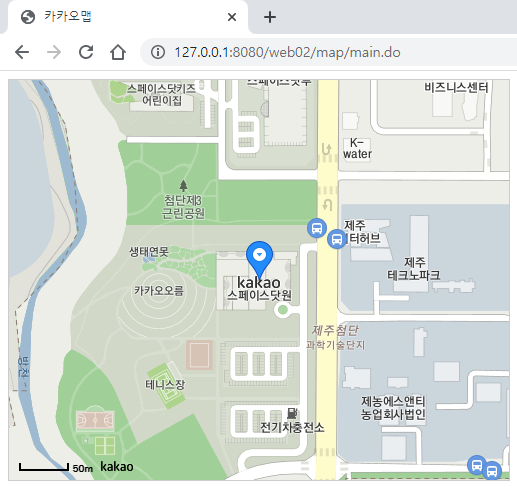
</html>카카오맵 api 사이트에서 코드를 가져온다.
가입하여 앱키도 입력하였다.
+등록한 사이트 도메인과 다르면 지도가 보이지 않는다. 꼭 확인하자.
// 마커가 표시될 위치입니다
var markerPosition  = new kakao.maps.LatLng(33.450701, 126.570667);

// 마커를 생성합니다
var marker = new kakao.maps.Marker({
    position: markerPosition
});

// 마커가 지도 위에 표시되도록 설정합니다
marker.setMap(map);
작성한 코드에 이어서 스크립트 안에 위 코드를 입력하면
마커가 생성된다.
카카오 로그인
<script src="https://t1.kakaocdn.net/kakao_js_sdk/2.1.0/kakao.min.js"
  integrity="sha384-dpu02ieKC6NUeKFoGMOKz6102CLEWi9+5RQjWSV0ikYSFFd8M3Wp2reIcquJOemx" crossorigin="anonymous"></script>
<script>
  Kakao.init('c089c8172def97eb00c07217cae17495'); // 사용하려는 앱의 JavaScript 키 입력
</script>

<a id="kakao-login-btn" href="javascript:loginWithKakao()">
  <img src="https://k.kakaocdn.net/14/dn/btroDszwNrM/I6efHub1SN5KCJqLm1Ovx1/o.jpg" width="222"
    alt="카카오 로그인 버튼" />
</a>
<p id="token-result"></p>

<script>
  function loginWithKakao() {
    Kakao.Auth.authorize({
      redirectUri: 'https://developers.kakao.com/tool/demo/oauth',
    });
  }

  // 아래는 데모를 위한 UI 코드입니다.
  displayToken()
  function displayToken() {
    var token = getCookie('authorize-access-token');

    if(token) {
      Kakao.Auth.setAccessToken(token);
      Kakao.Auth.getStatusInfo()
        .then(function(res) {
          if (res.status === 'connected') {
            document.getElementById('token-result').innerText
              = 'login success, token: ' + Kakao.Auth.getAccessToken();
          }
        })
        .catch(function(err) {
          Kakao.Auth.setAccessToken(null);
        });
    }
  }

  function getCookie(name) {
    var parts = document.cookie.split(name + '=');
    if (parts.length === 2) { return parts[1].split(';')[0]; }
  }
</script>
map.jsp의 body에 위 코드를 입력한다.

카카오 로그인 상자가 생긴다.

클릭하게 되면 이렇게 카카오 로그인 창이 생긴다.
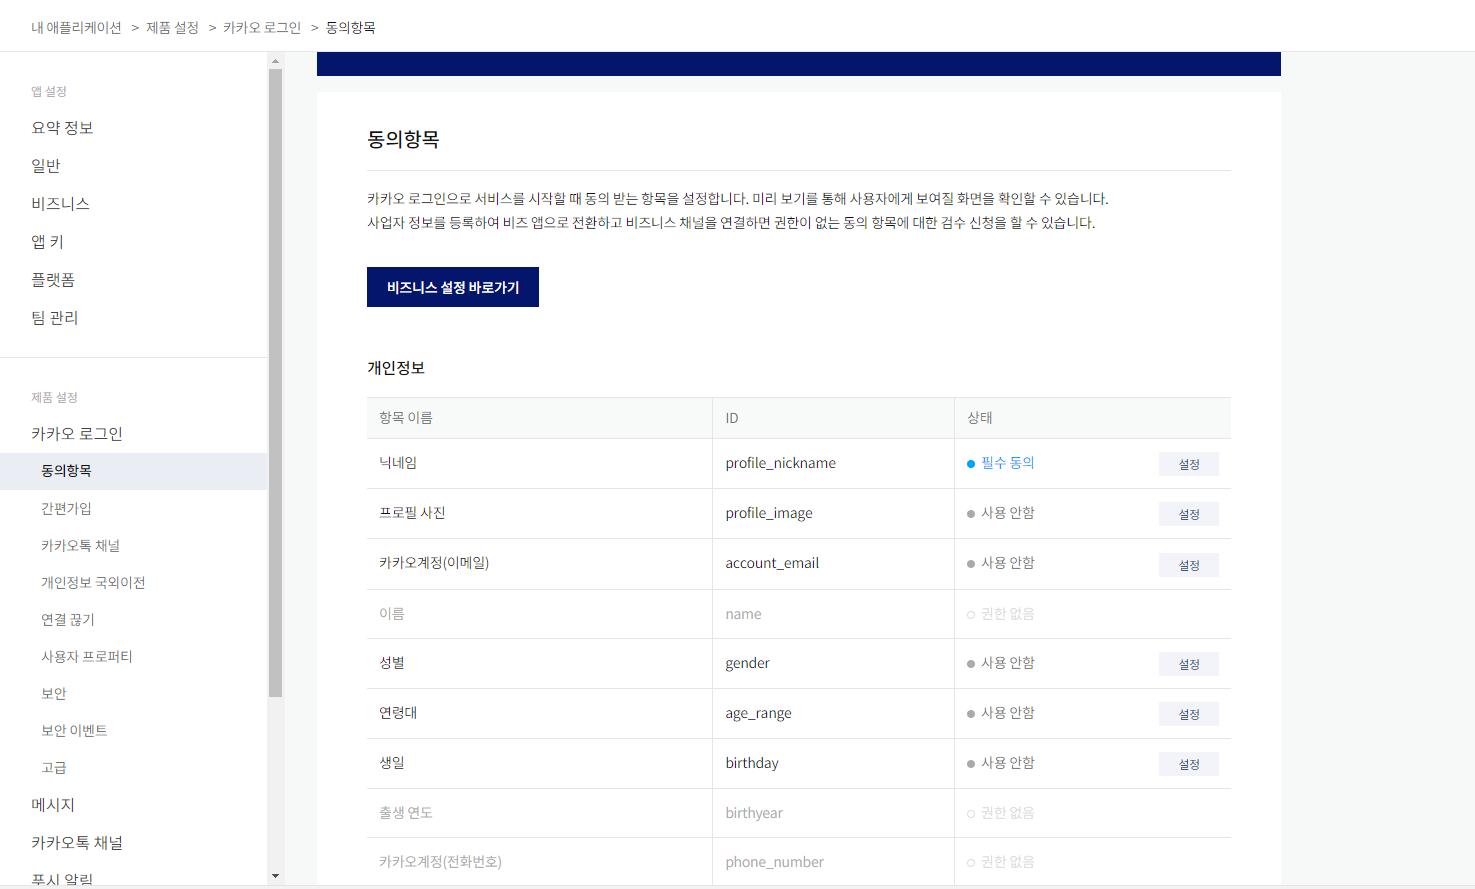
이렇게 닉네임을 필수 동의항목을 추가한다.
package day12;

import java.io.IOException;

import jakarta.servlet.ServletException;
import jakarta.servlet.annotation.WebServlet;
import jakarta.servlet.http.HttpServlet;
import jakarta.servlet.http.HttpServletRequest;
import jakarta.servlet.http.HttpServletResponse;

@WebServlet(urlPatterns = {"/kakao/main.do"})
public class KakaoController extends HttpServlet {
	private static final long serialVersionUID = 1L;


    public KakaoController() {
        super();
    }


	protected void doGet(HttpServletRequest request, HttpServletResponse response) throws ServletException, IOException {

		request.getRequestDispatcher("/WEB-INF/day12/login.jsp").forward(request, response);
	}

	protected void doPost(HttpServletRequest request, HttpServletResponse response) throws ServletException, IOException {

		doGet(request, response);
	}

}
KakaoController 서블렛을 만들고
<%@ page language="java" contentType="text/html; charset=UTF-8"
    pageEncoding="UTF-8"%>
<!DOCTYPE html>
<html>
<head>
	<meta charset="UTF-8">
	<title>카카오로그인</title>
</head>


<body>
	<a id="kakao-login-btn" href="javascript:loginWithKakao()">
		<img src="https://k.kakaocdn.net/14/dn/btroDszwNrM/I6efHub1SN5KCJqLm1Ovx1/o.jpg" width="222" alt="카카오 로그인 버튼" />
	</a>

	<button onclick="logoutWithKakao()">로그아웃</button>

	<hr />
	<script src = "https://developers.kakao.com/sdk/js/kakao.min.js"></script>
	<script>
		Kakao.init('javascript키정보');

		function loginWithKakao() {
			 Kakao.Auth.login({
			 	success: function(authObj) {
			 		console.log('authObj', authObj);
			 		Kakao.API.request({
						url: '/v2/user/me',
						success: function(response) {
							console.log('response', response);
							alert('로그인성공');
							// 성공시 이동할 페이지
							// location.href="http://127.0.0.1:8080/web03/auth.do";
						}
					})
		        },
		        fail: function(err) {
					alert(JSON.stringify(err));
		        }
			});
		}


		function logoutWithKakao(){
			 if (Kakao.Auth.getAccessToken()) {

				 Kakao.API.request({
					url: '/v1/user/unlink',
					success: function (response) {
						console.log(response)
					},
					fail: function (error) {
					  console.log(error)
					},
				});

				Kakao.Auth.setAccessToken(null);
			 }
		}
	</script>
</body>
</html>
login.jsp를 생성하였다. javascript키정보 위치에 내 키정보를 입력하면 된다.

로그인을 누르면

추가한 것처럼 닉네임을 필수로 동의해야 로그인이 가능하다.

동의를 체크하니 로그인 칸이 활성화된 모습이다.
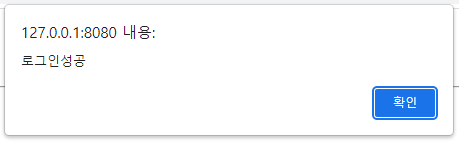
동의하고 로그인하니 로그인 성공창이 뜬다.
채팅
<%@ page language="java" contentType="text/html; charset=UTF-8"
    pageEncoding="UTF-8"%>
<!DOCTYPE html>
<html>
<head>
	<meta charset="UTF-8">
	<title>채팅</title>
</head>

<body>
	<div>
		<input type="text" id="msg" value="내용" />
		<input type="button" id="btn" value="전송" onclick="sendMessage()" />
		<div id="output" style="border: 1px solid #cccccc;">
		</div>
	</div>
	<script src="https://cdnjs.cloudflare.com/ajax/libs/mqtt/4.3.7/mqtt.min.js" type="text/javascript"></script>
	<script>
	const mqttOptions = {
			host :'1.234.5.158', // 서버주소
			port : 11884, // 포트주소
			options : { // 옵션사항들
				clear : true,
				reconnectPeriod : 2000, // 2초 간격으로 접속
				clientId : 'ds200_' + new Date().getTime(), // 접속하는 클라이언트 아이디 고유값
				username: 'ds606',
				password : 'ds606'
			}
		}

		// 서버접속 'ws://1.234.5.158:11884'
		const url = 'ws://'+mqttOptions.host+":"+mqttOptions.port;
		const client = mqtt.connect(url, mqttOptions.options);
		console.log(client);

		client.on('connect', () => { // 접속 성공했을때 호출됨
			console.log('success');
		});
		client.on('error', () => { // 접속 오류 발생시 호출됨
			console.log('error');
		});

		const output = document.getElementById('output');
		client.on('message', (topic, message) => { // 메세지 왔을때 호출됨
			// Unit8Array => String
			var msg1 = new TextDecoder().decode(message);
			console.log('message', topic, msg1);

			output.innerHTML = "["+topic+"]"+ msg1 + "<br />" + output.innerHTML
		});

		// 채널 열기 구독
		client.subscribe('/pknu/class302/#', {qos:0}, (error, res) =>{
			if(error){
				console.log('subscribe error'); // 구독실패
			}
			else {
				console.log('subscribe success'); // 구독성공
			}
		});

		function sendMessage(){
			const msg = document.getElementById("msg").value;
			client.publish('/pknu/class302/ds201', msg, 0, error => {
				if(!error) {
					console.log('send success');
				}
			});
		}
	</script>


</body>
</html>
script에 mqtt js를 입력하고 위처럼 작성하였다.
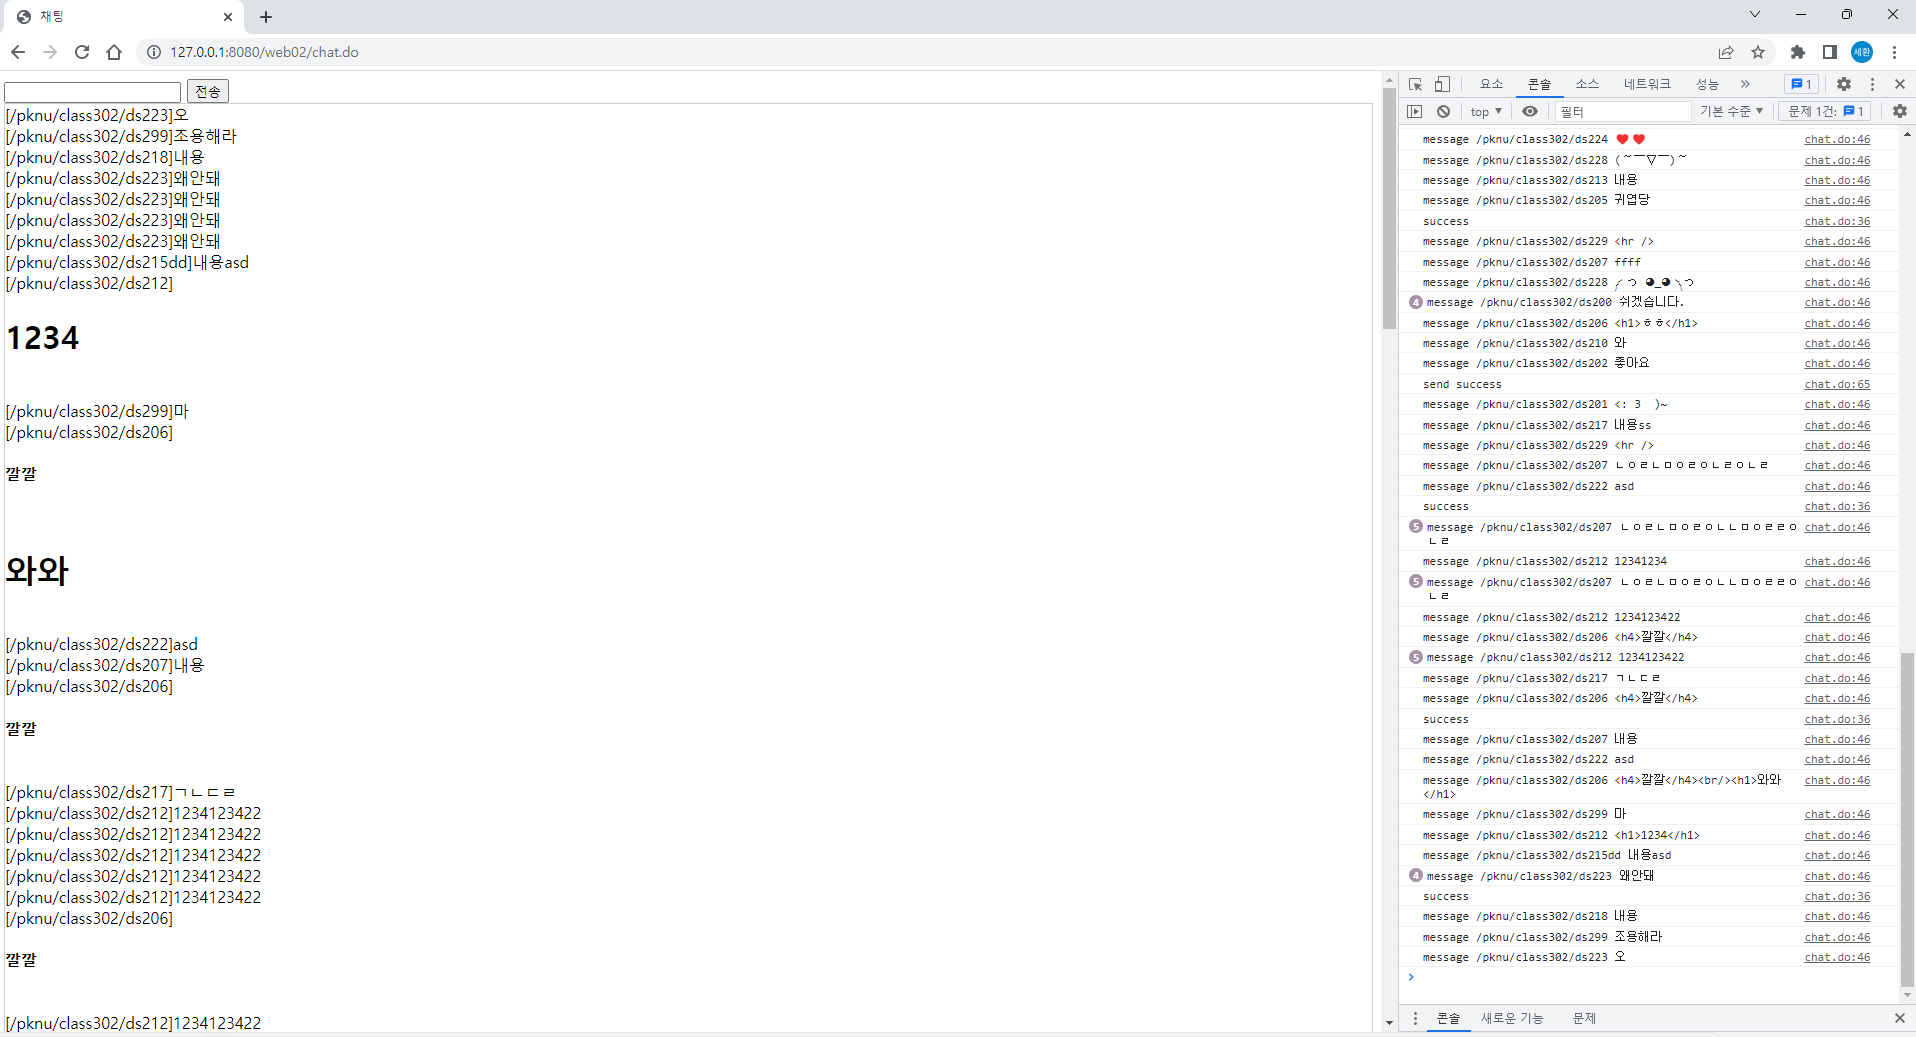
이렇게 채팅을 칠 수 있다.