html
html이란?
Hyper Text Markup Language
: 웹페이지를 만드는 언어
- html 편집기 사용하기
지난번에 설치하였던 visual studio code를 이용하였다.
File -> New File -> (파일명).html 입력
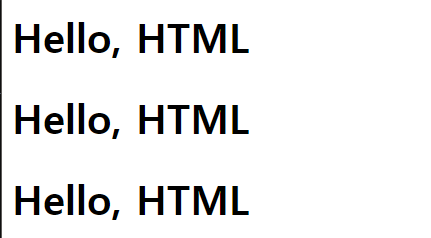
- 태그
<h1> Hello, HTML </h1>

- < h1> : 시작태그
- Hello, HTML : 내용
- < /h1> : 종료태그
- h1 : 태그이름 - 속성(attribute)
html 태그들은 속성을 가지고 있다. 속성은 태그에 추가적으로 정보를 제공하기도 하고, 우리가 원하는 대로 태그의 동작이나 표현을 조절할 수 있는 설정값들이기도 하다.속성은 이름과 값으로 이루어져 있다.
속성은 시작태그 안에 선언하면 된다.
속성은 여러개를 사용할 수 있다.
속성을 "로 열면 "로 닫고, '로 열면 '로 닫아야 한다.
<h1 id="title"> Hello, HTML </h1>

- 속성 : id="title"- 태그 중첩
태그는 중첩이 가능하다. 하지만 부모태그 안에서 자식 태그가 끝나야만 한다
- 올바른 예
<h1> Hello, <i> HTML </i></h1>- 틀린 예
<h1> Hello, <i> HTML </h1></i>- 빈 태그(EMPTY TAG)
닫는 태그가 없다. 우리가 입력하는 내용만 비어있을 뿐이고 속성을 통해서 화면을 나타내거나 또는 화면에 표시되지 않더라도 다른 용도로 사용되는 태그들이다.
대표적인 예로, 우리 대신 브라우저가 직접 화면을 그려줘야 하는 경우에 사용한다.
<br>  -> 빈 태그
<img src =""> -> 이미지 태그(Replacement tag)- 공백
기본적으로 html은 한칸 이상의 공백을 모두 무시해버린다.
<h1>Hello, HTML</h1>
<h1>Hello,     HTML</h1>
<h1>
    Hello,
    HTML
</h1>
위의 3코드는 같은 코드이다. 왜냐하면 한칸이상의 공백과 개행은 모두 무시하기 때문이다.
-
주석
화면에 노출되지 않고 순전히 메모의 목적으로만 사용되는 것<!-- 주석내용 -->
-
html 구조
<!DOCTYPE html>
<html lang="ko"> <!--어느 언어로 작성되었는지 알려줌-->
    <head>
        <meta charset="UTF-8">  <!--문자의 인코딩 방식을 설정-->
        <title>HTML</title>     <!--head 태그는 브라우저에 표시되지 않는다-->
    </head>
    <body>
        <h1>Hello, HTML</h1>
    </body>
</html>
<!DOCTYPE html>
태그는 아님
doctype : 이 문서는 html5로 작성되었다고 버전을 알려주는 것임
반드시 문서 최상단에 있을것, 잘못선언되면 비표준방식으로 해석한다
<html lang="ko">
어느 언어로 작성되었는지 알려줌
<head>
    <meta charset="UTF-8">  문자의 인코딩 방식을 설정
    <title>HTML</title>     브라우저의 탭 바에 노출
</head>
head 태그는 브라우저에 표시되지 않는다
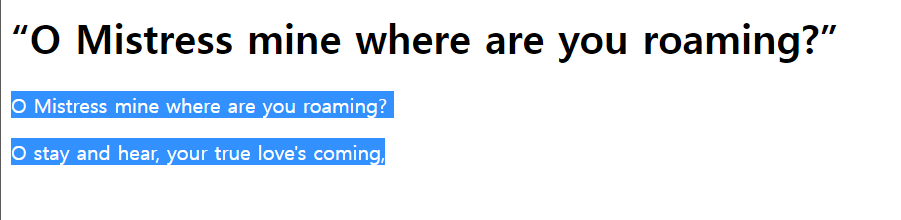
- 제목(Heading)
<h1>“O Mistress mine where are you roaming?”</h1>
- 단락
    <p>  O Mistress mine where are you roaming?</p>
    <p> O stay and hear, your true love's coming,</p>
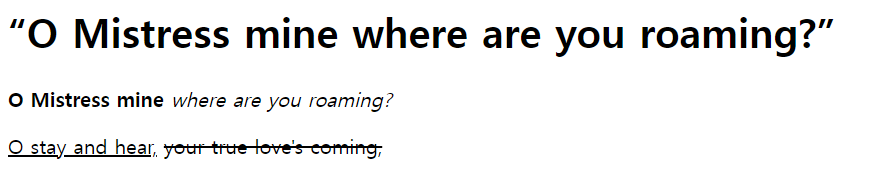
- 텍스트 관련 태그들 (B,I,U,S)
- < b> : 글자를 굵게 표현한다
- < i> : 글자를 이탤릭체로 표현한다.
- < u> : 글자에 밑줄을 표현한다.
- < s> : 글자에 중간선을 표현한다.
<!DOCTYPE html>
<html lang="ko">
    <head>
        <meta charset="UTF-8">
        <title>heading tags </title>
    </head>
    <body>
        <h1>“O Mistress mine where are you roaming?”</h1>
       <b>O Mistress mine</b> <i>where are you roaming?</i></p>
      <p><u>O stay and hear,</u> <s>your true love's coming,</s></p>

    </body>
</html>- 앵커태그
다른 문서로 이동할 수 있는 링크를 생성한다.
<!DOCTYPE html>
<html lang="ko">
    <head>
        <meta charset="UTF-8">
        <title>heading tags </title>
    </head>
    <body>
     <a href="https://velog.io/@nothingkim"> 김그냥의 velog </a>
    </body>
</html>
-파란색&밑줄로 텍스트가 나타나는것은 브라우저에서 제공하는 앵커태그의 스타일이다.
앵커태그는 외부 페이지로 이동하는 것 뿐만 아니라 내부 페이지에서도 이동할 수 있다. (내부 링크)
<a href="#top"> HTML </a>이것은 페이지 내에서 가장 위로 이동하는 앵커태그이다.
5.컨테이너 태그 : 의미없이 요소를 묶기 위한 태그
-스타일을 주기 위해서나 서버에서 보내는 데이터를 담기 위한 목적으로 컨테이너 태그를 사용한다.
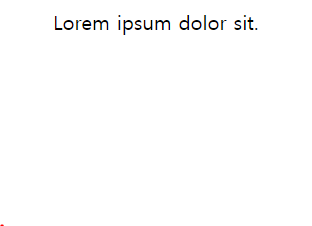
<div>
  <span> Lorem </span> ipsum dolor sit.
</div>- < div> : block-level (block-level은 line 하나를 다 채워서 표현한다.)
- < span> : inline-level (line-level은 block-level 안에 들어가게 된다)
- 리스트 태그
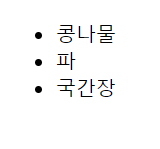
(1) ul : 단순 나열할 때 사용
<!DOCTYPE html>
<html lang="ko">
    <head>
        <meta charset="UTF-8">
        <title>ul list </title>
    </head>
    <body>
        <ul>
            <li>콩나물</li>
            <li>파</li>
            <li>국간장</li>
        </ul>
    </body>
</html>
(2) ol : 나열된 항목이 순서와 관련이 있을 때 사용

<!DOCTYPE html>
<html lang="ko">
  <head>
      <meta charset="UTF-8">
      <title>ol list </title>
  </head>
  <body>
      <ol>
          <li>물을 넣는다</li>
          <li>불을 켠다</li>
          <li>면을 넣는다</li>
      </ol>
  </body>
</html>
(3) dl : description list로 용어를 설명하는 리스트
- < dt> : definition term, 설명할 용어.
- < dd> : definition description, 용어의 설명.

<!DOCTYPE html>
<html lang="ko">
    <head>
        <meta charset="UTF-8">
        <title>dl list </title>
    </head>
    <body>
        <dl>
            <dt>콩나물</dt>
            <dd>콩을 물이 잘 빠지는 그릇 따위에 담아 그늘에 두고 물을 주어 자라게 한 것. 또는 그것으로 만든 나물</dd>
            <dt>물</dt>
            <dd>자연계에 강, 호수, 바다, 지하수 따위의 형태로 널리 분포하는 액체</dd>
            <dd>못, 내, 호수, 강, 바다 따위를 두루 이르는 말.</dd>
        </dl>
    </body>
</html>- 이미지 태그 : 문서에 이미지를 삽입한다.
<img src="(이미지 경로)" alt="(이미지 설명)" width/height="이미지 높이">-이미지 경로에는 상대경로와 절대경로가 있다.
-
상대경로 : 현재 웹문서의 페이지를 기준으로 상대적으로 이미지의 위치를 나타내는 경로, 같은 이미지를 삽입하더라도 불러오는 페이지의 위치에 따라서 이미지의 주소가 달라질 수 있다.
ex) ./images/tomato.jpg -
절대경로 : 실제 그 이미지가 위치해 있는 곳의 전체 경로, 어느 페이지에서 불러오더라도 같은 주소를 가지게 된다.
ex1) c:/user/tomato.jpg
ex2) http://velog.velcdn.com/images/nothingkim/tomato.jpg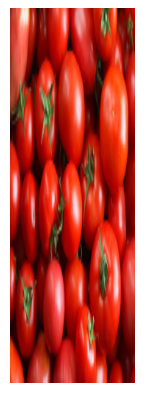
<!DOCTYPE html>
<html lang="ko">
    <head>
        <meta charset="UTF-8">
        <title>image tag </title>
    </head>
    <body>
        <img src="http://image.dongascience.com/Photo/2018/10/1e4e9eb4a36aaff4874434582f414eae.jpg" alt="토마토" width = "100" height = "300">
    </body>
</html>- 테이블 태그
-
< td>, < th> : 데이터 셀
-
< tr> : 행
-
< table> : 표

  <!DOCTYPE html>
<html lang="ko">
    <head>
        <meta charset="UTF-8">
        <title>table tag </title>
        <style media="screen">
            td { border: 1px solid; width:50px; height: 50px}
        </style>
    </head>
    <body>
        <table>
            <tr>
                <td></td><td></td><td></td><td></td>
            </tr>
            <tr>
                <td></td><td></td><td></td><td></td>
            </tr>
            <tr>
                <td></td><td></td><td></td><td></td>
            </tr>
            <tr>
                <td></td><td></td><td></td><td></td>
            </tr>

        </table>

    </body>
</html>- < caption> : 표의 제목
- < thead> : 제목 행을 그룹
- < tfoot> : 바닥 행을 그룹
- < tbody> : 본문 행을 그룹
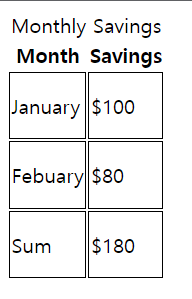
<!DOCTYPE html>
<html lang="ko">
    <head>
        <meta charset="UTF-8">
        <title>table tag </title>
        <style media="screen">
            td { border: 1px solid; width:50px; height: 50px}
        </style>
    </head>
    <body>
        <table>
            <caption>Monthly Savings</caption>
            <thead>
                <tr>
                    <th>Month</th>
                    <th>Savings</th>
                </tr>
            </thead>
            <tfoot>
                <tr>
                    <td>Sum</td>
                    <td>$180</td>
                </tr>
            </tfoot>
            <tbody>
                <tr>
                    <td>January</td>
                    <td>$100</td>
                </tr>
                <tr>
                    <td>Febuary</td>
                    <td>$80</td>
                </tr>
            </tbody>
        </table>
    </body>
</html>
** 셀병합
- colspan : 셀을 가로방향으로 병합
- rowspan : 셀을 세로방향으로 병합
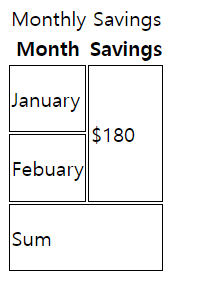
<!DOCTYPE html>
<html lang="ko">
    <head>
        <meta charset="UTF-8">
        <title>table tag </title>
        <style media="screen">
            td { border: 1px solid; width:50px; height: 50px}
        </style>
    </head>
    <body>
        <table>
            <caption>Monthly Savings</caption>
            <thead>
                <tr>
                    <th>Month</th>
                    <th>Savings</th>
                </tr>
            </thead>
            <tfoot>
                <tr>
                    <td colspan="2">Sum</td>
                </tr>
            </tfoot>
            <tbody>
                <tr>
                    <td>January</td>
                    <td rowspan="2">$180</td>
                </tr>
                <tr>
                    <td>Febuary</td>
                </tr>
            </tbody>
        </table>
    </body>
</html>- input 요소
1. text : 기본 입력창
2. password : 입력하는 것이 블라인드되어 보임
3. radio : 라디오버튼
4. checkbox : 체크박스
5. file : 내 컴퓨터에 있는 파일들을 서버에 올림
6. submit : 제출, 값이 서버로 전송됨
7. reset : 초기화, 입력된 모든 값이 사라짐(초기상태로 변경)
8. button: 기본 동작이 없는 버튼, 개발자가 직접 기능을 커스텀해서 추가할 때 사용
9. image : submit과 똑같지만 버튼에 이미지를 삽입할 수 있다.
10. select-option : 입력한 option들이 list로 노출된다. (option에 selected 속성을 입력해주면 checked와 같은 기능이다. )
11. textarea : 텍스트를 여러줄 입력 가능한 상자 (속성: cols: 글자수(영문기준), rows:줄 수)
- checkbox는 중복으로 선택가능, radiobutton은 하나만 선택 가능
- name="" 을 통해 같은 그룹으로 묶을 수 있다.
- checked를 입력해주면 처음 실행했을 때 체크된 상태로 실행된다.
- submit, reset, button 은 value라는 속성을 이용해서 안의 텍스트를 바꿀 수 있다.
- placeholder : 입력창에 입력 도움말을 넣을 수 있다.
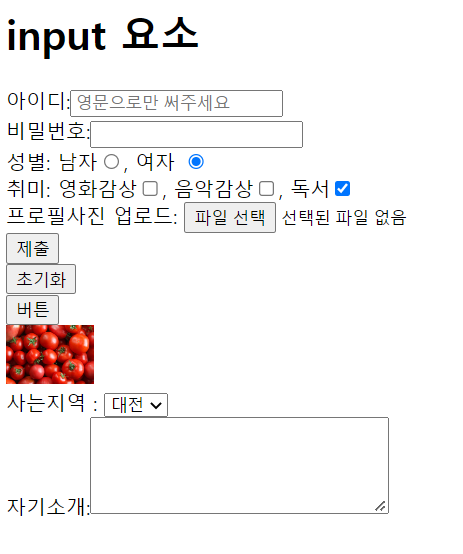
<!DOCTYPE html>
<html lang="ko">
<head>
<meta charset="UTF-8">
<title>input tag </title>
</head>
<body>
<h1> input 요소</h1>
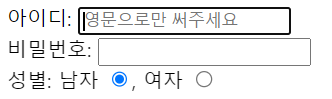
아이디:<input type = "text" placeholder="영문으로만 써주세요"> <br>
비밀번호:<input type="password"> <br>
성별: 남자<input type ="radio" name="gender">, 여자 <input type="radio" name="gender" checked> <br>
취미: 영화감상<input type ="checkbox" name="hobby">, 음악감상<input type ="checkbox" name="hobby">, 독서<input type ="checkbox" name="hobby" checked> <br>
프로필사진 업로드: <input type="file"> <br>
<input type="submit"> <br>
<input type="reset"> <br>
<input type="button" value ="버튼"> <br>
<input type="image" src="http://image.dongascience.com/Photo/2018/10/1e4e9eb4a36aaff4874434582f414eae.jpg" alt="토마토" width="70" > <br>
사는지역 : <select>
<option>서울</option>
<option selected>대전</option>
<option>부산</option>
<option>제주</option>
</select> <br>
자기소개:<textarea cols="30" rows="5" placeholder></textarea><br>
</body>
</html>- button 요소
--> input요소의 submit/reset/button과 뭐가 다를까?
button요소는 내용이 들어가기 때문에 직접 내용을 입력해줘야 한다.1. submit
2. reset
3. button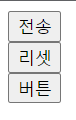
<!DOCTYPE html>
<html lang="ko">
    <head>
        <meta charset="UTF-8">
        <title>button tag </title>
    </head>
    <body>
        <button type ="submit">전송</button><br>
        <button type ="reset"> 리셋</button> <br>
        <button type = "button"> 버튼</button>
    </body>
</html>- 폼 관련 요소
label 요소 : 폼 컨트롤과 연결 시켜주기 위함으로 웹 접근성 향상에 도움이 된다. (필수적)
<!DOCTYPE html>
<html lang="ko">
    <head>
        <meta charset="UTF-8">
        <title>form tag </title>
    </head>
    <body>
        <label for="userid">아이디:</label> <input type = "text" placeholder="영문으로만 써주세요" id="userid"> <br>
        <label for="userpw">비밀번호:</label> <input type="password" id="userpw"> <br>
        성별: <label for="male">남자</label> <input type ="radio" name="gender" id="male">,
        <label for="female">여자 </label> <input type="radio" name="gender" checked id="female">
    </body>
</html>
fieldset : 여러개의 폼 요소를 그룹화하여 구조적으로 만들기 위해 사용
legend : 폼 요소의 제목으로 < fieldset>요소 내부에 작성

<!DOCTYPE html>
<html lang="ko">
    <head>
        <meta charset="UTF-8">
        <title>form tag </title>
    </head>
    <body>
        <fieldset>
            <legend>로그인</legend>
            <label for="userid">아이디:</label> <input type = "text" placeholder="영문으로만 써주세요" id="userid"> <br>
            <label for="userpw">비밀번호:</label> <input type="password" id="userpw"> <br>
        </fieldset>
        <fieldset>
            <legend>개인정보</legend>
            성별: <label for="male">남자</label> <input type ="radio" name="gender" id="male">,
            <label for="female">여자 </label> <input type="radio" name="gender" checked id="female">
        </fieldset>
    </body>
</html>
form 요소 : form 데이터를 그룹화하여 서버에 전송한다.
- action : 폼 데이터를 처리하기 위한 서버의 주소
- method : 데이터를 전송하는 방식을 지정(get, post)
** get은 민감한 정보를 다루는 포맷에서는 사용하면 안된다.
get
post
<!DOCTYPE html>
<html lang="ko">
  <head>
      <meta charset="UTF-8">
      <title>form tag </title>
  </head>
  <body>
      <form action="result1.html" method="get">
      <fieldset>
          <legend>로그인</legend>
          <label for="userid">아이디:</label> <input type = "text" placeholder="영문으로만 써주세요" id="userid"> <br>
          <label for="userpw">비밀번호:</label> <input type="password" id="userpw"> <br>
          <input type="submit">
      </fieldset>
      </form>
      <form action="result2.html" method="post">
      <fieldset>
          <legend>개인정보</legend>
          성별: <label for="male">남자</label> <input type ="radio" name="gender" id="male">,
          <label for="female">여자 </label> <input type="radio" name="gender" checked id="female">
          <input type="submit">
      </fieldset>
      </form>
  </body>
</html>- 콘텐츠 모델
html5 버전에서는 html 요소들이 가지고있는 성격에 따라 요소의 종류를 정의하는 규칙이 있다. 이런 규칙들을 그룹화 시켜놓은 것이 콘텐츠 모델이다.
- MetaData 모델 : 콘텐츠의 style(표현), script(동작)을 설정하거나 다른 문서와의 관계 등의 정보를 포함하는 요소(base, link,meta,tytle,style ···
- Flow 모델 : 문서에 사용되는 대부분의 요소(menu, buttton, header, p, span···)
- Sectioning : 헤딩과 푸터의 범위를 결정하는 요소, 아웃라인이 있음(article, aside, nav, section)
- Heading: 섹션의 헤더를 정의하는 요소(h1, h2, h3 ···)
- Phrasing : (object, span, sub,, button, output···)
- embedded : 이미지, 비디오, 플래시 등 외부 콘텐츠를 문서내에 표현하는 요소(audio, canvas, embed, img, object, video ···)
- Interactive : 사용자와 상호작용을 하는 요소(폼 요소, button, details, embed, input, menu···)
- 시멘틱 마크업
컴퓨터가 잘 이해할 수 있는 코드, 의미에 맞는 요소를 사용하고 문서의 구조화를 잘 하면 인간과 기계가 모두 잘 이해할 수 있는 코드가 된다.
- block & inline level
- block level 요소 : 한 줄에 하나의 요소 표시(div, h1···, p, ul, li, table 등)
- inline level 요소 : 한 줄에 여러개의 요소 표시(span, i , img, em, strong 등)
