https
HTTP secure, HTTP 프로토콜의 암호화된 버전
클라이언트와 서버 간의 모든 소통을 암호화 하기 위해 SSH나 TLS사용
- SSH(secure socket layer) : 인터넷 보안 프로토콜
- TLS(transport layer security) : SSL이 표준화 되면서 바뀐 이름
https 암호화 방식
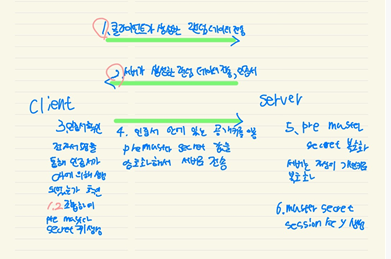
1. 클라이언트 → 서버로 랜덤 데이터와 사용 가능한 암호화 방식을 보냄
2. 서버 → 클라이언트로 랜덤 데이터 , 사용할 암호화 방식과 SSL 인증서를 보냄
3. 클라이언트는 서버에게 받은 인증서의 CA가 자신이 들고 있는 CA 리스트에 있는지 확인하고 , 있다면 CA의 공개키로 복호화. 이는 곧 CA 비밀키에 의해 암호화됐다는 것이므로 인증서의 신원을 보증해줌. 공개키 암호화 방식
4. 클라이언트는 자기가 보낸 랜덤 데이터와 서버로부터 받은 랜덤 데이터를 조합하여 임시 키 (pre master secret key)를 만듬.
5. 만들어진 임시 키를 인증서의 공개키로 암호화하여 서버에게 보냄
6. 서버는 자신이 들고 있던 비밀키로 임시 키를 복호화
7. 이로써 클라이언트와 서버는 동일한 임시 키를 공유하게 되는데, 일련의 과정을 거쳐 master secret 값을 만들고 세션 키를 생성
8. 이렇게 만들어진 세션 키로 암호화된 데이터를 주고받는다. 대칭키 암호화 방식
9.세션이 종료되면 클라이언트와 서버 모두 세션 키를 폐기
https 구성
mod_ssl 패키지 설치
[root@server ~]# yum -y install mod_ssl
[root@server ~]# systemctl start httpd
[root@server ~]# systemctl enable httpd
[root@server ~]# firewall-cmd --add-service=https
[root@server ~]# firewall-cmd --relaod
구성 파일
/etc/httpd/conf.d/ssl.conf에 구성
[root@server ~]# cd
/etc/httpd/conf.d/
[root@server conf.d]# ls
... ssl.conf ...- SSLEngine : on = TLS 사용, off = TLS 미사용
인증서
생성 방법
- 자체 서명된 인증서 생성
- CA에 요청해서 서명을 받아 생성
- 개인키 생성
[root@server conf.d]# openssl genrsa -out private.key 2048
Generating RSA private key, 2048 bit long modulus
.....................................+++
...............................................................................................................................+++
e is 65537 (0x10001)
- 생성된 키로 인증서 생성
[root@server conf.d]# openssl req -new -key private.key -out cert.csr
You are about to be asked to enter information that will be incorporated
into your certificate request.
What you are about to enter is what is called a Distinguished Name or a DN.
There are quite a few fields but you can leave some blank
For some fields there will be a default value,
If you enter '.', the field will be left blank.
-----
Country Name (2 letter code) [XX]:kr
State or Province Name (full name) []:admin
Locality Name (eg, city) [Default City]:seoul
Organization Name (eg, company) [Default Company Ltd]:seoul
Organizational Unit Name (eg, section) []:adm
Common Name (eg, your name or your server's hostname) []:server.test.example.com
Email Address []:admin@test.example.com

Please enter the following 'extra' attributes
to be sent with your certificate request
A challenge password []:
An optional company name []:
[root@server conf.d]# openssl x509 -req -signkey private.key -in cert.csr -out cert.crt
Signature ok
subject=/C=kr/ST=admin/L=seoul/O=seoul/OU=adm/CN=server.test.example.com/emailAddress=admin@test.example.com
Getting Private key- 권한 설정
[root@server conf.d]# chmod 600 private.key cert.crt- 생성된 파일 이동
[root@server conf.d]# mv private.key /etc/pki/tls/private/
[root@server conf.d]# mv cert.* /etc/pki/tls/certs/
파일의 위치 설명
ksr, csr, crt파일 모두 지정된 경로에 저장해야 함
- /etc/pki/tls/keyname.key : 개인 키 600 또는 400 사용권한과 cert_t로 유지
- etc/pki/tls/certname.csr : 서명 요청할 때만 생성, CA로 보내는 파일 서명용 )
- etc/pki/tls/cert/cretname.crt : 공개 인증서, 자체 서명된 인증서가 요청될 때만 생성. 서명 요청이 있고 CA로 전송될 때 CA에서 반환되는 파일 644 cert_t로 유지
ssl.conf 설정
# General setup for the virtual host, inherited from global configuration
DocumentRoot "/var/www/html"
ServerName server.test.example.com:443
...
#   Server Certificate:
# Point SSLCertificateFile at a PEM encoded certificate.  If
# the certificate is encrypted, then you will be prompted for a
# pass phrase.  Note that a kill -HUP will prompt again.  A new
# certificate can be generated using the genkey(1) command.
SSLCertificateFile /etc/pki/tls/certs/cert.crt
...
#   Server Private Key:
#   If the key is not combined with the certificate, use this
#   directive to point at the key file.  Keep in mind that if
#   you've both a RSA and a DSA private key you can configure
#   both in parallel (to also allow the use of DSA ciphers, etc.)
SSLCertificateKeyFile /etc/pki/tls/private/private.key
httpd 재실행
systemcl restart httpd

firewall-cmd --add-service=https   --permanent
firewall-cmd --reload
데이터베이스
데이터를 효율적으로 저장/관리하기 위한 시스템
- 계층형 : 데이터가 트리 형태의 구조로 조직된 것
- 관계형 : 키(key)와 값(value)들의 간단한 관계를 테이블화 시킨 데이터베이스 (가장 많이 사용)
- NoSQL : Not only SQL, 관계형 데이터베이스를 사용하지 않는다는 의미가 아닌, 여러 유형의 데이터베이스를 사용하는 것
데이터 베이스의 특징
- 실시간 접근성
- 지속적인 변화
- 동시 공유
- 내용에 대한 참조
- 데이터 논리적 독립성
용어
- DB : 데이터 베이스
- DBMS : 데이터 베이스 관리 시스템
- DBA : 데이터 베이스 관리자
- 테이블 : 데이터가 저장된 객체
- 컬럼 : 테이블에서 데이터들의 속성이 같은 값
- 행 : 특정 테이블에서 의미 있는 하나의 데이터 집합
- 필드 : 각각의 데이터 하나를 의미
- 레코드 : 여러 필드의 조합을 의미
설치 및 설정
패키지 설치
[root@server ~]# yum -y install mariadb-server
[root@server ~]# systemctl start mariadb
[root@server ~]# firewall-cmd --add-service=mysql
[root@server ~]# firewall-cmd --reload
기본 보안 설정
[root@server ~]# mysql_secure_installation설정파일
/ect/my.cnf
[root@server ~]# cat /etc/my.cnf
[mysqld]
datadir=/var/lib/mysql
socket=/var/lib/mysql/mysql.sock
# Disabling symbolic-links is recommended to prevent assorted security risks
symbolic-links=0
# Settings user and group are ignored when systemd is used.
# If you need to run mysqld under a different user or group,
# customize your systemd unit file for mariadb according to the
# instructions in http://fedoraproject.org/wiki/Systemd
autocommit=0

[mysqld_safe]
log-error=/var/log/mariadb/mariadb.log
pid-file=/var/run/mariadb/mariadb.pid

#
# include all files from the config directory
#
!includedir /etc/my.cnf.d
접속방법
[root@server ~]# mysql -u root -p
Welcome to the MariaDB monitor.  Commands end with ; or \g.
Your MariaDB connection id is 5
Server version: 5.5.68-MariaDB MariaDB Server

Copyright (c) 2000, 2018, Oracle, MariaDB Corporation Ab and others.

Type 'help;' or '\h' for help. Type '\c' to clear the current input statement.
SHOW DATABASES
생성된 데이터베이스 확인
MariaDB [(none)]> SHOW DATABASES;
+--------------------+
| Database           |
+--------------------+
| information_schema |
| mysql              |
| performance_schema |
| test               |
| test1              |
+--------------------+
5 rows in set (0.00 sec)
USE 데이터베이스명
지정한 데이터베이스를 사용하겠다는 명령어
SHOW TABLE
지정한 데이터베이스 내의 생성된 테이블을 확인
MariaDB [test]> SHOW TABLES;
+----------------+
| Tables_in_test |
+----------------+
| users          |
+----------------+
1 row in set (0.00 sec)
DML
Data Manipulatinon Language
테이블에 관리하기를 원하는 자료들을 입력, 수정, 삭제, 조회하는 명령어
INSERT
MariaDB [test]> INSERT INTO 테이블명
	-> VALUES (컬럼리스트 VALUES리스트);

MariaDB [test]> INSERT INTO 테이블명
	-> VALUES (전체 컬럼에 넣을 VALUES리스트);
UPDATE
정보를 수정
MariaDB [test]> UPDATE 테이블명
	-> SET 수정할 칼럼명 = 수정할 값;
DELETE
데이터 삭제
MariaDB [test]> DELETE [FROM] 삭제를 원하는 정보가 있는 테이블명SELECT
입력한 데이터를 조회
MariaDB [test]> SELECT [ALL/DISTINCT] 칼럼명1,칼럼명2, ..
	-> FROM 테이블명;
DISTINCT 옵션은 중복 제거
WILDCARD 활용
- 모든 데이터 조회
MariaDB [test]> SELECT *
	-> FROM 테이블명;
ALIAS 부여하기
조회 시, 칼럼명을 지정한 이름으로 조회
MariaDB [test]> SELECT 칼럼명 AS 원하는 이름
	-> FROM 테이블명;
WHERE
자료 조회 시 지정하는 조건문
MariaDB [test]> SELECT 칼럼명 AS 원하는 이름
	-> FROM 테이블명
    -> WHERE 조건식;
연산자
WHERE 절에 조건식을 사용할 때 사용되는 연산자
SQL 연산자
- BETWEEN a AND b : a b 사이에 있으면 참(a b 값 포함)
- IN (list) : 리스트에 있는 값 중 하나라도 일치하면 참
- LIKE '비교문자열' : 비교 문자열과 형태 일치하면 참
- % : ~로 시작하거나 ~끝나는 값 조회
'A%' // A로 시작하는 값 - _ : _의 개수만큼 시작하거나 끝나는 값, 혹은 포함이 되어있는 값
'L__T' // L로 시작하고 T로 끝나는 값
- IS NULL : NULL 값인 경우
NOT을 붙이면 참 거짓이 반대로
논리 연산자
- AND
- OR
- NOT
연산자 우선순위
- 괄호
- NOT
- 비교 연산자, SQL 비교 연산자
- AND
- OR