이번에는 React 환경의 CK에디터에서 업로드된 이미지를 로컬 서버로 저장하는 과정에 대해 살펴보겠습니다.
Express 서버 구성하기
const express = require("express");
const app = express();
const dotenv = require("dotenv");
const multer = require("multer"); // (1)
const path = require("path");
const mime = require("mime-types");
const {v4:uuid} = require("uuid");

dbConnect();

const storage = multer.diskStorage({ // (2)
  destination: (req, file, cb) => { // (3)
    cb(null, "images");
  },
  filename: (req, file, cb) => { // (4)
    cb(null, `${uuid()}.${mime.extension(file.mimetype)}`); // (5)
  },
});

const upload = multer({ // (6)
    storage,
    fileFilter: (req, file, cb) => {
        if (["image/jpeg", "image/jpg", "image/png"].includes(file.mimetype))
            cb(null, true);
        else
            cb(new Error("해당 파일의 형식을 지원하지 않습니다."), false);
        }
    ,
    limits: {
        fileSize: 1024 * 1024 * 5
    }
});

app.post("/api/upload", upload.single("file"), (req, res) => { // (7)
  res.status(200).json(req.file);
});

app.use("/images", express.static(path.join(__dirname, "/images"))); // (8)
(1) 파일 업로드를 위해 multer 모듈을 사용했습니다. multer는 multipart/form-data인코딩 타입의 form 데이터를 받아 파일 업로드를 쉽게 다룰 수 있게 해주는 NodeJS 미들웨어입니다.
(2) diskStorage에서 파일을 저장하기 위한 제어기능을 설정할 수 있습니다.
(3) destination에 파일이 업로드될 폴더를 지정해줍니다. 저는 루트 디렉토리/images로 지정하였습니다. 반드시 디렉토리를 먼저 생성해주어야 합니다.
(4) 업로드될 파일의 이름을 지정해줍니다. cb는 callback의 약자이며, 첫 번째 인자로는 오류 객체를 받는데 여기서는 null로 지정하겠습니다.
(5) 여기서 업로드되는 파일은 모두 한 폴더에 저장되므로 uuid로 고유 ID를 생성하여 중복을 방지하도록 해줍니다. 그리고 mime-types로 파일 타입을 지정해줍니다.
(6) 미들웨어 변수 upload를 선언해줍니다. 변수안에 storage와 어느 파일의 형식을 허용할지 제어하는 Filter 함수와 파일 크기 제한을 설정해줍니다.
(7) 파일 업로드에 대한 POST 요청 API입니다. 여기서는 단일 파일을 받기 위해 single 메소드를 사용했습니다. 다중 파일을 받고 싶다면 array 메소드를 사용하시면 됩니다.
(8) images 폴더 내의 파일들을 외부로 노출 시켜주기위한 미들웨어입니다.
React에서 에디터 적용하기
이제 클라이언트에서 CKEditor 5를 적용해보겠습니다.
https://ckeditor.com/docs/ckeditor5/latest/installation/getting-started/frameworks/react.html
위 주소로 들어가시면 React 환경에서 CKEditor를 설치하기위한 설명이 나와있습니다.
CKEditor5에서는 기본 제공해주는 에디터 builds가 있는데, 저는 기본 기능들만 제공해주는 classic을 설치했습니다.
npm install --save @ckeditor/ckeditor5-react @ckeditor/ckeditor5-build-classic
그리고 에디터를 적용할 파일에 다음과 같이 작성해줍니다.
Editor.jsx
import React from 'react'
import { CKEditor } from '@ckeditor/ckeditor5-react';
import ClassicEditor from '@ckeditor/ckeditor5-build-classic';

const Editor = () => {
    return (
        <CKEditor
            editor={ClassicEditor}
            data="<p>Hello World</p>"
            onReady={editor => {
                // console.log('Editor is ready to use!', editor);
            }}

            onChange={(event, editor) => {
                const data = editor.getData();
            }}

            onBlur={(event, editor) => {
                // console.log('Blur.', editor);
            }}

            onFocus={(event, editor) => {
                // console.log('Focus.', editor);
            }}/>
    )
}

export default Editor
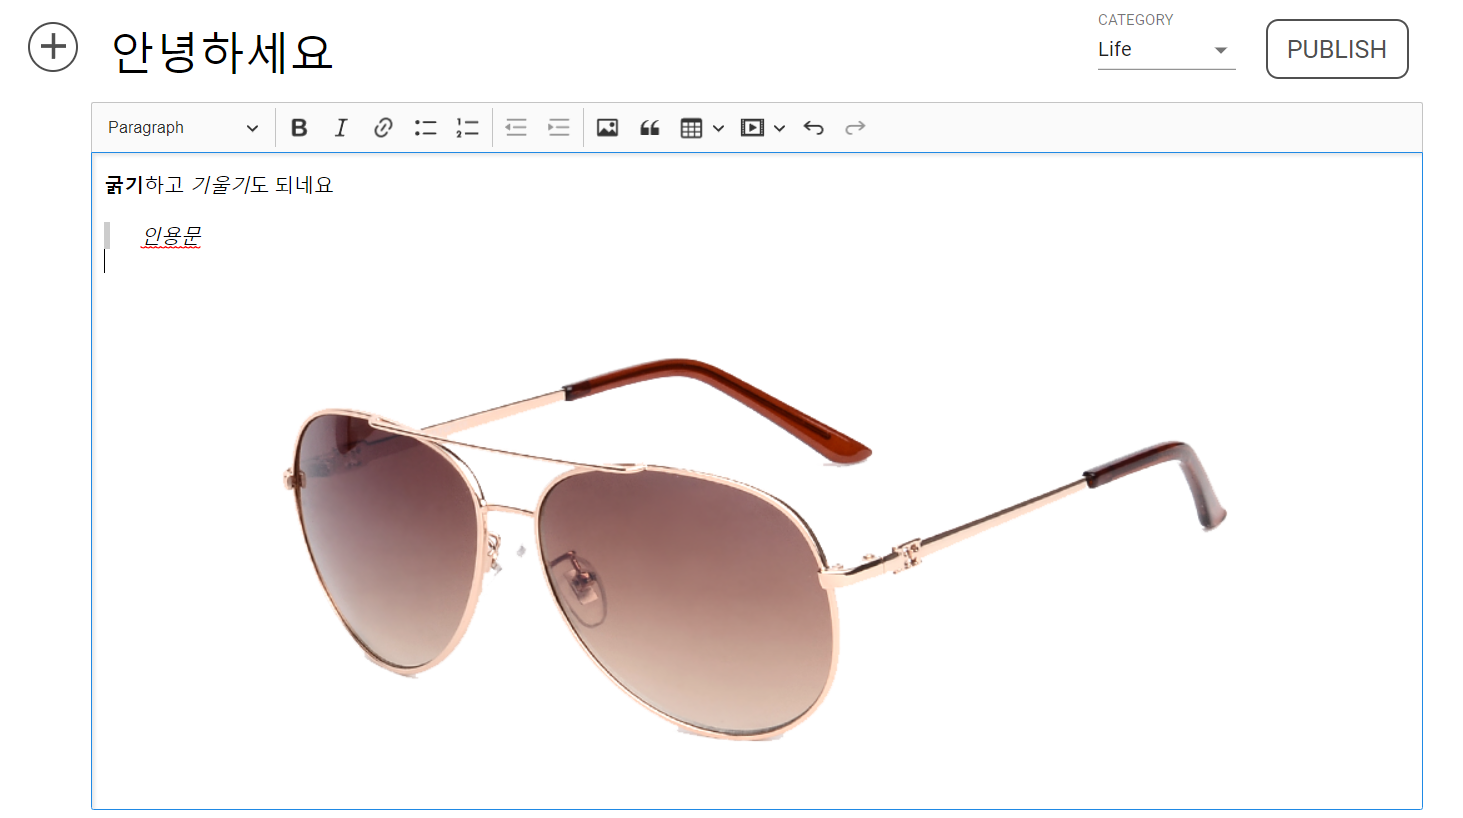
onChange는 에디터 데이터가 변경되었을 때 호출되는 함수입니다. 나머지는 필요없기 때문에 주석 처리 하겠습니다. 아래 이미지는 에디터를 적용시킨 모습입니다.

Image Upload Plugin 작성하기
이제 에디터에 이미지를 업로드하기 위한 작업을 진행해보겠습니다.
https://ckeditor.com/docs/ckeditor5/latest/features/images/image-upload/image-upload.html
위 공식 문서에 들어가보시면 이미지 업로드를 가능하게하는 업로드 어댑터를 사용하기 위한 여러 방식이 설명되어 있습니다. 저는 axios를 통한 API 호출과 서버의 응답을 직접 다루기 위해 커스텀 방식으로 어댑터를 구현했습니다.
어댑터 구현을 적용시킨 Editor.jsx 코드입니다.
Editor.jsx
import React, {useState} from 'react'
import axios from 'axios';
import { CKEditor } from '@ckeditor/ckeditor5-react';
import ClassicEditor from '@ckeditor/ckeditor5-build-classic';

const Editor = ({setDesc, desc, setImage}) => { // (1)
    const [flag, setFlag] = useState(false);
    const imgLink = "http://localhost:5000/images/"

    const customUploadAdapter = (loader) => { // (2)
        return {
            upload(){
                return new Promise ((resolve, reject) => {
                    const data = new FormData();
                     loader.file.then( (file) => {
                            data.append("name", file.name);
                            data.append("file", file);

                            axios.post('/api/upload', data)
                                .then((res) => {
                                    if(!flag){
                                        setFlag(true);
                                        setImage(res.data.filename);
                                    }
                                    resolve({
                                        default: `${imgLink}/${res.data.filename}`
                                    });
                                })
                                .catch((err)=>reject(err));
                        })
                })
            }
        }
    }

    function uploadPlugin (editor){ // (3)
        editor.plugins.get('FileRepository').createUploadAdapter = (loader) => {
            return customUploadAdapter(loader);
        }
    }

    return (
        <CKEditor
            editor={ClassicEditor}
            config={{ // (4)
                extraPlugins: [uploadPlugin]
            }}
            data="<p>Hello World</p>"
            onReady={editor => {
                // console.log('Editor is ready to use!', editor);
            }}
            onChange={(event, editor) => {
                const data = editor.getData();
                setDesc(data);
                console.log(desc);
            }}
            onBlur={(event, editor) => {
                // console.log('Blur.', editor);
            }}
            onFocus={(event, editor) => {
                // console.log('Focus.', editor);
            }}/>
    )
}

export default Editor
(1) 상위 컴포넌트에서 에디터 내에 작성한 내용과 썸네일 이미지를 저장하기위해 props를 받아옵니다.
(2) 어댑터 정의 함수 customUploadAdapter 를 살펴보겠습니다. customUploadAdapter는 서버와의 통신을 처리하는 역할을 합니다. 업로드 어댑터를 작동하기 위해서는 upload() 메소와 abort() 메소드를 선언해줍니다.
-
upload()에서는 파일 업로드를 위한 로직이 담기고 프로미스를 반환해주도록 합니다.
resolve() 내에 default 값으로 이미지를 접근하기 위한 주소를 적어주면<img>태그 내에 소스가 삽입된 형태로 반환됩니다. -
upload() 내의 콜백 함수에 적힌 flag는 프로젝트 내에서 첫 이미지를 썸네일 이미지로 설정하는 부분으로 무시하시면 됩니다.
-
abort()는 업로드가 중간에 중단될 경우 수행할 로직이 담기는데 여기서는 생략하였습니다.
(3) 에디터에서 어댑터를 활성화하기 위한 팩토리 메소드입니다. 파일 업로드를 할 때마다 새 업로드 인스턴스를 반환하는데, 인자로 전달되는 loader는 방금 정의한 어댑터에서 파일을 읽고 업로드하는 프로세스를 제어하는 데 사용됩니다.
화살표 함수로 정의할 시 오류가 발생했었는데 제 짐작으로는 화살표 함수는 일반 함수와 달리 prototype 프로퍼티를 가지고 있지 않아 새 인스턴스를 생성하는 과정에서 발생한 오류가 아닐까 싶습니다.
(4) 에디터에 업로드 플러그인을 적용시켜줍니다.
이제 이미지 업로드가 정상적으로 작동되는지 확인해보겠습니다.
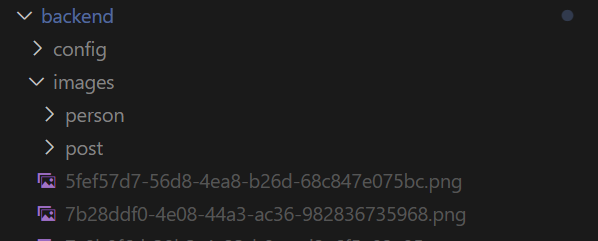
이미지 업로드를 완료한 후, images 경로에 이미지가 생성된 모습을 확인할 수 있습니다. 이제 포스팅을 하게되면 에디터 내에 작성된 내용은 html 형식으로 담기게 되므로 내용을 보여줄 때는 html-react-parser 라이브러리를 통해 html을 파싱해서 보여줘야 됩니다.
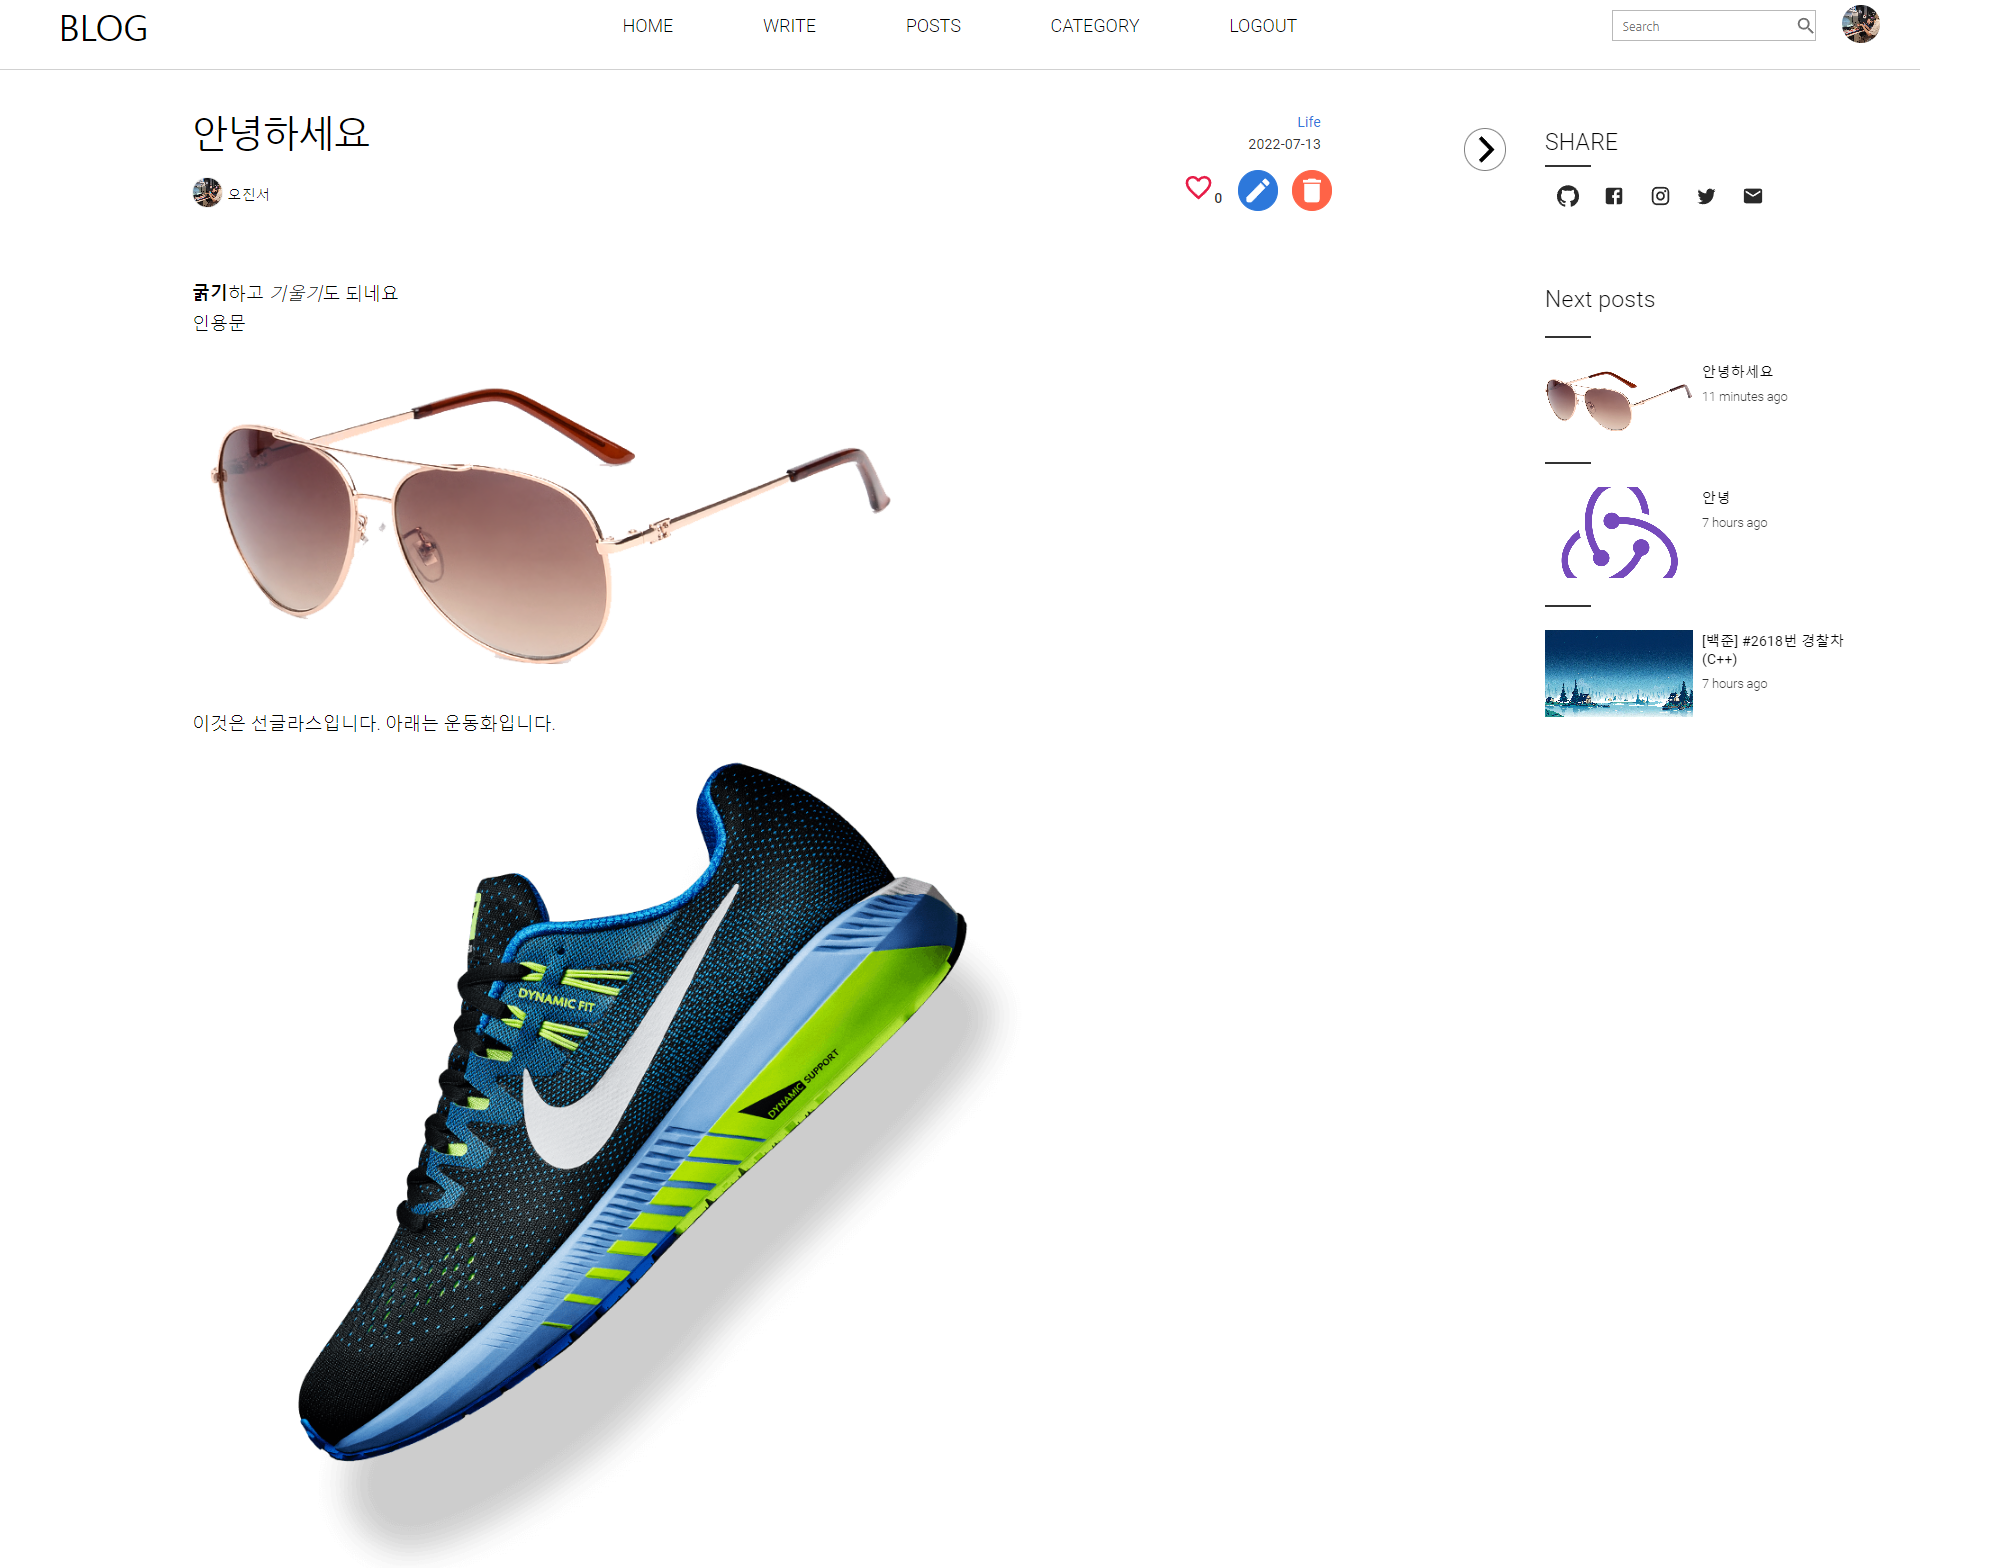
아래는 최종적으로 포스팅된 내용을 파싱하여 나타낸 결과입니다. (아래는 1년전에 토이프로젝트로 만든 블로그에 적용한 모습입니다.)
문제점
지금까지 구현한 이미지 업로드 방식에는 큰 단점이 존재합니다. 글쓰기에서 이미지를 드로그앤 드롭하는 순간 uploadPlugin이 가로채서 이미지를 서버로 전송하기 때문에 도중에 글쓰기를 취소하거나 사진을 지워도 서버에는 사진이 남는 일이 발생하게됩니다.
이를 위해 임시 폴더와 영구 폴더를 구분해서 조치를 취해야될 것 같습니다.
다음 포스팅에서는 해당 문제점을 해결하는 방법과 이미지를 로컬 서버가 아닌 AWS 클라우드 서비스 S3에 저장하는 방식으로 리팩토링해보는 과정에 대해 알아보도록 하겠습니다! 감사합니다.
참고
https://ckeditor.com/docs/ckeditor5/latest/
https://velog.io/@kyungjune/react-ckeditor5-%EA%B8%B0%EC%96%B5%ED%95%98%EA%B8%B0


혹시 작성하신 파일도 올려주실수있나요