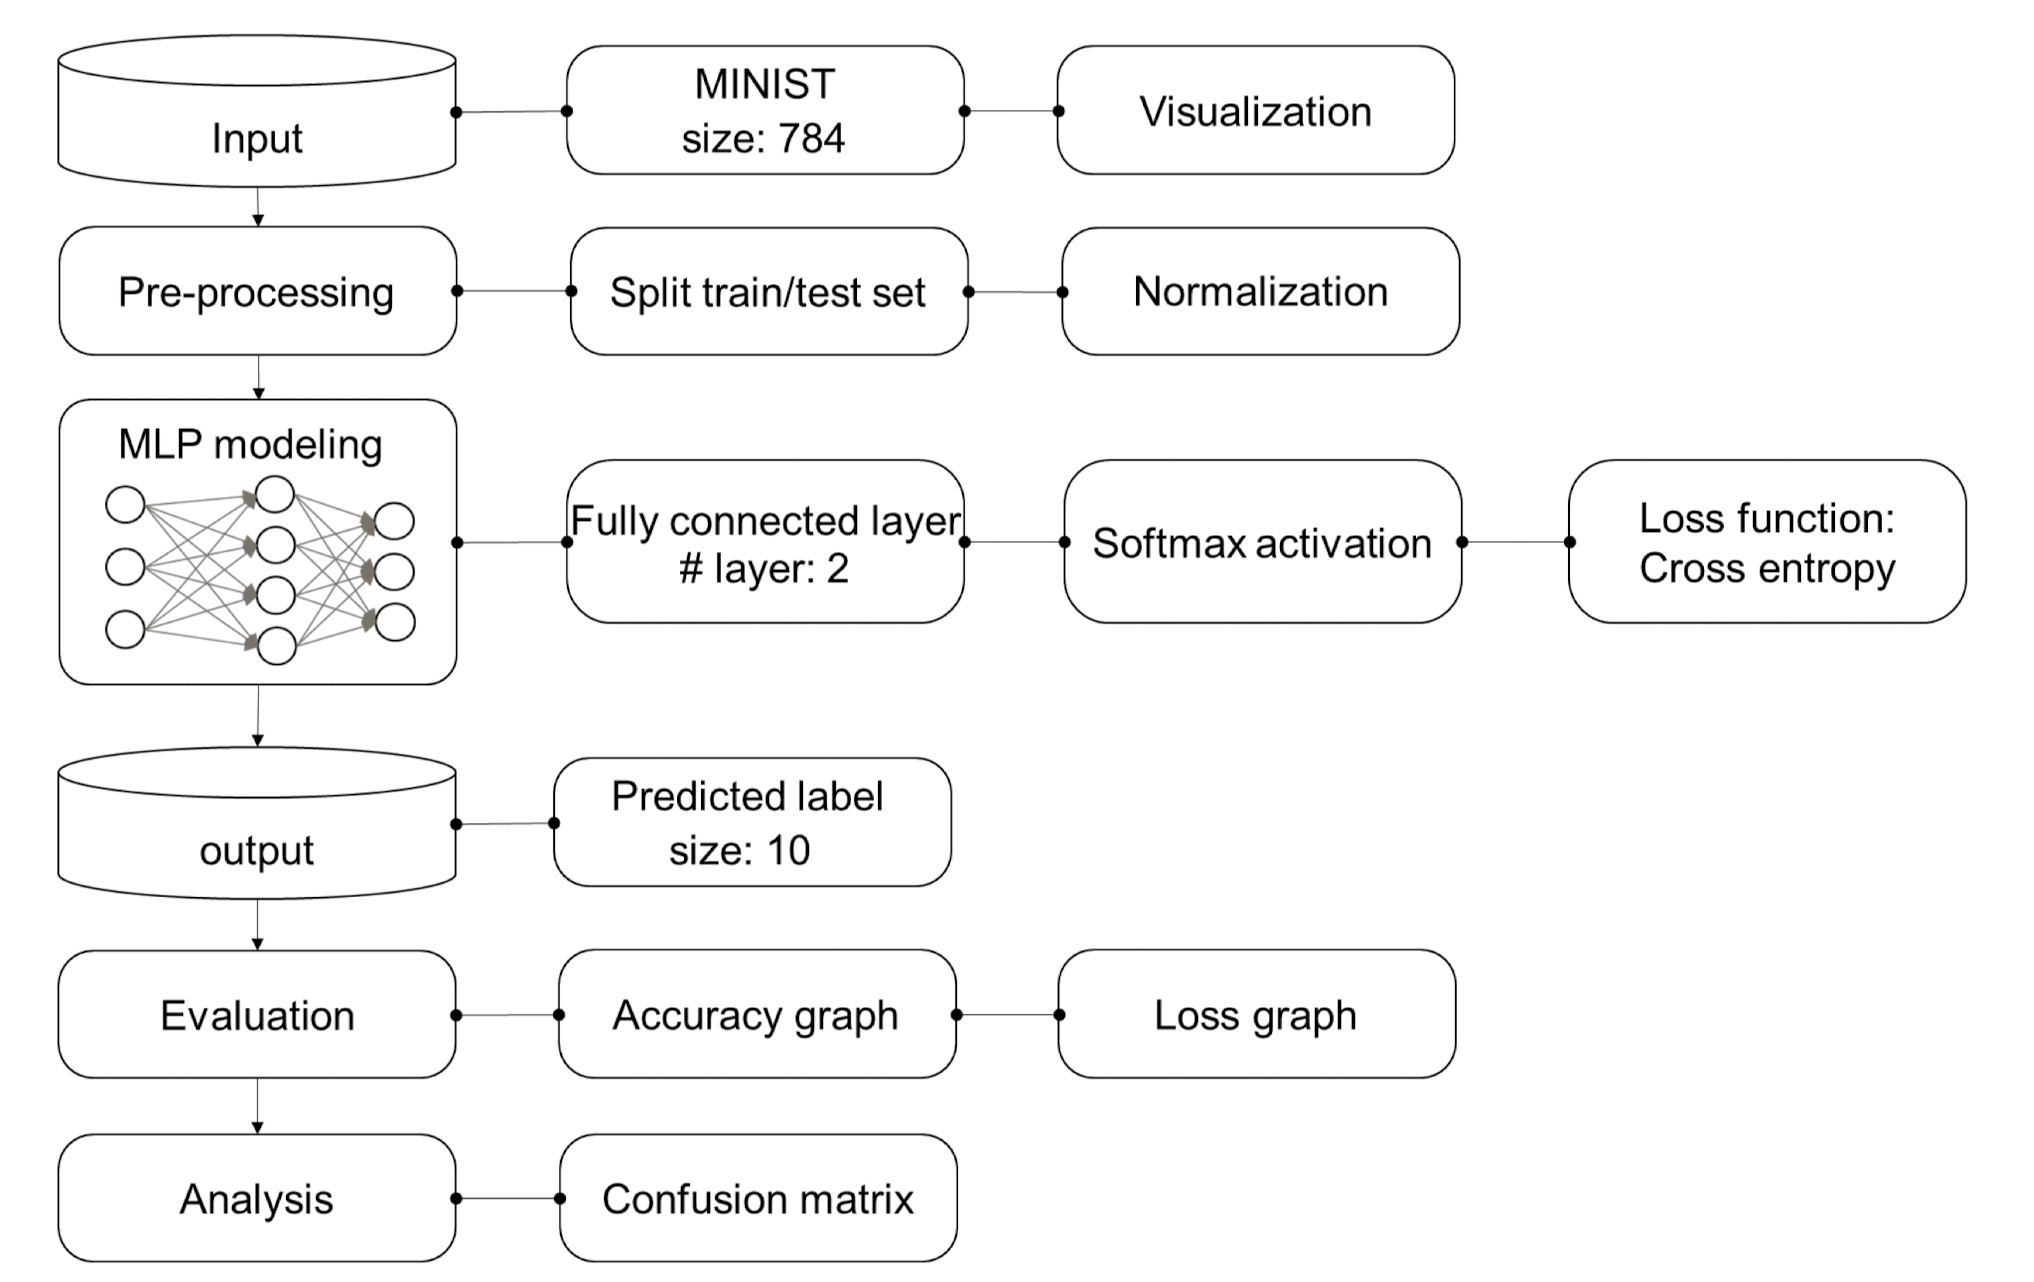
사람의 손 글씨로 적힌 숫자를 보고 숫자를 인식해내는 MLP 모델을 만들어보고자 한다.
- 개발 환경 : tensorflow에서 진행
- 데이터셋 : kaggle에서 제공되는 mnist.csv 파일 사용
- 따로 데이터 정규화하지 않음 (No normalize)
사용되는 라이브러리
import numpy as np
import pandas as pd
import matplotlib.pyplot as plt
from sklearn.model_selection import train_test_split
from sklearn.metrics import confusion_matrix
from tensorflow.keras import utils
from tensorflow.keras.models import Model
from tensorflow.keras.layers import Input, Dense, Conv2D, MaxPool2D, UpSampling2D, Flatten, Reshape, Embedding, LSTM
from tensorflow.keras.callbacks import EarlyStopping
from tensorflow.keras.preprocessing.text import Tokenizer
from tensorflow.keras.preprocessing.sequence import pad_sequencesNumPy: 수치 계산용 핵심 라이브러리Pandas: 테이블 형태 데이터 다룸Matplotlib: 시각화 라이브러리 (그래프, 이미지 출력 등)

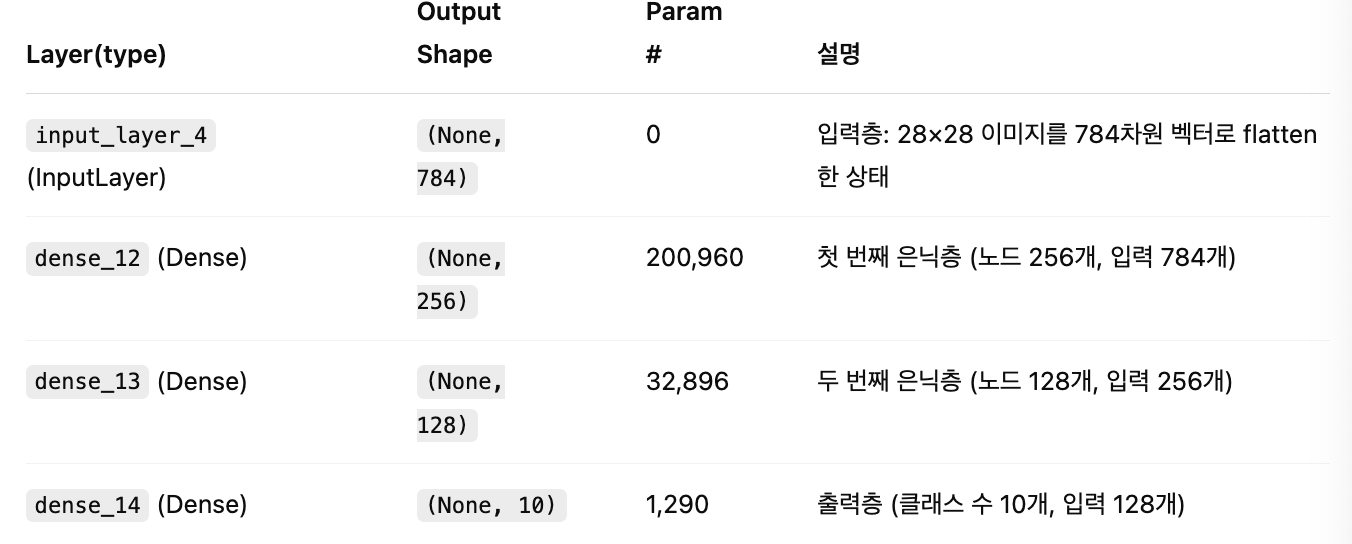
모델 구조
mlp_input = Input(shape=(784,))

# 첫 번째 은닉층 (노드 256개, 활성화 함수 tanh 사용)
# Dense는 Fully Connected Layer를 의미하며, 입력은 mlp_input에서 받아옴
h = Dense(256, activation='tanh')(mlp_input)

# 두 번째 은닉층 (노드 128개, tanh 활성화 함수 사용)
# 앞층의 출력을 그대로 받아 다음 계층으로 전달
h = Dense(128, activation='tanh')(h)

# 출력층 (클래스 수 10개, softmax로 다중 클래스 분류)
mlp_output = Dense(10, activation ='softmax')(h)
mlp_model = Model(mlp_input, mlp_output)

# 모델 컴파일 (3개는 거의 고정)
# - loss: 다중 분류에 적합한 mse 사용
# - optimizer: 가중치 업데이트 알고리즘으로 Adam 사용
# - metrics: 정확도 평가 지표로 설정 ('accurancy'는 오타임)
mlp_model.compile(loss='mse', optimizer='adam', metrics=['accuracy'])
mlp_model.summary()]
-
dense_12: 784 x 256 + 256 = 200,960
가중치: 784개 입력 × 256개 노드 = 200,704
편향: 256개 -
dense_13: 256 x 128 + 128 = 32,896
-
dense_14: 128 x 10 + 10 = 1,290
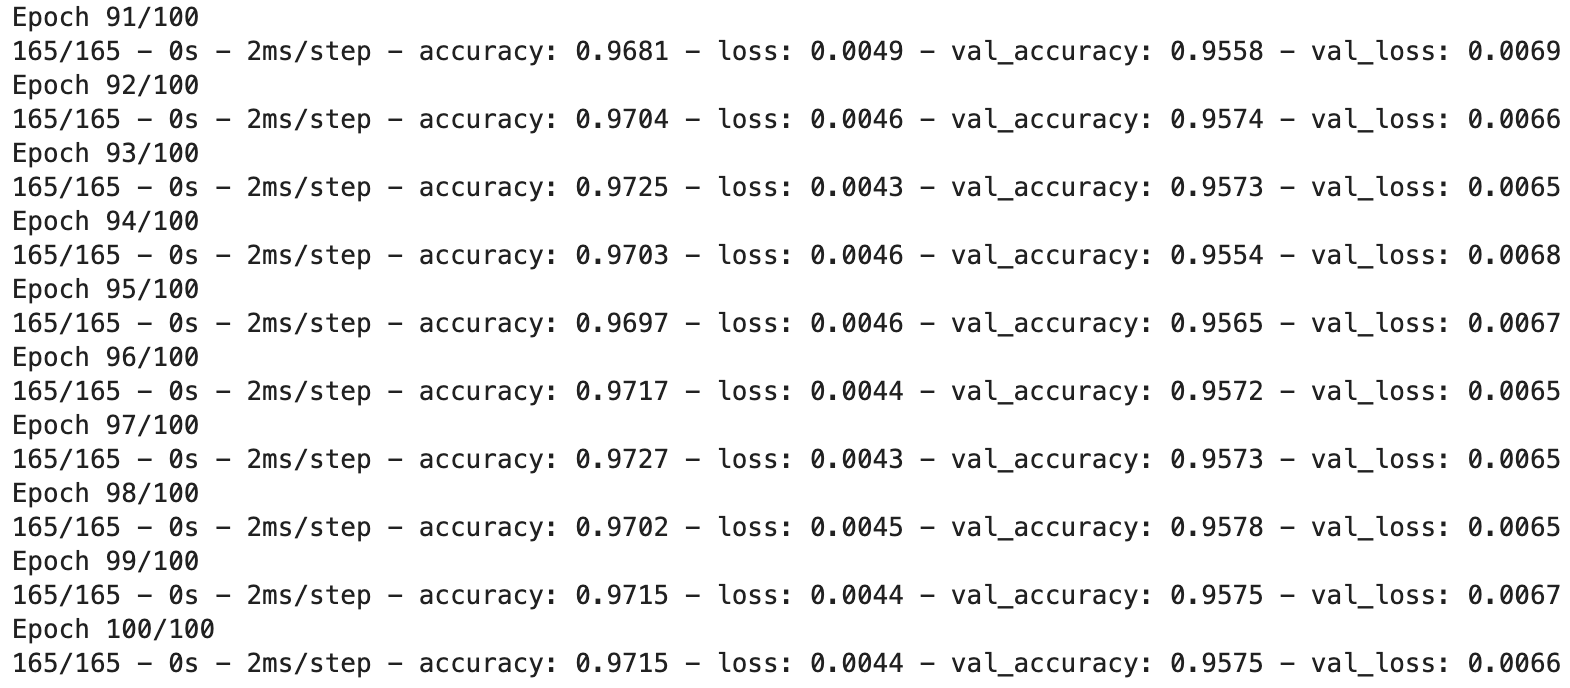
성능
성능 테스트를 위해 총 코드를 100번 돌렸다.
model_history = mlp_model.fit(X_train, Y_train_cat, validation_data=(X_test, Y_test_cat), \
                              epochs=100, batch_size=256, shuffle=True, verbose=2, callbacks=[])

전체 코드
import numpy as np
import pandas as pd
import matplotlib.pyplot as plt
from sklearn.model_selection import train_test_split
from sklearn.metrics import confusion_matrix
from tensorflow.keras import utils
from tensorflow.keras.models import Model
from tensorflow.keras.layers import Input, Dense, Conv2D, MaxPool2D, UpSampling2D, Flatten, Reshape, Embedding, LSTM
from tensorflow.keras.callbacks import EarlyStopping
from tensorflow.keras.preprocessing.text import Tokenizer
from tensorflow.keras.preprocessing.sequence import pad_sequences

mnist_csv = pd.read_csv('./mnist_train.csv', header=None, skiprows=1)
print(mnist_csv.shape)

train,test = train_test_split(mnist_csv, test_size=0.3, random_state=1)
print(train.shape)
print(test.shape)

# 전체 데이터(train)에서 입력 특성(feature)만 선택 (1열부터 마지막 열까지)
X_train = train.iloc[:, 1:]

# 전체 데이터(train)에서 레이블(label, 정답)만 선택 (0번 열)
Y_train = train.iloc[:, 0]

# 테스트 데이터(test)에서 입력 특성만 선택
X_test = test.iloc[:, 1:]

# 테스트 데이터(test)에서 레이블만 선택
Y_test = test.iloc[:, 0]

print(X_train.shape, Y_train.shape)
print(X_test.shape, Y_test.shape)

# 분류 문제이므로 레이블(Y)을 one-hot encoding으로 변환
Y_train_cat = utils.to_categorical(Y_train)
Y_test_cat = utils.to_categorical(Y_test)

print(Y_train_cat.shape)
print(Y_test_cat.shape)

plt.imshow(np.reshape(X_train.iloc[5], (28,28)), cmap=plt.cm.Blues)

mlp_input = Input(shape=(784,))

# 첫 번째 은닉층 (노드 256개, 활성화 함수 tanh 사용)
# Dense는 Fully Connected Layer를 의미하며, 입력은 mlp_input에서 받아옴
h = Dense(256, activation='tanh')(mlp_input)

# 두 번째 은닉층 (노드 128개, tanh 활성화 함수 사용)
# 앞층의 출력을 그대로 받아 다음 계층으로 전달
h = Dense(128, activation='tanh')(h)

# 출력층 (클래스 수 10개, softmax로 다중 클래스 분류)
mlp_output = Dense(10, activation ='softmax')(h)
mlp_model = Model(mlp_input, mlp_output)

# 모델 컴파일 (3개는 거의 고정)
# - loss: 다중 분류에 적합한 mse 사용
# - optimizer: 가중치 업데이트 알고리즘으로 Adam 사용
# - metrics: 정확도 평가 지표로 설정 ('accurancy'는 오타임)
mlp_model.compile(loss='mse', optimizer='adam', metrics=['accuracy'])
mlp_model.summary()

model_history = mlp_model.fit(X_train, Y_train_cat, validation_data=(X_test, Y_test_cat), \
                              epochs=100, batch_size=256, shuffle=True, verbose=2, callbacks=[])
공부 기록 공간 '◡'