파일시스템 구축📂
브라우저 OS를 구축하려면 가장 중요한 기능은 파일 시스템일 것이다.
폴더, 파일을 생성 삭제 읽기 쓰기 작업이 가능하다면 프로젝트의 큰 틀이 완성되고 그 이후 필요한 기능들을 작업하는 순서로 개발을 진행하는 것이 맞을 것 같다.
구축 순서🧾
- 웹 DB 설계
- 파일 시스템을 전역적으로 사용가능하게 프로젝트상 구현
- 폴더, 파일을 생성 삭제 읽기 쓰기 작업 구현
- 각 파일을 실행하는데 필요한 라이브러리 각 폴더, 파일에 연동
파일시스템 구축 어떻게?
우선 파일시스템이 작동하려면 DB가 있어야 할 것이다. 또한 생성한 폴더와 파일들을 전역적으로 store에서 관리하는것이 거의 필수 적인 작업일 것이다. daedalOS 프로젝트의 코드를 살펴봤을 때 요약하면
1. IndexedDB를 이용하여 웹 상 DB를 구축하고
2. 해당 DB의 정보는 React Context를 사용하여 Provider로 전달하고 관리하는 형태였다.
우선 DB 구축을 알아보자
//contexts/fileSystem/useAsyncFs.ts
//최초 IndexedDB를 세팅하는 부분
~~
import FileSystemConfig from "contexts/fileSystem/FileSystemConfig";
~~

export type AsyncFS = {~};

const { BFSRequire, configure } = BrowserFS as typeof IBrowserFS;

const useAsyncFs = (): AsyncFSModule => {
  ~~~생략~~~
      const setupFs = (writeToIndexedDB: boolean): void =>
        configure(FileSystemConfig(!writeToIndexedDB), () => {
          const loadedFs = BFSRequire("fs");

          fsRef.current = loadedFs;
          setFs(loadedFs);
          setRootFs(loadedFs.getRootFS() as RootFileSystem);
        });

      supportsIndexedDB().then(setupFs);
    }
  }, [fs]);
 ~~~생략~~~
};

export default useAsyncFs;
//contexts/fileSystem/FileSystemConfig.ts
//IndexedDB생성에 필요한 Config 값을 명시하는 부분
import type { FileSystemConfiguration } from "browserfs";
import { fs9pToBfs } from "contexts/fileSystem/functions";
const index = fs9pToBfs();
const FileSystemConfig = (writeToMemory = false): FileSystemConfiguration => ({
fs: "MountableFileSystem",
options: {
"/": {
fs: "OverlayFS",
options: {
readable: {
fs: "HTTPRequest",
options: { index },
},
writable: {
fs: writeToMemory ? "InMemory" : "IndexedDB",
},
},
},
},
});
export default FileSystemConfig;위에서 DB를 구축해두고 해당 정보들을 Context에서 사용가능하게 Provider를 반환해주는 Hooks 가 존재했다.
//contexts/fileSystem/FileSystemContextState.ts
const useFileSystemContextState = (): FileSystemContextState => {
  // 위에서 설정한 hooks를 가져온다
  const asyncFs = useAsyncFs();
  // CRUD에 필요한 기능들 hooks에서 구조분해 할당 받음
  const {
    exists,
    mkdir,
    readdir,
    readFile,
    rename,
    rmdir,
    rootFs,
    unlink,
    writeFile,
  } = asyncFs;
  ~~~ 생략
  //asyncFs에 있는 함수들을 이용하여 Context 값을 변경해주는 함수들 선언
  ~~~ 생략


  const restoredFsHandles = useRef(false);

  useEffect(() => {
    if (!restoredFsHandles.current && rootFs) {
      const restoreFsHandles = async (): Promise<void> => {
        restoredFsHandles.current = true;

        Object.entries(await getFileSystemHandles()).forEach(
          async ([handleDirectory, handle]) => {
            if (!(await exists(handleDirectory))) {
              try {
                mapFs(
                  SYSTEM_DIRECTORIES.has(handleDirectory)
                    ? handleDirectory
                    : dirname(handleDirectory),
                  handle
                );
              } catch {
                // Ignore failure
              }
            }
          }
        );
      };

      restoreFsHandles();
    }
  }, [exists, mapFs, rootFs]);

  return {
    addFile,
    addFsWatcher,
    copyEntries,
    ~생략~
    ...asyncFs,
  };
};

export default useFileSystemContextState;
//contexts/fileSystem/index.ts
import contextFactory from "contexts/contextFactory";
import useFileSystemContextState from "contexts/fileSystem/useFileSystemContextState";
const { Provider, useContext } = contextFactory(useFileSystemContextState);
// 구축한 Context를 Provider, useContext형태로 반환
export { Provider as FileSystemProvider, useContext as useFileSystem };위에서 구축한 FileSystemProvider를 전역 _app.tsx 파일에 적용하면 하위 모든 React 컴포넌트들이 해당 Context 를 사용할 수 있다.
//pages/_app.tsx
~생략~
// 위에서 생성한 Provider를 통해 하위 Component들을 감쌈
// _app.tsx 파일에서 작업을 진행했기 때문에 하위 Component들에서 사용 가능
import { FileSystemProvider } from "contexts/fileSystem";
~생략~

const App = ({ Component, pageProps }: AppProps): React.ReactElement => (
  <ProcessProvider>
    <FileSystemProvider>
       ~생략~
              <Component {...pageProps} />
       ~생략~
    </FileSystemProvider>
  </ProcessProvider>
);

export default App;
위 코드를 만든 DustinBrett씨에게 존경을 표합니다 🙏. shout out to DustinBrett
IndexedDB💾
IndexedDB의 구조 및 활용법은 생활코딩채널에서 볼 수 있다.
용량이 매우 큰 로컬스토리지를 사용하는 것 같은 느낌이다.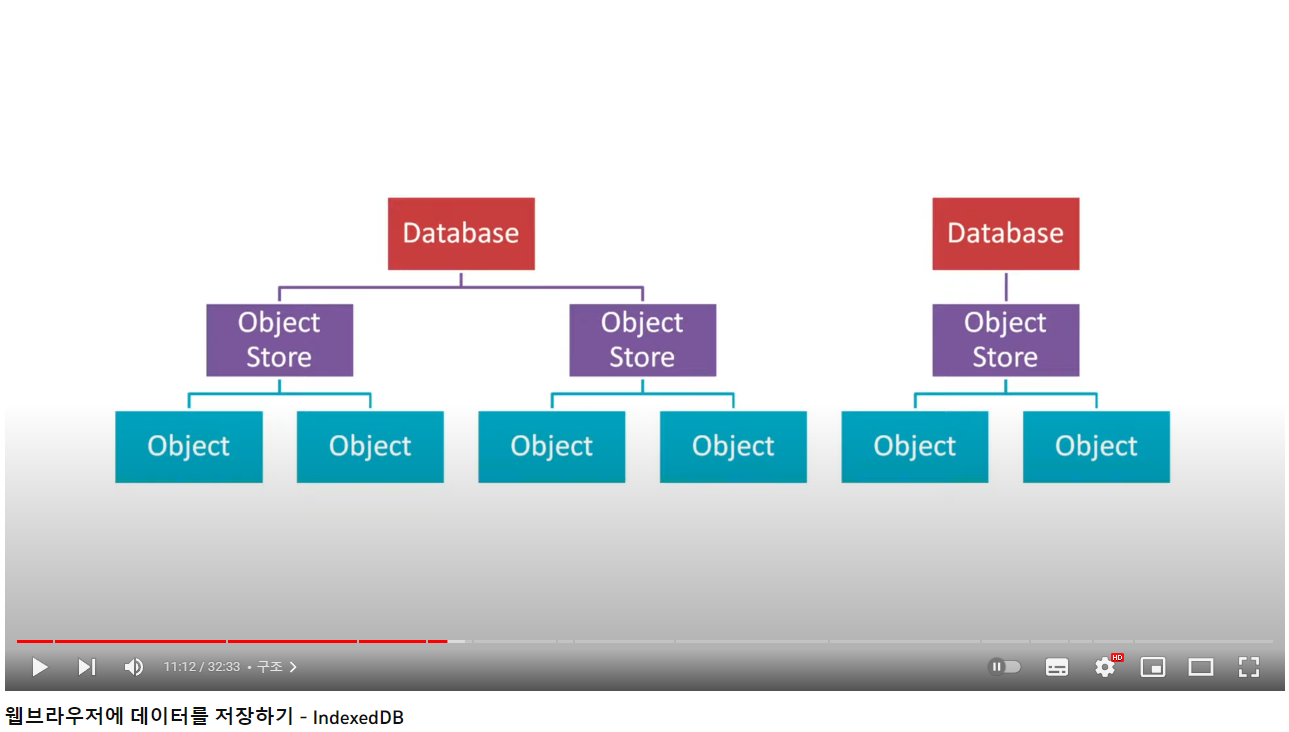
마무리
위 과정을 통해서 파일시스템을 먼저 구축해보아야겠다.

웹 개발 재너럴리스트가 되고픈 개발자 박병훈입니다.