state
1)props의 값에따라 내부구현에 필요한 데이터를 말 할수 있다.
2)component 내부적으로 사용된다.
3)object이다.
4)class 컴포넌트로 작성해야한다.
5)값을 변경할때는 setState 를 사용해야한다.
class App extends Component {
  constructor(props) {
    super(props);
    console.log("hello");
  }
  state = {
    count: 0,
  };
  add = () => {
    this.setState((current) => ({ count: current.count + 1 }));
  };
  minus = () => {
    this.setState((current) => ({ count: current.count - 1 }));
  };
    render() {
    console.log("i'm render");
    return (
      <div>
        <h1>>Im a class {this.state.count}</h1>
        <button onClick={this.add}>Add</button>
        <button onClick={this.minus}>Minus</button>
      </div>
    );
  }
}
state를 이용한 간단한 예시이다.
add와 minus라는 버튼을 만들어주었고
state객체의 값을 변경시켜준다.
Life cycle
컴포넌트가 브라우저에 보여질때 업데이트 될 때, 사라질 때 각 단계 전,후로 특정메서드가 호출되는 것을 말하는데. 밑에 위에 state를 작성한 코드에이어 특정메서드 가 실행될때마다 console로 출력해보는 코드를 작성하였다
class App extends Component {
  constructor(props) {
    super(props);
  }
  state = {
    count: 0,
  };
  add = () => {
    this.setState((current) => ({ count: current.count + 1 }));
  };
  minus = () => {
    this.setState((current) => ({ count: current.count - 1 }));
  };
  componentDidMount() {
    console.log("component rendered");
  }
  componentDidUpdate() {
    console.log("update");
  }
  componentWillUnmount() {
    console.log("die");
  }
  render() {
    console.log("i'm render");
    return (
      <div>
        <h1>>Im a class {this.state.count}</h1>
        <button onClick={this.add}>Add</button>
        <button onClick={this.minus}>Minus</button>
      </div>
    );
  }
}
이 코드에 출력 순서는
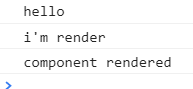
먼저 render함수가 실행이되고
component가 실행된 직후 발생하는 Mount함수가 출력이 되었습니다.
그리고 만들어둔 add 버튼을 클릭을하면
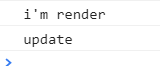
다시 render 함수가 호출이되고
update함수가 호출이되는걸 볼 수 있습니다.
component가 삭제될시 unmount 함수가 호출되는데 이거는 어떻게 테스트해볼지 좀더 생각해보아야 하겠지만.
이 함수가 호출이 된 다는건 분명합니다.
이렇게 react에 state와 lifecycle에 대해 나름대로 정리를 해 봤습니다.

FrontEnd Developer