이번 튜토리얼은 사용자지정 컨트롤을 사용하여 SAPUI5의 기능을 확장해본다.
detail 페이지에 표시된 제품의 평가를 표시하기 위해 glue code를 추가한다.
이렇게하면 앱 전체에서 컨트롤을 재사용하고 모든 관련 기능을 하나의 모듈에 보관할 수 있다.
Preview
Coding
webapp/control/ProductRating.js (New)
sap.ui.define([
	"sap/ui/core/Control"
], function (Control) {
	"use strict";
	return Control.extend("sap.ui.demo.walkthrough.control.ProductRating", {
		metadata : {
		},
		init : function () {
		},
		renderer : function (oRM, oControl) {
		}
	});
});
사용자 정의 컨트롤은 SAPUI5의 base object의 common control 기능을 상속받는다.
control의 경우 base object sap.ui.core.Control을 확장하여 이 컨트롤을 수행한다.
custom control은 쉽게 만들 수 있는 재사용 component이다.
이러한 특성 때문에 "notepad"또는 "on the fly" control 이라고 불린다.
custom control은 두 가지 특수 section(metadata 및 renderer)과 기능을 구현하는 여러 메서드가 있는 JavaScript Object이다.
-
Metadata
Metadata section은 data structure control의 API를 정의한다.
SAPUI5 컨트롤의 property, event 및 aggregation에 대한이 meta 정보를 사용하여
setter 및 getter 메서드와 응용 프로그램 내에서 호출 할 수 있는 편리한 함수를 자동으로 만들어준다. -
Renderer
renderer는 control이 view에서 instance화 될 때마다 App의 DOM tree에 추가되는 HTML 구조를 정의한다.
렌더 함수의 매개 변수 oRM은 문자열을 작성하고 HTML 페이지에 속성을 제어하는 데 사용할 수 있는 SAPUI5 render manager이다. -
init
init 메서드는 control이 instance화 될 때마다 SAPUI5 core에서 호출되는 함수이다.
컨트롤을 설정하고 내용을 표시 할 준비를 하는데 사용할 수 있다.
note:
control은 항상 sap.ui.core.Control을 확장하고 자체 rendering을 한다.
Data binding을 포함하고 있고 Rendering되지 않은 Object에 대한 SAPUI5의 life cycle 특징을 재사용(상속받고자) 하는경우
sap.ui.core.Element 또는 sap.ui.base.ManagedObject를 직접 확장 할 수 있다.
webapp/control/ProductRating.js
sap.ui.define([
	"sap/ui/core/Control",
	"sap/m/RatingIndicator",
	"sap/m/Label",
	"sap/m/Button"

], function (Control, RatingIndicator, Label, Button) {
	"use strict";
	return Control.extend("sap.ui.demo.walkthrough.control.ProductRating", {
		metadata : {
			properties : {
				value: 	{type : "float", defaultValue : 0}
			},
			aggregations : {
				_rating : {type : "sap.m.RatingIndicator", multiple: false, visibility : "hidden"},
				_label : {type : "sap.m.Label", multiple: false, visibility : "hidden"},
				_button : {type : "sap.m.Button", multiple: false, visibility : "hidden"}
			},
			events : {
				change : {
					parameters : {
						value : {type : "int"}
					}
				}
			}
		},
		init : function () {
			this.setAggregation("_rating", new RatingIndicator({
				value: this.getValue(),
				iconSize: "2rem",
				visualMode: "Half",
				liveChange: this._onRate.bind(this)
			}));
			this.setAggregation("_label", new Label({
				text: "{i18n>productRatingLabelInitial}"
			}).addStyleClass("sapUiSmallMargin"));
			this.setAggregation("_button", new Button({
				text: "{i18n>productRatingButton}",
				press: this._onSubmit.bind(this)
			}).addStyleClass("sapUiTinyMarginTopBottom"));
		},

		setValue: function (fValue) {
			this.setProperty("value", fValue, true);
			this.getAggregation("_rating").setValue(fValue);
		},

		reset: function () {
			var oResourceBundle = this.getModel("i18n").getResourceBundle();

			this.setValue(0);
			this.getAggregation("_label").setDesign("Standard");
			this.getAggregation("_rating").setEnabled(true);
			this.getAggregation("_label").setText(oResourceBundle.getText("productRatingLabelInitial"));
			this.getAggregation("_button").setEnabled(true);
		},

		_onRate : function (oEvent) {
			var oRessourceBundle = this.getModel("i18n").getResourceBundle();
			var fValue = oEvent.getParameter("value");

			this.setProperty("value", fValue, true);

			this.getAggregation("_label").setText(oRessourceBundle.getText("productRatingLabelIndicator", [fValue, oEvent.getSource().getMaxValue()]));
			this.getAggregation("_label").setDesign("Bold");
		},

		_onSubmit : function (oEvent) {
			var oResourceBundle = this.getModel("i18n").getResourceBundle();

			this.getAggregation("_rating").setEnabled(false);
			this.getAggregation("_label").setText(oResourceBundle.getText("productRatingLabelFinal"));
			this.getAggregation("_button").setEnabled(false);
			this.fireEvent("change", {
				value: this.getValue()
			});
		},
		renderer : function (oRM, oControl) {
			oRM.write("<div");
			oRM.writeControlData(oControl);
			oRM.addClass("myAppDemoWTProductRating");
			oRM.writeClasses();
			oRM.write(">");
			oRM.renderControl(oControl.getAggregation("_rating"));
			oRM.renderControl(oControl.getAggregation("_label"));
			oRM.renderControl(oControl.getAggregation("_button"));
			oRM.write("</div>");
		}
	});
});
RatingIndicator control은 제품에 대한 사용자 입력을 수집하고 Label은 추가 정보를 표시하며 Button이 App에 등급을 저장하도록 사용된다.
metadata 섹션에서 구현시 사용할 속성을 몇 가지 정의한다.
-
Properties
사용자가 rating에서 선택한 값을 보유 할 control property 값을 정의한다.
이 속성에 대한 Getter 및 Setter function이 자동으로 만들어지며 원하는 경우 데이터 model 필드에 바인딩 할 수도 있다. -
Aggregations
등급 기능을 실현하려면 세 가지 internal control이 필요하다.
따라서 visibility 속성을 hidden으로 설정하여 세 가지"hidden aggregation"를 만든다.
이렇게하면 inner control에서도 view에 설정된 model을 사용할 수 있으며 SAPUI5의 life cycle관리로 더 이상 필요 없는 컨트롤을 파괴한다.
Aggregation를 사용하여 control 배열을 사용 할 수도 있지만 각 Aggregation에 하나의 control 만 있으면 되므로
multiple 속성을 false로 설정하여 카디널리티를 낮게 조정한다.
_rating: A sap.m.RatingIndicator 사용자 입력 제어
_label: A sap.m.Label 추가 정보를 표시하는 레이블
_button: A sap.m.Button 등급을 제출할 버튼
note: 컨트롤에 대한 집계 및 연결을 정의 할 수 있다. 차이점은 부모와 관련 컨트롤간의 관계이다.
aggregation : 관련 control의 수명주기를 관리한다.
예를 들어 부모가 삭제된 경우 관련 control도 파괴된다.
또한 컨트롤은 하나의 단일 집계에만 할당 할 수 있다. 두 번째 집계에 할당 된 컨트롤은 이전 집계에서 자동으로 제거된다.
Association : lifecycle를 관리하지 않으며 여러번 정의 할 수있는 약한 관계이다.
분명한 구분을 위해 Association은 ID만 저장하지만 aggregation는 control에 대한 직접 참조를 저장한다.
이 예제에서는 association을 지정하지 않는다. internal control이 부모에 의해 관리된다.
- Events
rating을 submit할 때 control이 종료(fire)되는 change event를 지정한다. 현재 값을 이벤트 매개 변수로 포함 하고 있다.
control의 new instance가 instance화 될 때마다 SAPUI5에 의해 자동으로 호출되는 init 함수에서 internal control을 설정한다.
3개의 control을 instance화하고 sap.ui.core.Control에서 상속 된 framework method setAggregation을 호출하여 내부 aggregation에 저장한다.
custom control을 RatingIndicator의 liveChange event를 등록하고 Button의 press event도 등록한다.
일부 컨트롤 속성도 지정한다. Label과 Button의 초기 텍스트는 i18n model에서 참조된다.
renderer를 함수는 참조로 전달되는 SAPUI5 render manager와 control instance의 도움으로 이제 control의 HTML 구조를 rendering할 수 있다.
바깥 쪽
writeControlData를 호출하여 div 태그 내부에서 컨트롤의 ID 및 기타 기본 속성을 렌더링한다.
다음으로 정의 CSS 클래스를 추가한다. 이 CSS class 및 view에 추가 된 다른 클래스는 renderer 인스턴스에서 writeClasses를 호출하여 렌더링 된다.
internal aggregation의 내용을 render manager의 renderControl 함수에 전달하여 3개의 내부 control을 렌더링한다.
이렇게하면 control의 renderer가 호출되어 Page에 HTML이 추가된다.
마지막으로
setValue는 overridden된 setter이다.
SAPUI5는 controller에서 호출되거나 XML view에 정의 될 때 속성 값을 업데이트하는 setter를 자동으로 생성한다.
hidden aggregation인 내부 rating control을 업데이트하여 상태를 반영해야 한다.
또한 setProperty 메서드를 호출하여(세번제 parameter를 true로 설정)
control 에서 변경이 있을 때 마다 자동 호출되어 SAPUI5의 렌더링이 반영되게 된다.
이제 내부 rating control를 위한 event handler를 정의한다.
-
onRate: rating control의 현재 값은
sap.m.RatingIndicator컨트롤의 이벤트 parameter값에서 읽을 수 있다.
control status를 업데이트하는 OverRiden setter라고하는 value setValue를 사용하여
Rating 옆에있는 Label을 사용자가 현재 선택한 값을 최대 값과 함께 표시한다.
placeholder값이 있는 문자열은 컨트롤에 자동으로 할당 된 i18n 모델에서 읽는다. -
onSubmit: ratinge를 submit하는 평가 버튼의 press 핸들러가 있다.
제품 평가는 한번 점수를 하면 다른 등급을 제출할 수 없도록 한다.
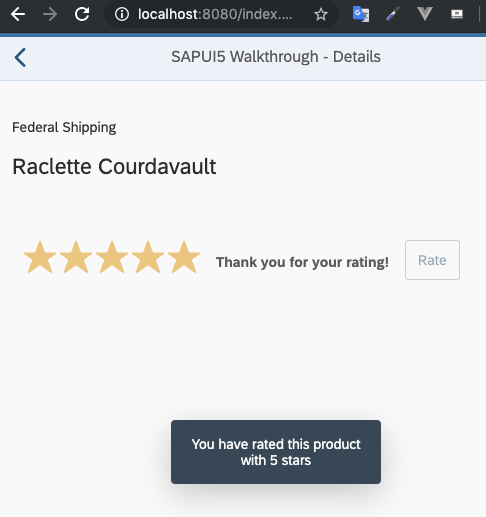
Rate버튼 클릭시 "Thank you for your rating!"라는 표시를 업데이트한다. -
reset: 사용자가 다시 등급을 제출할 수 있도록 UI의 컨트롤 상태를 초기 상태로 하는 reset 메소드를 정의한다.
webapp/view/Detail.view.xml
<mvc:View
	controllerName="sap.ui.demo.walkthrough.controller.Detail"
	xmlns="sap.m"
	xmlns:mvc="sap.ui.core.mvc"
	xmlns:wt="sap.ui.demo.walkthrough.control">
	<Page
		title="{i18n>detailPageTitle}"
		showNavButton="true"
		navButtonPress=".onNavBack">
		<ObjectHeader
			intro="{invoice>ShipperName}"
			title="{invoice>ProductName}"/>
		<wt:ProductRating id="rating" class="sapUiSmallMarginBeginEnd" change=".onRatingChange"/>
	</Page>
</mvc:View>
새로운 네임 스페이스 wt가 detail view에 정의되어 view에서 custom control을 쉽게 참조 할 수 있다.
ProductRating 컨트롤의 인스턴스를 detail 페이지에 추가하고 change 이벤트에 대한 이벤트 핸들러를 등록한다.
여백을 위해 스타일 클래스도 추가한다.
webapp/controller/Detail.controller.js
sap.ui.define([
	"sap/ui/core/mvc/Controller",
	"sap/ui/core/routing/History",
	"sap/m/MessageToast",

	"sap/ui/core/UIComponent"
], function (Controller, History, MessageToast, UIComponent) {
	"use strict";

	return Controller.extend("sap.ui.demo.walkthrough.controller.Detail", {
		…
		_onObjectMatched: function (oEvent) {
			this.byId("rating").reset();
			this.getView().bindElement({
				path: "/" + oEvent.getParameter("arguments").invoicePath,
				model: "invoice"
			});
		},

		onNavBack: function () {
			var oHistory = History.getInstance();
			var sPreviousHash = oHistory.getPreviousHash();

			if (sPreviousHash !== undefined) {
				window.history.go(-1);
			} else {
				var oRouter = UIComponent.getRouterFor(this);
				oRouter.navTo("overview", {}, true);
			}
		},

		onRatingChange: function (oEvent) {
			var fValue = oEvent.getParameter("value");
			var oResourceBundle = this.getView().getModel("i18n").getResourceBundle();

			MessageToast.show(oResourceBundle.getText("ratingConfirmation", [fValue]));
		}
	});
});
Detail controller에서 sap.m.MessageToast 종속성을 로드를 한다.
이벤트 onRatingChange는 등급이 제출되었을 때 발생하는 custom event change value를 읽는다.
그런 다음 MessageToast 컨트롤에 값이 포함 된 확인 메시지를 표시한다.
onObjectMatched private 메소드에서 reset 메소드를 호출하여
다른 item에 대한 detail view가 표시되면 다른 rating을 submit할 수 있다.
webapp/css/style.css
.myAppDemoWTmyCustomButton.sapMBtn {
	margin-right: 0.125rem;
}
.myAppDemoWTmyCustomText {
	font-weight: bold;
}
/*  ProductRating */
.myAppDemoWTProductRating {
	padding: 0.75rem;
}
.myAppDemoWTProductRating .sapMRI {
	vertical-align: initial;
}
webapp/i18n/i18n.properties
…
# Detail Page
detailPageTitle=Walkthrough - Details
ratingConfirmation=You have rated this product with {0} stars

# Product Rating
productRatingLabelInitial=Please rate this product
productRatingLabelIndicator=Your rating: {0} out of {1}
productRatingLabelFinal=Thank you for your rating!
productRatingButton=Rate
padding을 추가하여 3개의 inner control 주위에 약간의 간격을 두고
RatingIndicator 컨트롤의 정렬을 OverRiding하여 한 줄에 Label과 Button을 정렬한다.
이렇게 하면 custom control 내부에서만 적용된다.
그러나 SAPUI5의 향후 버전에서 내부 컨트롤이 변경되면 custom control이 응용 프로그램에 포함되어 조정되어야 할 수도 있다.
Resource Bundle은 확인 메시지와 custom control에서 참조하는 문자열로 확장한다.
우리는 이제 신규 사용자 정의control을 사용하여 detail에서 제품을 평가할 수 있다.
Conventions
- custom control을 App의 control 폴더에 위치시킨다.
Related Information
API Reference: sap.m.RatingIndicator
Samples: sap.m.RatingIndicator
API Reference: sap.ui.core.Control